
Main Dishes card 4 covers how to roast meat, methods of tenderizing it, simple soup, and white sauce with instructions to make it thin, medium, and thick. Includes options for making it gluten-free.
 Rice and more...  Barbecue Sauce. Make it quickly using tomato sauce as the main ingredient.  White Sauce- simple to make, and the base for several recipes. Main Dishes card 3 Recipes for pureed (any)vegetable soup, simple pasta sauce (starting with a can of diced tomatoes or tomato sauce, rice- basics, fried rice, Spanish rice, and rice pudding (which is breakfast food around here).
Main Dishes card 4 covers how to roast meat, methods of tenderizing it, simple soup, and white sauce with instructions to make it thin, medium, and thick. Includes options for making it gluten-free.
0 Comments
 Oregano volunteer between flagstones. The garden started itself, hooray! This baby plant needs moved since it will get tall. Are you itching to grow a garden this year? Whether you're planning big, or starting small, here's some great information. When you buy seeds, keep any you don't use. They will be good next year if you take good care of them- cool, dry, and dark. They will last at least a few years if you store them properly. I usually get a good four or five years out of my packets. After that, not as many of the seeds germinate. Edibles look good in your flower beds! Planting a few of those in existing beds is an easy way to get started.
For more information, click on this link, Gardening 101. It includes: -choosing a garden spot -preparing your soil -fertilizing -choosing seeds -saving seeds you grow -when to plant them -helpful links -an area-specific freeze chart for SLC, Utah (USDA Zone 5) See Gardening On A Dime for some cheap ways to help you garden. To get a chart showing what you can do each month in your garden, see the USU Extension month-by-month garden guide. Happy gardening! -Rhonda ______________________ Flour Tortillas- makes 12 3 c. all-purpose flour 2 tsp. baking powder 3/4 tsp. salt about 1 cup warm water The simple instructions: mix dry ingredients, add water and knead til smooth. Form 12 balls, let rest covered, flatten with hands, roll thin, and cook in a hot pan, flipping once. Cover with a kitchen towel. If you want more details: Stir together flour, baking powder, and salt. Gradually stir in the water, then mix with your hands until it holds together. If it's very tough, add another teaspoon or two of water. If too sticky, add a little flour. Knead until smooth. Divide into 12 balls. Cover with plastic wrap or a damp cloth and let rest 10-15 minutes to let the gluten relax. Flatten a ball with your hands until it's about 4 inches across, then roll with a rolling pin, working from center out, until very thin and about 9 inches across. It helps to use very little flour on the counter and a little more on the top of the tortilla so the rolling pin doesn't stick. Cook over med-hi heat in an ungreased skillet. When top is covered in blisters, flip it over and cook until the other side bubbles up too. The blisters should be golden brown. Each side should take a minute or less. When each tortilla is done, put it in a plastic bag or on a plate; cover with a towel to keep them warm and moist. If you're saving them for the next day, they stay soft but not soggy in a plastic bag with a paper napkin inside to absorb the excess moisture. To make tortilla chips, cut into triangles and deep fry, or spray with Pam and bake at 375 degrees for about 7-10 minutes, until crisp. Make tortilla bowls by either baking or frying, too. Baking- drape over an upside-down ovensafe bowl, spray or brush lightly with oil, bake until golden. Frying- make a few holes around the bottom of an empty 10-oz soup can, heat oil 2" deep to 375 degrees, put a tortilla on the hot oil, and immediately press down on it with the soup can. Cook about 30 seconds or until crisp. Lift out, draining off extra oil. Set on paper towels. Simple Gluten-Free Tortillas-makes 8 2 cups oat flour (I use whole oat grouts, and grind them into flour with my wheat mill. You can also use rolled oats and grind them in a blender) 1/4 teaspoon salt 1/2-3/4 cup warm water (using warm or hot water allows the oats to act 'glutinous', no xantham gum needed.) Mix dry ingredients. Add water slowly and mix evenly with a fork til moistened. Gather dough into a ball, adding more water if needed. For pliable tortillas, I've found it's important for the balls to be moist(not sticky once kneaded, though). Knead well. Split into 8 sections, then form balls with each section. Cover for 10 min. You may want to cover with moist towel to keep them moist. Shape into tortillas 7 - 8 inches diameter. Cook on hot griddle or medium-high heat frying pan(heat these first), for 1 -2 min per side. Stack on plate and cover with a dish towel. Serve warm. These will toughen quickly when reheated. The basic recipe can also be rolled out and baked for crackers. For more details on that, go to http://wheatdairyeggnutfree.blogspot.com/search/label/Tortillas%20and%20Crackers Here's the next bit of the book. Have you had enough time to look through the other sections yet?
Desserts - apple crisp for one (or more!), other flavors of Crisp, no-baked Cheesecake, lowfat New York style cheesecake, Pudding/ Cream Pie filling and variations. Fruits and Vegetables- dressed-up green beans or other vegetables, the 'creamy' salad family: Coleslaw, carrot salad, Waldorf salad; ways to cook vegetables and flavors to add, how to steam-saute vegetables; roasted winter squash, green salad ideas, fruit salad ideas.  Little purple pansies... Did you know that both the flowers and leaves are edible? They're nice in a salad. Hey, it’s that time again- the snow has melted, the soil is drying, and some things can be planted! Depending on where in the yard your garden is, it may be dry enough to till, at least as soon as yesterday's rain dries up. A way to tell is- walk on it or stick a shovel in it. If big chunks stick to your shoe or shovel, it’s not ready. If you tilled now you’d compact the soil and have big hard lumps all over. My garden area used to be a sandbox, so it has good drainage-- yes, I had to add a bunch of good stuff to it!--, and it was absolutely beautiful tilling condition this week, at least until it rained. Early season crops that can be planted outdoors now include potatoes, peas, lettuce, spinach, broccoli, cabbage, kale, radishes, onions, asparagus, and rhubarb. Most of the nurseries, both big-box and local- now have seed potatoes, asparagus, rhubarb, onion sets, and bare-root berries (strawberries, blackberries, and raspberries) and fruit trees waiting for you. For a GREAT information sheet you can print out, listing when to plant different seeds here on the Wasatch Front (USDA Zone 5), go to http://extension.usu.edu/files/publications/publication/Horticulture_Garden_2009-01pr.pdf If you live elsewhere, look up your state's extension office- they'll likely have a list for your area. For a list of what you can plant without having to go buy seeds, see my blog post, More Seeds From Your Kitchentheprovidenthomemaker.com/my-blog/more-of-the-cookbook-more-seeds-from-your-kitchen. Next week I’ll post “Gardening 101”, info on finding a good spot for your garden, how to prepare the soil, and when to plant what. After the recipes is a condensed version of an essay, "The Proper Role of Government", that President Benson wrote while an apostle. It is classic, timely, and every American, LDS or not, would be better off reading it. Please look it over. I know the principles in it are true. -Rhonda __________________________________ Honey Butter (simplest version) 8 oz. (2 sticks) butter, softened 8 oz. (3/4 c.) honey, room temperature A tiny bit of salt and vanilla is good, too. Stir or whip until all smooth. Whipping it will give you a fluffier texture. Refrigerate. This kind sometimes separates. Just stir it again to recombine. Or to keep it from separating, add either ½ c. powdered sugar or one egg yolk. The Lion House recipe calls for the egg yolk. It makes it silky-smooth, too. Make sure to use an egg with no cracks, then wash and dry it well before using in the recipe. Then using it raw will be safe. Canadian White Honey 3 lbs (1 qt.) honey warmed just till softened 2 (7-oz.) jars marshmallow cream 1 cube softened butter or margarine Combine all and whip until blended. Makes about 2 quarts. To make true creamed honey, (which is EASY, just takes time for it to sit) see this video. __________________________________ The Proper Role of Government by The Honorable Ezra Taft Benson (excerpts) Former Secretary of Agriculture to President Eisenhower Published in 1968 See full text here. THE MOST IMPORTANT FUNCTION OF GOVERNMENT It is generally agreed that the most important single function of government is to secure the rights and freedoms of individual citizens. But, what are those rights? And what is their source? Until these questions are answered there is little likelihood that we can correctly determine how government can best secure them. Thomas Paine, back in the days of the American Revolution, explained that: "Rights are not gifts from one man to another, nor from one class of men to another… It is impossible to discover any origin of rights otherwise than in the origin of man." (P.P.N.S., p. 134) Starting at the foundation of the pyramid, let us first consider the origin of those freedoms we have come to know are human rights. There are only two possible sources. Rights are either God-given as part of the Divine Plan, or they are granted by government as part of the political plan. Reason, necessity, tradition and religious convictions all lead me to accept the divine origin of these rights. If we accept the premise that human rights are granted by government, then we must be willing to accept the corollary that they can be denied by government. I, for one, shall never accept that premise. As the French political economist, Frederick Bastiat, phrased it so succinctly, "Life, liberty, and property do not exist because men have made laws. On the contrary, it was the fact that life, liberty, and property existed beforehand that caused men to make laws in the first place." (The Law, p.6) A FORMULA FOR PROSPERITY 1. Economic security for all is impossible without widespread abundance. 2. Abundance is impossible without industrious and efficient production. 3. Such production is impossible without energetic, willing and eager labor. 4. This is not possible without incentive. 5. Of all forms of incentive – the freedom to attain a reward for one’s labors is the most sustaining for most people. Sometimes called THE PROFIT MOTIVE, it is simply the right to plan and to earn and to enjoy the fruits of your labor. 6. This profit motive DIMINISHES as government controls, regulations and taxes INCREASE to deny the fruits of success to those who produce. 7. Therefore, any attempt THROUGH GOVERNMENTAL INTERVENTION to redistribute the material rewards of labor can only result in the eventual destruction of the productive base of society, without which real abundance and security for more than the ruling elite is quite impossible. BUT WHAT ABOUT THE NEEDY? On the surface this may sound heartless and insensitive to the needs of those less fortunate individuals who are found in any society, no matter how affluent. "What about the lame, the sick and the destitute? Is an often-voice question. Most other countries in the world have attempted to use the power of government to meet this need. Yet, in every case, the improvement has been marginal at best and has resulted in the long run creating more misery, more poverty, and certainly less freedom than when government first stepped in. THE BETTER WAY By comparison, America traditionally has followed Jefferson’s advice of relying on individual action and charity. The result is that the United States has fewer cases of genuine hardship per capita than any other country in the entire world or throughout all history. Even during the depression of the 1930’s, Americans ate and lived better than most people in other countries do today. FIFTEEN PRINCIPLES WHICH MAKE FOR GOOD AND PROPER GOVERNMENT (1) I believe that no people can maintain freedom unless their political institutions are founded upon faith in God and belief in the existence of moral law. (2) I believe that God has endowed men with certain unalienable rights as set forth in the Declaration of Independence and that no legislature and no majority, however great, may morally limit or destroy these; that the sole function of government is to protect life, liberty, and property and anything more than this is usurpation and oppression. (3) I believe that the Constitution of the United States was prepared and adopted by men acting under inspiration from Almighty God; that it is a solemn compact between the peoples of the States of this nation which all officers of government are under duty to obey; that the eternal moral laws expressed therein must be adhered to or individual liberty will perish. (4) I believe it a violation of the Constitution for government to deprive the individual of either life, liberty, or property except for these purposes: (a) Punish crime and provide for the administration of justice; (b) Protect the right and control of private property; (c) Wage defensive war and provide for the nation’s defense; (d) Compel each one who enjoys the protection of government to bear his fair share of the burden of performing the above functions. (5) I hold that the Constitution denies government the power to take from the individual either his life, liberty, or property except in accordance with moral law; that the same moral law which governs the actions of men when acting alone is also applicable when they act in concert with others; that no citizen or group of citizens has any right to direct their agent, the government to perform any act which would be evil or offensive to the conscience if that citizen were performing the act himself outside the framework of government. (6) I am hereby resolved that under no circumstances shall the freedoms guaranteed by the Bill of Rights be infringed. In particular I am opposed to any attempt on the part of the Federal Government to deny the people their right to bear arms, to worship and pray when and where they choose, or to own and control private property. (7) I consider ourselves at war with international Communism which is committed to the destruction of our government, our right of property, and our freedom; that it is treason as defined by the Constitution to give aid and comfort to this implacable enemy. (8) I am unalterably opposed to Socialism, either in whole or in part, and regard it as an unconstitutional usurpation of power and a denial of the right of private property for government to own or operate the means of producing and distributing goods and services in competition with private enterprise, or to regiment owners in the legitimate use of private property. (9) I maintain that every person who enjoys the protection of his life, liberty, and property should bear his fair share of the cost of government in providing that protection; that the elementary principles of justice set forth in the Constitution demand that all taxes imposed be uniform and that each person’s property or income be taxed at the same rate. For the other principles see here.  Ezra Taft Benson  courtesy photos8.com Today you get the cookie recipes. Lest you think the whole cookbook is for treats-- because last week was cakes & frostings-- I'm also giving you the table of contents and index. (The truth of the matter is that the categories are in alphabetical order.)
Cookies card 1 Cookies card 2 Table of contents and index A post last week had a short list of seeds you may not need to buy because you have them already. Here's a longer list of them. It includes ones I've mentioned before, to put the info in one place. There are lots of seeds that you may already have at home, that you can plant outside. For instance: -dry beans (i.e. pinto beans, Great Northern, kidney, black-eyed peas, garbanzo, Lima, etc.) -seeds inside a tomato (may or may not be hybrid- look it up online if it matters to you. What it grows into will NOT be a hybrid, though!) -seeds from melons or any winter squash (some are hybrids) -wheat kernels (good for sprouts, wheat grass, or let it grow to maturity) -amaranth (good for greens, as well as the seeds) or quinoa -flax seed (gives you beautiful blue flowers, more seeds, and fiber if you're interested in spinning...) -coriander (whole, not ground!) the plant it grows is cilantro; harvest the seeds for more coriander -mustard seed- the greens are good eating, plus more seeds.. -fennel seed -celery seed (actually is not celery, you grow this one for the celery-flavored seed) -aniseed (anise seed) -other whole spices or herb seeds -raw unsalted sunflower seeds -raw unsalted pumpkin seeds -raw unsalted peanuts And roots you can plant: -carrots or parsnips (you'll get ferny foliage and lacy white flowers, followed by lots of seed for next year) -other root vegetables- beets, turnips, radishes, etc- will give you seeds this season -onions, garlic, or shallots that are starting to sprout (or not). You'll get ball-shaped flowerheads, then seeds from them this year, too. -potatoes that are shrivelling or sprouting- turn that one into several! -don't throw them away! -horseradish (a chunk of root from the grocery store will grow)- this is the 2011 Herb of the Year -ginger root -Jerusalem artichokes ('sunchokes') And if you want a tree: -raw tree nuts- walnut, pecan, hazelnut, almond, etc. -avocado pits -seeds from any citrus -cherry, apricot, pear, plum, peach pits or seeds. NOTE: these are almost always hybrids. The fruit it grows will most likely not be the same as you ate. But it's something, and it's food, and if you don't like it, you can always use it as rootstock for a graft from a neighbor's good tree. Or firewood. :D It's helpful to look online to find the plant's ideal growing conditions and how many days until harvest.  My version of the finished cookbook. What will yours look like? 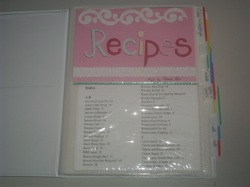 Title page: this is as close as I get to scrapbooking! The book also has a table of contents and an index. 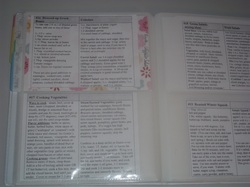 Each section has a tabbed divider stuck onto the page. I just used the tabs you find in the office supply section of a store. 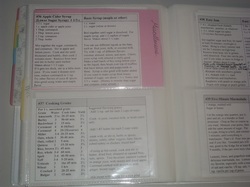 The first recipe of each new section gets a colored 'scrapbooking' paper behind it. I’ve put together a cookbook of basic recipes and cooking concepts (like how to take a basic yellow cake recipe to make any number of variations). It was designed to be portable and highly useful. I hope it is! I had non-cooks, college students, and young missionaries in mind. It’s typed in 3x5/4x6 card format, so you cut out the cards and slip them into the sleeves of a small photo album. This collection fits perfectly in a 72-sleeve album. If you only find bigger ones, you can use the extra spaces for blank cards to write recipe notes on, or slip a photo of the food in the sleeve next to the recipe. If you like the photo idea, I already have pictures of lots of them. Email me if you want them, rhair2473@gmail.com
Rather than give a link to the whole cookbook, I’ll put an installment of it once or twice a week here on my website. That way you have time to really look through the recipes, at a manageable pace. The first one is below: Cakes and Frostings page 1 Cakes and Frostings page 2 Note on printing these pages: the links open to GoogleDocs. To print, select GoogleDoc's print button, don't do Control-P or you'll print the browser page and only get half the recipes.  courtesy photos8.com It felt like spring today! I love the warmth of the sunshine, the smell of the moist dirt, the sight of daffodils and tulips popping out of the earth, the plump firmness of leaf buds swelling. If you’re thinking about gardening this year, the stores (and catalogs!) have the seeds and bareroot plants you may want. For instance, this week’s CAL-Ranch ad features packets of seeds 10/$1. (No, that wasn’t a typo.) They also have onion sets, a bag of 100, for $1.99. (Onion sets are baby onions, you plant them to harvest onion bulbs this year. You could plant onion seed, but it’d likely be two years before bulb harvest.) Smith’s Marketplace had bareroot raspberries and blackberries a month ago, and have their roses and fruit trees now. I assume everyone else does, too.
When you buy seeds, keep any you don't use. They will be good next year if you take good care of them- keep them cool. dry ,and dark. They will last at least a few years if you store them properly. I usually get a good four or five years out of my packets. After that, not as many of the seeds germinate. You can use seeds from your pantry, too: the dry beans you buy will grow in your garden. Other seeds you may have in your kitchen are flax, mustard seed, celery seed (this one is NOT celery plant, you grow this for the celery-flavored seeds), coriander seeds (the plant is cilantro, the seeds are harvested as ‘coriander’), fennel seeds, aniseed, raw unsalted sunflower seeds, popcorn, raw peanuts, other raw nuts (if you want a tree!)…. If you have any onions, potatoes, or garlic that are starting to sprout, plant them instead of throwing them away. Edibles look good in your flower beds! Planting a few of those in existing beds is an easy way to get started. Leave a few carrots or parsnips in the ground for year #2, or plant carrots from the grocery store. They'll send up beautiful, lacy white flowers in the summer. (I love them in flower arrangements.) And then the next year, you'll have volunteer carrots 'naturalized' into your flower bed! Onions and carrots have some of my favorite flowers. Fresh herbs make nice companions in a flower bed, too. The foliage is great, and most have pretty flowers as well. My 'kitchen garden' is just off the front porch; hardly anybody even notices that it's food. It's only 6x22 but in the bed are LOTS of edibles. To get the whole mixed picture, here's what's in it: lots of spring bulbs (NOT edible), rock cress/aubrietta, pansies (edible leaves and flowers) a couple strawberry plants, a young crabapple tree, a really gorgeous yellow rose bush, garlic chives (white 'firework' flowers), chives (purple ball-shaped flowers), a trailing mini red rose, shasta daisies, lavender, catmint, oregano, parsley, lemon thyme, regular thyme, marjoram, purple-leaf sage, green-leaf sage, a few annuals, one ornamental grass (Miscanthus), sedum and aster for fall color. Even better, I can use the herbs in the dead of winter- I just plunge my hand down in the right place through the snow, and come up with a handful of parsley or thyme for the soup pot. Yummy. Sunchokes (Jerusalem Artichokes) are beautiful, too; they look like small sunflowers. They're pretty pricy to mail-order the roots, though. I just bought a 1-lb bag from the grocery store, though, for $3. Much better. I also got my horseradish start from the grocery store, and I'm thinking of growing some ginger that way. There’s quite a bit of gardening, or ’pre-gardening’, that can be done right now. For instance: -If you have fruit trees, now is the time to prune and fertilize them. -If you’re up for a bigger challenge, you can graft fruit trees right now. -You can till when your garden soil doesn’t stick to your shoes. (Another test is to make a ball of it; if it compacts densely, it’s too wet.) You COULD till it before that, but your garden will end up compacted and clumpy. Your plants would not appreciate it. There is a month-by-month gardening guide on our local Glover Nursery’s website. Here’s a piece of it: MARCH • Early March is a great time to plan your garden layout. • Make corrections and amendments to your garden if the soil has dried out enough. • Start eggplant, peppers and tomatoes INDOORS. (6-8 weeks before setting plants out) • Plant bare root raspberries and strawberries. • Plant kohlrabi, lettuce, parsnip, potatoes, rhubarb asparagus, cabbage, cauliflower, broccoli, parsley, swiss chard, spinach, turnips, onion, peas from mid-March until the first part of May. • Plant carrots, beets and endive from mid-March until mid-June. • Plant radishes from mid-March until September. • Use floating row cover to help warm the soil for faster plant growth. For info on how to start a garden, or improve the one you have, see Gardening 101 The how-to-start–it is the first page. The other pages have the chart for last average frost dates in Utah, links to good gardening websites, ideas for gardening cheaply, etc. Have fun! Pink Salad Dressing
½ -1 c. sugar ½ c. red wine vinegar (there is no alcohol in wine vinegar) 1 tsp. dry mustard 1 ½ tsp. salt ½ c. chopped red onion. Combine all in a blender. Turn on and slowly pour in 1 c. oil. Run until well blended. ________________________ Does it seem like your money isn’t going as far as usual? The government is claiming that there has been only 1% increase in cost of living for the year, but here are what some food prices have done over the last year. Numbers are taken from http://www.cnbc.com/id/41831886 · Ground beef up 11%. · Butter, up a stunning 27%. · Potatoes, up 7.1%. · Lettuce is up 5%. · Bread up 3%. · Chicken up 4.3%. · Egg prices have been fairly steady. · Milk, up 2%. Two of the biggest ways to save money on everyday things are: 1-the S.O.S. method- Stay Out of Stores. This especially includes restaurants! 2- Be organized so food and ‘stuff’ doesn’t get lost or ruined, waste less of the food you buy _____________________________ Compiled by my friend Angie Utah FOOD SAVINGS Liquidation Wearhouse (Orem): sellsCostco's and Sam's leftover and returned merchandise Sunflower Market (Murray. across from Fashion Place) honors competitors' ads on Wednesdays from this week's and next week's ads. They specialize in produce and their prices are crazy low anyway (29 cent per lb. oranges). It's kind of a like a Wild Oats. Winco Foods (around 72nd South, Salt Lake Valley, see http://www.wincofoods.com/ for other locations) has cheap food/produce as well. Reams often has very cheap produce and other items (note from Rhonda- my overall grocery list there costs about the same as Walmart. Produce and meat are cheaper, canned and boxed things are generally more.) Buy-Lo: In Orem. They have amazingly low produce prices. (10/$1 kiwi). You can print off their list and price match at Wal-Mart. The Baker's Outlet and Donut Shop (12652 S. 2700 W. #A, Riverton, #542-8286) has restaurant bread, pastries, donuts, rolls, artisan breads, wheat breads, etc., for cheap. Bags of flour tortillas are $. 50. They have both fresh bread and day-old bread both. Smith's Foods deeply discounts their meat and dairy when close to the sell-by date. With dairy, the ‘best by’ date is actually 1 week after the ‘sell by’ date. MEAL PLANNING Planning meals around the sales does wonders for the food budget. You do have to spend a little time using leftovers and preparing more raw foods (uncanned/boxed things) like rice, pasta, grains, etc., if you want to save. However, if you use coupons effectively with sales (see below) you can get a lot of manufacturer deals on brand-name boxed/canned food. PRICE MATCHING Wal-Mart price matches exact prices from any ad (not BOGOs) in checkout lines. So get the online ads for the cheap stores above and take them to walmart for location convenience. Target price matches at the Customer Service desk. Sunflower Market (see above) COUPONS Print out dozens of online coupons and add them to any sale any stores are having. Plan ahead and bring ads for proof of price-matching if you don't have coupons. You can also use this strategy with price matching at the above-listed stores. Note that some of these may be .net or .com, you'll need to search a sec if you don't find it.) Coupon sites that compare sales at all the stores and let you print coupons that you can add to already-good sales PinchingYourPennies.com/Grocery Smarts: This site (I assume Pinching Pennies? Or Maybe they're linked companies?) and their daily newsletter can get you some of the best internet clothing deals out there, particularly for Kohls (we're talking a regular 75% off of purchase and free shipping), Children's Place and free-shipping codes for countless other stores. Children's Place clothing is often $3 and under. DealsToMeals.com (costs $5 a month) This site is similar to pinching your pennies, but requires a little less effort. For $4.95/month they scour the ads for you, compare them to Costco, Sams club and Walmart and tell you where the best deals are. They also have a menu planner with recipes centered around the best deals. They give you tips on things to stock up on for food storage. If you use it, it's definitely worth the $5/ month. You'll definitely save much more than that. They also have a blog: www.myfoodstoragedeals.blogspot. com and www.dealstomeals. blogspot. com. Both are full of great food storage tips and recipes. GroceryGame.com SmartSource.com Pricecheck.com TheObessiveShopper.net E-bay: People also sell overprinted manufacturer coupons on e-bay for pennies. They come within a couple days in the mail. You can add these all up when it's a limit of 10 per item or something and get steals. CLOTHING AND HOUSEWARES Craigslist.com, KSL.com (for-sale part of the site): For more expensive clothing purchases, like a great ski parkas or watches, I've had great luck here. People respond to politeness, so be kind in emails. Be brave and always ask what price they want to sell for first: Never be the first to offer a price. The last person talking in the negotiation always wins. (For selling stuff, remember that Craig's list is often a younger crowd and often out of state, and KSL is usually local and older crowds. But try selling to both places when you have something to sell.) Liquidation Wearhouse (Orem): sells Costco's and Sam's leftover and returned merchandise—like backyard deck sets and stuff like that. Downeast Outlet's Outlet- 3500 S. & Bangerter, across from Granger High next to Albertsons. Clothing (2 for $5), housewares, Potterybarn, seasonal. Prices are slightly negotiable; ask what percentage you can get off (about 20%). This is where I buy Diesl, Lucky, Ann Taylor, 7, American Eagle and Downeast for around $2.50. They have a great size selection. Savers: Two locations. Always bring items to donate and get 20% off of your whole purchase.Clothing from Tanger outlet mall is shipped here. JCrew, Banana Republic, Express, Ann Taylor, J Jill, Aerospostale, American Eagle, Old Navy, Gap, Children's Place, Victoria's Secret, Nordstrom Rack shoe returns, Dress Barn, Ross and TJ Maxx books--- kids books are $.69 and buy 3 get one free. I get wonderful children's items and very nice shoes here. This is where I took the J Crew catalog, found the $100 items on the racks and walked away paying less than $6 for each. (You can take the catalogs in, find things that are still selling, then buy and resell them on ebay.) DI: Mondays after yardsale items have been dropped off from the previous Saturday. Larger items are negotiable and it's tax free. Downtown/nicer-area DIs will have nicer stuff. The Store. Part of the Salvation Army. They receive shipments from Target on Wednesdays. (in West Valley and Murray; 56th south and 9th east) Kid to Kid (store in sandy) with kids clothes and stuff for cheap—used but in good condition. Dillards in St. George: has great fall shoe sales—especially on close-toed shoes since no one there wears them. ONLINE SHOPPING Coupon codes online. Look up every store before purchasing online. For example, Google "Office Max Coupon Codes." I did so when looking for a camera and found a $20 off any $100 purchase. MISC The Library: So this is obvious---that the library is cheaper—but just a reminder that they carry lots of magazine subscriptions as well as tons of movies along with the books. The current magazines can now be checked out, not just back issues. And if they don't have something, you can often request an inter-library loan from other library systems. You can request things and use it as a free version of Netflix (where they hold the movies that come in and you just have to swing by and get them). You'll have to wait on a few things, but patience is a virtue—a free one. Cars lose half of their value by the third year. So buy a 3-yr-old car with low miles for the least loss of investment. Cash up front does wonders for prices! We got incredible rent, insurance prices, and yardsale items that way. Yard Sales: you can do better with small amounts of cash in your hand, small children that are cute, and kindness. Negotiating fact: whoever offers the first price looses! Always ask "What price could you do on this?" By noon people are burned out and will give you almost anything for low, low prices. 118th south and 114th south had great sales last year. Daybreak is always good. So is the Johnson Farms ivory home development behind the district—the homes are bigger but about 10 years old, so you know their kids are casting off stuff. People spend 18% percent less when dealing with cash. Carry cash=saving money. It hurts more! Reading List: The Scriptures, LDS General Conference articles on debt. Books: The Tightwad Gazette, Millionaire Next Door, Total Money Makeover, One for the Money  Tiny Spicy Chicken is great over rice, with a little fruit to help balance out the heat. Bok choy is great on the side. Do you have children or grandchildren who are afraid of what’s lurking under their beds? Here’s the perfect solution, found on Meridian magazine online a couple months ago: The Monster Under the Bed "I overheard my two young adult sons talking. One asked, “Do kids really think there are monsters under their beds?” The other one answered: 'I never did. There was always so much food storage under there that I knew there was no room for a monster.'” So let's all chase out those monsters! For a lot of suggestions on storing food when you have little space, see the Food Storage Made Easy page. ______________________________ This recipe came from a class at the Macey’s in Logan, back when I lived there. “Tiny Spicy Chicken” was one of the entrees at Mandarin Gardens, a local Chinese restaurant. Maybe it’s a Cache Valley specialty, because I haven’t run into anyone not from there who has had this dish. Tiny Spicy Chicken 3 lbs. boneless, skinless chicken, cut into 1 ½ “ cubes garlic salt 2 beaten eggs 1 cup cornstarch ¼ c. oil Sprinkle chicken with garlic salt, let sit for 1 hour in the fridge. Heat oil in a large frying pan. Dip chicken into eggs, then roll or shake in a bag with cornstarch. Brown chicken pieces in the oil, until golden brown. Put in a greased 9x13 pan. Shortcut method: use 1- 1 ½ lbs. fully cooked chicken nuggets, frozen is OK. (Don't use 3 lbs nuggets; they have too much breading that soaks up this sauce.) Sauce: ½ -1 tsp. chili paste* 1 c. sugar ½ c. ketchup 2 tsp. soy sauce Dash of salt ½ c. chicken broth ¼ c. brown sugar ½ c. vinegar Sauce will be very runny. Pour over chicken (if using chicken nuggets, mix the sauce in the 9x13 pan, then add the chicken) and stir to coat. Bake at 425 degrees for 10-15 minutes, stirring once or twice during that time. Serve over rice. Alternate cooking methods: bake at 325 degrees for 1 hour, stirring a couple times, or put in a crockpot and cook on low for 5-8 hours. *Sambal chili paste can be found in the Asian section at Macey's grocery store, it probably can be found at most other grocery stores. If you don't have it, or can't find it, substitute red pepper flakes. Start with 1/4 tsp., put it in the sauce, then taste to see if it's as hot/mild as you like. 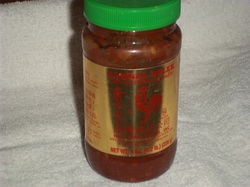 Chili paste is made from whole, hot chilies, ground up, and mixed with a little vinegar. It includes the seeds, so it packs a punch. 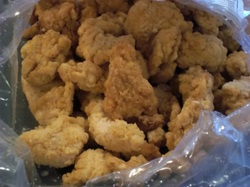 If you use raw chicken breasts, the recipe takes about 1 1/2 hours to make. If you start with these, you can have it done in 20 minutes. 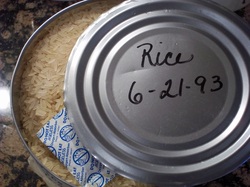 Aren't cans and oxygen packets great? I opened this can just yesterday. And yes, 6-21-93 was when it was sealed.  The chicken, coated with sauce, ready to bake. 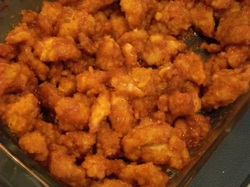 Baking it condenses the sauce and helps it soak into the coating on the chicken. It's a little sweet, and a little zippy.  To make a heart-shaped cupcake or muffin, fill cupcake liners with batter, then put a marble on one side, between the liner and the pan. This makes the top of the heart. These muffins are made with frozen cranberries, to up the 'Valentines' factor.  The baked muffin. It will look even more like a heart it you strategically put on a drizzle of glaze, or frosting, for a cupcake. I love making people smile by cooking them something they like, and I love the peace of mind I get from 'shopping' for the ingredients in my own pantry.
My family’s Valentine’s tradition, as a child, was that my mom would make us each a big heart-shaped sugar cookie, frost it red or pink, then decorate it with our name and a pretty border. We got those every year (often for breakfast!), and loved them. For most of my growing-up years, our heart-shaped cookie cutter was formed out of an empty tuna can. I remember being fascinated as I watched her shape a replacement cutter one year, amazed that this thing we’d normally throw away could turn into a useful item. Especially something that would create our much-anticipated heart cookie! If you’re looking for something new to do for Valentine’s this year, here are some ideas (I borrowed heavily from Living On a Dime, links below): -For any food, ask yourself, “could I cut/shape it into a heart or make it red?” You can use food coloring, or if you like the natural route, use beet puree or beet juice, raspberry, strawberry, or cherry juice to color things. They each give a different version of red. -Make heart-shaped food: pizza (crust recipe here), muffins or cupcakes (use the marble trick), biscuits (recipe here, use hands or a cookie cutter), heart-shaped cinnamon rolls (individual or cooked in a heart pan), Rice Krispie treats, cookies, toast, brownies, red Jello cut with cookie cutters or set up in a heart-shaped cake pan, slices of cheese, pancakes. If you want, write their name on these with frosting, whipped cream, chocolate, or chocolate chips. -If you don’t have a heart cookie cutter for the ideas above, trace a heart onto cardstock, cardboard, or a whipped topping lid. Cut out, then use that as a guide for your knife. Or cut off the top and bottom from a tuna fish can, then use pliers to shape it into a heart. -Use pretty place settings. Or decorate paper plates using red and pink markers. Use little paper doilies under fancy glasses, or use bigger ones under a plate. -Serve foods that are red, maybe even a whole meal’s worth! – enchiladas, red Jello, strawberries, beets, maraschino cherries, cherry cobbler or pie, red juice, toast with strawberry jam, tomato soup, apple slices, watermelon, cranberries, spaghetti and meatballs -Decorate with a little construction-paper hearts- stack pages so you can cut out multiples. -A kiss on their pillow- cut out a paper heart, glue a kiss to it, and leave it on your kids’ or sweetie’s pillow. Simple but effective! -Buy a candy bar or make and wrap bar cookies, then make your own label for it. You could just draw hearts on it, or you could write a personalized message or a cute little poem. -Try making just one part of the meal special- their favorite main dish, dessert, OR side dish. -Make some homemade candy, instead of purchasing it. -If you want to make a cake or cupcakes, try my favorite chocolate frosting, or the any-flavor basic frosting. -Send your hubby or kids on a Valentine’s Treasure Hunt: http://www.livingonadime.com/valentines-on-a-dime/ For more ideas, also see: http://www.livingonadime.com/more-valentines-day-ideas/http://www.livingonadime.com/valentines-day-ideas/ Valentine’s dessert recipes http://www.livingonadime.com/valentines-day-recipes/  photo courtesy of photos8.com Hi everyone,
Does it always seem like too much of your budget goes to food? Do you wonder what amount of money is 'normal'? If so, go to the Official USDA Food Plans pdf. This page will give you the 2010 averages, based on nutritionally balanced diets cooked at home. Now that you see how frugal you really are, here are some tips to help even more; pick just one or two to try so it's not overwhelming. Then all that's left is deciding how that new-found money is going to better use! Ways to eat well on less money: *Buy on sale and get extras so you never pay full price. *Buy the fresh fruits/veggies that are $1/lb or less. *Find ways to throw away less- only serve up what you will eat, save wilted veggies in the freezer for soup later, re-purpose leftovers. *Use meat mostly as a flavoring (mixed in with other ingredients), not as its own dish. *Buy meats that you can get for $2/lb or less, or whatever is bargain-price for your area. *When you buy meat, get a bunch on sale, then cook it all at once. Package and freeze most of it for future, faster, meals. *Buy flour, sugar in bulk, make more things from scratch. *Keep your kitchen clean so you like being there! (You don't need to do it all yourself! Doing dishes 'all the time' causes depression for me- once I added that to my kids' job charts, I felt much better!) *Grow a garden where you used to have some lawn- you get the same water bill, more food. Packets of seeds can last 4-5 years if kept cool and dark. Or split packets with a friend. *Make your own bread instead of buying it. How much can you save on bread? Cost varies by recipe, but mine comes out to less than $ .50 per loaf ($. 42), including the electricity for baking, for top-quality whole-wheat bread. (Well, frankly, the quality varies by week....) If you eat two loaves a week, that saves you $200/year when compared to $2.50/loaf of bread. We go through 6 loaves a week, so we’re saving over $600 per year. Yes, a stand mixer and grain mill definitely pay for themselves! For the recipe I use, see Basic Bread on my website. Yesterday the Teachers' Quorum (14-15 yr. old boys) came to my house for their weekly activity. They've been learning about nutrition and safe food handling, so they all pitched in and cooked a meal. Their handout included budget-friendly, adaptable, and fairly fast recipes; the kind that would be especially valuable when in college or on missions. For these recipes, click on Quick & Cheap Meals. The boys did great with them, I think you'll like them, too. Happy cooking and budgeting! 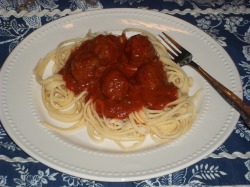 Mmm...meatballs! This quote was recently brought to my attention; it’s from some training that our General Relief Society President recently gave. It is motivating and assuring at the same time. I am grateful for wise and loving leaders, as well as the Spirit, to guide us. I know they teach truth. Below it is a very adaptable recipe for meatballs/meatloaf. -Rhonda “I have a sense and a feeling as we have watched some of these disasters in the world, that this is a time for us to learn and prepare from these experiences. The preparation happens in our own homes. There are not enough tents in the world to furnish every person with a tent unless the members of the church have a tent in their own homes...a simple thing like that. And then the storehouse is pressed down, heaped over and running over in our own homes. Some of you have student apartments, how prepared are you? If an earthquake or an economic disaster happened, would you have enough water to drink for 24 hours? Would you be able to get by until help could come to you? Those are the kind of the things we need to be thinking about in our day and time, the Lord expects us to do our little part and then He can bring on the miracles and then we don't need to fear. I bear you my testimony that the gospel of Jesus Christ is true, and that these principles will strengthen us individually, and as a family, and as a people, and as a church. As we listen to prophets of God we will be okay. We don’t need to worry about being alive in this scary time. The world has had scary times before and the Lord has always taken care of His people who have been faithful. “ – Julie B. Beck see herefor her whole video clip, then click on Training Video: Self-Reliance Meatballs and meatloaf are essentially the same food; only the size differs. Burgers or patties can be the same recipe, too. In the simplest version, you simply salt and season meat, then form and cook it. To end up with tender, juicy results, you either use higher-fat meat, or use something to help hold the moisture in. Many recipes call for crushed crackers or dry breadcrumbs, but the most tender results come from making a panade, which is a bread-and-milk paste. You can also use, in the same amount as the panade, mashed or grated potato, cooked rice, leftover cooked oatmeal (unsweetened!) or other hot cereal for this. This would make the meatballs be gluten-free. Dry crumbs soak up more moisture, leaving you with a drier result. Egg is usually used as a binder, to hold the meat together. And try to not squeeze the meat very much when you’re mixing it; compressed meat is tough. Other than that, use whatever flavor additions you prefer – Onion, garlic, ground pepper, Worchestershire sauce, soy sauce, raw pork sausage, Parmesan or other cheese, parsley, rosemary, thyme, nutmeg, Liquid Smoke, bacon pieces, diced chili peppers, shredded zucchini or carrot, chopped mushrooms, bits of sundried tomatoes, chopped spinach. For quick, simple meals later on, make a BIG batch of meatloaf, and shape it into * a couple meatloaves *rolled meatloaf- pat into a rectangle on some waxed paper, spread on some filling (cheese and spinach, or whatever sounds good), roll it up with the help of the waxed paper. (Don’t leave the paper inside it!) *some meatballs *mini meat loaves (portions to bake in muffin tins or custard cups) *patties Freeze on cookie sheets so they won’t stick together, either before or after cooking them, then pop into freezer bags, squeeze the air out, label and freeze. For several flavor variations, click on Tender and Moist Meatloaf and Meatballs . Tender and Moist Meatballs or Meatloaf 2 slices good-quality white bread, cut in ¼” cubes (1 ½ c.) 3 Tbsp. buttermilk, thinned yogurt or sour cream- milk works but is less creamy 1 egg 1 ½ lbs. lean burger (may use pork sausage as part of this) ¾ tsp. salt ¼ tsp. pepper ¼- ½ c. Parmesan cheese ¼ c. minced fresh parsley 2 cloves garlic, minced Combine the bread, buttermilk, and egg, or use 1/2 c. other wet starch (i.e. cooked rice, oatmeal, mashed potato), with the egg, omitting buttermilk. Mash together until it forms a paste. Add everything else and mix gently. Form into meatballs, 1- 2” in diameter. If you’re cooking them right away, they’ll hold together better if you first refrigerate them for an hour. To cook, pan-fry over medium heat in 1-2 Tbsp. oil, shaking the pan often to turn the meatballs. 1 ½” meatballs should be done in about 10 minutes. Add to sauce, or cool and freeze. Another way to cook them is: Put meatballs on a cookie sheet. Bake at 450 degrees F for 12-15 minutes, rotating the cookie sheet back-to-front halfway through. Partially cool, then freeze. Meatloaf: Mix, form into a loaf, and bake for 1 hour @ 350 F. Before the last 15 minutes, brush with Meatloaf glaze: 1/4 c. ketchup 1/4 c. brown sugar 1 Tbsp. Dijon mustard 1 tsp. cider vinegar 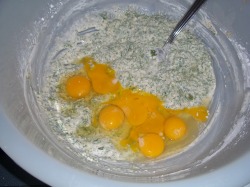 This is the panade mixed with the seasonings; eggs are mixed in before adding the meat. There are so many eggs because this is for a ten-pound batch of meatballs/loaf. 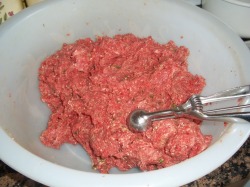 Fully mixed. A small icecream scoop (this is a #10) makes quick work of meatballs. Another way to make evenly-sized ones is to pat the meat in a square or rectangle, then cut them into evenly-sized small squares. Roll each one. One pound of meatball mixture will give you about 30 1-inch balls. 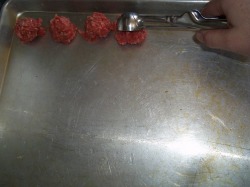 Put the meatballs on a lightly greased or sprayed cookie sheet. For the roundest meatballs, roll them between your hands. You can bake them now, and freeze them already cooked, or freeze them raw. Put the whole tray in the freezer. When they're solid, remove and put the meatballs in a freezer-safe bag or container. Squeeze out the extra air, label, and put back in the freezer. 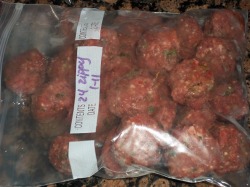 The individually-frozen meatballs packaged and ready to go in the freezer. They're best if used within a few months, but they'll be safe to eat for much longer. (I've used 2-year-old meatballs before.) 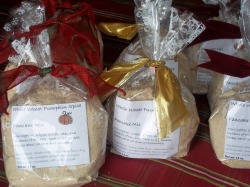 These make great little gifts. I gave these out during the holidays, when most people are short on time and have had enough 'goodie plates'. If you want to give them something extra, also include a bottle of syrup (homemade or storebought) or a couple different mixes in a basket. Back on 10/27/2010 I wrote a post on making vegetable powders. Here's one kind you can make- pumpkin powder! The recipe below uses it to make some fragrant, fresh pancakes. You can also adapt any recipe that calls for pumpkin puree. I've made pumpkin pie with the powder, and it turns out great. 3 tablespoons pumpkin powder plus just shy of one cup of water is all it takes to make a cup of pumpkin puree. Most recipes won't require rehydrating the pumpkin first, either. Just mix everything together, and the powder will rehydrate while it cooks. This mix is just a really large batch of "Foolproof Pancakes," made so you only need to add eggs and water. Pumpkin Pancake Mix ½ cup coconut oil (shortening works too, but I don't use it) 1 ¼ c. brown sugar or raw cane sugar ¼ c. cinnamon 1 ¼ c. pumpkin powder 3 c. powdered milk 1/4 c. baking soda ¼ c. salt 13 c. flour ( ½ wheat, ½ white) Mix together the coconut oil, brown sugar, and cinnamon. Stir in everything else. Store in a container with a tight-fitting lid. Makes about 20 cups. To use it, combine 1 1/3 c. mix, 1 egg, 1 cup water. You'll get about 15 batches this size from the whole mix. I made up a smaller bag with 2 2/3 c. mix, which is 12 ounces if you like to weigh things. The instructions to use the whole bag is to add 2 eggs and 2 cups of water. My bigger bag has 4 cups mix, about 17 ounces, and mixes with 3 eggs and 3 cups water. For a ready-made label, click here. * * * * * The amount of pumpkin is based on using roughly 1/2 cup of pumpkin puree for a 1-cup-of-flour batch of pancakes. If you don't have pumpkin powder, omit that ingredient, use just under 1 1/4 cups of mix, 1 egg, 1/2 cup fresh or canned pumpkin puree, and reduce the water to 3/4 cup.  To make pumpkin powder, first wash (but don't peel) the outside of a pumpkin. Scoop out the seeds. 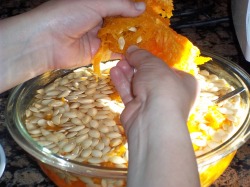 The seeds are great themselves. I find them easiest to separate from the stringy fibers by putting them in a bowl of water. Pinch the seeds off into the water. Dry them for a couple weeks and save them for planting in next year's garden, or roast them with a little oil and salt. 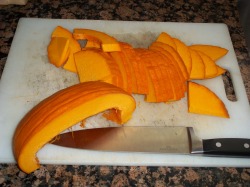 Trim off the stem and the blossom end. Slice the pumpkin lengthwise into pieces about 2" wide. If you steam them now, the pumpkin will dehydrate in about half the time, and have a mellower, sweeter flavor. Let cool enough to handle, then cut them about 1/4- 3/8" thick crosswise. 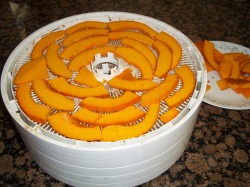 Lay the thin pieces in a single layer on a dehydrator try, or on a windowscreen laid down in a hot car, or on a cookie sheet with the oven on lowest setting... whatever you have. When crispy-dry, put the pieces in a blender and puree until powdered. This 5-lb pumpkin dehydrated down to just under 7 ounces, which measured 1 1/2 cups of powder. That's a great space saver! It takes just 3 Tbsp of this powder to equal 1 cup of puree, after adding water. Use it in anything that calls for pumpkin; you don't even need to rehydrate it first: just add the right amount of water and powder. Try Pumpkin Shake! Or how about a gluten-free, dairy-free Pumpkin Cheesecake? Pumpkin Pie? 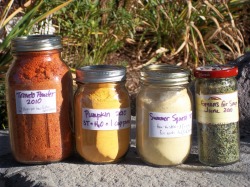 A rainbow of dehydrated vegetables: from left to right: tomato powder, pumpkin powder, yellow squash powder, and dried & crumbled greens. 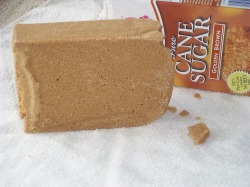 Does this look familiar? It's almost hard enough to build with... 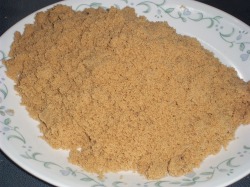 Less than a minute later, it can be measured! Did you know sugar stores forever? It doesn't ever spoil or go rancid. And here's a little practical science for your kitchen- brown sugar is hygroscopic, meaning that it attracts moisture from the air. Cookies made with it have a better chance of being chewy. This also depends, of course, on how long you let them bake! Brown sugar adds moistness, chewiness in baked goods, and a deeper, caramel-like flavor. All of this is because of the small amount of molasses in it. Most brown sugar is just refined white sugar with molasses added at the factory. Turbinado, or raw cane sugar is an exception to this- the brown color in it is because the molasses wasn't taken out to begin with. What this hygroscopic nature means for you is that if there’s any moisture available to the sugar, it will soften up over the course of several hours or overnight. Some ways to add moisture are: · Add a slice of apple to a sealed container of brown sugar. Let sit. · Add a slice of bread. This is a great use for those heels that sometimes don’t get eaten. When it’s totally dried out, you can crush it into breadcrumbs. · Soak a small (clean!) terra-cotta pot, saucer, or shard (piece of a broken pot), in water. When it’s moist, add it to your brown sugar container. This one’s reusable! Just soak it again when dry. · Put a dampened cloth or paper towel in the container, or just put the brown sugar in a bowl and cover it with the damp cloth. · Any place the brown sugar actually touches something wet, the moisture may drive out the molasses (which is what makes it brown) and leave a white, moist section of sugar. It’s fine. Stir it back in. If you can’t wait that long for your sugar, there are more options: · Microwave the brown sugar for 30 seconds. If it’s not softened yet, put it in for a little longer. It will be soft and easy to measure, but only while it’s still warm! Crumble it while you can, measure what you need, and put the rest in a container with one of the ideas above. · If you don’t have a microwave, you can use a grater to get what you need off that solid block of sugar. · If you have molasses on hand, stir it into regular sugar. This is how they make brown sugar at the factory! For light brown sugar, use 1/2 Tbsp (1 ½ tsp). molasses to 1 cup white sugar. If you want dark brown sugar, use 1 Tbsp. molasses instead. · Knock off some chunks with a hammer or other heavy item. Weigh them instead of using a measuring cup. A cup of brown sugar weighs about 7 ounces. (For the curious or the kitchen scientist, a handy chart listing other foods’ weights per cup, see http://www.veg-world.com/articles/cups.htm) Most recipes use some form of liquid- add the hard sugar lumps to the recipe's liquid to let it soften, dissolve, or mix in. One great thing to make with brown sugar is Caramel Pudding 2-4 Tbsp. butter 1/4-1/2 c. brown sugar 1/4 c. cornstarch OR 1/2 c. flour 2 c. milk 1/8 tsp. salt, optional 2 eggs 1 tsp. vanilla In a medium sauce pan, melt the butter over medium heat, stir occasionally until it turns brown and smells heavenly. Remove from heat. Add brown sugar, cornstarch, and salt; stir until smooth. Gradually stir in the milk; return to heat and stir until it comes to a boil. Meanwhile, beat the eggs in a medium bowl. Pour a thin stream of the hot milk into the beaten egg, stirring constantly, until about half the milk is mixed with it. This keeps the egg from curdling (scrambling). Pour the egg mixture back into the boiling mixture; cook and stir for two minutes more. For more variations on pudding, see White Sauces and Pudding  This one doesn't taste like a candy cane- though you could make it so that it does! I just noticed that in my 'dinner rolls' post there were no instructions for making that candy cane bread. So here they are. Use the same technique to make cinnamon rolls, only those need sliced at the end of making the roll. 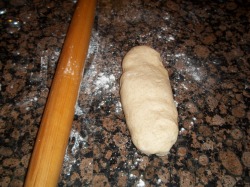 The simplest way I've found to roll a rectangle is to give the shape a head-start before rolling it out. Pat or stretch it into an oblong shape. 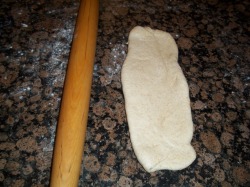 Roll it out to its full finished length. In this case, I have a pound of dough that I want to be about 8x14, so it's now rolled to be 14" long. 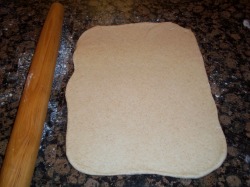 Then work on getting it the right width. Eight inches is the width of my thumb to pinky, when I stretch my hand. It doesn't have to be exact when you roll these things out; a hand width is a great measuring tool! 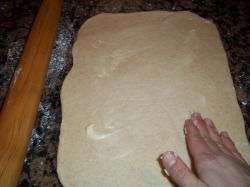 Spread soft butter on it, using a utensil or your hand. If your butter is cold and hard, your hand warms it up in a hurry. The butter prevents the dough from sticking to itself, which leaves your finished spiral open (great for letting frosting ooze into if you're making cinnamon rolls!). This means you DON'T want to spread the butter clear to the edge; stay about an inch or two away from one long edge. 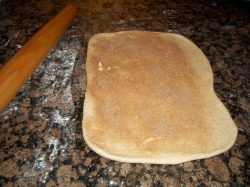 Sprinkle with cinnamon and sugar, if that's the filling you want. I 'eyeball' this kind of thing, but this was about 1- 1 1/2 tsp. cinnamon and 2-3 Tbsp. sugar. Again, stay an inch away from one long edge. 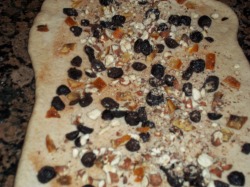 You can add whatever you want as filling- this one has the cinnamon and sugar, but then also has raisins, chopped toasted hazelnuts, and some chopped candied orange peel. 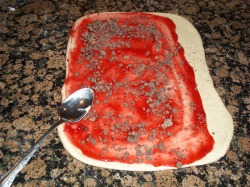 This flavor was the most popular with everyone who tried it this year- raspberry filling, sprinkled with little chocolate chunks, or chocolate chips. I get the raspberry filling from the bakery at a local grocery store; it's cheaper than I can make it, plus it doesn't go runny when heated, like raspberry jam does. Raspberry jam does have better flavor, however. 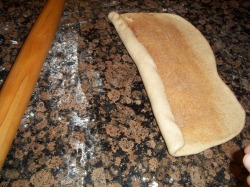 Start rolling the dough, starting with the long side opposite the unbuttered one. 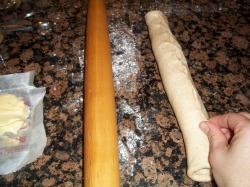 This is when you'll be glad you remembered to keep the butter away from the edge. Pinch the edge to seal.  Curve the roll into a candy cane shape and put it pinched-side down on a cookie sheet. Butter it or use parchment paper. When I have different flavors on the same cookie sheet, I sprinkle or spread some of the filling on top, too, so it's easy to tell them apart. Let rise until nearly doubled, 45-90 minutes, depending on the temperature of your kitchen, and bake at 350- 375 degrees F about 20-25 minutes, or until well browned on bottom, and a little browned on top. It will continue to cook outside the oven for the next 15-20 minutes. When they're cool. Drizzle with icing, chocolate syrup, melted chocolate or white chocolate, or melted jam, and sprinkle with some nuts, cinnamon, or chocolate chips if you like. Merry Christmas! Here is a simple thing to make with your family- hot chocolate. There are a few different ways to make it- you can add chocolate syrup to milk, or you can melt a chocolate bar into milk, or you can make it the old-fashioned way, starting with unsweetened cocoa. It’s really fast and easy. May you have a wonderful Christmas, full of the spirit of love and of God. -Rhonda Homemade Hot Cocoa 1 Tbsp. unsweetened cocoa powder 1 Tbsp. sugar or honey 1 cup milk Pinch of salt, ¼ tsp. vanilla, optional Stir together the cocoa powder and sugar. Stir in 2 Tbsp. milk, mix until smooth. Bring to a boil, either on the stove or in a microwave. This is to dissolve the sugar and bring out the flavor of the cocoa. Stir in the remaining milk, the salt, and vanilla. Heat to the temperature you like. Top with marshmallows or whipped cream if you have them. This recipe can be sized up to whatever you like. I usually make a 4-cup batch, using the microwave, and a canning jar for my cooking container. This makes a ‘milk chocolate’ flavor. If you like it darker, use 1 1/2 – 2 Tbsp. cocoa. If it’s bitter, add the same amount additional sugar. For mint chocolate, use whatever form of mint you have- mint extract, peppermint patties, or crushed candy canes. For raspberry flavor, you can use 1 Tbsp. of raspberry Jello powder instead of the sugar. Orange is another good flavor to make this way. If you like richer cocoa, use whole milk, or a bit of cream, evaporated milk, or half-and-half. To make it frothy, use a blender, or an immersion blender, to whip it. This works especially well if you used powdered milk! 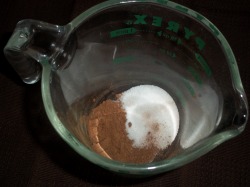 The cocoa and sugar, ready to be stirred. 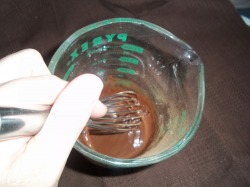 Add as much milk as you have of the sugar and cocoa- in this case, 2 Tbsp. You want to make a smooth, pancake-batter-consistency slurry. 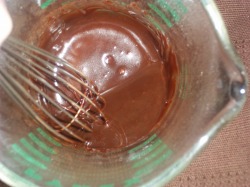 Bring it to a boil to dissolve the sugar and 'bloom' (bring out the flavor of) the cocoa. Once it's at this point, add the rest of the milk, along with salt and vanilla if you want them.  To make 2 oz. Butterhorn rolls- start with one pound of dough and roll it into about a 12" circle. Spread softened butter on all except the middle, leave about a 2-3" circle unbuttered so the dough can stick to itself. With a pizza cutter or knife, cut into eight wedges. Roll each one up, starting with the wide edge. Pinch the point so it sticks to the rest of the roll. Put the rolls on parchment or a greased baking sheet, point-side tucked securely underneath so it doesn't unroll during baking. Curve ends a bit, then cover and let rise. If you're making a bunch of these, use a loaf's worth of dough (about 1 1/2 lbs), roll into a 12-15" circle, and cut into 12 wedges.  Great gift bread for Christmas- the Candy Cane loaf. This one has a raspberry-chocolate swirl through it; see the slice at right. I like to give these to neighbors with a little poem about the symbolism of the candy cane This week here is a review of the ideal we work towards as women, and then the info from the Dinner Rolls class I held this week. --------------- Have you read Proverbs chapter 31 lately? The Hebrew word for 'virtuous' is חַיִל, 'chayil,' and means POWERFUL, STRONG, and EFFICIENT. Virtues are strengths. Excellence in particular attributes. Who can find a powerful woman? Her price is far above the most valuable gems. I think most of us remember reading verse 10, but look what else it says. "Who can find a virtuous woman? for her price is far above rubies. The heart of her husband doth safely trust in her, so that he shall have no need of spoil. She will do him good and not evil all the days of her life. "She seeketh wool, and flax, and worketh willingly with her hands. She is like the merchants’ ships; she bringeth her food from afar. She riseth also while it is yet night, and giveth meat to her household, and a portion to her maidens. She considereth a field, and buyeth it: with the fruit of her hands she planteth a vineyard. She girdeth her loins with strength, and strengtheneth her arms. She perceiveth that her merchandise is good: her candle goeth not out by night. She layeth her hands to the spindle, and her hands hold the distaff. She stretcheth out her hand to the poor; yea, she reacheth forth her hands to the needy. "She is not afraid of the snow for her household: for all her household are clothed with scarlet. She maketh herself coverings of tapestry; her clothing is silk and purple. "Her husband is known in the gates, when he sitteth among the elders of the land. She maketh fine linen, and selleth it; and delivereth girdles unto the merchant. "Strength and honour are her clothing; and she shall rejoice in time to come. She openeth her mouth with wisdom; and in her tongue is the law of kindness. She looketh well to the ways of her household, and eateth not the bread of idleness. Her children arise up, and call her blessed; her husband also, and he praiseth her "Many daughters have done virtuously, but thou excellest them all. Favour is deceitful, and beauty is vain: but a woman that feareth the Lord, she shall be praised. Give her of the fruit of her hands; and let her own works praise her in the gates." I know that all of us can grow by picking something in those verses on which to begin-- or continue-- our efforts. Are you ‘afraid of the snow for [your] household’? Or are they going to be fine through lean times because of your preparations? ________________ For the basic bread recipe along with these variations, see my Google Docs version This makes 2 dozen 2 oz. rolls (if basic shape rolls, closely spaced, they’ll fill a 12x18 baking sheet perfectly), two dozen medium-small cinnamon rolls (a trayful), two 8x4” loaves, OR three 1-lb. ‘candy cane’ loaves. Dinner Roll/Sweetbread Dough 3 cups flour to start with (5-6 cups total) 2 tsp. salt 2 tsp. yeast ¼-1/3 c. sugar 3 Tbsp. oil or butter 1 egg 2 cups hot water or milk (no hotter than 130 degrees F or it will kill the yeast) Mix salt, yeast, sugar, oil, water, and first amount of flour in a bowl. Beat about two minutes with a wooden spoon. Stir in half of what’s left, then mix in more until too stiff to stir. Dump out onto a floured counter and knead for 8-10 minutes, adding only enough flour to keep the dough from sticking to the counter. The dough should be smooth and elastic after kneading. (Yes, you could use a stand mixer for this, too….) Cover with a kitchen towel or plastic grocery bag and let rise 1 to 1 ½ hours, or until doubled. Punch down and shape into rolls or loaves. Place on greased baking sheet or in 8x4 loaf pans and let rise about 45 minutes or until nearly doubled. Bake at 350 for about 30 minutes or until the bottoms of rolls, or sides of loaves, are brown. (Tip a loaf out of the pan to check.) Remove from pans and cool on a rack. This is my basic bread recipe with three tweaks: egg, milk, and more sugar. The egg helps make the bread more moist, springy, higher-rising, and tender. The white helps add strength and leavening. The yolk adds a tiny bit of color, plus some richness and tenderness from the natural fats in it, especially from the lecithin (worth a whole blog post just for lecithin!) it contains. Milk helps a little bit with browning, as well as making the internal structure (“the crumb”) softer and smoother. It’s one of those things that may be harder for an amateur to notice, but it makes enough of a difference that I always use it in sweet breads for competitions. If you have powdered milk available, just mix the milk powder in with the other dry ingredients, and use water. For this size batch, you’ll use 6 Tbsp powder, which is just over 1/3 c. Sugar makes a big difference in the crust browning, or ‘caramelizing’, as well as in the flavor of the bread. Sugar can also help the yeasts grow, but it only helps to a certain point. No-sugar-used bread will still rise, but will take twice as long. And you can get it to brown, too, because of the natural sugars in the flour, but you have to use a higher temperature. When I’m making bread with no sugar, I bake it between 400 and 450 degrees F, which gives a nice brown crust. If you cook bread with sugar in the dough, if you cook that hot it will be black on the outside before the inside is done. When baking sweetened breads like this, then, keep the temperature between 350-400; the bigger the loaf, the lower temperature. Smaller things, like individual rolls, can still handle up to 400 degrees because the insides can cook quickly. The other thing about sugar, helping the yeasts grow, is kind of funny. A moderate amount of sugar is good food for the yeast, but over a certain point actually slows down its growth. To compensate, let it rise a little longer, or add more yeast.  How long the rolls are in the oven will make a HUGE difference in how dry or moist and velvety they are. Cook them just until the bottoms are brown and they sound a bit hollow. They will continue to cook for 15-20 minutes after coming out of the oven. The roll on the left is overbaked and is dry. The one on the right is perfect. See how the sides are golden brown where the baking pan touched? If you want more color on top, brush with oil or butter after baking; this will intensify the color that is there. You can also brush them before baking, with milk, beaten egg, or melted butter. Each one has a little different effect; see which you prefer. 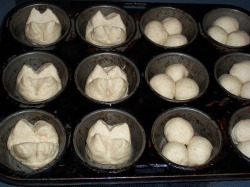 (left) Mock Cloverleaf rolls, (right) Cloverleaf rolls. Start with 2 oz dough, a little bigger than a golf ball. For the Mock style, shape it into a smooth ball, put in greased muffin tins, and make two snips with scissors to create four points. For the Cloverleaf, divide each golf-ball-sized into three; shape each into a smooth ball. 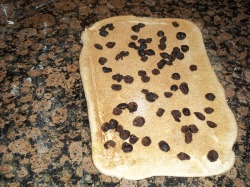 For cinnamon rolls, roll dough into a rectangle. A two-loaf batch will make 2 dozen; roll into a 24x10 rectangle, spread with butter (so the rolls will 'peel' open and let frosting seep between the spirals!), sprinkle with cinnamon and sugar, raisins if you want. Roll up and pinch to seal. 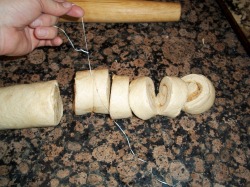 Cut into 1” sections using dental floss or thread, put on greased baking sheet, let rise, and bake. Frost (Cream Cheese Frosting is great!!!) or glaze while warm. 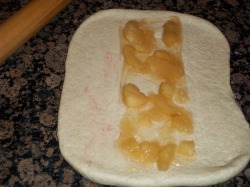 To make a filled ladder loaf, roll dough into a rectangle. I used one pound of dough and rolled it to about 8" by 14". Whatever amount of dough you use, roll it to about 1/4-inch thick. Put filling down the center third. I used apple pie filling from a can, but you can use cream cheese and jam, rehydrated dried fruit, nuts and cinnamon, or thinly sliced or chopped fruit, sweetened or not, depending on what you have. What's in your house or yard that might taste good in this? 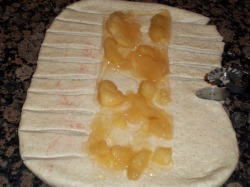 Make cuts about an inch apart. You'll want to have the same number on each side. A pizza cutter makes great work of slicing. 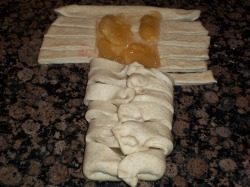 Bring opposite slices together; pinch together in the middle to seal them. Let it rise until dough is nearly doubled, then bake. Great with a drizzle of glaze (powdered sugar and water), maybe with a sprinkle of cinnamon or nuts on top for a nice presentation. 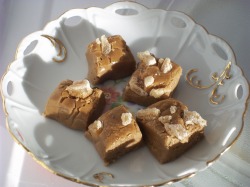 Fresh fudge, made whatever flavor you feel like. This one is Gingerbread Fudge.  Truffles, the same on the inside but rolled in cocoa, powdered sugar, and sprinkles. I love making treats; it makes me very popular with my children and the neighbors! Every Christmas season I make 'goodie plates' with my family, and take them to neighbors, teachers, and friends. We try to get them done by the first or second week of December. This way mine are distributed before anyone has overindulged and decreased in their appreciation for sugar. So far we've made lots of bread, caramels, truffles, and fudge. See here for the candy recipes. Below the list are photos and instructions for making a fun layered and swirled Chocolate Peanut Butter Fudge. True to form, this includes basic recipes, then how to tweak them to get new flavors. Here's what's in that file: Buttercream Fondant Fondant centers Pecan logs English Toffee Fudge Two-Minute Fudge Milk Chocolate Fudge Peanut Butter or Butterscotch Fudge Vanilla Fudge Cherry Vanilla Fudge Cookies and Creme Fudge Orange Creme Fudge (Creamsicle) Caramel Swirl Fudge Candy Bar Fudge Chocolate-Peanut Butter Fudge Mint Layer Fudge Orange-Pecan Fudge Peanut Butter Swirl Fudge Rocky Road Fudge S’mores Fudge Strawberry Fudge Strawberry ‘Truffle Layer’ Fudge Toasted Coconut Fudge Wonka Bar Fudge Five Minute Fudge Easy Fudge Old-Time Fudge Blue Ribbon Fudge Quick Penuche Maple-nut Fudge Maple-nut Goodies Molasses Fudge/Gingerbread Fudge Quick Centers for Pecan Logs Truffles Milk Chocolate Truffles White Chocolate Truffles Whipped Truffles  For this batch of chocolate-peanut butter fudge, I used the Five Minute Fudge recipe but split the batch in half after adding the marshmallow. Half of it got peanut butter, half of it got chocolate chips. I spread the peanut butter layer into a lined pan, then topped it with the chocolate mixture.  Lining the pan with waxed paper or foil, buttered, makes it much easier to cut the fudge when finished. To make the peanut butter swirl, drop several small spoonfuls of plain peanut butter on top.  Tap the pan on the counter to get the peanut butter to flatten into the fudge.  Drag a knife or spoon back and forth through it to swirl a bit.  It's best to not break it up too much. Tap the pan on the counter again to flatten the top. 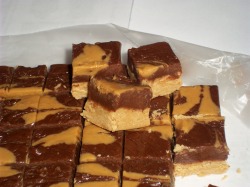 Chill until it's firm, then lift the whole batch out. Put it on a cutting board, and cut into squares.  Right-click to save, it should come up full-sized once you do. You can also find this in pdf format. The song is on page 25. (originally from 4/15/10
Now that the Three Month Challenge is over, the next step is finishing your year’s supply. In agrarian cultures, it was very common to have a year’s supply, in case the next year’s harvest was insufficient- hailstorms, drought, fire, flood, damage from animals or bugs. Since we don’t grow all our own food anymore, we sometimes become oblivious to the need to have backup. In reality, our food situation is more precarious- it involves a large web of people, machinery, and transportation, as well as Nature, all doing their part. If any one of these is messed with, the stores could be empty within a few days. Food storage is great insurance and brings peace of mind. I can’t afford to invest in gold, but I can afford wheat. You can’t eat gold, anyway. I’ll send a quote next week from Brigham Young about gold and wheat. A great article on what and how to store your long-term food is “Home Storage: Build on the Basics” from the Ensign magazine, June 1989. Some highlights from it are: “We continue to encourage members to store sufficient food, clothing, and where possible fuel for at least one year. We have not laid down an exact formula for what should be stored. However, we suggest that members concentrate on essential foods that sustain life, such as grains, legumes, cooking oil, powdered milk, salt, sugar or honey, and water. Most families can achieve and maintain this basic level of preparedness. The decision to do more than this rests with the individual. “We encourage you to follow this counsel with the assurance that a people prepared through obedience to the commandments of God need not fear.” (First Presidency letter to priesthood leaders, 24 June 1988.) If families would think in terms of storing only foods basic to survival, or if they would supplement the food storage they already have with the basics to build it up to a year’s supply, the task would be simpler than they might think. They would then be prepared for food emergencies. A year’s supply of food storage is beneficial in several ways: 1. It provides peace of mind as we obey the counsel to store. 2. It helps ensure survival in case of personal (including financial setbacks, health issues) or natural disaster. 3. It strengthens skills in preparing and using basic foods. No single food storage plan will work for everyone. Each family’s needs differ, as does their financial ability to accumulate the storage items. But by working under the direction of the First Presidency “to concentrate on essential foods,” it can be done. President Ezra Taft Benson has said on at least three different occasions, “The revelation to produce and store food may be as essential to our temporal welfare today as boarding the ark was to the people in the days of Noah.” (Ensign, Nov. 1980, p. 33.)” Noah didn’t build it in a week, and he didn’t take out a loan for it… but he worked at it until it was done. Are you building your ark? * * * * * * * The recipe this time around is for something fun to make and eat: Tootsie Rolls 2 Tbsp. butter ½ c. corn syrup ¼ c. unsweetened cocoa powder 1 tsp. vanilla 3 c. powdered sugar ¾ c. dry milk powder Combine in a bowl, mix as much as you can with a spoon, then knead by hand. At first it will look like a big bunch of powdered sugar that won’t ever stick together….. but keep with it, and it will. Once it all turns brown and holds together, roll into long ‘snakes’ and cut into bite-size pieces. These are even better the next day, and if you want them chewier, let them sit out a few days. (Remember how old the store’s Tootsie Rolls must be…) Vanilla Tootsie Rolls Instead of corn syrup, use sweetened condensed milk and omit the milk powder. Increase vanilla to 1 Tbsp. |
Need a Search bar?
|