The Provident Homemaker
  • Recipes and Info
    • Making Bread
  • My Blog
  • Favorite Resources
  • Documents and Files
  • 52 Weeks of Building Storage

Gingerbread House Pattern

12/8/2020

0 Comments

 
Picture
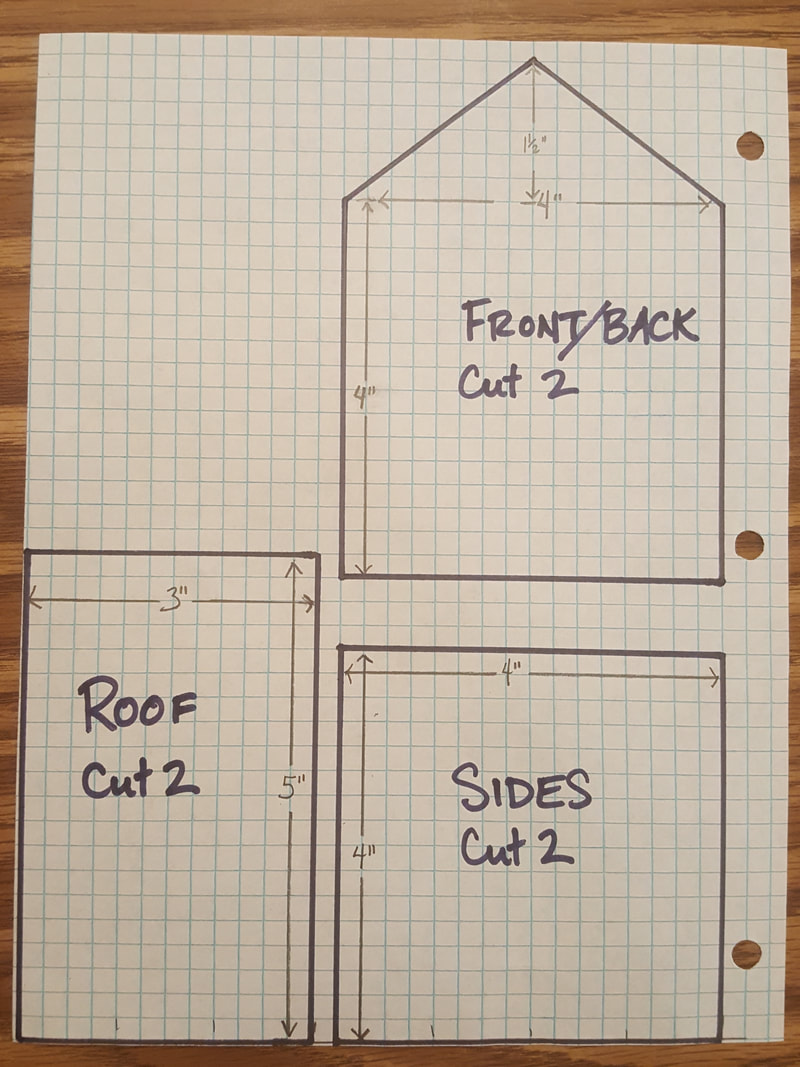
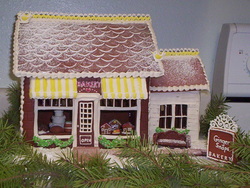
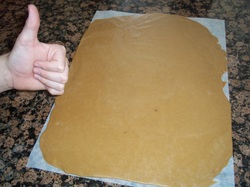
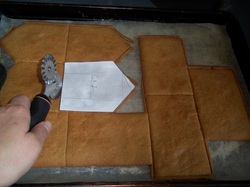
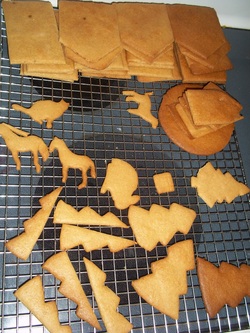
One of my children's very favorite traditions is decorating their own gingerbread house before Christmas. We put all of them up on the fireplace mantle, side by side, and (mostly) leave them alone until the end of the year.  Eating the houses is a fun treat for New Year's Eve. This is a pattern for the size of house each of them gets.  Before decorating, it stands just under 6" tall, 5" front-to-back, and about 4 1/2" side-to-side. You'll need to cut two pieces of gingerbread from each pattern piece, for one house. A single batch of my gingerbread dough will make 5 houses, with a little bit of dough left over if you rolled it to the right thickness. 

There are other gingerbread posts on this website -- one with my best gingerbread house recipe and baking tips --there's even a link to a gluten-free version-- and another with easy instructions for assembling the houses with the least amount of hassle possible, and then decorating-- but I've not posted my pattern before.  Mostly because I hadn't figured out a good way to do it. Hopefully this works-- sharing the dimensions via photo. I make the annual pattern using graph paper, a ruler, and a pencil. Sometimes I use that pattern to trace onto cardstock or a cover sheet, for a thicker one that can handle being used on more houses.  We baked about 30 houses one year, as a school class activity! With eight children, a daughter-in-law, and usually a couple of extra people joining us, we typically make about 12-13 houses at one go now.  The graph paper one should hold up fine for one or two batches of dough. The paper will get translucent pretty quickly from soaking up some of the butter in the dough-- but that doesn't hurt it. 

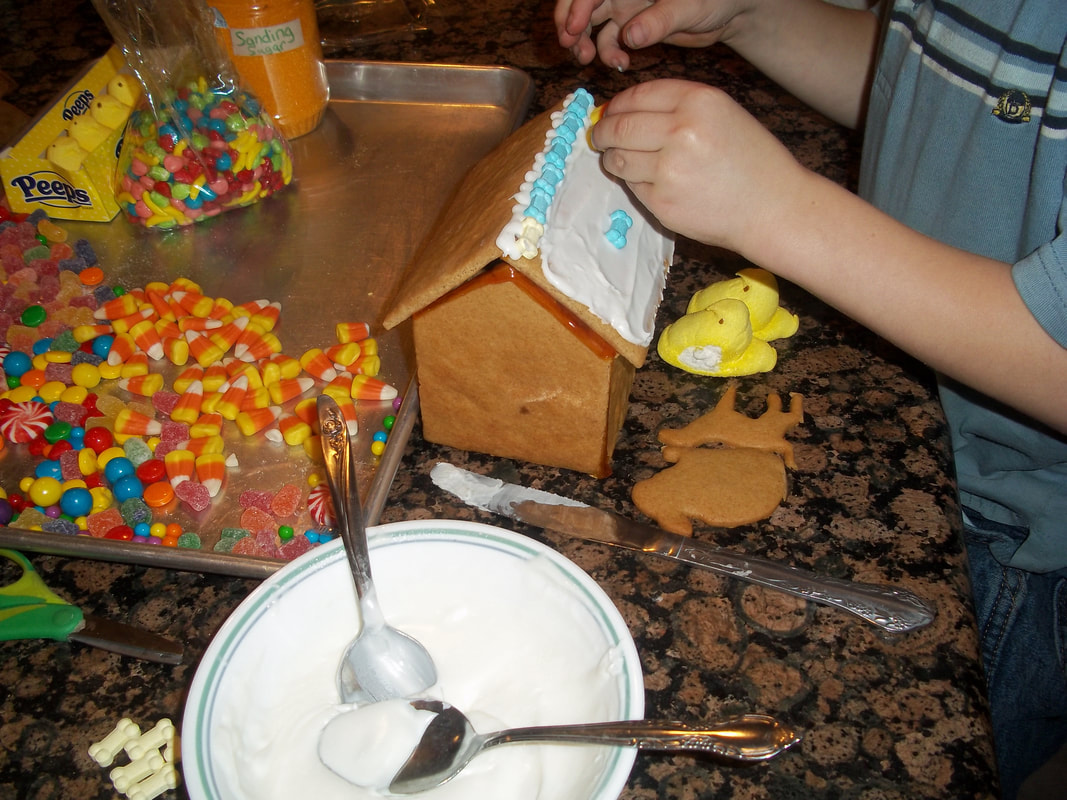
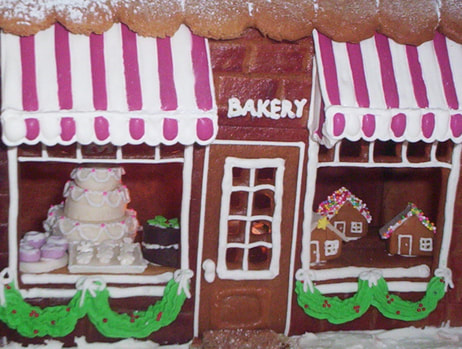
Below is a photo of the size house this pattern will make. 
​
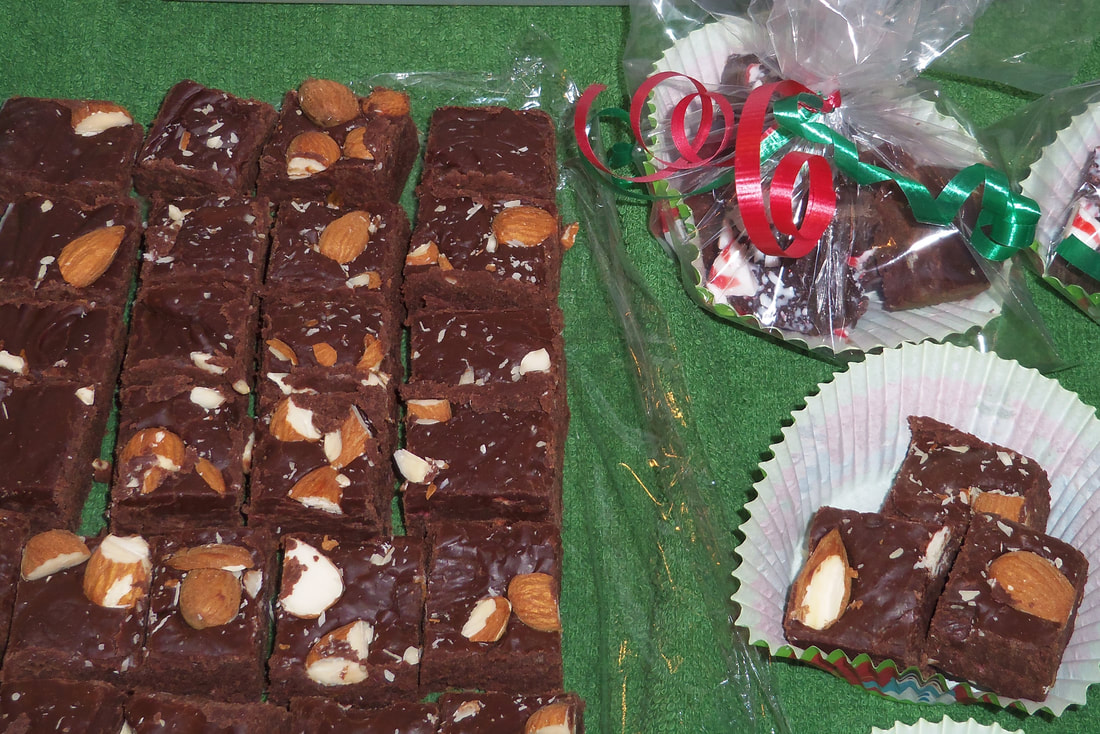
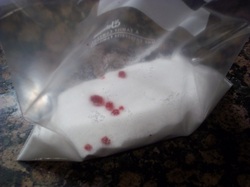
Yes, most of our decorating candy comes from buying Easter and Halloween candy on clearance after the holiday!

Picture
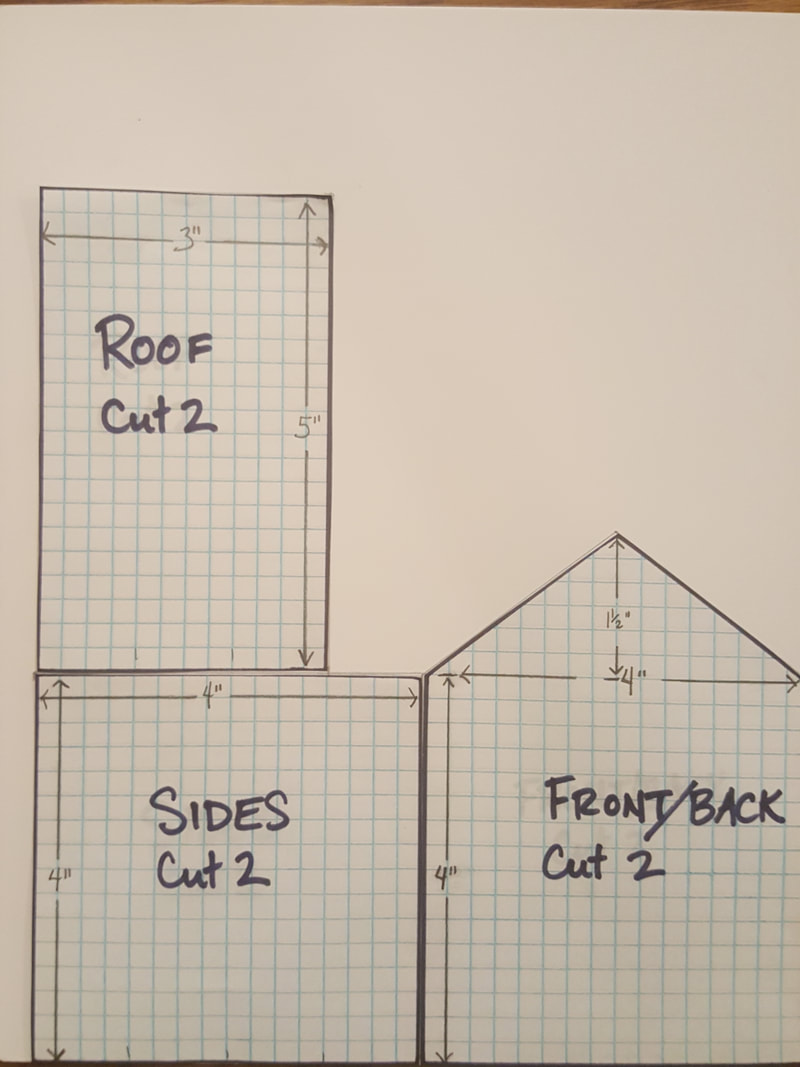
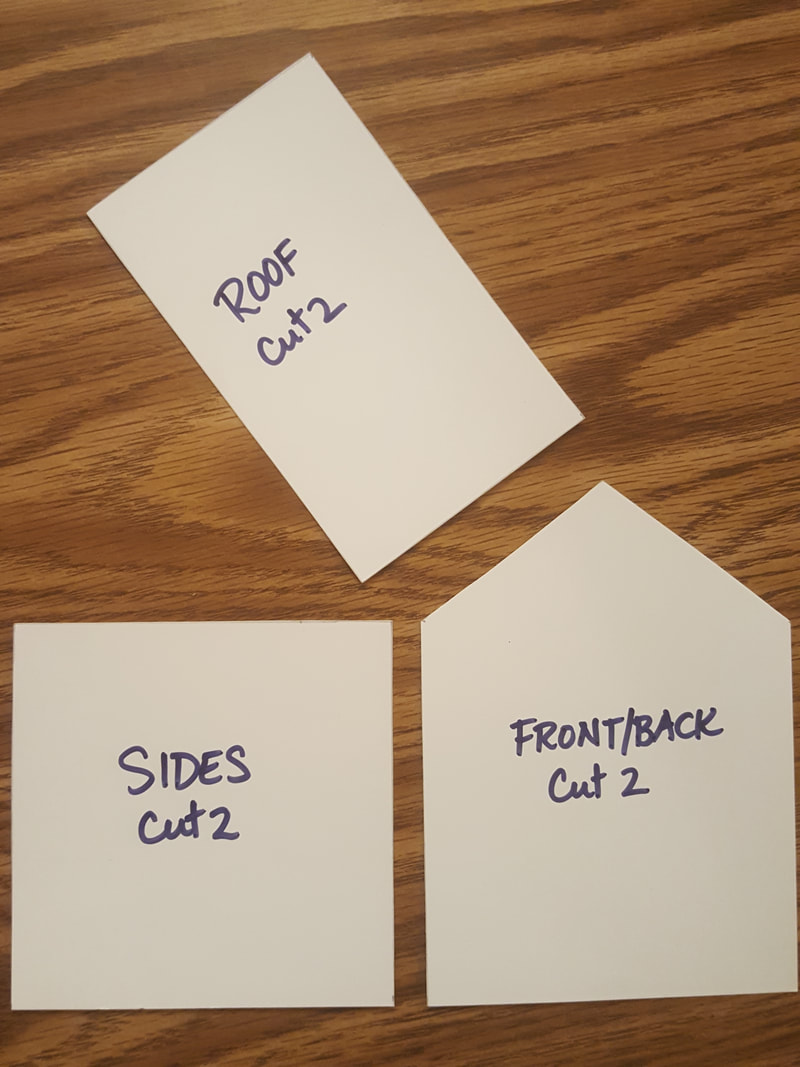
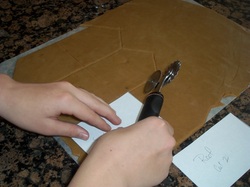
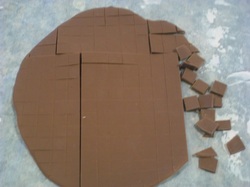
If you want stiffer pattern pieces (below), trace around the graph paper pieces onto a piece of cardstock, a cover sheet, or thin rigid plastic (cleaned well). The plastic one could be washed and saved to reuse every year. 
Then the only trick is to remember where you stored it...

Picture

Picture

Picture
Picture
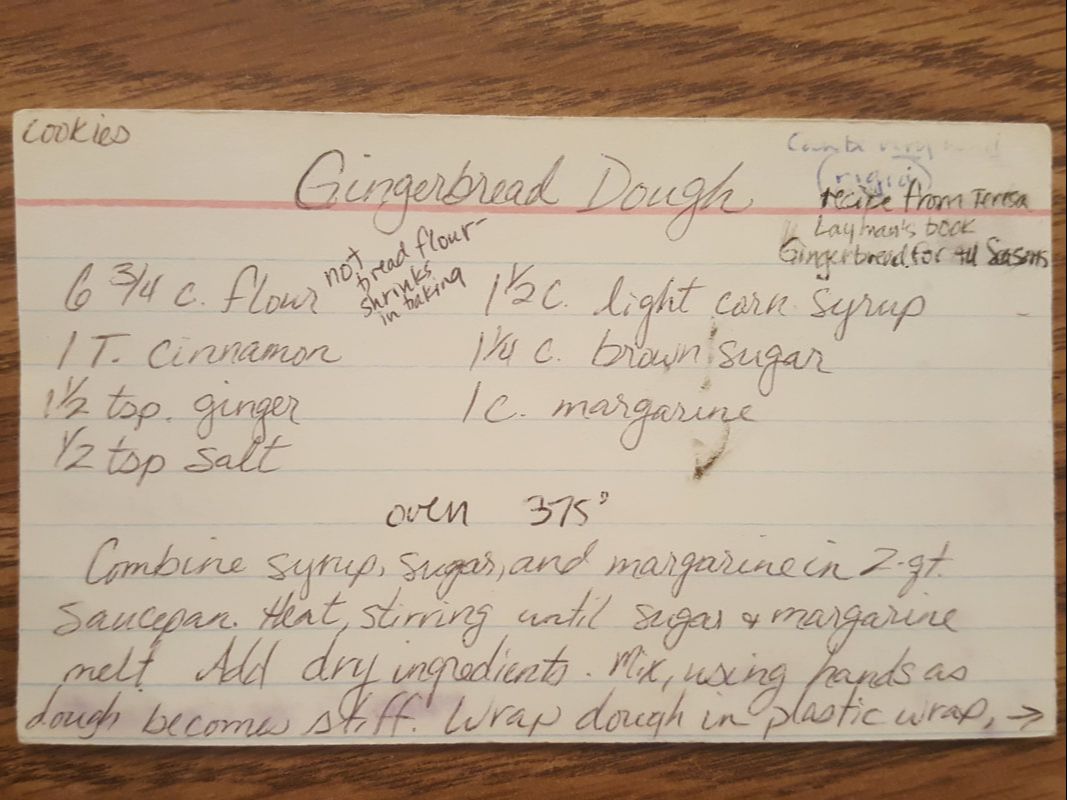
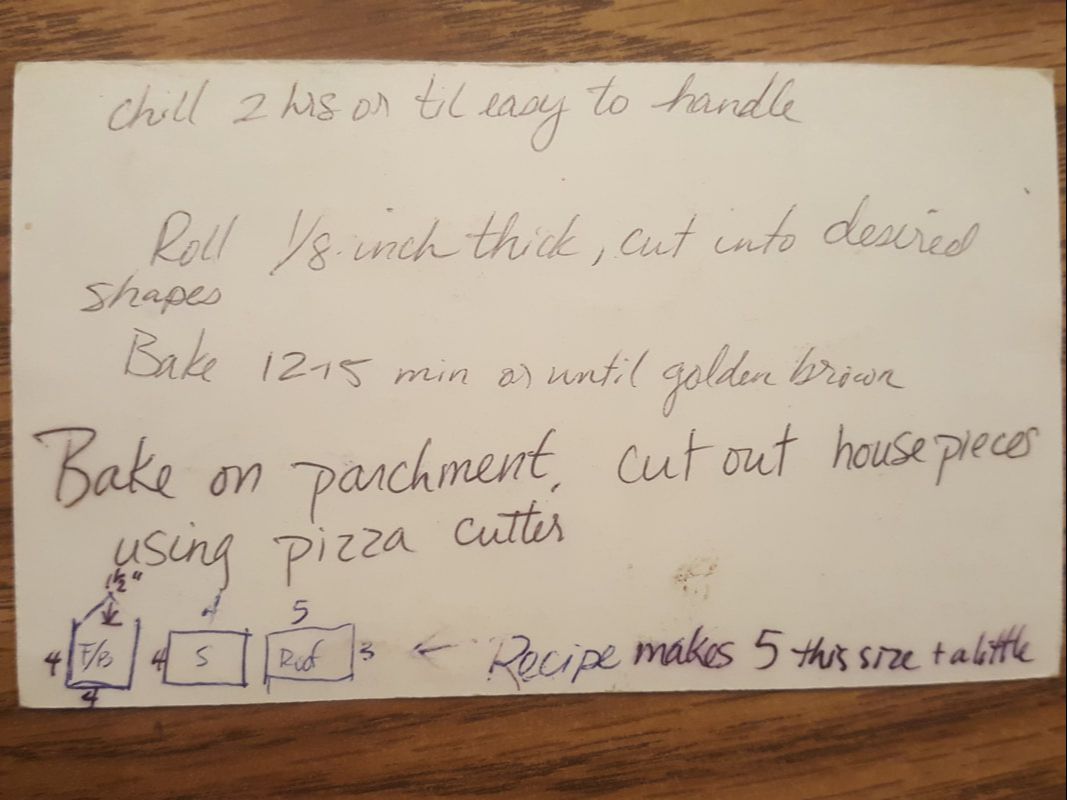
....and this is how I remember what size to make the pattern pieces each year.  It took about ten years to realize that adding a note on the back of the recipe card would be super helpful...
0 Comments

Week 37, and Candied Orange Peel

12/26/2019

0 Comments

 
Picture
To help with building your year's supply (this is Week 11 of 26), see this chart. 
 
Candied orange peel takes some time, but it's really easy and requires very little hands-on time. It's done mostly while you’re working on other projects. Basically, you cut orange peel into strips, boil it in two changes of water to get the bitterness out, simmer for an hour in a basic sugar syrup, cool, then toss with sugar to coat. It’s delicious by itself, dipped in chocolate (my favorite!), or chopped up and used in recipes. It’s especially good in muffins, cookies, breakfast oatmeal,yeast breads, cakes, zucchini bread, etc. You get the picture.  Any citrus peel may be candied- grapefruit, lemon (yum!), lime. Clementines are even an option, but their peel s are so thin you’ll be candying uneven pieces, rather than neat strips.

I saw chopped candied orange peel at the store today.  The ingredients included high fructose corn syrup, sodium benzoate, sulfur dioxide.  When you make this yourself, it has two ingredients.  Two. (Water doesn't count.)


I made three batches this year with the peel from eight oranges each batch. This made about six pounds of candied orange peel total, which took between 3 and 4 pounds of chocolate to coat. (I tend to work in biggish quantities.)  Everybody who tried it loved it.  Everybody, that is, except my husband.  He’d rather eat the orange jelly sticks from the store.  I’m OK with that; I’d rather have these.
 
You can make any size batch—even down to the peels from a single orange—but other than the time to cut up the peels, it takes almost no more time to candy a lot than a little.
 
What can you do with the now-peeled oranges?  In a family my size, we have no problem eating them within a day or two. My kids especially like them sliced in wheels to eat with breakfast. But we often make my mom’s orange salad- separate the oranges into segments, cut them into bite-sized pieces, then combine in a bowl with canned pineapple and shredded coconut.  Quantities are super flexible, but a good amount is 4 -6 oranges to one 20-ounce can of pineapple (chunks or tidbits), along with ½ to 1 cup coconut.  Toss together and serve.
​

 
See the slide show below for pictures on making this.
Candied Orange Peel

8 oranges
Water
3 cups sugar, for candying
½ cup sugar, for coating
Chocolate for dipping- about 1 ½ pounds, optional

 
Peel the oranges as neatly as possible.  My favorite peeler by far is the one from Tupperware  –maybe that’s just because I grew up with it-- but this one will work, too.   
 
If you peel them like this (video) you’ll end up with four quarter-peels per orange.  Grab a pair of scissors and snip them lengthwise, with each one ¼- 3/8” wide.  Toss them in a large pan.
 
Cover with water and bring to a boil.  Turn down the heat and let the peels simmer for 10 minutes. Turn off the heat and let the peels sit anywhere from another ten minutes to overnight.  Drain the water. 

Cover the peels with new water. Repeat the boiling process, letting them sit afterwards for 10-30 minutes.  Drain as much of the water as you can.
 
To the peels in the pan, add 3 cups granulated sugar and 1 ½ cups water. Bring to a boil, then reduce to keep a stead boil.  Stir the peels occasionally.  Meanwhile, put a cooling rack on top of a cookie sheet to catch the drips later.

The goal here is to get as much of the syrup to absorb into the peels as possible. This usually takes about 60-70 minutes of cooking.  As you get closer to the end, the bubbles will change their look, becoming smaller and more white-looking.  Stir more often towards the end, so the peels don’t scorch. Once the syrup has been absorbed, use a slotted spoon to transfer the peels onto the waiting cooling rack.  Spread them out more or less evenly.   Let them cool for 30 minutes to 2 hours. (Nothing bad will happen if it’s longer; the worst is that less sugar will stick to them.)  Get the ½ cup of sugar. In a large bowl with a lid, dump half of it onto the bottom of the bowl.  Put all the orange peels in next, then add the other half of the sugar. Put the lid securely on the bowl, and shake to coat.  Stir if needed.  Leave the pan on the stove; we’ll get back to it.

Spread the orange peel out flat and one layer deep on two cooling racks or cookie sheets.  Once it’s dry to the touch—a few hours or overnight—it’s ready to dip in chocolate.

What do you do with the last of the syrup in the pan and what dripped off onto the cookie sheet when the hot peels drained? 
Scrape off whatever’s on the cookie sheet and add it to the pan. Add ¼ cup water to the pan, bring it to a boil, scraping the sides of the pan.    This syrup can be used on pancakes or oatmeal, or to flavor water, smoothies, or other drinks.  Refrigerate any leftover syrup.

Store not-dipped orange peel in a tightly-covered container at room temperature if it's only for a few days, or in the refrigerator for longer.  I've had it that way for months.  As long as it hasn't grown mold, it's still good.  It's likely to dry out a bit over time, but that's fine.  Store
chocolate-dipped orange peel in a tightly-covered container for a few weeks.  I really don't know the shelf life because it's always eaten within a week or two. 

0 Comments

Week 36- Two Minute Fudge - and Make Your Own Sweetened Condensed Milk

12/21/2019

0 Comments

 
Picture
To help with building your year's supply (this is Week 10 of 26), see this chart. 

Have you ever been to a store that sells fudge?  They display pan after pan of luscious flavors.  Well, now you can make them in mere minutes!  This recipe includes not only the basic semisweet chocolate fudge, but eighteen other flavors. 

Fudge can be made in advance, kept airtight in the refrigerator for a month, or wrapped well and frozen for 2-3 months. This recipe is super simple, and can be turned into lots of flavors.  My family’s favorites are Orange Crème Fudge and Cookies and Cremesicle Fudge. (Yes, that’s not the normal spelling, but ‘creamsicle’- regular spelling- is trademarked.)  My favorites include Caramel Swirl Fudge- in either vanilla or chocolate- Strawberry-Truffle-Layer Fudge. With pecans, please.

See here for more classic candy recipes-- toffee, penuche, truffles, fondant, and more base fudge recipes.
Picture
When making a batch of fudge, if it’s too firm or too soft, it can be fixed.

If it’s too soft, there are at least two approaches.

1- you can refrigerate or freeze it and serve it cold.  Once it’s chilled, you can eat it plain in the traditional squares, or scoop into tablespoon-sized balls.  Roll in powdered sugar or unsweetened cocoa powder, and serve as truffles.
2- make it even softer and turn it into hot fudge sauce. To do this, scrape the fudge into a microwave-safe bowl, add ¼ cup milk, cream, or evaporated milk, and heat for a minute or two, until you can stir it.  Stir until smooth.  If it’s still too thick for sauce, add more milk or cream.
 
If the fudge is too firm, scrape the fudge into a microwave-safe bowl, add 1-2 Tbsp. milk, cream, or evaporated milk, and heat for a minute or two, until you can stir it.  Stir until smooth.  Pour into a newly buttered pan.
 
If you want a healthier version of fudge, try Clean Eating Fudge. It’s Paleo! -and even works for those who can’t have dairy.


The fudge below can be made with a regular can of sweetened condensed milk, a homemade version, or even with a homemade dairy-free version. If you don't have any of those 3 options available, you can boil 7 ounces of cream, evaporated milk or (naturally dairy-free) coconut cream with 1 cup of sugar. Stir to dissolve the sugar, and you have a great substitute for sweetened condensed milk.

Two-Minute Fudge* 

3 cups semisweet chocolate chips (1 ½ 12-oz bags)
1 (14 oz.) can sweetened condensed milk (make your own here)
1 tsp. vanilla, optional
pinch of salt, optional
1 c. toasted and chopped nuts, optional
 
*Approximately two minutes of cooking time. 
 
Line an 8x8 pan with aluminum foil, waxed paper, or plastic wrap.  Spray with nonstick spray, or butter it. Set aside.
Stir together chips and milk.  Heat in microwave for one minute. Stop and stir. Repeat until the mixture is melted, stirring every minute. Stir in vanilla and salt.
 
Pour into lined and buttered 8x8 pan. Chill until firm- this will take about 2 hours in the refrigerator or 20 minutes in the freezer.
 
Makes 2 lbs. without the nuts.
 
To cut the recipe in half, 7 oz. of sweetened condensed milk is just over 1 ¼ cups.
 

Milk Chocolate Fudge
Increase chocolate to 4 cups (2 12-oz. bags). Makes almost 2 ½ lbs. without nuts.

Peanut Butter or Butterscotch Fudge
Use 4 c. peanut butter chips or butterscotch chips.

Vanilla Fudge
Use white chocolate chips, increasing to 4 cups.

Cherry Vanilla Fudge
Stir in 1 c. quartered candied cherries, replace half the vanilla with
almond extract, use almonds for the nuts.


Cookies and Creme Fudge
Break each of 16 chocolate sandwich cookies into fourths; stir into Vanilla Fudge. (see below)

Cremesicle Fudge (Orange Creme Fudge)
Make a batch of vanilla fudge, pour 3/4 of it into prepared pan. To remaining fudge, add 3 drops yellow food color, 2 drops red, and 1 tsp. orange extract.
Drop by spoonfuls onto top, swirl in.


Caramel Swirl Fudge
Melt 4 oz (about 18 squares) of caramel with 1-2 tsp. of water, drop by spoonfuls onto top, then swirl.

Candy Bar Fudge
Melt 4 oz caramel with 1-2 tsp. water, stir in 3/4 c. peanuts. Drop on top and either swirl in or cover the top with 1 c. chocolate chips, melted.

Chocolate-Peanut Butter Fudge
Add 2 Tbsp. peanut butter to hot mixture, before powdered sugar is added. Top with chopped peanuts if you like, pressing them in slightly.

Mint Layer Fudge
Make chocolate fudge; spread in pan. Melt together 1 c. white chips, 2 Tbsp. milk, 1/4-1/2 tsp. mint extract, and 1/8 tsp. green food color. Mix well, spread on top.

Orange-Pecan Fudge
Make vanilla fudge, stir in 1 Tbsp. orange zest, finely chopped, and 1 c. pecans.

Peanut Butter Swirl Fudge
Make chocolate fudge, melt ½ c. peanut butter, drop on top of fudge; swirl.

Rocky Road Fudge
Use nuts, and stir 2 c. mini marshmallows into fudge before spreading into the pan.

S’mores Fudge
Leave out nuts, stir in 1 c. mini marshmallows and 4 whole grahams, broken.

Strawberry Fudge
Replace half the condensed milk with 1 1/4 c. strawberry jam. Swirl about 2
Tbsp. jam on top. Especially good with pecans or walnuts.


Strawberry ‘Truffle Layer’ Fudge
Spread regular fudge in pan, melt together 1 c. (6 oz.)semisweet chips with 2 Tbsp. butter. Stir in 1/4 c. strawberry jam. Spread on top.

Toasted Coconut Fudge
For either chocolate or white fudge, toast 1 c. coconut, stir in 3/4 c, along with 1 c. chopped toasted pecans. Sprinkle remaining 1/4 c. coconut on top, press in. If using a fudge recipe that calls for milk or evaporated milk, you may also substitute an equal amount of coconut milk.

Wonka Bar Fudge
substitute 4 whole graham crackers, broken into small chunks, for the nuts.


Picture
Cremesicle Fudge.  
0 Comments

Indoor S'Mores

7/17/2014

0 Comments

 
Picture
The fastest, simplest S'mores ever!  My 6-year-old had a blast making these nearly by herself.  If you have a toaster oven, you can make just a few and hardly heat the kitchen up at all.  Even a big batch doesn't make your whole kitchen hot, or make you smell like campfire, or have the neighbors wondering what's on fire.  
If you use GF/CF chocolate chips and GF grahams, these are also a gluten-free, dairy-free treat.

For a big batch, you will need:

1 cup chocolate chips (milk chocolate or semisweet, you choose)
one 10-oz bag regular marshmallows
1/2 cup graham cracker crumbs (I used precrushed ones) OR 4-5 crackers, crushed
Also:
A cookie sheet, an oven with a broil setting, and a sheet of parchment if you want the easiest cleanup.

Put the oven rack in the highest position.  Dump the chocolate chips into a microwaveable bowl; I used a Corelle cereal bowl.  Microwave for one minute; stir.  If it's not quite melted, microwave 30 seconds more; stir. Repeat if needed, but once you get past 2 minutes it overheats and clumps.  (You can rescue it by stirring in 1-2 tsp. oil.)

Dip the bottom half of a marshmallow into the chocolate, then dip into graham cracker crumbs.  Place on cookie sheet, at least 1/2" apart.

Turn the broiler on and put the marshmallows in.  If you have HI and LO options, here's what happened in my oven with them:

HI:  browned at 35-40 seconds.  Centers were still firm.
LO:  browned at 1 1/2- 2 minutes.  Nearly the whole marshmallow was now melted and gooey.  

Either way, watch these things closely!   Don't walk away for even a few seconds or they may be black when you get back.  Flaming marshmallows over a campfire in the dark may be entertaining, but they're not nearly as amusing in the house!

Picture
The marshmallows ready to be broiled.
0 Comments

Chocolate Pecan Toffee Bars

4/26/2014

0 Comments

 
Picture
Salty, sweet, crunchy, and chewy!  Makes one 8x8 pan.

Crust:  
3 oz pretzels (about 1 cup), crushed 
3 Tbsp. melted butter
2 Tbsp c. sugar
Bake at 350 degrees for 10 minutes or until it starts smelling delicious.

While it's baking, make the filling: 

Filling:
3 Tbsp. butter
1/2 c. packed dark brown sugar
1/8 tsp. salt
1 large egg
1/4 c. corn syrup*  (or use mild molasses and sub light brown sugar for dark, above)
1 1/2 tsp. vanilla
1 C. pecans, toasted and chopped coarsely
1 c. semisweet chocolate chips

Melt the butter in a small saucepan.  Mix in the brown sugar and salt, stirring until the butter is absorbed.  Beat in the egg, corn syrup/molasses, and vanilla.  Continue to cook and stir the mixture until it is shiny and hot to the touch but not near boiling.  Remove from heat; stir in pecans.  Pour onto the hot crust.  Bake at 350 about 25-30 minutes, until it jiggles like Jello and not like water when shaken.  Cool at least 20 minutes before cutting if you want them to keep their shape.
Picture
0 Comments

Edible Geodes

4/4/2014

0 Comments

 
Picture
These are fun.  We made them as a little homeschool science project.  EVERYONE in the family thought these were awesome, and we had enough to give a couple to some of my son's friends who are fascinated with rocks.  My next-door-neighbor, the Webelos Scout leader, pointed to a pile of broken rocks on her sidewalk.  "This,"  she said, "was what we did so the boys could feel like they might find a geode- we gave them hammers and rocks from our yard.  We should have made these instead!"

They'd love them too.

These would make some amazing and unusual Easter eggs, too:  make a bunch the same size and wrap two halves together to form a ball.

Edible Geodes
Crystal-growing solution (Rock candy syrup)
1 ½ c. sugar
½ c. water
Mix the two, heat on high in a small saucepan, and stir until the sugar completely dissolves.  Add several drops food color if you want, along with ½ tsp. flavoring (optional). Let cool a bit while you make the rock shells.

Rock Shell (Marshmallow Fondant)
8 ounces marshmallows
2-4 Tbsp. water
1 lb. powdered sugar
¼ c. coconut oil or shortening

Mix marshmallows with 2 Tb. water in a microwave-safe bowl, heat for 30 seconds in microwave.  Stir.  Microwave 30 seconds more, stir. Repeat until it’s melted and smooth.  Add the powdered sugar and mix with a spoon and then with your hands.  Spread 1 Tbsp. coconut oil on clean counter, knead the fondant on top adding more coconut oil when needed.   When smooth and stiff, take half of it and set aside.  Take other half and knead in ¼ c. cocoa powder to make fondant brown.  Roll out ¼“ thick.  Roll out the white half to the same size and stack them on top of each other.    Line a few bowls with aluminum foil, sprayed with nonstick spray.  Cut a piece of the two-layer fondant to fit, and line a bowl with it, with the brown side touching the foil.  Repeat until you run out.   Trim off any fondant that is beyond the lip of the bowl, using scissors.  Set aside.

Pour the sugar syrup into the fondant-lined bowls.  Let them sit, undisturbed, for at least a day (or 2-3 days for bigger crystals).  When ready, break the surface and pour off the syrup. Turn the geodes upside down to drain for an hour.  They’re ready! 

Picture
0 Comments

Baggie Fudge 

3/22/2014

0 Comments

 
Picture
Bonus- this fudge can be made dairy-free and still have that creamy, melt-in-your mouth texture!

This week in Joyschool I taught the kids about the process of making chocolate.  I had a library book that had pictures of each step, from cacao tree to wrapped chocolate bars, and I brought hands-on things, as well.  They got to see, smell, and taste bits of roasted cocoa beans (didn't like them!- it's like eating unsweetened chocolate but crunchier.), see and smell cocoa powder, see, smell, and have cocoa butter rubbed into their skin, we melted and molded chocolates (cute little Easter shapes)... and then made this baggie fudge.  If you're making it yourself or have careful children, a single bag is fine, but for this group that includes a few 3-year-old boys, I double-bagged it. :)  This could be a fun Family Home Evening activity AND treat. 
Our batch was made using the coconut oil and coconut cream, since 3 of the kids can't have dairy.

I had brought walnuts in the shell to use in the fudge, but the kids had so much fun cracking the nuts first and eating the bits inside that they were all gone before the fudge was ready.  It's good fudge either way!

Baggie Fudge
1/2 c. coconut oil or butter, softened or melted
1/2 c.  cocoa powder
1/3 c. coconut cream, OR 1/4 c. water and  1/2 c. nonfat dry milk powder
a pinch of salt
1 tsp. vanilla 
1 lb. powdered sugar (about 4 cups unsifted)
1/2 c. chopped nuts (optional)

Put the ingredients in a gallon-sized ziptop bag.  Put this bag inside another bag if  it seems like a good idea.  Squish, knead, or pound the bag until everything is well mixed.  (Giving the kids 30 -second turns seemed to work the best- and gave them practice counting.)  

Once it's mixed, squish the mixture into a rectangular shape near the top, making the rectangle about an inch narrower on each side than the bag.  Put the bag on a cutting board or similar surface.  Cut down one side of the bag and across the bottom with scissors. Cut fudge into squares, or use small cookie cutters to make cute shapes.  Makes about 1 1/2 pounds.

If fudge is a little too soft, let it chill in the fridge or freezer for a few minutes to firm up.


0 Comments

Cinnamon Honey Nuts

2/15/2014

0 Comments

 
Picture
These are delicious in a green salad with sour berries or salty cheese, or just by themselves.   
My grandmother has six beautiful pecan trees,  ones she and my grandpa planted when my dad was a little boy. When they visited recently, they brought a bagful of their shelled, fresh pecans for each of their adult grandchildren.   A treasure.  Pecans are my favorite nut; it might be because of the memories of the Christmastime harvest: my dad and uncles high in the pecan trees, shaking the branches while we grandchildren stuffed the fallen nuts into bags.  We'd sit around Grandma's big dining room table with some of those nuts and a nut cracker, talking, laughing, and eating those moist, mild nuts.  The bulk of the nuts, though, got hauled over to the local nut company, where they machine-shelled them for a fee.  A while later Grandma would pick up a now-shrunken bag of the best nuts in the world! 

I used pecans in this, but any nut may be used.

Cinnamon Honey Pecans
1 tsp. honey
1 Tbsp. water
dash of salt
1/4 tsp. cinnamon
1/3 c. pecans (a good handful)

Put the honey, water, salt and cinnamon in a small nonstick frying pan.  Turn heat on to medium-high.  Stir until reasonably mixed.  Add pecans and stir until the nuts are coated.  Heat, stirring often, until nuts first become dry, then begin to smell a little toasty.  

This takes somewhere around 5 minutes but can be more or less, depending on how hot your burner gets and how cold the nuts were. (I keep mine in the freezer, so mine always take on the longer side to toast.)    If in doubt, take a nut out, blow on it a bit, and eat it.  If it has a little bit of crispness to it and tastes delicious, they're done!  Remove from heat.  Cool completely before adding to a green salad.

These are a perfect ingredient in Mango Berry Salad.

0 Comments

Dulce de Leche balls (Ositos)

2/6/2014

0 Comments

 
Picture
I've been neighbors with a few Brazilians; they have been warm, kind people who have a strong affinity for desserts made with cooked sweetened condensed milk, or 'dulce de leche'.  There's a plum-caramel filling for cakes, another cake filling made with crushed pineapple and the caramel, and that's just the tip of the iceberg.  

One Christmas my Brazilian neighbor Celia brought over a plate of these creamy, sugar-coated dulce de leche balls.  When I next saw her, I asked for the recipe and what they were called.  She shrugged her shoulders, then said, "little bears, I guess".  This is a simplified version of hers, which contained strained egg yolks and 'crema media' (half-and-half), but the results are just as delicious.  Best of all, these are cooked and ready to shape within ten minutes of starting!

Ositos
1 (14 oz) can sweetened condensed milk
unsweetened cocoa powder
about 1/2 cup sugar, for rolling


Pour the sweetened condensed milk in an ungreased, very large microwave-safe bowl.  Cover the top with plastic wrap  to help avoid boilovers: this boils much higher than you would expect!, Microwave it for 2 minutes.  Stir.  Microwave for 2 more minutes.  Stir, scraping sides down.  Repeat in 2-minute intervals for a total of either 6 or 8 minutes, stirring every two minutes.  It should thicken and darken some. To see if it has cooked enough, drop a little in a cupful of icy water, then pull out after about five seconds.  However hard it gets is how hard it will be when completely cool.  It needs to be able to hold its shape.  Put the sugar in a cereal bowl and set aside.

With buttered hands, pinch off a bit and roll in a ball, about 3/4" across.To get the brown side, drop into unsweetened cocoa powder, then pick it up and drop it  into the sugar.  After you have a few in there, roll or toss to coat, then set on another dish.

Makes 30-36 balls, about 3/4" each.
0 Comments

'Clean Eating' Paleo Fudge

12/10/2013

1 Comment

 
Picture
Are you trying to eat healthier but really, really crave fudge?  This one uses healthy fats and honey.   It's also dairy-free and gluten-free for those who need to avoid those.  

Avocados are high in three amazing fats: both phytosterols and PFAs (polyhydroxylated fatty alcohols) are documented to be anti-inflammatory, and oleic acid, which helps our digestive tract absorb fat-soluble nutrients.  Coconut oil is healthy for many reasons, including being anti-inflammatory and having a high lauric acid  and medium-chain fatty acids content.  
But enough about that.

The big question is, doesn't avocado totally mess up the flavor here?

No.  I have a pretty discriminating set of tastebuds, and the only way I can detect the avocado is by a faint fruity flavor.  Because of that, some of my favorite variations of this fudge include fruit:  orange zest or oil, chopped dried cherries (and toasted almonds!), and the like.  This fudge is really only a slightly thicker version of my ChocolateTruffle Pie.

The recipe below includes both orange and pecans; if you don't want them, just omit the pecans and orange zest or orange oil.

You can also use this recipe to make truffles; cut into squares, then quickly roll each square into a ball; roll in cocoa powder or chopped nuts to coat.

Orange-Pecan Fudge            makes about 3/4 of a pound 

1 ripe avocado, peel and pit removed
1/4 c. coconut oil
1/4 c. honey
1/4 c. unsweetened cocoa powder
2 Tbsp. water
zest from half of an orange (about 1/2 Tbsp.), or 2 drops orange essential oil
3/4 tsp. vanilla
pinch of salt (1/16 tsp.)
1/4 c. toasted chopped pecans

Line a 5 1/2 x 3 loaf pan (or 2-cup rectangular or square container) with foil; spray with nonstick cooking spray.   Set aside.
Put the water, zest (should be about 1 Tbsp), honey, coconut oil, cocoa, avocado, vanilla, and salt in a blender or food processor.  Run on high for 1-2 minutes, until smooth.  Pour into prepared pan.  Cover and refrigerate 2-3 hours until set.   

Store in the refrigerator or freezer.  If freezing this, let pieces thaw about 10 minutes before serving.  I don't know how long it will keep in the fridge because it gets eaten so quickly.   But the one piece that survived us for a week and a half was still good.  Any longer than a week, though, it'd be better preserved in the freezer.  Wrap tightly.

1 Comment

Fossil Cake.  Or Brownies.

7/13/2013

0 Comments

 
Picture
My nephew just had a birthday, and having spent the day before at the Museum of Ancient Life, wanted-- what else?-- a dinosaur fossil cake.  His cake photo is at the end of the slide show below.  The version above was made of brownies.  Cookies and Cream Brownies. Mmm.

The fossil is made of melted white chocolate chips: melt a cup of them in the microwave (1 minute, stir) or over a double boiler, then put in a zip-top freezer-safe bag with a small corner snipped off (start with 1/8" hole and see if it it's big enough), or use a pastry bag and a #3 or #5 tip.  Trace onto waxed paper with an outline below, let it set up, then transfer to your dessert.  Good surfaces include chocolate frosting, unfrosted brownies or chocolate cake, a frosted cake coated with graham cracker or cookie crumbs, or anything else that resembles rock or dirt.

You can make all kinds of designs this way- when I turned my kids loose, they made  a pony (complete with chocolate jimmies on the mane and tale), a butterfly, a banana (covered in yellow sugar crystals), and a set of exploding fireworks.

At any rate, here's the recipe for the brownies, which were very moist and fudgy, with a crunchy, sweet topping:

Cookies and Cream Brownies
1 batch of your favorite brownie batter to fit a 9x13 pan (I used a Duncan Hines mix)
1 cup of vanilla pudding 
8 oz. chocolate sandwich cookies, crushed

Mix the brownie batter according to its directions; bake as usual.  When done, spread with the pudding, then sprinkle with the crushed cookies.  Press the crumbs down lightly to make them stay.  Best the first day; they get a little gooey by the second day.

If you're adding a 'fossil', wait until the brownies are completely cool.
0 Comments

Neighbor Gifts, Gingerbread Syrup and Cherry-Almond Fudge

12/21/2012

0 Comments

 
Picture
Do you want something simple to give to friends and neighbors?  Here are some quickies; if you have more time you might like Candy Cane Bread, shaped and decorated like a candy cane.  
Recipes for the fudge and the gingerbread syrup are below.

For the jars to pour syrup in, I save jars through the year: spaghetti sauce jars, pickle jars, jelly jars,baby food jars, peanut butter containers (don't use those for anyone with peanut allergies!)...
After Christmas, anything that didn't get used gets put in the recycle bin, and I have cupboard space once again!
Cherry-Almond Fudge

2 c. sugar
1/2 c. milk
7 oz. marshmallow creme (may use 7 oz. marshmallows instead)
12 oz. semisweet chocolate chips
1 tsp. almond extract
1 tsp. cherry flavor  (I used wild cherry, and it was amazing!)
1/4 c. dried cherries or cranberries, finely chopped
1/2 c. almonds, chopped

Line an 8x8 pan with parchment or foil; butter well if using foil.  Set aside.  Combine the sugar and milk in a medium saucepan.  Bring to a boil, stirring often, then boil for 3 minutes.  Pull off the heat, then add marshmallow creme, chocolate chips, almond and cherry extracts, and dried cherries.  Stir until smooth.  Pour into prepared pan, and sprinkle with chopped nuts.  
Refrigerate 1 hour or until firm, then cut into squares.  Store airtight at room temperature.

Makes just over 2 pounds.


Gingerbread Syrup 
(notice this recipe is basically the same as above, only without the marshmallow, and with extra milk to make it pourable)  If you don't have cinnamon chips, use white chocolate chips or butterscotch chips, then add 1-2 Tbsp. ground cinnamon, to taste.


2 c. sugar (can use brown sugar for deeper flavor, or add 1 Tbsp. molasses)
1 c. plus 2 Tbsp. milk
12 oz. cinnamon chips (I used Hershey's brand)
1 tsp. ground ginger OR 1 drop ginger essential oil
1/2 tsp. ground cloves OR 1 toothpick of clove oil
1/8 tsp. salt
1/2 c. pecans, toasted and finely chopped

In a medium saucepan, bring the sugar and milk to a boil, stirring occasionally.  Boil for 1 minute, then remove from heat.  Stir in cinnamon chips, ginger, cloves, salt, and stir until smooth.  Stir in pecans, then pour syrup into jars.  Store in the refrigerator.  Warm before serving.  (If too thick, microwave briefly.)

Makes about 3 1/2 cups.


0 Comments

Making Gingerbread Houses, part 1- Baking

11/17/2011

0 Comments

 
Picture
It's that time of year...

to make gingerbread houses!  Whether you want to make one for a competition, or just make something fun with your children, here's my family's tried-and-tested favorite recipe for eating AND building. (See here for a gluten-free recipe, or just substitute a GF flour blend in place of regular flour.)  We have a yearly tradition of everyone in the family decorating a small house.  If you want a recipe that will bake up thin yet strong, suitable for competition-level houses, the next couple pictures are of this one.  The eating/building recipe has more leavening and therefore a lighter crunch.  The 'building' recipe, below, is also good, but more dense.  Be sure to roll this one thinly!!!

The pattern I use most often for my family is here. 

See here for Part 2- Assembling and Decorating

Picture
For the full recipe, along with more instructions, tips, and things I've learned, it's also on the link above.  Put in a large bowl or medium saucepan: 1 1/2 c. light corn syrup, 1 1/4 c. brown sugar, and 1 cup butter.  This will be easiest if you cut each cube of butter into 5-6 chunks.

Picture
Heat in the microwave about a minute or until everything melts and can be stirred together.  If using a saucepan, heat over medium-high, stirring until the sugar and butter melt.

Picture
Add the dry ingredients to the bowl:
6 3/4 c. flour, 1 Tbsp. cinnamon, 1 1/2 tsp. ginger, 1/2 tsp. salt.

I like to grab the dry stuff with my fingers and mix lightly before mixing it with the wet, this saves the step of pre-stirring all the dry ingredients in a separate bowl first.  

Stir until everything is mixed well.

Picture
This dough will be warm and firm yet soft; it gets stiffer as it cools.  It's easiest to roll out while still warm. 
If it gets too stiff, return to the microwave for 30 seconds to rewarm it. 
   

Picture
Divide dough into 2 or three pieces.  Working with one a time, roll  directly onto parchment, if at all possible.  This will save you immeasurable aggravation! 

Picture
Try to get it an even 1/8" thick.  As you can see, this is quite thin.  The corn syrup gives this dough a lot of strength.

Picture
Put your pattern on top of the dough, and cut around each piece.  Try to have each piece touching as much as possible.  The easiest way to cut them, by far, is to use a pizza cutter or pastry wheel.

Picture
Bake until golden brown and firm to the touch.  Pull out of the oven, and IMMEDIATELY re-cut the pieces, if you need them to be exact.  They will have spread a little bit.  If you're making eight houses for your family, you can skip this step! 

Picture
My favorite part of baking gingerbread houses: eating the 'twigs', the skinny little pieces trimmed off the house parts.  They are addictive!    

Picture
To make stand-up trees, cut out two for each tree.  Cut a section out of the middle of one of the pieces, as wide as your dough is thick.  You'll 'glue' one  of these halves on the front of the whole tree, the other half on the back.        

Picture
Cool on a cooling rack.  When all the way cool, I like to stack all the pieces for one house in each stack.  Here are five houses -- what one batch of dough made-- ready to put together.

Next is the really fun part- decorating!  That is another post.
Picture
It's the little details that make gingerbread so fun!

0 Comments

Homemade Marshmallow Eggs and Chicks

4/8/2011

0 Comments

 
Picture
What a fun basket to make and give!  (or eat...)

Picture
Chocolate-covered cherry marshmallow egg.

Marshmallows are one of those things that most people don't realize you can make at home.  They are simple, pretty quick, (15 minutes if you make squares,) and superior to what you can buy.  (Most homemade things are, aren't they?) 

To get the actual recipe and to see photos of the marshmallow cooking- and beating- process, see this post.
Egg- shaped marshmallows- fill a couple 9x13 pans (or one jellyroll pan) with 1- 2” of flour.  Make egg-shaped indentions in the flour using a clean egg or the back of a large spoon.   Pour, drop by spoonfuls,  or pipe marshmallow into the indentations.  When they’re set up, dust the tops with flour, cornstarch, or powdered sugar.  Great dipped in chocolate (brush extra flour off first) and decorated.

The flour can be put back in your canister and used for something else.


Chick-shaped marshmallows (‘Peeps’)- Whip the mixture until it can hold a shape.  Put the slightly-cooled whipped marshmallow mixture into a pastry bag, no tip needed.  Or put in a gallon-sized ziptop bag, with ½” of one corner snipped off.  Sprinkle a cookie sheet with a layer of granulated sugar, colored if you like.  Squeeze the marshmallow sort of into an upright ‘Z’, pulling off to form a beak.  Make them so the sides just touch; this gives them extra support.  Sprinkle with sugar.  When set, pull apart and roll in a small bowlful of sugar. Coating them with yellow-tinted macaroon coconut would be very cute, too.

Picture
The chick on the right was made when the mixture wasn't beaten quite enough.  If you're not sure, scoop some on top of itself in the mixing bowl. If it flattens, it's not ready.  If you already made them and they're flattening-- well, you weren't really going for realism anyway. 

Don't be too hard on yourself- they still taste the same!

Picture
If you want colored sugar on your chicks: put about a cup of sugar in a ziptop bag.  Add a couple drops of food color and a couple drops of water.  Shake or rub the bag until the color is evenly distributed.

Picture
Shape the chicks by putting the marshmallow mixture into a pastry bag -or a ziptop bag with 1/2" of one corner snipped off.  Pipe them by making sort of a 'Z'.  Pull away to form a beak.  (If they look more like a sleeping elephant than a bird, you can pinch of part of the 'trunk' when they've firmed.  Or just call it "charm".)

Picture
Sprinkle more sugar over the top.  This helps them not stick to you as much when you finish coating them.

How sticky are they without a coating?  As my hubby said, "Ever hear about Brer Rabbit and the Tar Baby?"

Picture
Put a chick in a bowlful of sugar, and flip it over using a fork or spoon.  After it's completely coated, do the next one.  If you want the external chewiness you get with Peeps, let them sit uncovered for several hours.  Or a couple days.

Picture
To make marshmallow eggs:

Pour flour in a 9x13 pan.  You need a layer at least 3/4" deep.  Make egg-shaped depressions using an egg or spoon.

Picture
You can get the marshmallow into your 'molds' by using a spoon...

Picture
Or with a pastry bag.  Make your own disposable pastry bag by snipping off 1/2" from one corner of a ziptop bag.  A gallon-sized bag will fit the whole batch at once.   Let the eggs sit aside at room temperature until they're firm.  This usually takes a couple hours.  Flip them over or sprinkle with more flour so they're not sticky.  Brush off any extra, then call it good or dip them in chocolate.

Picture
Dipping chocolate or confectionary coating is the easiest option for good results.  Sometimes you just don't have it, though, and a trip to the store defeats the purpose...

This is a 12-oz bag of chocolate chips, melted with 1 Tbsp. of coconut oil.  (Use between 1 tsp. and 1 Tbsp.) Heat in the microwave for one minute, stir, and heat for another minute. Stir until smooth.  Or heat over barely simmering water. 
Chocolate chips are thicker than dipping chocolate when melted.  The extra fat is to help thin them out.  One downside is that it doesn't set up firm- or stay that way- unless it's chilled.  So store in the fridge or freezer anything you coated with this.


Picture
Drop a marshmallow egg into the chocolate.  Flip it over with a fork or your clean, DRY fingers, then lift it out, onto waxed paper or plastic wrap.  If there's so much as a tiny spot not coated by chocolate, drizzle some onto it.  The whole marshmallow can dry out through a small hole in the coating.

If you get even a tiny amount of water in melted chocolate, it will 'seize'- turn lumpy and thick. 
If this happens, add a little more oil or shortening and try to get it to smooth out.

Picture
Put the dipped eggs in the fridge for 15 minutes, or in the freezer for 5-10 minutes, until the chocolate sets up.

Picture
If you have leftover chocolate,  pour it onto waxed paper, plastic wrap, or parchment, chill until mostly set, then cut into small chunks.  Use them in place of chocolate chips.

Or turn the chocolate into truffles by stirring in 1-3 Tbsp. butter.  Pour into a foil-lined pan and chill until set. Cut in 3/4" squares and roll in powdered sugar, cocoa, or nuts.

Picture
An easy nest can be made with a lunch-size brown paper bag.  Fold the top over, then scrunch it down to make a nest shape.  Add some grass, and put in your eggs or chicks. 
I saw the paper-bag idea in Family Fun magazine  They glued twigs on, but I didn't want sticks touching the marshmallows- and this way is is much quicker and simpler.

0 Comments

Homemade Marshmallows, and What's Preparedness?

4/8/2011

3 Comments

 
Picture
Light, fluffy, and springy homemade marshmallows.

Two quotes have been on my mind lately, they are:

“Preparedness, when properly pursued, is a way of life, not a sudden, spectacular program."  - Spencer W. Kimball

* * * * * * *

“ For God hath not given us the spirit of fear; but of power, and of love, and of a sound mind.” -2 Timothy 1:7

God is aware of us, and offers his love and power, as we keep trying to become the kind of person he intends us to be.  Are we adjusting our way of life to become more self-reliant? I know he blesses us as we do.

____________________________


This is a recipe my mom made every Easter; she made marshmallow eggs, dipped them in chocolate, and decorated them with a flower and our name.  We made marshmallows other times of the year, too, in just a simple square shape.  There are recipes available that use less gelatin; they are egg-white based.  This recipe, however, is as simple and quick as you can get, and doesn’t require heating sugar syrup to soft-ball.  These are also egg-free, dairy-free, and gluten-free.  There’s even a version that uses honey instead of table sugar.  To get instructions for making marshmallow  eggs or chicks (“Peeps”), seehere.


Mom’s Marshmallows

2 c. sugar                                                                  
3 envelopes (2 Tbsp.) unflavored gelatin
1 c. water
¼  tsp. salt, optional 

1 tsp. vanilla
 Powdered sugar and/or cornstarch for dusting

Combine gelatin and sugar in a small pan, stir in water and salt, if using.  Heat just until sugar is dissolved, then bring just to boiling.  Remove from heat and cool about 5 minutes.  Stir in vanilla, transfer to a large bowl.  Beat at high speed about 10 minutes or until it looks like thick marshmallow cream.  Pour into buttered 9x13 pan.  Let set a couple hours.  With clean scissors dipped in hot water or shortening, cut into squares.  Roll in powdered sugar and/or cornstarch.  Store airtight, unless you like them crunchy!


Flavored marshmallows:  Instead of the 2 c. sugar and the gelatin, use 1 c. sugar, 1 big (6-oz) box of flavored ‘Jello’, and 1 envelope (2- 2 ½ tsp.) unflavored gelatin.

Naturally flavored marshmallows:  Use fruit juice in place of water, and reduce sugar by 1-2 Tbsp.  Use vanilla or any other complementary flavor.  Almond extract is great with cherry juice; orange oil, zest, or extract is good with strawberry, lemon oil/zest/extract with raspberry, 1 tsp. ground cinnamon with apple juice….  Just don’t use oils in an egg white-based marshmallow recipe; it won’t whip.  Jell-0 brand  gelatin says that it won’t set if you use “fresh or frozen Pineapple, Kiwi, Gingerroot, Papaya, Figs, or Guava.”  So be aware those might not make marshmallows, either.

Chocolate marshmallows:  Add 1/3 c. cocoa to the mixture before whipping. Use the optional salt.

Toasted-Coconut marshmallows- toast 1 ½ cups of fine-flake coconut.  Take any shape marshmallows, after they’ve set up, and spray them with a fine mist of water or roll them on a lightly wet surface.  Roll them in the coconut.   If you don’t have fine-flake coconut, put two cups of regular sweetened shredded coconut in a food processor.  Pulse until the pieces are mostly under ¼” long.

Honey marshmallows: use 1 cup plus 2 Tbsp. honey instead of the 2 c. sugar.  Reduce water to ¾ c.  Or use a 2/3 batch: ¾ c. honey, ½ c. water, 2 packages unflavored gelatin.  These would be good with a little lemon extract/oil, or 1 c. fine flake (macaroon) coconut stirred in at the end.  Using a couple tbsp. of lemon juice in place of some of the water may work, but having a lot of Vitamin C prevents the gelatin from setting properly.  I wouldn’t use fresh lemon for sure, only bottled.  If it doesn’t set, you’ll know why.  If it does set, I’d love to know!
Picture
This batch was made with tart cherry juice instead of water.  Normally the mixture is off-white before beating.

After you combine the gelatin, sugar, and water, you only need to bring it to a boil.  You don't need any particular temperature, just make sure the sugar and gelatin have dissolved.

Picture
Prepare your pan while the mixture cools a few minutes.  For square marshmallows, just butter a 9x13 pan.  For eggs, fill couple pans with a 1-inch-deep layer of flour.  Make egg-shaped indentations to mold your marshmallow eggs.  A clean egg from the fridge, or a big spoon for big eggs.

Picture
Pour gelatin mixture into a big bowl (a standing mixer is ideal), add vanilla, and start beating it on high speed.

Picture
This is mostly beaten.  It will set up great at this point, but if you want puffier eggs or chicks, keep beating.


Picture
This is thick and fluffy, perfect.  It holds its shape pretty well.  Pour into your prepared pan, and let set up, at room temperature, for a couple hours, until firm.

Picture
Cutting square marshmallows is easiest with  scissors.   You can dip them in hot water or grease them.  A quick way is to poke them down into a container of shortening or coconut oil.  After snipping, roll them in more powdered sugar or cornstarch.  Store tightly covered.

Picture
This is the yield of a whole batch of marshmallows.  Well, almost a whole batch.  We had to taste-test, you know...!

3 Comments

Cookbook- Miscellaneous, Pies, Quick Breads 1

4/4/2011

0 Comments

 
Picture
Different pies and piecrusts.  The card only covers cream pie varieties, but has a few different crusts.

Picture
Did you want to see closer?

This one is chocolate-peanut butter cream pie.

Picture
Apple Cider Syrup is YUMMY.  We use the recipe to make many flavors.  Our latest favorite is made using mango juice.

Picture
Crunchy on the outside, velvety on the inside, simple Drop Biscuits.  The batch pictured uses about half whole-wheat flour.

Picture
Craggy, crisp, and hearty- use the Drop Biscuit recipe to make Drop Scones.  Here, I swapped some oats for some of the flour, and stirred in chopped figs and toasted nuts.

Miscellaneous card 1 apple cider syrup, basic syrup, easy jam, cooking grains, 5-min marmalade

Miscellaneous card 2 granola, granola bars, home remedies, seasoned salt, seasoned flour, spice chart 

Pies  cream pie filling, shortbread crust, meringue, crumb crust, pat-in-pan crust, traditional crust

Quick Breads card 1  drop biscuits, English scones, biscuit mix, soft breadsticks, rolled biscuits, shortcake, biscuit dough ideas

0 Comments

Classic Candymaking

12/4/2010

0 Comments

 
Picture
Fresh fudge, made whatever flavor you feel like.  This one is Gingerbread Fudge.

Picture
Truffles, the same on the inside but rolled in cocoa, powdered sugar, and sprinkles.

I love making treats; it makes me very popular with my children and the neighbors!

Every Christmas season I make 'goodie plates' with my family, and take them to neighbors, teachers, and friends. We try to get them done by the first or second week of December.  This way mine are distributed before anyone has overindulged and decreased in their appreciation for sugar.  So far we've made lots of bread, caramels, truffles, and fudge.   See here for 
the candy recipes.

Below the list are photos and instructions for making a fun layered and swirled Chocolate Peanut Butter Fudge.

True to form, this includes basic recipes, then how to tweak them to get new flavors.  Here's what's in that file:

Buttercream Fondant
Fondant centers
Pecan logs
English Toffee

Fudge
Two-Minute Fudge
Milk Chocolate Fudge
Peanut Butter or Butterscotch Fudge
Vanilla Fudge
Cherry Vanilla Fudge
Cookies and Creme Fudge
Orange Creme Fudge (Creamsicle)
Caramel Swirl Fudge
Candy Bar Fudge
Chocolate-Peanut Butter Fudge
Mint Layer Fudge
Orange-Pecan Fudge
Peanut Butter Swirl Fudge
Rocky Road Fudge
S’mores Fudge
Strawberry Fudge
Strawberry ‘Truffle Layer’ Fudge
Toasted Coconut Fudge
Wonka Bar Fudge
Five Minute Fudge
Easy Fudge
Old-Time Fudge
Blue Ribbon Fudge

Quick Penuche
Maple-nut Fudge
Maple-nut Goodies
Molasses Fudge/Gingerbread Fudge
Quick Centers for Pecan Logs
​

Truffles
Milk Chocolate Truffles
White Chocolate Truffles
Whipped Truffles
Picture
For this batch of chocolate-peanut butter fudge, I used the Five Minute Fudge recipe but split the batch in half after adding the marshmallow.  Half of it got peanut butter, half of it got chocolate chips.  I spread the peanut butter layer into a lined pan, then topped it with the chocolate mixture.

Picture
Lining the pan with waxed paper or foil, buttered, makes it much easier to cut the fudge when finished. 

To make the peanut butter swirl, drop several small spoonfuls of plain peanut butter on top.

Picture
Tap the pan on the counter to get the peanut butter to flatten into the fudge.

Picture
Drag a knife or spoon back and forth through it to swirl a bit.

Picture
It's best to not break it up too much.  Tap the pan on the counter again to flatten the top.

Picture
Chill until it's firm, then lift the whole batch out.  Put it on a cutting board, and cut into squares. 

0 Comments

Your year's supply; Tootsie Rolls

11/26/2010

0 Comments

 
Picture
Picture
Right-click to save, it should come up full-sized once you do.  You can also find this in pdf format.  The song is on page 25.

(originally from 4/15/10

Now that the Three Month Challenge is over, the next step is finishing your year’s supply.  In agrarian cultures, it was very common to have a year’s supply, in case the next year’s harvest was insufficient- hailstorms, drought, fire, flood, damage from animals or bugs.  Since we don’t grow all our own food anymore, we sometimes become oblivious to the need to have backup.  In reality, our food situation is more precarious- it involves a large web of people, machinery, and transportation, as well as Nature, all doing their part.  If any one of these is messed with, the stores could be empty within a few days.  Food storage is great insurance and brings peace of mind.    I can’t afford to invest in gold, but I can afford wheat.  You can’t eat gold, anyway.  I’ll send a quote next week from Brigham Young about gold and wheat. 

A great article on what and how to store your long-term food is “Home Storage: Build on the Basics” from the Ensign magazine, June 1989.  Some highlights from it are:

“We continue to encourage members to store sufficient food, clothing, and where possible fuel for at least one year. We have not laid down an exact formula for what should be stored. However, we suggest that members concentrate on essential foods that sustain life, such as grains, legumes, cooking oil, powdered milk, salt, sugar or honey, and water. Most families can achieve and maintain this basic level of preparedness. The decision to do more than this rests with the individual.

“We encourage you to follow this counsel with the assurance that a people prepared through obedience to the commandments of God need not fear.” (First Presidency letter to priesthood leaders, 24 June 1988.)

If families would think in terms of storing only foods basic to survival, or if they would supplement the food storage they already have with the basics to build it up to a year’s supply, the task would be simpler than they might think. They would then be prepared for food emergencies.

A year’s supply of food storage is beneficial in several ways:

1. It provides peace of mind as we obey the counsel to store.

2. It helps ensure survival in case of personal (including financial setbacks, health issues) or natural disaster.

3. It strengthens skills in preparing and using basic foods.

No single food storage plan will work for everyone. Each family’s needs differ, as does their financial ability to accumulate the storage items. But by working under the direction of the First Presidency “to concentrate on essential foods,” it can be done. President Ezra Taft Benson has said on at least three different occasions, “The revelation to produce and store food may be as essential to our temporal welfare today as boarding the ark was to the people in the days of Noah.” (Ensign, Nov. 1980, p. 33.)”


Noah didn’t build it in a week, and he didn’t take out a loan for it… but he worked at it until it was done.


Are you building your ark?

 
* * * * * * *
The
recipe this time around is for something fun to make and eat:

 Tootsie Rolls
2 Tbsp. butter
½ c. corn syrup
¼ c. unsweetened cocoa powder
1 tsp. vanilla
3 c. powdered sugar
¾ c. dry milk powder

 Combine in a bowl, mix as much as you can with a spoon, then knead by hand.  At first it will look like a big bunch of powdered sugar that won’t ever stick together….. but keep with it, and it will.  Once it all turns brown and holds together, roll into long ‘snakes’ and cut into bite-size pieces.

These are even better the next day, and if you want them chewier, let them sit out a few days.  (Remember how old the store’s Tootsie Rolls must be…)

Vanilla Tootsie Rolls
Instead of corn syrup, use sweetened condensed milk and omit the milk powder.  Increase vanilla to 1 Tbsp.  

 
0 Comments

Gladness and Cheer, Just-Fruit-and-Nut Bars

10/27/2010

0 Comments

 
Picture
Picture
Picture
(Originally 9/2/10)

I love this time of year!  The temperatures have dropped enough that the roses are reblooming, the grass is having an easier time, and the mornings and  late evenings have the smell of earth and coolness.  The garden is in full swing, tomatoes are fragrant and sweet,  most of the lumps that come out of my garden are potatoes instead of rocks, and I get to be creative using squash again.  What a fulfilling time, enjoying the fruits of our labors (or others’ labors, if you prefer the farmers’ market or grocery store).  It brings to mind   D&C 59:18-19 “Yea, all things which come of the earth, in the season thereof, are made for the benefit and the use of man, both to please the eye and to gladden the heart;

   Yea, for food and for raiment, for taste and for smell, to strengthen the body and to enliven the soul.”

I’m grateful for the beauties of the earth that the Lord has given us, for the wonderful things he’s put here for us to wisely enjoy.  The recipe at the end of the email uses nothing but some of these things that grow for us. Enjoy!


Here is a bit from Elder Maxwell, from a talk he called “Be Of Good Cheer”- both sobering and encouraging. 


“We are living in a time in which we shall see things both wonderful and awful. There is no way that we can be a part of the last days and have it otherwise. Even so, we are instructed by our Lord and Exemplar, Jesus Christ, to “be of good cheer.” (D&C 61:36; D&C 78:18.)

Jesus has given that same instruction to others before, when the stressful circumstances in which they found themselves were anything but cheerful.

“In the world ye shall have tribulation: but be of good cheer; I have overcome the world.” (John 16:33; italics added.)

What precious perspective we obtain from the gospel of Jesus Christ concerning things that really matter—against which we measure the disappointments of the day!

Jesus calls upon us to have a deliberate trust in God’s unfolding purposes, not only for all humankind but for us individually. And we are to be of good cheer in the unfolding process. The Lord has made no secret of the fact that He intends to try the faith and the patience of His Saints. (See Mosiah 23:21.) We mortals are so quick to forget the Lord: “And thus we see that except the Lord doth chasten his people with many afflictions … they will not remember him.” (Hel. 12:3.)

Given the aforementioned grand and overarching reasons to rejoice, can we not “be of good cheer” in spite of stress and circumstance?

President Brigham Young said of a geographical destination, “This is the place.” Of God’s plan of salvation, with its developmental destination, it can be said, “This is the process”!   

(from “Be of Good Cheer” by Neal A. Maxwell,  Oct. 1982 Conference) http://lds.org/ldsorg/v/index.jsp?hideNav=1&locale=0&sourceId=1ca9c5e8b4b6b010VgnVCM1000004d82620a____&vgnextoid=2354fccf2b7db010VgnVCM1000004d82620aRCRD
If you can make the time, please read the whole thing, it’s wonderful!


Now for the recipe: these fruit/nut bars are basically the same as the old-old recipe for ‘fruit balls’ or ‘dried fruit candy’, if you’ve run across those before.  The dates are there both for sweetness and stickiness to hold the whole thing together.  

Just-Fruit-and-Nut Bars (the original 'energy bar') and naturally gluten-free!

1/3 cup chopped pecans - toasting the nuts will increase the flavor
1/3 cup chopped dates
1/3 cup chopped dried apples 

 Put the pecans in a food processor (or blender?) and chop until finely ground.  Remove and do the same with dates and apples.  Add the nuts back in, add a pinch of cinnamon, and process until it holds together.  Divide into 6 pieces, mold each one into a bar, and wrap tightly in plastic wrap, waxed paper, or parchment.  81 calories each, if you care.   (I’m thinking these things ought to be double-sized- plus I’ll make my batch with 1 cup of each ingredient.)

If you can’t have nuts: the nuts are there to give body and fat for shaping, digestibility and energy, so try a combination of chopped-up rolled oats and coconut oil (or butter)

Variations:

Apricot-Almond: use equal amounts dried apricots, dates, and almonds

Cherry Tart:  equal parts dried cherries, dates, and walnuts or almonds

Peanut Cookie: use peanuts and only dates (2/3 cup).  Add a pinch of salt and a bit of vanilla.

Cashew Cookie: same as Peanut Cookie, except use cashews.

How about using dates, dried pineapple, macadamias, then rolling in coconut?

Or use any nut and dried fruit you have, or whatever else sounds good…..

 
0 Comments

    Need a Search bar?
    One day I may upgrade my website-- but until then, use your web browser search bar. Type in my web address and what you're looking for, like this-- 
    www.theprovidenthomemaker.com  pumpkin --  and you should get results.


    Author

    I'm a disciple of Christ, a member of the Church of Jesus Christ of Latter-day Saints, a family-defending, homemaking, and homeschooling mom of eight children, two of whom sometimes can't have milk or wheat. Growing up on a farm in a high mountain valley, my parents taught me to 'make do', work hard, smile, and help others.  I love cooking, learning, growing food and flowers, picking tomatoes, and making gingerbread houses --which CAN be made allergy-friendly-- with my children.  I hope you find something to help you on my site!

    Archives

    April 2024
    July 2023
    April 2022
    September 2021
    March 2021
    December 2020
    April 2020
    March 2020
    February 2020
    January 2020
    December 2019
    November 2019
    October 2019
    September 2019
    August 2019
    July 2019
    June 2019
    May 2019
    April 2019
    January 2016
    November 2015
    October 2015
    September 2015
    March 2015
    February 2015
    November 2014
    October 2014
    September 2014
    August 2014
    July 2014
    June 2014
    May 2014
    April 2014
    March 2014
    February 2014
    January 2014
    December 2013
    November 2013
    October 2013
    September 2013
    August 2013
    July 2013
    June 2013
    May 2013
    April 2013
    March 2013
    February 2013
    January 2013
    December 2012
    November 2012
    October 2012
    September 2012
    August 2012
    July 2012
    June 2012
    May 2012
    April 2012
    March 2012
    February 2012
    January 2012
    December 2011
    November 2011
    October 2011
    September 2011
    August 2011
    July 2011
    June 2011
    May 2011
    April 2011
    March 2011
    February 2011
    January 2011
    December 2010
    November 2010
    October 2010
    September 2010

    Categories

    All
    Alcohol
    Alternate Cooking
    Appearances
    Apple
    Apricots
    April Fools
    Aprons
    Bananas
    Beans
    Beef
    Beets
    Bench
    Beverages
    Bonnet
    Bread
    Breakfast
    Budget
    Budgeting
    Cake
    Candy
    Canning
    Carrots
    Cheese
    Chicken
    Children
    Chocolate
    Christmas
    Cleaning
    Coconut
    Comfrey
    Common Core
    Constitution
    Cookbook
    Cookies
    Cooking Oil
    Crafts
    Dairy Substitutions
    Dehydrating
    Dessert
    Dried Fruit
    Earth Oven
    Earthquake
    Easter
    Edible Weeds
    Eggs
    Emergency Prep
    Essential Oils
    Faith
    Family Home Evening
    Fertilizing
    Food Storage
    Fourth Of July
    Freezer
    Frosting
    Fudge
    Garden
    Gardening
    Gingerbread
    Gluten
    Gluten Free
    Gold
    Government
    Grains
    Gratitude
    Hat
    Herbs
    Home Remedies
    Home Repairs
    Homeschool
    Home Storage
    Honey
    Hope
    Inflation
    Leftovers
    Legumes
    Lemon
    Main Dishes
    Mixes
    Mothers
    Noah
    Non Artificial Colors
    Non-artificial Colors
    Nuts
    Oats
    Oil
    Orange
    Paint
    Peaches
    Pear
    Pie
    Pizza
    Plums
    Poem
    Popcorn
    Pork
    Potatoes
    Powdered Milk
    Prayer
    Preparedness
    Projects
    Prophecy
    Pruning
    Pumpkin
    Quick Bread
    Rhubarb
    Rice
    Salad
    Salt
    Sauces
    Self Reliance
    Self-reliance
    Sewing
    Shelf Life
    Shelves
    Sky
    Smoothie
    Snacks
    Soup
    Spices Or Seasonings
    Squash
    Strawberries
    Substitutions
    Sugar
    Summer Fun
    Three Month Supply
    Time
    Tomatoes
    Trees
    Truffles
    T-shirts
    Tuna
    Ultra Gel
    Valentine\'s Day
    Vegetables
    Water
    Watermelon
    Wheat
    Work
    Year Supply
    Zucchini

    RSS Feed

Web Hosting by iPage