The Provident Homemaker
  • Recipes and Info
    • Making Bread
  • My Blog
  • Favorite Resources
  • Documents and Files
  • 52 Weeks of Building Storage

Indoor S'Mores

7/17/2014

0 Comments

 
Picture
The fastest, simplest S'mores ever!  My 6-year-old had a blast making these nearly by herself.  If you have a toaster oven, you can make just a few and hardly heat the kitchen up at all.  Even a big batch doesn't make your whole kitchen hot, or make you smell like campfire, or have the neighbors wondering what's on fire.  
If you use GF/CF chocolate chips and GF grahams, these are also a gluten-free, dairy-free treat.

For a big batch, you will need:

1 cup chocolate chips (milk chocolate or semisweet, you choose)
one 10-oz bag regular marshmallows
1/2 cup graham cracker crumbs (I used precrushed ones) OR 4-5 crackers, crushed
Also:
A cookie sheet, an oven with a broil setting, and a sheet of parchment if you want the easiest cleanup.

Put the oven rack in the highest position.  Dump the chocolate chips into a microwaveable bowl; I used a Corelle cereal bowl.  Microwave for one minute; stir.  If it's not quite melted, microwave 30 seconds more; stir. Repeat if needed, but once you get past 2 minutes it overheats and clumps.  (You can rescue it by stirring in 1-2 tsp. oil.)

Dip the bottom half of a marshmallow into the chocolate, then dip into graham cracker crumbs.  Place on cookie sheet, at least 1/2" apart.

Turn the broiler on and put the marshmallows in.  If you have HI and LO options, here's what happened in my oven with them:

HI:  browned at 35-40 seconds.  Centers were still firm.
LO:  browned at 1 1/2- 2 minutes.  Nearly the whole marshmallow was now melted and gooey.  

Either way, watch these things closely!   Don't walk away for even a few seconds or they may be black when you get back.  Flaming marshmallows over a campfire in the dark may be entertaining, but they're not nearly as amusing in the house!

Picture
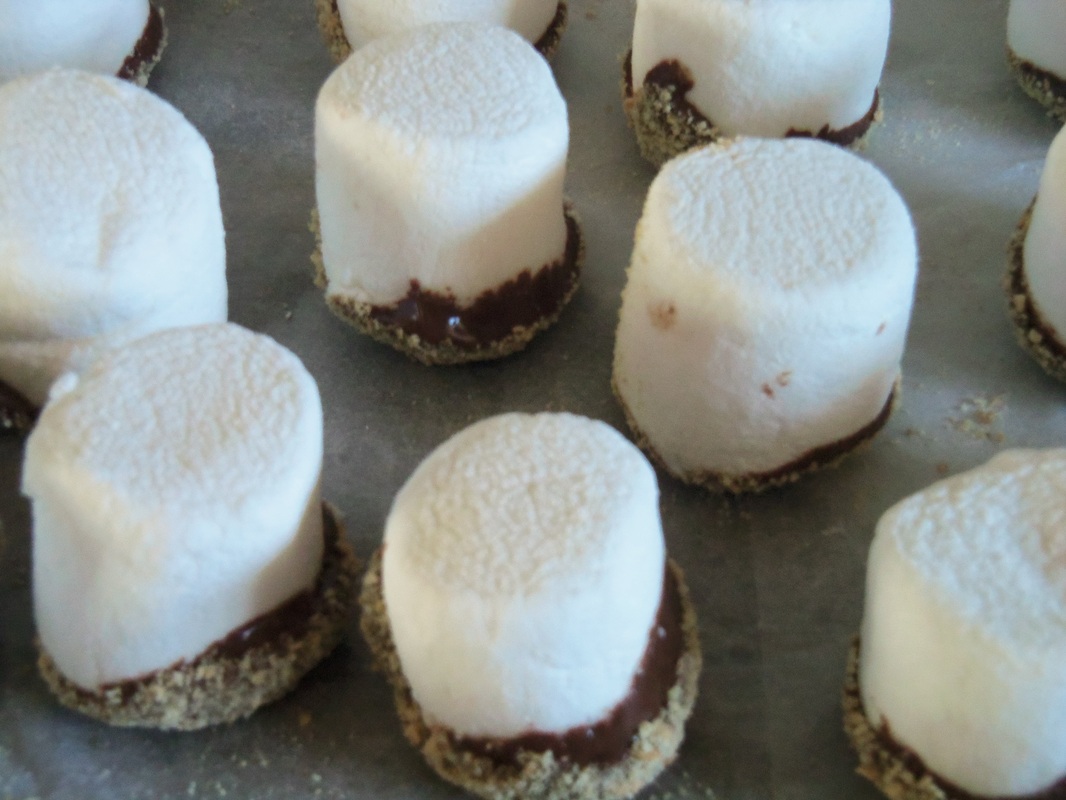
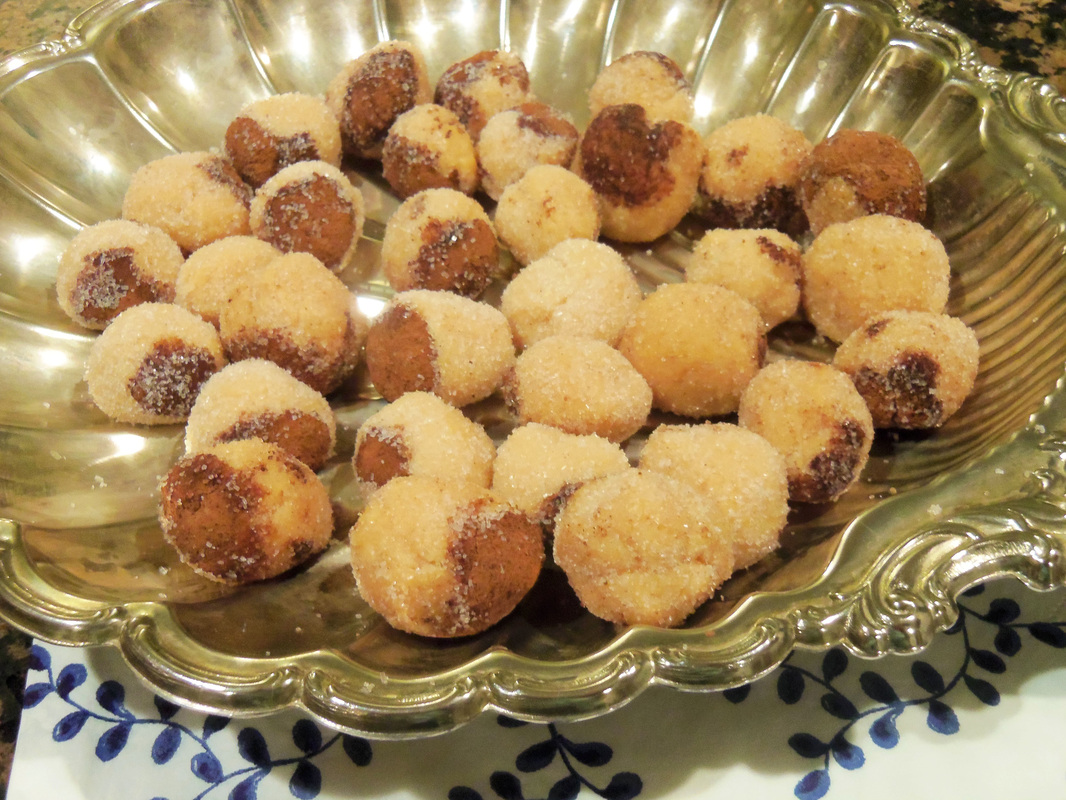
The marshmallows ready to be broiled.
0 Comments

Cookie Pizza

7/5/2014

0 Comments

 
Picture
The monthly envelope full of local ads and coupons arrived a couple days ago.  As I flipped through it, one summery dessert caught my eye:  a dessert pizza.  It was an advertisement for a local pizza buffet, "only" $5.99 for the buffet.  
Well, we have 7 people at home, so $6 x 7 is not something we're willing to spend very often.  :)  Instead, I could make this for under $4 with what I had on hand.  Frozen blueberries and strawberries are always in the freezer here; I get them at DollarTree in the frozen section.  Cream cheese stores way beyond its sell-by date, so I stock up when it's $1 for 8 ounces.  A local store recently had whipping cream at $.33, and it stores quite a bit past the sell-by date, plus it can be frozen.  And I stock up on butter when it's on sale, then keep it in the freezer.

What are some of your must-have-on-hand ingredients?

Cookie base
1 stick butter (1/2 c.), softened
1 c. sugar
1 egg
1/3 c. buttermilk, kefir, OR sour milk (add 1 Tbsp. lemon juice to fresh milk to make 1/3 c.)
1 tsp. vanilla
1/2 tsp. baking soda
1 tsp. baking powder
1/2 tsp. salt
2 1/2 c. flour

Preheat oven to 375 degrees F.  Cream the butter with sugar; beat in the egg, buttermilk, and vanilla.  Combine baking soda, baking powder, salt, and flour; stir in to the other ingredients.  Grease or spray a 10x17 rimmed cookie sheet or 14" or 15" round pizza pan.  Drop cookie dough on top and pat into an even layer; wet your fingers so the dough doesn't stick so much to you.  Bake for 14-20 minutes, until light golden brown on edges and underside.  Cool completely.  

Topping/Frosting 
3 oz cream cheese
1/4 c. sugar
1/2 cup whipping cream
1 tsp. vanilla

2-4 cups berries or other fruit (I used 1 cup frozen blueberries, about 1 1/2 c. frozen strawberries)

Spread the topping over cooled cookie, cut into squares, and then sprinkle or decorate with fruit.  Serve; cover and refrigerate any leftovers.
Picture
Picture
0 Comments

Refreshing Watermelon Salad

6/21/2014

0 Comments

 
Picture
Sometimes you pick a perfect watermelon:  firm, juicy, sweetness dripping from every piece.  Sometimes the melon could use a little bit of help.  Or sometimes you just want a little variety in the flavor department.

Several years ago I found a recipe for a lemon-and-mint-infused syrup to pour over watermelon, or over a mixture of watermelon, cantaloupe, and honeydew.  It took a few hours to make the syrup, though.  Now that I have essential oils on hand, the flavor base takes almost no time at all!

Citrus-Mint Watermelon Salad
(enough syrup for 4-8 lbs melon while weighed with the rinds still on)

1/4 c. sugar (OR 3 Tbsp. honey)
2 Tbsp. lemon juice
1-3 drops mint essential oil (1 for subtle flavor, 3 for very noticeable)
6 drops any combination of citrus oils (lime, orange, lemon, grapefruit... I used 3 drops lime oil, 3 drops grapefruit oil)

Stir together the sugar and lemon juice; bring to a boil, stirring just until sugar is dissolved.  If using honey, there is no need to heat it; just stir the honey and lemon together.
Let the syrup cool slightly (if the sugar version), then add mint and citrus oils.

Pour over cut-up melon- plain watermelon or a combination of melons- and stir well to coat.

This would make a fun Fourth of July salad if you added some fresh blueberries to the watermelon.  

BONUS:  the juice left in the bottom is delicious plain (you might prefer it diluted with some water) or added to smoothies.

0 Comments

No-bake cheesecake

5/23/2014

1 Comment

 
Picture
This is a refrigerator cheesecake; no baking needed!  It takes only about ten minutes until the filling is set enough to serve. This one has a rhubarb topping, but use whatever you like on the top!  The cheesecake can be made gluten-free, and this version is sweetened with honey.  It can even be dairy-free if you have a nondairy substitute for cream cheese; use any milk you prefer in place of the milk called for in this recipe.
This makes one 8x8 pan or one 8" pie pan.  Pick your shape.  :)

Crust:
3/4 c. quick-cooking oats (GF if needed)
1/4 c. oat flour (whirl oats in the blender until powdered)
2 Tbsp. coconut oil (melted) or butter
1 Tbsp. honey, liquid

Stir all four ingredients together, then press into the bottom of an 8x8 pan or up the sides then along the bottom of an 8" pie plate.  Put it in the freezer to firm up while you make the filling.

Filling:
6 oz. cream cheese, softened
3 Tbsp. honey
2 Tbsp. lemon juice (fresh is best)
pinch of salt
1 tsp. vanilla1/2 cup evaporated milk, half-and-half, or whipping cream (or coconut cream)
2 Tbsp. Ultra Gel

Beat the cream cheese until softened, then mix in the honey, lemon juice, salt, and vanilla; beat until smooth.  Gradually add the  milk/cream and Ultra Gel; beat until thick and fluffy.  Spread evenly over the chilled crust.  Let chill for at least 5-10 minutes away if you like. Store any leftovers in the refrigerator.

Lemon Topping:  1/4 c. lemon marmalade (use this recipe, substituting lemons for orange), thinned with just enough water to make it a sauce.

Rhubarb Topping:
1 c. chopped rhubarb (about 1 big stalk)
1/4 c. water
1 1/2 - 2 Tbsp. honey, to taste

Combine in a microwave-safe bowl.  Microwave for two minutes; stir.  Repeat until the rhubarb is soft.  Mash and taste to see if it's sweet/tart enough for you.  
Picture
1 Comment

Homemade Anna and Elsa dolls

5/3/2014

0 Comments

 
Picture
My 11-year-old daughter had decided she really, really wanted some Frozen dolls.  However, having used all her spending money previously on a couple plush My Little Pony toys, the ones we found were way out of her price range.

She flipped through a girls' sewing book, spent a couple days thinking about how to possibly make the dolls instead, and came up with this plan:  find a picture, use it for a pattern, sew two identical pieces together, color, stuff, and stitch closed.

We used plain white knit fabric from my fabric stash so the doll would be softer and a little more forgiving, stuffed it with plain old fiberfill For the Anna doll, we used this coloring page 
Elsa:  in her coronation dress, or with one hand out.  (The one hand out was pretty tricky to turn right-side out, but it worked.)

You'll need a picture, 1/3 yd of fabric (for 11" high dolls, but you'll have enough width for 4 dolls!), needle and thread, sewing machine (optional), a handful or two of fiberfill, and some non-water-soluble markers  (we used a combination of Sharpies and fabric markers).

1- Resize the picture to make the size doll you'd like. 
2- Add 3/8" all the way around the picture*, for a seam allowance, and cut this paper pattern.
3- Pin onto a double layer of fabric, and cut this out.
4- Unpin the pattern from the fabric, take ONE of the fabric pieces, put the pattern piece behind it, hold it up on a window, and, using a Sharpie or fabric marker, trace all the lines you'll need to color later.  Draw in the facial features, neck, dress design, etc. Invent what the back should look like, for the second fabric piece. :)
5- Put the right sides (drawn-on sides) together, and sew 3/8" from the edge, almost all the way around.  Be sure to backstitch when you start and stop!  Leave 2" open.
6- Turn the fabric right-side out, stuff with a handful of fiberfill.
7- Turn the raw edges of the opening inward, and stitch closed, knotting well at both ends.  
8- Color your doll with the markers, front, back, and sides.

*On the coloring pages, the necks are too narrow to pull the rest of the body through when turning the fabric right-side-out after sewing, so shoot for a finished measurement of 1" wide, and just draw the neck the width it should be.

She had a lot of fun marking these- so much that she also made Kristof and Olaf the same way.  

The only question she has left is how much of the ink will survive their first trip through the washer and dryer!

Picture
Picture
0 Comments

Chocolate Pecan Toffee Bars

4/26/2014

0 Comments

 
Picture
Salty, sweet, crunchy, and chewy!  Makes one 8x8 pan.

Crust:  
3 oz pretzels (about 1 cup), crushed 
3 Tbsp. melted butter
2 Tbsp c. sugar
Bake at 350 degrees for 10 minutes or until it starts smelling delicious.

While it's baking, make the filling: 

Filling:
3 Tbsp. butter
1/2 c. packed dark brown sugar
1/8 tsp. salt
1 large egg
1/4 c. corn syrup*  (or use mild molasses and sub light brown sugar for dark, above)
1 1/2 tsp. vanilla
1 C. pecans, toasted and chopped coarsely
1 c. semisweet chocolate chips

Melt the butter in a small saucepan.  Mix in the brown sugar and salt, stirring until the butter is absorbed.  Beat in the egg, corn syrup/molasses, and vanilla.  Continue to cook and stir the mixture until it is shiny and hot to the touch but not near boiling.  Remove from heat; stir in pecans.  Pour onto the hot crust.  Bake at 350 about 25-30 minutes, until it jiggles like Jello and not like water when shaken.  Cool at least 20 minutes before cutting if you want them to keep their shape.
Picture
0 Comments

Chocolate Fudge Banana Muffins

4/12/2014

0 Comments

 
Picture
Warm, chocolatey, just sweet enough, high fiber, and with little pockets of gooey melted chocolate chips!   My sister-in-law posted a similar recipe on Facebook.  It sounded delicious and had very little added sugar.  The original recipe called for applesauce instead of oil, but I'm a fan using healthy fats alongside carbohydrates so that my kids and I aren't hungry again an hour after breakfast!  It helps you process the fiber in these, too.

Chocolate Fudge Banana Muffins - makes 12
(can be gluten-free and dairy-free)

3 medium bananas, very ripe, mashed (about 1 cup)
2 eggs
1/4 brown sugar
1/4 c. oil or melted butter (I like coconut oil in these)
1/3 c. cocoa powder
1 tsp. vanilla
1 1/3 c. oat flour (or you can use all-purpose flour or whole wheat flour)
1/2 tsp. baking soda
1 1/2 tsp. baking powder
1/2 tsp. salt
chocolate chips, optional (1/4- 1/2 cup)

Preheat oven to 350 degrees.  Grease a 12-cup muffin tin.  
Whisk together eggs and brown sugar.  Mix in the oil, cocoa powder, and vanilla.  Mix the dry ingredients and add to the wet.  Stir in chocolate chips.

Divide between the muffin cups; bake about 17-23 minutes, or until the top of a muffin springs back lightly when gently pressed.
0 Comments

Edible Geodes

4/4/2014

0 Comments

 
Picture
These are fun.  We made them as a little homeschool science project.  EVERYONE in the family thought these were awesome, and we had enough to give a couple to some of my son's friends who are fascinated with rocks.  My next-door-neighbor, the Webelos Scout leader, pointed to a pile of broken rocks on her sidewalk.  "This,"  she said, "was what we did so the boys could feel like they might find a geode- we gave them hammers and rocks from our yard.  We should have made these instead!"

They'd love them too.

These would make some amazing and unusual Easter eggs, too:  make a bunch the same size and wrap two halves together to form a ball.

Edible Geodes
Crystal-growing solution (Rock candy syrup)
1 ½ c. sugar
½ c. water
Mix the two, heat on high in a small saucepan, and stir until the sugar completely dissolves.  Add several drops food color if you want, along with ½ tsp. flavoring (optional). Let cool a bit while you make the rock shells.

Rock Shell (Marshmallow Fondant)
8 ounces marshmallows
2-4 Tbsp. water
1 lb. powdered sugar
¼ c. coconut oil or shortening

Mix marshmallows with 2 Tb. water in a microwave-safe bowl, heat for 30 seconds in microwave.  Stir.  Microwave 30 seconds more, stir. Repeat until it’s melted and smooth.  Add the powdered sugar and mix with a spoon and then with your hands.  Spread 1 Tbsp. coconut oil on clean counter, knead the fondant on top adding more coconut oil when needed.   When smooth and stiff, take half of it and set aside.  Take other half and knead in ¼ c. cocoa powder to make fondant brown.  Roll out ¼“ thick.  Roll out the white half to the same size and stack them on top of each other.    Line a few bowls with aluminum foil, sprayed with nonstick spray.  Cut a piece of the two-layer fondant to fit, and line a bowl with it, with the brown side touching the foil.  Repeat until you run out.   Trim off any fondant that is beyond the lip of the bowl, using scissors.  Set aside.

Pour the sugar syrup into the fondant-lined bowls.  Let them sit, undisturbed, for at least a day (or 2-3 days for bigger crystals).  When ready, break the surface and pour off the syrup. Turn the geodes upside down to drain for an hour.  They’re ready! 

Picture
0 Comments

Coconut Cake- using coconut flour and agave

4/1/2014

0 Comments

 
Picture
This gluten-free cake is high in fiber, but you'd never know it when eating it.  It just tastes like a moist coconut cake.  It also has a delicious cream cheese frosting that you can sweeten using agave or honey, and a lemon-cream cheese filling between the layers.  This makes a small cake, 6" round if two layers, or a single 8" layer:  a much better size for most people!

Coconut Cake:

4 large eggs
1/2 c. melted coconut oil
1/2 c. agave nectar
1 Tbsp. vanilla
1 tsp. coconut extract
1/2 c. coconut flour
1 tsp. baking soda (this is too much, I can taste it and the cake overbrowned)
1/4 tsp. salt
1/8 tsp. xanthan gum
1/2 c. shredded coconut, either sweetened or unsweetened
Cream Cheese Agave Frosting (recipe below)
1 1/2 Tbsp. orange or lemon marmalade
1 cup sweetened shredded coconut 

Preheat oven to 350 degrees.  Grease sides and line bottom of a 6" round pan* with a circle of parchment paper.  Set aside.

Whisk eggs until light in color and a little foamy, about 2 minutes.  Add the coconut oil, agave, vanilla, and coconut extract; mix well.  Add coconut flour, then put the baking soda, salt, and xanthan gum on top of the coconut flour, and mix all together.  The batter will be very thin at first, but will thicken within minutes as the coconut flour begins absorbing liquid.  Stir in the 1/2 c. shredded coconut.

Pour into the prepared pan.  Bake until center no longer jiggles and toothpick inserted in center comes out clean, about 45 minutes.  Run a knife around the outside edge of the cake to loosen it.  Cool cake, in the pan, on a cooling rack for 10 minutes.  Remove from pan/s and cool completely.

When cool, split the 6" cake into two layers.  Frost the first half with lemon-cream cheese filling.  Place the other layer on top of the filling, then frost the entire cake.   Pat coconut onto the sides of the cake, then sprinkle it all over the top.
  
*If you don't have a 6" round, you may use either one 8" round (reduce baking time to about  30- 35 minutes), a 9x5 loaf pan (about the same baking time), 12-15 cupcakes (about 30-35 min. of baking), or four 4" round pans (reduce baking time to  18-20 minutes each).

Cream Cheese Agave Frosting:  use the recipe for Fluffy Honey-Cheesecake Frosting, except substitute agave for the honey.

To make the lemon-cream cheese filling (or orange-cream cheese filling), take  3/4 cup of the Cream Cheese Agave Frosting and put it in a small bowl.  Add 1 1/2 Tbsp. marmalade and stir.  
0 Comments

Baggie Fudge 

3/22/2014

0 Comments

 
Picture
Bonus- this fudge can be made dairy-free and still have that creamy, melt-in-your mouth texture!

This week in Joyschool I taught the kids about the process of making chocolate.  I had a library book that had pictures of each step, from cacao tree to wrapped chocolate bars, and I brought hands-on things, as well.  They got to see, smell, and taste bits of roasted cocoa beans (didn't like them!- it's like eating unsweetened chocolate but crunchier.), see and smell cocoa powder, see, smell, and have cocoa butter rubbed into their skin, we melted and molded chocolates (cute little Easter shapes)... and then made this baggie fudge.  If you're making it yourself or have careful children, a single bag is fine, but for this group that includes a few 3-year-old boys, I double-bagged it. :)  This could be a fun Family Home Evening activity AND treat. 
Our batch was made using the coconut oil and coconut cream, since 3 of the kids can't have dairy.

I had brought walnuts in the shell to use in the fudge, but the kids had so much fun cracking the nuts first and eating the bits inside that they were all gone before the fudge was ready.  It's good fudge either way!

Baggie Fudge
1/2 c. coconut oil or butter, softened or melted
1/2 c.  cocoa powder
1/3 c. coconut cream, OR 1/4 c. water and  1/2 c. nonfat dry milk powder
a pinch of salt
1 tsp. vanilla 
1 lb. powdered sugar (about 4 cups unsifted)
1/2 c. chopped nuts (optional)

Put the ingredients in a gallon-sized ziptop bag.  Put this bag inside another bag if  it seems like a good idea.  Squish, knead, or pound the bag until everything is well mixed.  (Giving the kids 30 -second turns seemed to work the best- and gave them practice counting.)  

Once it's mixed, squish the mixture into a rectangular shape near the top, making the rectangle about an inch narrower on each side than the bag.  Put the bag on a cutting board or similar surface.  Cut down one side of the bag and across the bottom with scissors. Cut fudge into squares, or use small cookie cutters to make cute shapes.  Makes about 1 1/2 pounds.

If fudge is a little too soft, let it chill in the fridge or freezer for a few minutes to firm up.


0 Comments

Moist, refined sugar free, grain-and-gluten-free Chocolate Quinoa Cupcakes

3/14/2014

0 Comments

 
Picture
A friend recently shared this delicious recipe with me.  Since I wanted to make cupcakes for a friend who can only handle sweeteners like honey and agave, it was time to tweak the recipe.  You can find the original, sugar-sweetened, recipe here, if you want to compare it to my version. As cupcakes, they needed more moisture than the original, plus a couple things needed adjusted to allow for honey.  And I discovered that the amount of water your quinoa was cooked in makes a huge difference in whether they're dry, moist, or collapse when baking.   (Not to worry, the problem should be solved now!)   Quinoa is technically a seed and not a grain.

I tried really hard to find a way to use just the blender to make the batter, and not need both it and a bowl, but the batter puffs up so much once the leavening is added, that it just didn't work out that way .  Oh well.

Everyone who has tried these loves them.

Moist Chocolate Quinoa Cupcakes

1/2 c. uncooked quinoa*
1 1/4 c. water 
1/3 c. any kind of milk (dairy, almond or coconut are fine)
4 large eggs
1 tsp. vanilla
3/4 c. melted coconut oil or other liquid vegetable oil
2/3 c. honey
a few drops of orange essential oil, or the washed peel of one clementine, optional
1 c. unsweetened cocoa powder
1 1/2  tsp. baking powder
1/2 tsp. salt

Cook the quinoa, covered, in the 1 1/4 cups water:  either combine in the microwave or stovetop.  To microwave,  put them in a microwave-safe bowl, cover, then cook for 5 minutes at full power, then 5 minutes at 50% power.  For stovetop:  combine in a pan that has a tight-fitting lid.  (If the lid isn't, use 1 1/2 cups water to compensate for what will evaporate.)  Bring to a boil, reduce to a simmer, and let simmer for 20 minutes, until water is all absorbed.
*or use 2 cups cooked quinoa and omit the water.

Preheat oven to 375 degrees.  Put liners in 18-24 cupcake tins, depending on how high you want the cupcakes.

Combine in a blender the cooked quinoa, milk, eggs, vanilla, oil, honey, and orange oil/peel if using it.  Blend until smooth.   Mix the cocoa powder, baking powder, and salt in a medium bowl.   Pour the quinoa mixture over the top, and stir until well-combined.  Spoon into cupcake liners, or use a spring-loaded ice cream scoop instead to portion out the batter.

For an easy, sweet topping, sprinkle each cupcake before baking with a few semisweet chocolate chips and chopped pecans or other nut.

Bake for about 20 minutes, until the top of a cupcake springs back when lightly pressed with a finger.

Frost with your favorite frosting if you like, or  try any of these.   The cupcakes above are frosted with whipped coconut cream with melted chocolate beaten in:  use 1 cup of chilled coconut cream and 1 cup melted semisweet chocolate.  Whip the cream until it starts to hold soft peaks, then add in the chocolate plus a teaspoon of vanilla and a pinch of salt.  Beat until fluffy and smooth.


0 Comments

No-pectin, No-refined sugar Strawberry Jam

2/26/2014

0 Comments

 
Picture
This is a great fresh jam to eat fresh. It also freezes well, so is a good freezer jam.  Since the berries are not cooked and there's not enough sugar to help preserve it, its fridge life is fairly short.  If you're keeping it in the fridge, try to use it within about a week.  If left too long, it will get moldy (you'll know if it does!)   But it's SO GOOD fresh!  My eight-year-old made a batch two nights ago; we ran out yesterday.  I made another batch this morning, and between spreading it on our pancakes at breakfast, and using it on warm bread this afternoon, it's gone again!

Pectin-free Strawberry Freezer Jam
1 pound strawberries, washed and hulled (green parts pulled off)
2 Tbsp. honey (or to taste; use any sweetener you prefer)
2 Tbsp. chia seeds, OR 1 Tbsp. ground flax seeds

Mash the berries with a fork, or chop in a blender until they're the consistency you want.  Stir in the honey (or other sweetener) and the chia.
 After this sits for about half an hour, the chia (or flax) will gel as they absorb the extra liquid.  Keep refrigerated or frozen.

Makes about 2 1/4 cups.

Come to think of it, a drop or two of orange essential oil would be really, really goo
0 Comments

Mango Berry Salad

2/22/2014

0 Comments

 
Picture
We have a favorite salad... at a local place called Zupas.  I found a recipe online that a lady had tweaked a little, and I've tweaked it a little more!   The original salad uses strawberries where I used blackberries, but I used what I had: blueberries and blackberries were $.99/cup at NPS.

Sometimes DollarTree has frozen mango chunks, 12 ounces for a dollar. The trick is to visit the store within a week of when they get their monthly frozen shipment.

Mango Berry Salad
Salad:
8-10 cups greens (I used green leaf lettuce)
1-2 cups chopped fresh strawberries (or other slightly sour berry)
1 cup fresh blueberries
1 fresh mango, cubed, or 1 cup frozen mango, diced and mostly thawed
1/3 cup cinnamon honey nuts
 
Combine in a large bowl in the order given.

Creamy Mango Dressing:
1/2 c.Greek yogurt* (plain or something mild like vanilla) 
2 Tbsp. lemon juice or balsamic vinegar
1 fresh mango, pitted and peeled, or 1 cup frozen mango, mostly thawed
1/4 tsp. salt

 Combine in a blender until smooth.  If too tart, sweeten with a little honey.  Makes about 1-1/4 cups. Drizzle  about 1/2 cup over salad; toss to coat.  Serve salad with additional dressing on the side, or save the rest for another day .

*for a dairy-free option, use coconut cream (NOT cream of coconut, which is sweetened)
0 Comments

Cinnamon Honey Nuts

2/15/2014

0 Comments

 
Picture
These are delicious in a green salad with sour berries or salty cheese, or just by themselves.   
My grandmother has six beautiful pecan trees,  ones she and my grandpa planted when my dad was a little boy. When they visited recently, they brought a bagful of their shelled, fresh pecans for each of their adult grandchildren.   A treasure.  Pecans are my favorite nut; it might be because of the memories of the Christmastime harvest: my dad and uncles high in the pecan trees, shaking the branches while we grandchildren stuffed the fallen nuts into bags.  We'd sit around Grandma's big dining room table with some of those nuts and a nut cracker, talking, laughing, and eating those moist, mild nuts.  The bulk of the nuts, though, got hauled over to the local nut company, where they machine-shelled them for a fee.  A while later Grandma would pick up a now-shrunken bag of the best nuts in the world! 

I used pecans in this, but any nut may be used.

Cinnamon Honey Pecans
1 tsp. honey
1 Tbsp. water
dash of salt
1/4 tsp. cinnamon
1/3 c. pecans (a good handful)

Put the honey, water, salt and cinnamon in a small nonstick frying pan.  Turn heat on to medium-high.  Stir until reasonably mixed.  Add pecans and stir until the nuts are coated.  Heat, stirring often, until nuts first become dry, then begin to smell a little toasty.  

This takes somewhere around 5 minutes but can be more or less, depending on how hot your burner gets and how cold the nuts were. (I keep mine in the freezer, so mine always take on the longer side to toast.)    If in doubt, take a nut out, blow on it a bit, and eat it.  If it has a little bit of crispness to it and tastes delicious, they're done!  Remove from heat.  Cool completely before adding to a green salad.

These are a perfect ingredient in Mango Berry Salad.

0 Comments

Dulce de Leche balls (Ositos)

2/6/2014

0 Comments

 
Picture
I've been neighbors with a few Brazilians; they have been warm, kind people who have a strong affinity for desserts made with cooked sweetened condensed milk, or 'dulce de leche'.  There's a plum-caramel filling for cakes, another cake filling made with crushed pineapple and the caramel, and that's just the tip of the iceberg.  

One Christmas my Brazilian neighbor Celia brought over a plate of these creamy, sugar-coated dulce de leche balls.  When I next saw her, I asked for the recipe and what they were called.  She shrugged her shoulders, then said, "little bears, I guess".  This is a simplified version of hers, which contained strained egg yolks and 'crema media' (half-and-half), but the results are just as delicious.  Best of all, these are cooked and ready to shape within ten minutes of starting!

Ositos
1 (14 oz) can sweetened condensed milk
unsweetened cocoa powder
about 1/2 cup sugar, for rolling


Pour the sweetened condensed milk in an ungreased, very large microwave-safe bowl.  Cover the top with plastic wrap  to help avoid boilovers: this boils much higher than you would expect!, Microwave it for 2 minutes.  Stir.  Microwave for 2 more minutes.  Stir, scraping sides down.  Repeat in 2-minute intervals for a total of either 6 or 8 minutes, stirring every two minutes.  It should thicken and darken some. To see if it has cooked enough, drop a little in a cupful of icy water, then pull out after about five seconds.  However hard it gets is how hard it will be when completely cool.  It needs to be able to hold its shape.  Put the sugar in a cereal bowl and set aside.

With buttered hands, pinch off a bit and roll in a ball, about 3/4" across.To get the brown side, drop into unsweetened cocoa powder, then pick it up and drop it  into the sugar.  After you have a few in there, roll or toss to coat, then set on another dish.

Makes 30-36 balls, about 3/4" each.
0 Comments

Really good whole wheat bread without a grain mill

1/29/2014

2 Comments

 
Picture
Do you have wheat stored, but haven't been able or willing to spend $250 on a grain mill?  Have you wondered if there's a way to make bread with it anyhow?  THERE IS!   This bread is moist, tender, with a good crumb and impressive natural gluten strength.   The overnight soak is the magic trick here:  as the mash sits, enzymes break down proteins and allow gluten to begin forming  on its own, enzymes break down starches into sugars for flavor and to feed the yeast you add the next day, and the soaking lets the little hard bits of wheat soften up, leaving no trace of grittiness or graininess. You will not need to add dough enhancer, Vitamin C, vinegar, vital wheat gluten, or any thing else to get great structure!

If you use the 2 1/2 c of wheat kernels, the bread ends up about 60% whole wheat;  if you use a high-speed blender (like BlendTec or Vitamix) , you can use 3 cups and end up with bread that is about 75% whole wheat.


Blender Wheat Bread
Soaker mash:
2 1/3 cups (17 oz) wheat kernels OR 3 cups (22oz), if using a high-speed blender
2 1/2  cups water

Combine in blender; mix on high speed for two minutes.  If it seems too hard on your motor, add 2 Tbsp. water.  Let the mash soak, covered and at room temperature, 8 hours or overnight.   After soaking, add:

2- 2 ½ cups all-purpose flour (10-12 oz) OR use 1-1 ½ cups instead (5-7 oz) if you used 3            cups wheat in the puree
2 tsp. salt
2 Tbsp. oil
3 Tbsp. honey
1 ½ Tbsp. yeast (or 2 envelopes)
¼ c. hottest tap water (no more than 130°F) 


Knead for five minutes, dough should be just thick enough to clean the bowl's sides.  Add flour if needed, but the dough should be tacky and very soft.  It’s had enough kneading  when it passes the windowpane test. (See slide show.)  Cover and let rest 20 minutes.  Coat two 8x4 loaf pans with nonstick cooking spray.

Pour ½ cup water on the oven floor (avoid the heating elements!) or in a small metal pan on lowest rack.  Turn the oven on 350°F for ONLY ONE MINUTE to warm it, then turn heat off. 

Divide dough in half.  With wet hands, shape each loaf and place in a pan.  Place pans in the warmed oven.  When the top of the loaf has risen about ½” above the edge of the pan (around 30-40 minutes later), remove from oven and preheat the oven to 400°F.  When oven is hot and dough has risen to about ¾” above the rim, bake loaves for 20-25 minutes, until the sides are browned. Remove from pans; cool on a rack at least 20 minutes before slicing.

   If using a high -speed blender, use 3 cups of wheat kernels in the mash. When adding flour the next day, use 1 1/2 cups flour instead of the 2 1/2 cups. 

FAQ’s:

How long can a soaker sit?  It’s best right around 8-12 hours, up to 24 hrs.  If you need to have it go longer, refrigerate it from the beginning to slow down enzyme activity.

How high does the ideal proof go? (3/4”)  Does the poke test work? Yes if you use a wet finger or let it rise uncovered.

How smooth can I get the puree in a blender, and does it matter much? It will be a little lumpy. It doesn’t need to be super smooth with this method; soaking eliminates any hard bits.

How long does it take to rise without a warm oven? Depends on your kitchen temperature, but around 1 hour.

Is the 20 minute autolyze necessary for flavor or texture? It’s OK without it, but rises better and tastes a little nicer (sweeter) with it.

How long does it really take to bake at 400°​? This depends on whether your loaves are identical in size, where any hot spots are in your oven, and how accurate its thermometer is.    My evenly-sized loaves took 21 min.
2 Comments

Homemade Vegetable Broth Powder

1/23/2014

1 Comment

 
I have the HARDEST time finding bouillon that doesn't contain MSG.  Here's a solution:  no MSG, no fillers, no preservatives.  Only what you choose to put in it.

This recipe was adapted from Traci's Transformational Health Principles by Traci J. Sellers

Vegetable Broth Powder     (makes about 1 1/2 cups)
​
1 cup Nutritional Yeast (to make your own, see here)
1/4 cup RealSalt (or Himalayan salt; something with those trace minerals)
1 Tbsp. onion powder (see how to make your own, here)
1 1/2 tsp. turmeric
1 1/2 tsp. dried parsley
1 tsp. dried dill weed
1 tsp. marjoram or oregano, optional
1 tsp. dried lemon peel, optional
1/2 tsp. celery seed
1/2 tsp. dry basil
1/2 tsp. ground thyme 

 Put everything except parsley in a blender or food processor, in the order given.  Blend until
 powdered.  Add parsley, pulse just enough to chop it a little bit (you're aiming for small bits).  Store in an airtight container indefinitely.  

To use, add a heaping 1/2 tsp. per cup of water, or 1 Tbsp. of powder  for every quart of water.

1 Comment

Roasted Cauliflower and Chicken

1/16/2014

0 Comments

 
Picture
We discovered roasting vegetables about three years ago.  Now when I buy broccoli or cauliflower, they are almost always served roasted.  Even my kids who  "don't prefer"  (the PC term at our table) broccoli, like it roasted. 

 Roasted Cauliflower and Chicken    - serves 6-8
1 head cauliflower, cut into florets
1-2 Tbsp. olive oil
1/2 tsp. salt
2 cups cooked chicken 

Preheat oven to 475, adjust the oven rack to the lowest position about 20 minutes.  Put the cauliflower on a baking sheet, drizzle with oil, then sprinkle with salt.  Roast about 20 minutes, stirring once about after about 15 minutes.  Cauliflower is done when parts of it turn a deep golden brown.  Stir in the chicken .

 We ate this with rice and chicken gravy (see below) on the side; conveniently enough, it also takes about the same amount of time to cook.  If you start the rice first, then cut up the cauliflower, the rice should be done about the same time if you're using regular white rice and cooking on a stove top.

Since I didn't have any leftover chicken,  I put 1 lb of chicken in my pressure cooker along with two medium-small onions (or use one med-large) and about 1/2 tsp. salt.  My pressure cooker does not lose water when it cooks, so I didn't add any.  (If your pressure cooker does, please add water!  Probably 1/2 cup, as the chicken and onions release moisture as they cook.)  It was done after 15 minutes of high pressure. 

Clear Chicken Gravy
1 Tbsp. water
1 Tbsp. cornstarch
1 cup juices from cooking the chicken and onion

(microwave instructions)  
In a  1-cup glass measuring cup, stir together the water and cornstarch until smooth.  Stir in a little of the cooking juices, then stir in enough that you have 1 cup total.  Microwave for 1 minute; stir.  If it hasn't thickened yet, microwave another minute and stir again.  Add salt if needed.  (Mine didn't need it.)

0 Comments

Make your own nutritional yeast

1/9/2014

44 Comments

 
Picture
photo: Wikimedia Commons

Have you ever run across a recipe calling for nutritional yeast and you didn't have any?  Maybe didn't even have access to some?  Or maybe you attempted to make a batch of bread and the yeast wasn't working anymore?

Too bad I didn't know, a month ago, what I'm about to tell you.  I threw away an entire pound package of baking yeast (Saccharoymyces cerevisiae) because it wasn't raising my dough.  Sad.

First of all, what IS nutritional yeast?  It's deactivated yeast, frequently the strain used is   Saccharomyces cerevisiae.  Totally dead yeast.  Usually it is cultured in something sweet for a few days, then heated to deactivate it.  It adds a nutty, savory, almost meat-y depth of flavor to recipes. (The term is 'umami'). It also contains B vitamins and is a complete protein. 

I've been studying a new (to me) breadmaking book  (more on that later!), and in it,  the author, Peter Reinhart, gives instructions for making your own nutritional yeast:

 Put 1/4 c. active dry yeast in a hot skillet.  Toast over med-hi heat until it turns a medium shade of brown. 

That's it.

Now, was my dysfunctional pound of yeast ready to be used as nutritional yeast without toasting?  No.  It was only  partly dead.  Or maybe 'mostly dead', to quote a favorite movie.  But it needs to be totally dead  before you consume it.   Besides that, toasting brings out flavor.

Ways to use nutritional yeast:
  • as a topping on popcorn
  • sprinkle on top of things in place of cheese
  • mix into mashed potatoes or scrambled eggs in place of cheese
  • add to soups or white sauces to improve flavor (the flavor acts similar to adding bouillon or broth)
  • use in this recipe for dairy-free buttery spread
  • sprinkle on top of homemade crackers or breadsticks before baking
  • make your own vegetable broth recipe, on this post.  Tastes like chicken.  :)


44 Comments

Cleanliness and godliness

1/4/2014

0 Comments

 
Picture
Cleanliness is next to godliness.

It seems that most of us translate this statement as "cleanliness is a form of godliness".

Well, maybe.  Maybe not.  

CLEANLINESS, noun

1. Freedom from dirt, filth, or any foul, extraneous matter.

2. Neatness of person or dress; purity.
(1828 Noah Webster's Dictionary)


Cleanliness and order can be synonymous, and 'order' can be defined as 'priorities'.  Proper priorities are definitely a form of godliness: sometimes 'proper priorities' means leaving a mess behind so I can focus on my children, or my neighbors, or my husband (not necessarily in that order).  And usually proper priorities means cleaning the SLOW way by teaching my children to do it.  It's easier, and cleaner much sooner, if I do it myself, but one of my God-given jobs is to train them.

In other words, I often have to choose between being godly and having cleanliness; and 

cleanliness is 

NEXT TO 

godliness.


0 Comments
<<Previous
Forward>>

    Need a Search bar?
    One day I may upgrade my website-- but until then, use your web browser search bar. Type in my web address and what you're looking for, like this-- 
    www.theprovidenthomemaker.com  pumpkin --  and you should get results.


    Author

    I'm a disciple of Christ, a member of the Church of Jesus Christ of Latter-day Saints, a family-defending, homemaking, and homeschooling mom of eight children, two of whom sometimes can't have milk or wheat. Growing up on a farm in a high mountain valley, my parents taught me to 'make do', work hard, smile, and help others.  I love cooking, learning, growing food and flowers, picking tomatoes, and making gingerbread houses --which CAN be made allergy-friendly-- with my children.  I hope you find something to help you on my site!

    Archives

    April 2024
    July 2023
    April 2022
    September 2021
    March 2021
    December 2020
    April 2020
    March 2020
    February 2020
    January 2020
    December 2019
    November 2019
    October 2019
    September 2019
    August 2019
    July 2019
    June 2019
    May 2019
    April 2019
    January 2016
    November 2015
    October 2015
    September 2015
    March 2015
    February 2015
    November 2014
    October 2014
    September 2014
    August 2014
    July 2014
    June 2014
    May 2014
    April 2014
    March 2014
    February 2014
    January 2014
    December 2013
    November 2013
    October 2013
    September 2013
    August 2013
    July 2013
    June 2013
    May 2013
    April 2013
    March 2013
    February 2013
    January 2013
    December 2012
    November 2012
    October 2012
    September 2012
    August 2012
    July 2012
    June 2012
    May 2012
    April 2012
    March 2012
    February 2012
    January 2012
    December 2011
    November 2011
    October 2011
    September 2011
    August 2011
    July 2011
    June 2011
    May 2011
    April 2011
    March 2011
    February 2011
    January 2011
    December 2010
    November 2010
    October 2010
    September 2010

    Categories

    All
    Alcohol
    Alternate Cooking
    Appearances
    Apple
    Apricots
    April Fools
    Aprons
    Bananas
    Beans
    Beef
    Beets
    Bench
    Beverages
    Bonnet
    Bread
    Breakfast
    Budget
    Budgeting
    Cake
    Candy
    Canning
    Carrots
    Cheese
    Chicken
    Children
    Chocolate
    Christmas
    Cleaning
    Coconut
    Comfrey
    Common Core
    Constitution
    Cookbook
    Cookies
    Cooking Oil
    Crafts
    Dairy Substitutions
    Dehydrating
    Dessert
    Dried Fruit
    Earth Oven
    Earthquake
    Easter
    Edible Weeds
    Eggs
    Emergency Prep
    Essential Oils
    Faith
    Family Home Evening
    Fertilizing
    Food Storage
    Fourth Of July
    Freezer
    Frosting
    Fudge
    Garden
    Gardening
    Gingerbread
    Gluten
    Gluten Free
    Gold
    Government
    Grains
    Gratitude
    Hat
    Herbs
    Home Remedies
    Home Repairs
    Homeschool
    Home Storage
    Honey
    Hope
    Inflation
    Leftovers
    Legumes
    Lemon
    Main Dishes
    Mixes
    Mothers
    Noah
    Non Artificial Colors
    Non-artificial Colors
    Nuts
    Oats
    Oil
    Orange
    Paint
    Peaches
    Pear
    Pie
    Pizza
    Plums
    Poem
    Popcorn
    Pork
    Potatoes
    Powdered Milk
    Prayer
    Preparedness
    Projects
    Prophecy
    Pruning
    Pumpkin
    Quick Bread
    Rhubarb
    Rice
    Salad
    Salt
    Sauces
    Self Reliance
    Self-reliance
    Sewing
    Shelf Life
    Shelves
    Sky
    Smoothie
    Snacks
    Soup
    Spices Or Seasonings
    Squash
    Strawberries
    Substitutions
    Sugar
    Summer Fun
    Three Month Supply
    Time
    Tomatoes
    Trees
    Truffles
    T-shirts
    Tuna
    Ultra Gel
    Valentine\'s Day
    Vegetables
    Water
    Watermelon
    Wheat
    Work
    Year Supply
    Zucchini

    RSS Feed

Web Hosting by iPage