The Provident Homemaker
  • Recipes and Info
    • Making Bread
  • My Blog
  • Favorite Resources
  • Documents and Files
  • 52 Weeks of Building Storage

Really good whole wheat bread without a grain mill

1/29/2014

2 Comments

 
Picture
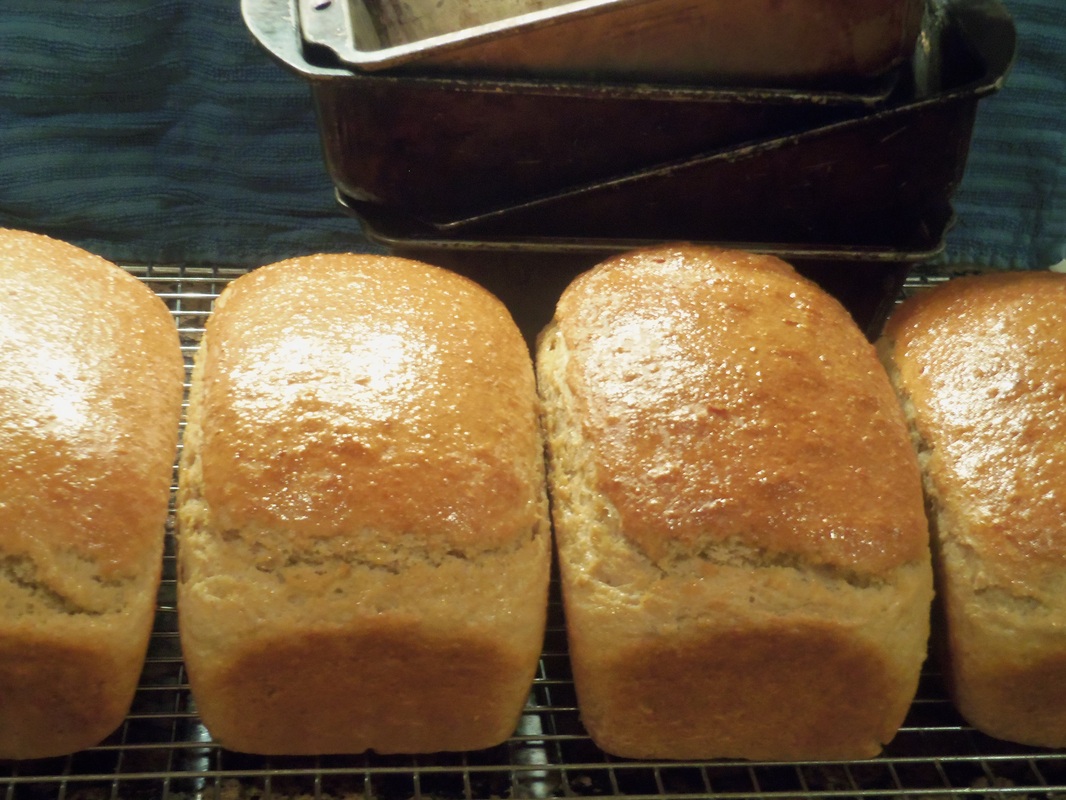
Do you have wheat stored, but haven't been able or willing to spend $250 on a grain mill?  Have you wondered if there's a way to make bread with it anyhow?  THERE IS!   This bread is moist, tender, with a good crumb and impressive natural gluten strength.   The overnight soak is the magic trick here:  as the mash sits, enzymes break down proteins and allow gluten to begin forming  on its own, enzymes break down starches into sugars for flavor and to feed the yeast you add the next day, and the soaking lets the little hard bits of wheat soften up, leaving no trace of grittiness or graininess. You will not need to add dough enhancer, Vitamin C, vinegar, vital wheat gluten, or any thing else to get great structure!

If you use the 2 1/2 c of wheat kernels, the bread ends up about 60% whole wheat;  if you use a high-speed blender (like BlendTec or Vitamix) , you can use 3 cups and end up with bread that is about 75% whole wheat.


Blender Wheat Bread
Soaker mash:
2 1/3 cups (17 oz) wheat kernels OR 3 cups (22oz), if using a high-speed blender
2 1/2  cups water

Combine in blender; mix on high speed for two minutes.  If it seems too hard on your motor, add 2 Tbsp. water.  Let the mash soak, covered and at room temperature, 8 hours or overnight.   After soaking, add:

2- 2 ½ cups all-purpose flour (10-12 oz) OR use 1-1 ½ cups instead (5-7 oz) if you used 3            cups wheat in the puree
2 tsp. salt
2 Tbsp. oil
3 Tbsp. honey
1 ½ Tbsp. yeast (or 2 envelopes)
¼ c. hottest tap water (no more than 130°F) 


Knead for five minutes, dough should be just thick enough to clean the bowl's sides.  Add flour if needed, but the dough should be tacky and very soft.  It’s had enough kneading  when it passes the windowpane test. (See slide show.)  Cover and let rest 20 minutes.  Coat two 8x4 loaf pans with nonstick cooking spray.

Pour ½ cup water on the oven floor (avoid the heating elements!) or in a small metal pan on lowest rack.  Turn the oven on 350°F for ONLY ONE MINUTE to warm it, then turn heat off. 

Divide dough in half.  With wet hands, shape each loaf and place in a pan.  Place pans in the warmed oven.  When the top of the loaf has risen about ½” above the edge of the pan (around 30-40 minutes later), remove from oven and preheat the oven to 400°F.  When oven is hot and dough has risen to about ¾” above the rim, bake loaves for 20-25 minutes, until the sides are browned. Remove from pans; cool on a rack at least 20 minutes before slicing.

   If using a high -speed blender, use 3 cups of wheat kernels in the mash. When adding flour the next day, use 1 1/2 cups flour instead of the 2 1/2 cups. 

FAQ’s:

How long can a soaker sit?  It’s best right around 8-12 hours, up to 24 hrs.  If you need to have it go longer, refrigerate it from the beginning to slow down enzyme activity.

How high does the ideal proof go? (3/4”)  Does the poke test work? Yes if you use a wet finger or let it rise uncovered.

How smooth can I get the puree in a blender, and does it matter much? It will be a little lumpy. It doesn’t need to be super smooth with this method; soaking eliminates any hard bits.

How long does it take to rise without a warm oven? Depends on your kitchen temperature, but around 1 hour.

Is the 20 minute autolyze necessary for flavor or texture? It’s OK without it, but rises better and tastes a little nicer (sweeter) with it.

How long does it really take to bake at 400°​? This depends on whether your loaves are identical in size, where any hot spots are in your oven, and how accurate its thermometer is.    My evenly-sized loaves took 21 min.
2 Comments

Homemade Vegetable Broth Powder

1/23/2014

1 Comment

 
I have the HARDEST time finding bouillon that doesn't contain MSG.  Here's a solution:  no MSG, no fillers, no preservatives.  Only what you choose to put in it.

This recipe was adapted from Traci's Transformational Health Principles by Traci J. Sellers

Vegetable Broth Powder     (makes about 1 1/2 cups)
​
1 cup Nutritional Yeast (to make your own, see here)
1/4 cup RealSalt (or Himalayan salt; something with those trace minerals)
1 Tbsp. onion powder (see how to make your own, here)
1 1/2 tsp. turmeric
1 1/2 tsp. dried parsley
1 tsp. dried dill weed
1 tsp. marjoram or oregano, optional
1 tsp. dried lemon peel, optional
1/2 tsp. celery seed
1/2 tsp. dry basil
1/2 tsp. ground thyme 

 Put everything except parsley in a blender or food processor, in the order given.  Blend until
 powdered.  Add parsley, pulse just enough to chop it a little bit (you're aiming for small bits).  Store in an airtight container indefinitely.  

To use, add a heaping 1/2 tsp. per cup of water, or 1 Tbsp. of powder  for every quart of water.

1 Comment

Roasted Cauliflower and Chicken

1/16/2014

0 Comments

 
Picture
We discovered roasting vegetables about three years ago.  Now when I buy broccoli or cauliflower, they are almost always served roasted.  Even my kids who  "don't prefer"  (the PC term at our table) broccoli, like it roasted. 

 Roasted Cauliflower and Chicken    - serves 6-8
1 head cauliflower, cut into florets
1-2 Tbsp. olive oil
1/2 tsp. salt
2 cups cooked chicken 

Preheat oven to 475, adjust the oven rack to the lowest position about 20 minutes.  Put the cauliflower on a baking sheet, drizzle with oil, then sprinkle with salt.  Roast about 20 minutes, stirring once about after about 15 minutes.  Cauliflower is done when parts of it turn a deep golden brown.  Stir in the chicken .

 We ate this with rice and chicken gravy (see below) on the side; conveniently enough, it also takes about the same amount of time to cook.  If you start the rice first, then cut up the cauliflower, the rice should be done about the same time if you're using regular white rice and cooking on a stove top.

Since I didn't have any leftover chicken,  I put 1 lb of chicken in my pressure cooker along with two medium-small onions (or use one med-large) and about 1/2 tsp. salt.  My pressure cooker does not lose water when it cooks, so I didn't add any.  (If your pressure cooker does, please add water!  Probably 1/2 cup, as the chicken and onions release moisture as they cook.)  It was done after 15 minutes of high pressure. 

Clear Chicken Gravy
1 Tbsp. water
1 Tbsp. cornstarch
1 cup juices from cooking the chicken and onion

(microwave instructions)  
In a  1-cup glass measuring cup, stir together the water and cornstarch until smooth.  Stir in a little of the cooking juices, then stir in enough that you have 1 cup total.  Microwave for 1 minute; stir.  If it hasn't thickened yet, microwave another minute and stir again.  Add salt if needed.  (Mine didn't need it.)

0 Comments

Make your own nutritional yeast

1/9/2014

44 Comments

 
Picture
photo: Wikimedia Commons

Have you ever run across a recipe calling for nutritional yeast and you didn't have any?  Maybe didn't even have access to some?  Or maybe you attempted to make a batch of bread and the yeast wasn't working anymore?

Too bad I didn't know, a month ago, what I'm about to tell you.  I threw away an entire pound package of baking yeast (Saccharoymyces cerevisiae) because it wasn't raising my dough.  Sad.

First of all, what IS nutritional yeast?  It's deactivated yeast, frequently the strain used is   Saccharomyces cerevisiae.  Totally dead yeast.  Usually it is cultured in something sweet for a few days, then heated to deactivate it.  It adds a nutty, savory, almost meat-y depth of flavor to recipes. (The term is 'umami'). It also contains B vitamins and is a complete protein. 

I've been studying a new (to me) breadmaking book  (more on that later!), and in it,  the author, Peter Reinhart, gives instructions for making your own nutritional yeast:

 Put 1/4 c. active dry yeast in a hot skillet.  Toast over med-hi heat until it turns a medium shade of brown. 

That's it.

Now, was my dysfunctional pound of yeast ready to be used as nutritional yeast without toasting?  No.  It was only  partly dead.  Or maybe 'mostly dead', to quote a favorite movie.  But it needs to be totally dead  before you consume it.   Besides that, toasting brings out flavor.

Ways to use nutritional yeast:
  • as a topping on popcorn
  • sprinkle on top of things in place of cheese
  • mix into mashed potatoes or scrambled eggs in place of cheese
  • add to soups or white sauces to improve flavor (the flavor acts similar to adding bouillon or broth)
  • use in this recipe for dairy-free buttery spread
  • sprinkle on top of homemade crackers or breadsticks before baking
  • make your own vegetable broth recipe, on this post.  Tastes like chicken.  :)


44 Comments

Cleanliness and godliness

1/4/2014

0 Comments

 
Picture
Cleanliness is next to godliness.

It seems that most of us translate this statement as "cleanliness is a form of godliness".

Well, maybe.  Maybe not.  

CLEANLINESS, noun

1. Freedom from dirt, filth, or any foul, extraneous matter.

2. Neatness of person or dress; purity.
(1828 Noah Webster's Dictionary)


Cleanliness and order can be synonymous, and 'order' can be defined as 'priorities'.  Proper priorities are definitely a form of godliness: sometimes 'proper priorities' means leaving a mess behind so I can focus on my children, or my neighbors, or my husband (not necessarily in that order).  And usually proper priorities means cleaning the SLOW way by teaching my children to do it.  It's easier, and cleaner much sooner, if I do it myself, but one of my God-given jobs is to train them.

In other words, I often have to choose between being godly and having cleanliness; and 

cleanliness is 

NEXT TO 

godliness.


0 Comments

    Need a Search bar?
    One day I may upgrade my website-- but until then, use your web browser search bar. Type in my web address and what you're looking for, like this-- 
    www.theprovidenthomemaker.com  pumpkin --  and you should get results.


    Author

    I'm a disciple of Christ, a member of the Church of Jesus Christ of Latter-day Saints, a family-defending, homemaking, and homeschooling mom of eight children, two of whom sometimes can't have milk or wheat. Growing up on a farm in a high mountain valley, my parents taught me to 'make do', work hard, smile, and help others.  I love cooking, learning, growing food and flowers, picking tomatoes, and making gingerbread houses --which CAN be made allergy-friendly-- with my children.  I hope you find something to help you on my site!

    Archives

    April 2024
    July 2023
    April 2022
    September 2021
    March 2021
    December 2020
    April 2020
    March 2020
    February 2020
    January 2020
    December 2019
    November 2019
    October 2019
    September 2019
    August 2019
    July 2019
    June 2019
    May 2019
    April 2019
    January 2016
    November 2015
    October 2015
    September 2015
    March 2015
    February 2015
    November 2014
    October 2014
    September 2014
    August 2014
    July 2014
    June 2014
    May 2014
    April 2014
    March 2014
    February 2014
    January 2014
    December 2013
    November 2013
    October 2013
    September 2013
    August 2013
    July 2013
    June 2013
    May 2013
    April 2013
    March 2013
    February 2013
    January 2013
    December 2012
    November 2012
    October 2012
    September 2012
    August 2012
    July 2012
    June 2012
    May 2012
    April 2012
    March 2012
    February 2012
    January 2012
    December 2011
    November 2011
    October 2011
    September 2011
    August 2011
    July 2011
    June 2011
    May 2011
    April 2011
    March 2011
    February 2011
    January 2011
    December 2010
    November 2010
    October 2010
    September 2010

    Categories

    All
    Alcohol
    Alternate Cooking
    Appearances
    Apple
    Apricots
    April Fools
    Aprons
    Bananas
    Beans
    Beef
    Beets
    Bench
    Beverages
    Bonnet
    Bread
    Breakfast
    Budget
    Budgeting
    Cake
    Candy
    Canning
    Carrots
    Cheese
    Chicken
    Children
    Chocolate
    Christmas
    Cleaning
    Coconut
    Comfrey
    Common Core
    Constitution
    Cookbook
    Cookies
    Cooking Oil
    Crafts
    Dairy Substitutions
    Dehydrating
    Dessert
    Dried Fruit
    Earth Oven
    Earthquake
    Easter
    Edible Weeds
    Eggs
    Emergency Prep
    Essential Oils
    Faith
    Family Home Evening
    Fertilizing
    Food Storage
    Fourth Of July
    Freezer
    Frosting
    Fudge
    Garden
    Gardening
    Gingerbread
    Gluten
    Gluten Free
    Gold
    Government
    Grains
    Gratitude
    Hat
    Herbs
    Home Remedies
    Home Repairs
    Homeschool
    Home Storage
    Honey
    Hope
    Inflation
    Leftovers
    Legumes
    Lemon
    Main Dishes
    Mixes
    Mothers
    Noah
    Non Artificial Colors
    Non-artificial Colors
    Nuts
    Oats
    Oil
    Orange
    Paint
    Peaches
    Pear
    Pie
    Pizza
    Plums
    Poem
    Popcorn
    Pork
    Potatoes
    Powdered Milk
    Prayer
    Preparedness
    Projects
    Prophecy
    Pruning
    Pumpkin
    Quick Bread
    Rhubarb
    Rice
    Salad
    Salt
    Sauces
    Self Reliance
    Self-reliance
    Sewing
    Shelf Life
    Shelves
    Sky
    Smoothie
    Snacks
    Soup
    Spices Or Seasonings
    Squash
    Strawberries
    Substitutions
    Sugar
    Summer Fun
    Three Month Supply
    Time
    Tomatoes
    Trees
    Truffles
    T-shirts
    Tuna
    Ultra Gel
    Valentine\'s Day
    Vegetables
    Water
    Watermelon
    Wheat
    Work
    Year Supply
    Zucchini

    RSS Feed

Web Hosting by iPage