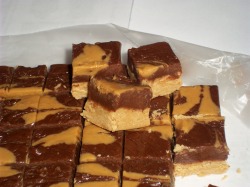
The Provident Homemaker
  • Recipes and Info
    • Making Bread
  • My Blog
  • Favorite Resources
  • Documents and Files
  • 52 Weeks of Building Storage

Softening Brown Sugar

12/30/2010

0 Comments

 
Picture
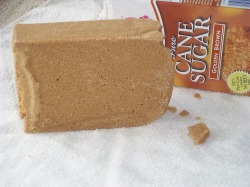
Does this look familiar?  It's almost hard enough to build with...

Picture
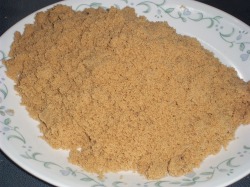
Less than a minute later, it can be measured!


Did you know sugar stores forever?  It doesn't ever spoil or go rancid.  And here's a little practical science for your kitchen- brown sugar is hygroscopic,  meaning that it attracts moisture from the air.   Cookies made with it have a better chance of being chewy.  This also depends, of course, on how long you let them bake!  Brown sugar adds moistness, chewiness in baked goods, and a deeper, caramel-like flavor.  All of this is because of the small amount of molasses in it.  Most brown sugar is just refined white sugar with molasses added at the factory.  Turbinado, or raw cane sugar is an exception to this- the brown color in it is because the molasses wasn't taken out to begin with.

What this hygroscopic nature means for you is that if there’s any moisture available to the sugar, it will soften up over the course of several hours or overnight.  Some ways to add moisture are:

·         Add a slice of apple to a sealed container of brown sugar.  Let sit.

·         Add a slice of bread.  This is a great use for those heels that sometimes don’t get eaten.  When it’s totally dried out, you can crush it into breadcrumbs.

·         Soak a small  (clean!) terra-cotta pot, saucer, or shard (piece of a broken pot), in water.  When it’s moist, add it to your brown sugar container.  This one’s reusable! Just soak it again when dry.

·         Put a dampened cloth or paper towel in the container, or just put the brown sugar in a bowl and cover it with the damp cloth.


·         Any place the brown sugar actually touches something wet, the moisture may drive out the molasses (which is what makes it brown) and leave a white, moist section of sugar.  It’s fine.  Stir it back in.


 If you can’t wait that long for your sugar, there are more options:

·         Microwave the brown sugar for 30 seconds.   If it’s not softened yet, put it in for a little longer.  It will be soft and easy to measure, but only while it’s still warm!  Crumble it while you can, measure what you need, and put the rest in a container with one of the ideas above.

·         If you don’t have a microwave, you can use a grater to get what you need off that solid block of sugar.

·         If you have molasses on hand, stir it into regular sugar.  This is how they make brown sugar at the factory!  For light brown sugar, use 1/2 Tbsp (1 ½ tsp). molasses to 1 cup white sugar.  If you want dark brown sugar, use 1 Tbsp. molasses instead.

·         Knock off some chunks with a hammer or other heavy item.  Weigh them instead of using a measuring cup.  A cup of brown sugar weighs about 7 ounces. (For the curious or the kitchen scientist, a handy chart listing other foods’ weights per cup, see http://www.veg-world.com/articles/cups.htm)  Most recipes use some form of liquid- add the hard sugar lumps to the recipe's liquid to let it soften, dissolve, or mix in.

One great thing to make with brown sugar is

Caramel Pudding
2-4 Tbsp. butter
1/4-1/2 c. brown sugar
1/4 c. cornstarch OR 1/2 c. flour
2 c. milk
1/8 tsp. salt, optional
2 eggs
1 tsp. vanilla

In a medium sauce pan, melt the butter over medium heat, stir occasionally until it turns brown and smells heavenly.  Remove from heat.  Add brown sugar, cornstarch, and salt; stir until smooth.  Gradually stir in the milk; return to heat and stir until it comes to a boil.  Meanwhile, beat the eggs in a medium bowl.  Pour a thin stream of the hot milk into the beaten egg, stirring constantly, until about half the milk is mixed with it.  This keeps the egg from curdling (scrambling).  Pour the egg mixture back into the boiling mixture; cook and stir for two minutes more.  

For more variations on pudding, see White Sauces and Pudding 

 
0 Comments

Candy Cane Bread

12/27/2010

0 Comments

 
Picture
This one doesn't taste like a candy cane- though you could make it so that it does!

I just noticed that in my 'dinner rolls' post there were no instructions for making that candy cane bread.  So here they are.  Use the same technique to make cinnamon rolls, only those need sliced at the end of making the roll.
Picture
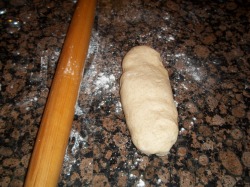
The simplest way I've found to roll a rectangle is to give the shape a head-start before rolling it out.  Pat or stretch it into an oblong shape.

Picture
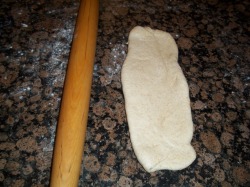
Roll it out to its full finished length.  In this case, I have a pound of dough that I want to be about 8x14, so it's now rolled to be 14" long.

Picture
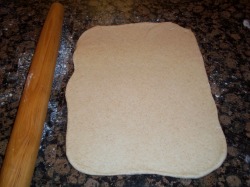
Then work on getting it the right width.  Eight inches is the width of my thumb to pinky, when I stretch my hand.  It doesn't have to be exact when you roll these things out; a hand width is a great measuring tool!

Picture
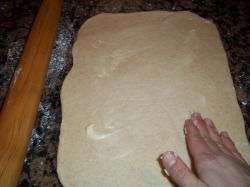
Spread soft butter on it, using a utensil or your hand.  If your butter is cold and hard, your hand warms it up in a hurry.  The butter prevents the dough from sticking to itself, which leaves your finished spiral open (great for letting frosting ooze into if you're making cinnamon rolls!).  This means you DON'T want to spread the butter clear to the edge; stay about an inch or two away from one long edge.

Picture
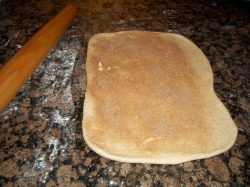
Sprinkle with cinnamon and sugar, if that's the filling you want.   I 'eyeball' this kind of thing, but this was about 1- 1 1/2 tsp. cinnamon and 2-3 Tbsp. sugar.  Again, stay an inch away from one long edge.

Picture
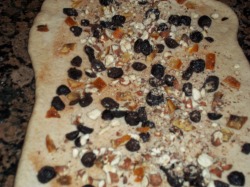
You can add whatever you want as filling- this one has the cinnamon and sugar, but then also has raisins, chopped toasted hazelnuts, and some chopped candied orange peel.

Picture
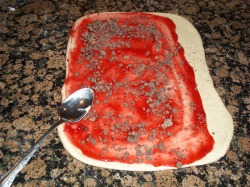
This flavor was the most popular with everyone who tried it this year- raspberry filling, sprinkled with little chocolate chunks, or chocolate chips.  I get the raspberry filling from the bakery at a local grocery store; it's cheaper than I can make it, plus it doesn't go runny when heated, like raspberry jam does.  Raspberry jam does have better flavor, however.

Picture
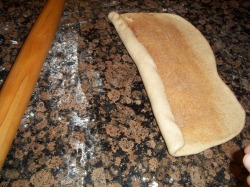
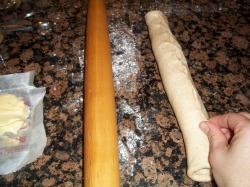
Start rolling the dough, starting with the long side opposite the unbuttered one.

Picture
This is when you'll be glad you remembered to keep the butter away from the edge.  Pinch the edge to seal.

Picture
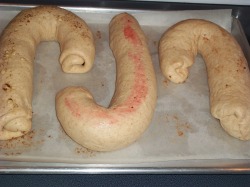
Curve the roll into a candy cane shape and put it pinched-side down on a cookie sheet.  Butter it or use parchment paper.   When I have different flavors on the same cookie sheet, I sprinkle or spread some of the filling on top, too, so it's easy to tell them apart.   Let rise until nearly doubled, 45-90 minutes, depending on the temperature of your kitchen, and bake at 350- 375 degrees F  about 20-25 minutes, or until well browned on bottom, and a little browned on top.  It will continue to cook outside the oven for the next 15-20 minutes.  When they're cool.  Drizzle with icing, chocolate syrup, melted chocolate or white chocolate, or melted jam, and sprinkle with some nuts, cinnamon, or chocolate chips if you like.

0 Comments

Homemade Hot Cocoa

12/23/2010

0 Comments

 
Picture
Merry Christmas!

Here is a simple thing to make with your family- hot chocolate.  There are a few different ways to make it-  you can add chocolate syrup to milk, or you can melt a chocolate bar into milk, or you can make it the old-fashioned way, starting with unsweetened cocoa.  It’s really fast and easy.

May you have a wonderful Christmas, full of the spirit of love and of God.

-Rhonda

Homemade Hot Cocoa

1 Tbsp. unsweetened cocoa powder
1 Tbsp. sugar or honey
1 cup milk
Pinch of salt, ¼ tsp. vanilla, optional
 
Stir together the cocoa powder and sugar.  Stir in 2 Tbsp. milk, mix until smooth.  Bring to a boil, either on the stove or in a microwave.  This is to dissolve the sugar and bring out the flavor of the cocoa.   Stir in the remaining milk, the salt, and vanilla.  Heat to the temperature you like. Top with marshmallows or whipped cream if you have them.

This recipe can be sized up to whatever you like.  I usually make a 4-cup batch, using the microwave, and a canning jar for my cooking container.  

This makes a ‘milk chocolate’ flavor.  If you like it darker, use 1 1/2 – 2 Tbsp. cocoa.  If it’s bitter, add the same amount additional sugar.

 For mint chocolate, use whatever form of mint you have- mint extract, peppermint patties, or crushed candy canes.

For raspberry flavor, you can use 1 Tbsp. of raspberry Jello powder instead of the sugar.  Orange is another good flavor to make this way.

If you like richer cocoa, use whole milk, or a bit of cream, evaporated milk,  or half-and-half.   

To make it frothy, use a blender, or an immersion blender, to whip it.  This works especially well if you used powdered milk!
 
Picture
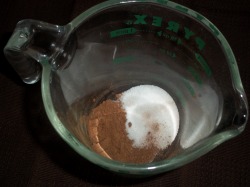
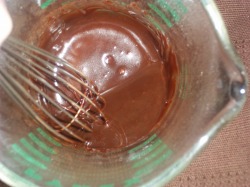
The cocoa and sugar, ready to be stirred.

Picture
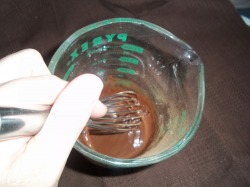
Add as much milk as you have of the sugar and cocoa- in this case, 2 Tbsp.  You want to make a smooth, pancake-batter-consistency slurry.

Picture
Bring it to a boil to dissolve the sugar and 'bloom' (bring out the flavor of) the cocoa.  Once it's at this point, add the rest of the milk, along with salt and vanilla if you want them.

0 Comments

Far Above Rubies; Dinner Rolls and sweetbreads

12/9/2010

0 Comments

 
Picture
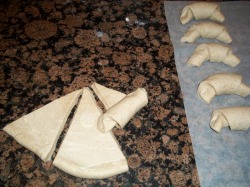
To make 2 oz. Butterhorn rolls- start with one pound of dough and roll it into about a 12" circle.  Spread softened butter on all except the middle, leave about a 2-3" circle unbuttered so the dough can stick to itself.  With a pizza cutter or knife, cut into eight wedges.  Roll each one up, starting with the wide edge.  Pinch the point so it sticks to the rest of the roll.  Put the rolls on parchment or a greased baking sheet, point-side tucked securely underneath so it doesn't unroll during baking. Curve ends a bit, then cover and let rise.
If you're making a bunch of these, use a loaf's worth of dough (about 1 1/2 lbs), roll into a 12-15" circle, and cut into 12 wedges.

Picture
Great gift bread for Christmas- the Candy Cane loaf.  This one has a raspberry-chocolate swirl through it; see the slice at right.  I like to give these to neighbors with a little poem about the symbolism of the candy cane

This week here  is a review of the ideal we work towards as women, and then the info from the Dinner Rolls class I held this week.

---------------

Have you read Proverbs chapter 31 lately?  The Hebrew word for 'virtuous' is חַיִל, 'chayil,' and means POWERFUL, STRONG, and EFFICIENT. Virtues are strengths. Excellence in particular attributes.

Who can find a powerful woman? Her price is far above the most valuable gems. 

I think most of us remember reading verse 10, but look what else it says. 


"Who can find a  virtuous woman? for her price is far above rubies.  The heart of her husband doth safely trust in her, so that he shall have no need of spoil. She will do him good and not evil all the days of her life.

"She seeketh wool, and flax, and worketh willingly with her hands. She is like the merchants’ ships; she bringeth her food from afar. She riseth also while it is yet night, and giveth meat to her household, and a portion to her maidens. She considereth a field, and buyeth it: with the fruit of her hands she planteth  a vineyard. She girdeth her loins with strength, and strengtheneth her arms. She perceiveth that her merchandise is good: her candle goeth not out by  night. She layeth her hands to the spindle, and her hands hold the distaff. She stretcheth out her hand to the poor; yea, she reacheth forth her hands to the needy.

"She is not afraid of the snow for her household: for all her household are clothed with scarlet. She maketh herself coverings of tapestry; her clothing is silk and purple.

"Her husband is known in the gates, when he sitteth among the elders of the land.  She maketh fine linen, and selleth it; and delivereth girdles unto the merchant.

"Strength and honour are her clothing; and she shall rejoice in time to come. She openeth her mouth with wisdom; and in her tongue is the law of kindness. She looketh well to the ways of her household, and eateth not the bread of idleness. Her children arise up, and call her blessed; her husband also, and he praiseth her

"Many daughters have done virtuously, but thou excellest them all.
Favour is deceitful, and beauty is vain: but a woman that feareth the Lord, she shall be praised. Give her of the fruit of her hands; and let her own works praise her in the gates."

I know that all of us can grow by picking something in those verses on which to begin-- or continue-- our efforts.  Are you ‘afraid of the snow for [your] household’?  Or are they going to be fine through lean times because of your preparations? 
​________________


For  the basic bread recipe along with these variations, see my Google Docs version  

This makes 2 dozen 2 oz. rolls (if basic shape rolls, closely spaced, they’ll fill a 12x18 baking sheet perfectly), two dozen medium-small cinnamon rolls (a trayful),  two 8x4” loaves, OR three 1-lb. ‘candy cane’ loaves.

 
Dinner Roll/Sweetbread Dough

3 cups flour to start with (5-6 cups total)
2 tsp. salt
2 tsp. yeast
¼-1/3 c. sugar
3 Tbsp. oil or butter
1 egg
2 cups hot water or milk (no hotter than 130 degrees F or it will kill the yeast)

      Mix salt, yeast, sugar, oil, water, and first amount of flour in a bowl.  Beat about two minutes with a wooden spoon.  Stir in half of what’s left, then mix in more until too stiff to stir.  Dump out onto a floured counter and knead for 8-10 minutes, adding only enough flour to keep the dough from sticking to the counter.   The dough should be smooth and elastic after kneading.  (Yes, you could use a stand mixer for this, too….)

     Cover with a kitchen towel or plastic grocery bag and let rise 1 to 1 ½ hours, or until doubled.  Punch down and shape into rolls or loaves.  Place on greased baking sheet or in 8x4 loaf pans and let rise about 45 minutes or until nearly doubled.  Bake at 350 for about 30 minutes or until the bottoms of rolls, or sides of loaves, are brown.  (Tip a loaf out of the pan to check.)  Remove from pans and cool on a rack.

 
This is my basic bread recipe with three tweaks: egg, milk, and more sugar.

The egg helps make the bread more moist, springy, higher-rising, and tender.  The white helps add strength and leavening.  The yolk adds a tiny bit of color, plus some richness and tenderness from the natural fats in it, especially from the lecithin (worth a whole blog post just for lecithin!) it contains.

Milk helps a little bit with browning, as well as making the internal structure (“the crumb”) softer and smoother.  It’s one of those things that may be harder for an amateur to notice, but it makes enough of a difference that I always use it in sweet breads for competitions.  If you have powdered milk available, just mix the milk powder in with the other dry ingredients, and use water.  For this size batch, you’ll use 6 Tbsp powder, which is just over 1/3 c.

Sugar makes a big difference in the crust browning, or ‘caramelizing’, as well as in the flavor of the bread.  Sugar can also help the yeasts grow, but it only helps to a certain point.  No-sugar-used bread will still rise, but will take twice as long.  And you can get it to brown, too, because of the natural sugars in the flour, but you have to use a higher temperature.  When I’m making bread with no sugar, I bake it between 400 and 450 degrees F, which gives a nice brown crust.  If you cook bread with sugar in the dough, if you cook that hot it will be black on the outside before the inside is done.  When baking sweetened breads like this, then, keep the temperature between 350-400; the bigger the loaf, the lower temperature.  Smaller things, like individual rolls, can still handle up to 400 degrees because the insides can cook quickly.  The other thing about sugar, helping the yeasts grow, is kind of funny.  A moderate amount of sugar is good food for the yeast, but over a certain point actually slows down its growth.  To compensate, let it rise a little longer, or add more yeast. 


Picture
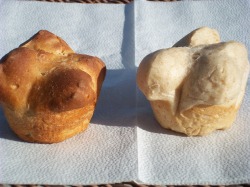
How long the rolls are in the oven will make a HUGE difference in how dry or moist and velvety they are.  Cook them just until the bottoms are brown and they sound a bit hollow.  They will continue to cook for 15-20 minutes after coming out of the oven.  The roll on the left is overbaked and is dry.  The one on the right is perfect. See how the sides are golden brown where the baking pan touched? 
​If you want more color on top, brush with oil or butter after baking; this will intensify the color that is there.  You can also brush them before baking, with milk, beaten egg, or melted butter.  Each one has a little different effect; see which you prefer.

Picture
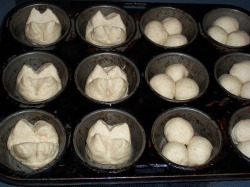
(left) Mock Cloverleaf rolls, (right) Cloverleaf rolls.  Start with 2 oz dough, a little bigger than a golf ball.  For the Mock style, shape it into a smooth ball, put in greased muffin tins, and make two snips with scissors to create four points.
For the Cloverleaf, divide each golf-ball-sized into three; shape each into a smooth ball.

Picture
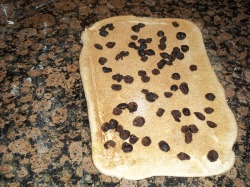
For cinnamon rolls, roll dough into a rectangle.  A two-loaf batch will make 2 dozen; roll into a 24x10 rectangle, spread with butter (so the rolls will 'peel' open and let frosting seep between the spirals!), sprinkle with cinnamon and sugar, raisins if you want.  Roll up and pinch to seal.

Picture
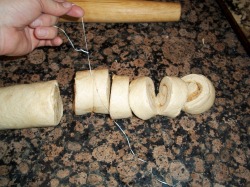
Cut into 1” sections using dental floss or thread, put on greased baking sheet, let rise, and bake.  Frost (Cream Cheese Frosting is great!!!) or glaze while warm.

Picture
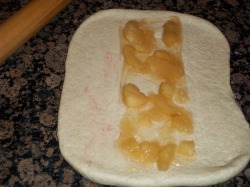
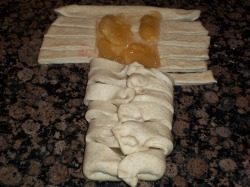
To make a filled ladder loaf, roll dough into a rectangle.  I used one pound of dough and rolled it to about 8" by 14".  Whatever amount of dough you use, roll it to about 1/4-inch thick.  Put filling down the center third.  I used apple pie filling from a can, but you can use cream cheese and jam, rehydrated dried fruit, nuts and cinnamon, or thinly sliced or chopped fruit, sweetened or not, depending on what you have.  What's in your house or yard that might taste good in this?

Picture
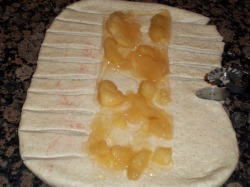
Make cuts about an inch apart.  You'll want to have the same number on each side.  A pizza cutter makes great work of slicing.

Picture
Bring opposite slices together; pinch together in the middle to seal them.  Let it rise until dough is nearly doubled, then bake.  Great with a drizzle of glaze (powdered sugar and water), maybe with a sprinkle of cinnamon or nuts on top for a nice presentation.

0 Comments

Classic Candymaking

12/4/2010

0 Comments

 
Picture
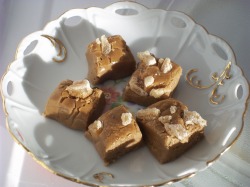
Fresh fudge, made whatever flavor you feel like.  This one is Gingerbread Fudge.

Picture
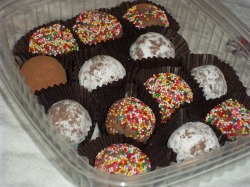
Truffles, the same on the inside but rolled in cocoa, powdered sugar, and sprinkles.

I love making treats; it makes me very popular with my children and the neighbors!

Every Christmas season I make 'goodie plates' with my family, and take them to neighbors, teachers, and friends. We try to get them done by the first or second week of December.  This way mine are distributed before anyone has overindulged and decreased in their appreciation for sugar.  So far we've made lots of bread, caramels, truffles, and fudge.   See here for 
the candy recipes.

Below the list are photos and instructions for making a fun layered and swirled Chocolate Peanut Butter Fudge.

True to form, this includes basic recipes, then how to tweak them to get new flavors.  Here's what's in that file:

Buttercream Fondant
Fondant centers
Pecan logs
English Toffee

Fudge
Two-Minute Fudge
Milk Chocolate Fudge
Peanut Butter or Butterscotch Fudge
Vanilla Fudge
Cherry Vanilla Fudge
Cookies and Creme Fudge
Orange Creme Fudge (Creamsicle)
Caramel Swirl Fudge
Candy Bar Fudge
Chocolate-Peanut Butter Fudge
Mint Layer Fudge
Orange-Pecan Fudge
Peanut Butter Swirl Fudge
Rocky Road Fudge
S’mores Fudge
Strawberry Fudge
Strawberry ‘Truffle Layer’ Fudge
Toasted Coconut Fudge
Wonka Bar Fudge
Five Minute Fudge
Easy Fudge
Old-Time Fudge
Blue Ribbon Fudge

Quick Penuche
Maple-nut Fudge
Maple-nut Goodies
Molasses Fudge/Gingerbread Fudge
Quick Centers for Pecan Logs
​

Truffles
Milk Chocolate Truffles
White Chocolate Truffles
Whipped Truffles
Picture
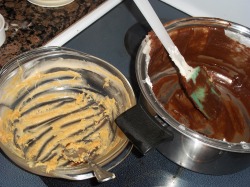
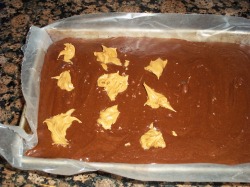
For this batch of chocolate-peanut butter fudge, I used the Five Minute Fudge recipe but split the batch in half after adding the marshmallow.  Half of it got peanut butter, half of it got chocolate chips.  I spread the peanut butter layer into a lined pan, then topped it with the chocolate mixture.

Picture
Lining the pan with waxed paper or foil, buttered, makes it much easier to cut the fudge when finished. 

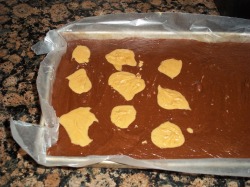
To make the peanut butter swirl, drop several small spoonfuls of plain peanut butter on top.

Picture
Tap the pan on the counter to get the peanut butter to flatten into the fudge.

Picture
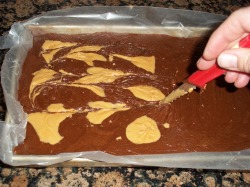
Drag a knife or spoon back and forth through it to swirl a bit.

Picture
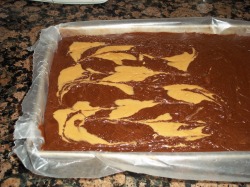
It's best to not break it up too much.  Tap the pan on the counter again to flatten the top.

Picture
Chill until it's firm, then lift the whole batch out.  Put it on a cutting board, and cut into squares. 

0 Comments

    Need a Search bar?
    One day I may upgrade my website-- but until then, use your web browser search bar. Type in my web address and what you're looking for, like this-- 
    www.theprovidenthomemaker.com  pumpkin --  and you should get results.


    Author

    I'm a disciple of Christ, a member of the Church of Jesus Christ of Latter-day Saints, a family-defending, homemaking, and homeschooling mom of eight children, two of whom sometimes can't have milk or wheat. Growing up on a farm in a high mountain valley, my parents taught me to 'make do', work hard, smile, and help others.  I love cooking, learning, growing food and flowers, picking tomatoes, and making gingerbread houses --which CAN be made allergy-friendly-- with my children.  I hope you find something to help you on my site!

    Archives

    April 2024
    July 2023
    April 2022
    September 2021
    March 2021
    December 2020
    April 2020
    March 2020
    February 2020
    January 2020
    December 2019
    November 2019
    October 2019
    September 2019
    August 2019
    July 2019
    June 2019
    May 2019
    April 2019
    January 2016
    November 2015
    October 2015
    September 2015
    March 2015
    February 2015
    November 2014
    October 2014
    September 2014
    August 2014
    July 2014
    June 2014
    May 2014
    April 2014
    March 2014
    February 2014
    January 2014
    December 2013
    November 2013
    October 2013
    September 2013
    August 2013
    July 2013
    June 2013
    May 2013
    April 2013
    March 2013
    February 2013
    January 2013
    December 2012
    November 2012
    October 2012
    September 2012
    August 2012
    July 2012
    June 2012
    May 2012
    April 2012
    March 2012
    February 2012
    January 2012
    December 2011
    November 2011
    October 2011
    September 2011
    August 2011
    July 2011
    June 2011
    May 2011
    April 2011
    March 2011
    February 2011
    January 2011
    December 2010
    November 2010
    October 2010
    September 2010

    Categories

    All
    Alcohol
    Alternate Cooking
    Appearances
    Apple
    Apricots
    April Fools
    Aprons
    Bananas
    Beans
    Beef
    Beets
    Bench
    Beverages
    Bonnet
    Bread
    Breakfast
    Budget
    Budgeting
    Cake
    Candy
    Canning
    Carrots
    Cheese
    Chicken
    Children
    Chocolate
    Christmas
    Cleaning
    Coconut
    Comfrey
    Common Core
    Constitution
    Cookbook
    Cookies
    Cooking Oil
    Crafts
    Dairy Substitutions
    Dehydrating
    Dessert
    Dried Fruit
    Earth Oven
    Earthquake
    Easter
    Edible Weeds
    Eggs
    Emergency Prep
    Essential Oils
    Faith
    Family Home Evening
    Fertilizing
    Food Storage
    Fourth Of July
    Freezer
    Frosting
    Fudge
    Garden
    Gardening
    Gingerbread
    Gluten
    Gluten Free
    Gold
    Government
    Grains
    Gratitude
    Hat
    Herbs
    Home Remedies
    Home Repairs
    Homeschool
    Home Storage
    Honey
    Hope
    Inflation
    Leftovers
    Legumes
    Lemon
    Main Dishes
    Mixes
    Mothers
    Noah
    Non Artificial Colors
    Non-artificial Colors
    Nuts
    Oats
    Oil
    Orange
    Paint
    Peaches
    Pear
    Pie
    Pizza
    Plums
    Poem
    Popcorn
    Pork
    Potatoes
    Powdered Milk
    Prayer
    Preparedness
    Projects
    Prophecy
    Pruning
    Pumpkin
    Quick Bread
    Rhubarb
    Rice
    Salad
    Salt
    Sauces
    Self Reliance
    Self-reliance
    Sewing
    Shelf Life
    Shelves
    Sky
    Smoothie
    Snacks
    Soup
    Spices Or Seasonings
    Squash
    Strawberries
    Substitutions
    Sugar
    Summer Fun
    Three Month Supply
    Time
    Tomatoes
    Trees
    Truffles
    T-shirts
    Tuna
    Ultra Gel
    Valentine\'s Day
    Vegetables
    Water
    Watermelon
    Wheat
    Work
    Year Supply
    Zucchini

    RSS Feed

Web Hosting by iPage