The Provident Homemaker
  • Recipes and Info
    • Making Bread
  • My Blog
  • Favorite Resources
  • Documents and Files
  • 52 Weeks of Building Storage

Chocolate Banana Cake

4/3/2024

0 Comments

 
Picture
Some of the best recipes happen when you need to 'use up' something in the house.  In this case, there were 3 things-- some chocolate milk that had gone sour, a bunch of bananas that were overripe, and the tail end of a jar of mayonnaise. 

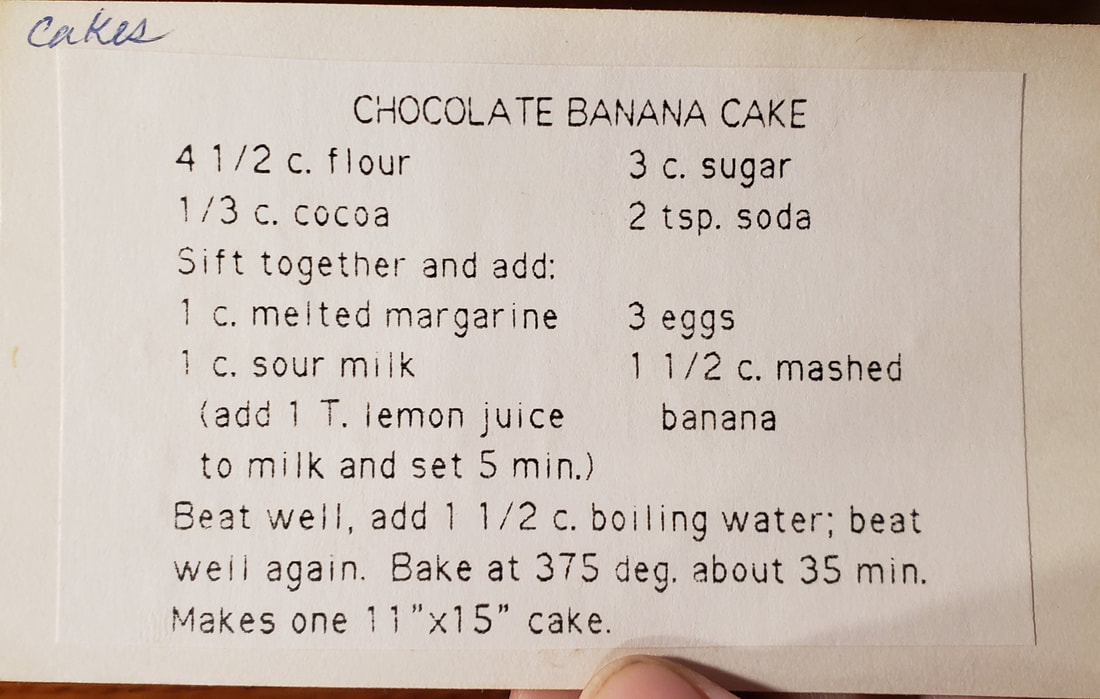
Several years back, when I was still in high school, I told my mom what I would really like as a graduation gift was a card file of her recipes.  She made one, painstakingly putting one card at a time into our manual typewriter (OK, this was more than several years back) and typing out each recipe.  When the next sibling graduated, 2 years later, she had realized there was a way to type the recipes on the computer, and that way the info was saved for and could be printed an number of times without having to retype them. The recipe card in the photo below is from one of that second round of recipes she gave me. As you can see, it makes a big cake. 11x15. So I've scaled it down to fit a 9x13, and tweaked the leavening to use both baking soda and baking powder, which combination I've found to give slightly more consistent results.

Have you ever had the boiling-water chocolate cake before?  It's a wonderful, very moist cake. It looks to me that my mom simply took that recipe and adjusted it to include mashed bananas. Chances are high that she was simply being creative with what needed using up, too.

For the cake this week, I made it using mostly whole-wheat flour, for the nutrition, fiber, and flavor. I also used a blender to streamline the mixing steps.  The strange-sounding frosting really does work!  It's modified from the Sauerkraut Cake recipe posted much earlier.

Chocolate Banana Cake

Heat oven to 375 degrees F, and spray a 9x13 pan with nonstick cooking spray. (This can also fill 2 9" round cake pans instead.)

In a large bowl, stir together
3 cups flour (I used 2 c. whole wheat flour, 1 cup all-purpose flour)
1/4 to 1/3 cup cocoa powder
1 tsp. baking soda
1 tsp. baking powder
1 tsp. salt


Meanwhile, melt
1/2 c. butter
and set aside. Measure 1 cup of water and bring it to a boil in the microwave or on the stovetop. Set aside.

In a blender, combine
2/3 cups sour milk (or milk mixed with 1 Tbsp. lemon juice or vinegar)
2 eggs
2 large overripe bananas, or 3 medium/small ones
2 cups sugar
​

Mix until smooth. Pour over the flour mixture, add the melted butter, and stir well. Pour the boiling water over the top, and mix in thoroughly. Bake at 375F for about 30-35 minutes, or until the top springs back when pressed lightly with a finger.

Chocolate Mayonnaise Frosting
1 bag (11-12 ounces) chocolate chips (I used semisweet)
2/3 c. mayonnaise

Melt the chocolate chips in a heatproof bowl in the microwave; heating for 1 minute at a time and stopping to stir.  This took about 2 minutes in my microwave. 

Add the mayonnaise, and stir to combine.  Spread over cake.
Notes:
If you put the frosting in the fridge, it will set up very firmly. Too firm to spread. If you need to soften it, microwave for 15-30 seconds and stir.  
If you don't have mayonnaise-- remember I said we were at the tail end of the jar?-- use yogurt instead. I had only half the mayo needed, so used that, and made up the difference with some strawberry yogurt sitting in the fridge. 


Picture
0 Comments

Inflation!  Rush to the Store?

4/15/2022

0 Comments

 
Inflation has done some crazy things to food prices.  

What's a girl to do?

Don’t rush to the store!

That tends to make the problem worse, if you panic while others are panic-buying. Instead, be calm, watchful, resourceful, and grateful.

A couple of weeks ago, while chatting on the couch with a dear friend, she asked me, "With prices rising so quickly, are you beefing up your food storage?  

An online definition says "beefing up" means “To make markedly greater in measure or degree.”

Am I doing that?

No, not really. The way I store food is centered on stocking up on what we use when it is inexpensive. Buying or gleaning what most don’t want right then.

For example, look at what has happened with wheat. The retail price of a 50-pound bag jumped from $24.99 two years ago to $39.99 two weeks ago. (Oat groats -- the whole grain--- jumped even more, to $100 for a 50-pound bag.) Even so, every store in my area appeared to be completely sold out of wheat by the first weekend in April.  Now is NOT the time for me to replenish a wheat supply. What I have is just fine. And if it wasn’t, I’d use more of some other grain in my rotation.

I did buy one bag of all-purpose flour at Sam’s Club two or three months ago—but that was before war broke out between two of the world’s biggest suppliers of wheat.  I just knew that my flour quantity was a little lower than optimal, and the flour was a good price.
 
Good food storage habits not only allow you to buy at low prices, but to help moderate supply and demand. You HELP the supply chain! -by absorbing excess when there is too much of something—by purchasing then—and help the limited quantities go to more people when there’s more demand than supply.

In other words, good food storage purchases help even out the supply-and-demand cycle.

-They help reduce excess --by preserving it for later when supply is low-
-And reduce demand – by using reserves rather than purchasing.

Not only that, but doing this allows you eat at or near the lowest prices available within the food’s shelf life.
_____________
Now, if that friend had asked “have you added anything to your family storehouse lately?” the answer would be yes.  I’ve been doing what I always do.  Shopping for my family, keeping an eye out for anything that a store has too much of, that would be helpful to my family.

Want some examples?  My two biggest food storage additions since inflation and war have combined forces are dried bananas (click for details on that) and flour. Not the single bag of flour I mentioned before.  This was after prices went nuts. But remember that in 2020-21 it was hard to find flour?  Apparently the flour had been produced, but had been sitting in warehouses waiting for trucks, or people who could drive those trucks. The overstock grocery store I frequent had just received multiple pallets of 25-pound bags of flour that had barely hit the “best by” date (see here for why that's not bad). They wanted the flour out, quickly.  It was $2.99 for one bag, or $5.49 for two of them. 

Our family goes through about 25 pounds of wheat and/or flour per month. (That's six loaves of bread every 7 days; there are currently 8 of us here, with more on Sundays). In my dark, cool basement, flour can stay fresh for about 3-4 years.  I bought 8 bags, put the flour in buckets, labelled them, and rearranged the storage room a bit to get the oldest buckets in front, newest ones behind.  It's not 'markedly greater' than what I usually have.  The buckets they went in were already sitting empty, waiting for refill. Food storage is meant to be a cushion. There's plenty of flexibility in it.

And I'm feeling pretty grateful and amazed.  Blessings are all around. 

What have you found in your area?
Picture
0 Comments

Week 49- Using Wheat: Making Bread (and rescuing it)

3/21/2020

0 Comments

 
Picture
​If you’re storing up all the wheat, flour, and other grains recommended, you’ll need to have the ability to use it.  (You know-- "store what you eat, and eat what you store!") The most common way to do this is to grind the wheat into flour to make bread and other baked goods.

My mom taught all of us kids how to make bread when we were young. I still use her recipe today; it has good flavor, is immensely adaptable, and works well with quite a bit less yeast per loaf needed than many other recipes call for.  That recipe is found on my website under “Making Bread”. There are two amounts of ingredients- one for a two-loaf batch, and another for a six-loaf batch (the size that fills my oven-- because it's the same amount of dishes and time to make 6 as it is to make 1).

Wait until the bread is cool before slicing and bagging it. The exception is the loaf you eat while it's still hot!  But be patient for 10-20 minutes after it's out of the oven; it continues to cook during that time. It will mash if you slice before then.  Bread freezes exceptionally well, so I always put in the pantry only the bread we'll eat in the next three days, when fresh bread is at its best. The rest goes into the freezer; it will taste fresh-baked when you thaw it later. (The best way to thaw is in its bag at room temperature for a few hours. The next best way-- which we do more often-- is to put it in the microwave for 60 seconds. Be sure to remove any metal twist tie on the bag!)


This recipe works whether you’re making it in a big bowl with a strong wooden spoon, or if you have a stand mixer.  (Mom made me learn initially with the bowl and spoon, because, she said, “You won’t always have a mixer.”  That turned out to be true. I made my bread all through college with nothing but a bowl and wooden spoon.)  If you’re new to making bread, make your first few batches with all white flour.  It’s easier to make good white bread with than it is to make good whole wheat bread.

A new electric grain mill generally costs somewhere around $200. There are hand mills sold for much less money – around $80—but it’s a whole lot of work and time to get enough flour for a batch of bread with one of those. I like having one as emergency backup, but not for normal use. The electric mill can give you finer flour anyway. 

If you want to start using your wheat for bread and don’t have a mill, try this recipe: Really Good Whole Wheat Bread Without a Grain Mill. It's the bread version of Blender Pancakes; this kind of pancake recipe can also be found in the Wooden Spoon: Wheat section, and in the Bee Prepared Pantry Cookbook.
​
What if you don’t have yeast?  Use a sourdough start or “everlasting yeast” to leaven it.  (Maybe that should be the topic for next week’s post—What do you think?)

What if I ruin the batch of bread?

First of all, everyone makes a ‘bad’ batch every now and then.  See if you can figure what went wrong, and learn from it.  Meanwhile, here are some common problems and how to use the bread anyway.  Ruined doesn’t need to mean wasted.

BURNT BREAD- Scrape off the darkest parts, or cut it away in the thinnest slices you can manage. 

BREAD WON’T RISE- Make fried scones. If you’re unfamiliar with the term, they’re a kind of yeast-raised Indian fry bread or sopapillas. Here in Utah, we just call them ‘scones’. Heat a 1-2” deep layer of cooking oil to 350 degrees, pinch off golfball-sized pieces of dough and stretch or roll them about ¼” thick. Fry 3 or 4 at a time, turning them over after about a minute. Drain on paper towels and serve as the base for Navajo Tacos, or with butter and honey or jam.

BREAD IS UNDERCOOKED- if the bread is still hot, put it back in the oven for another five minutes.  Check again. Cook longer if needed.  If the bread was no longer hot when you discovered the problem, slice it a little thinner than you normally would, and toast it. Now it’s cooked. 

BREAD IS CRUMBLY. (Or stale)- This is a problem you see only after it has cooled; warm bread is almost always amazing and not crumbly. The solution next time is to get the gluten to develop better. (Unless the problem is the bread is several days old and dried out. These solutions still apply.)

• Make it into French toast, egg toast, or bread pudding. (Try Caramel Pumpkin Bread Pudding or Pineapple Coconut Bread Pudding!) 

• Use it for sandwiches with a creamy filling, like egg salad or chicken salad.

• Use it up sooner than usual and freeze everything that you won’t use within a day, rather than the regular 3-day window I usually keep it out for. 

• Cut it into ½” cubes, toss with a little oil and whatever seasonings you like, and toast them in a skillet or in the oven to make croutons.

• Make bread soup. This is an Italian specialty, and you can find lots of recipes.

• Make cream of tomato soup using bread in a surprising way to make it thick and creamy.

• Make a batch of bread crumbs- either toast them to dry them out, or if you want the fresh, soft bread crumbs, store any extras in an airtight container in the freezer. 
​___________________________


What other bread problems would you like a solution for?  Comment below, and I’ll do my best to answer.  If there's a way to mess up a batch, I've likely done it.  :) Experience is a good teacher.
0 Comments

Week 32-  Storing grains and more – dry pack and vacuum method

11/16/2019

0 Comments

 
Picture
To help with building your year's supply (this is Week 6 of 26), see this chart. 

How do you keep your dry foods safe?  That depends on a number of factors, including the local climate, humidity levels, if your storage area is cool and dark or not, and how long you need to store it. 
  
One good option is the ‘dry pack’ method. 
You pack (or pour) dry food into an airtight food grade container.
 
There are better and worse ways to do this. (See here for ALL about it!)
 
Several years ago I attended a class at a local grocery store where the teacher showed us how to extend the shelf life of dry foods.  Some of those foods were wheat and rice, but she included chocolate and nuts.  You can store peanut M&Ms?!  She said this was an experiment, but they’d stored beautifully for a year and she didn’t know how much more to expect.
 
She used glass canning jars, lids, and a seal-a-meal (vacuum packaging)  attachment for canning lids. 

I don’t have the attachment, but discovered something else that works-- oxygen packets!  A 300cc oxygen pack will remove oxygen from filled containers up to a gallon in size. The cheapest way I’ve found to buy these is through the Church’s website, in quantities of 100.  If you’re buying them elsewhere, know that a 100cc oxygen pack is powerful enough for any container of one quart or less.

Oxygen packets are little squares—about 2” across and mostly flat—that contain iron powder.  Oxygen crosses through the packaging material, where it causes the iron inside to rust.  This permanently locks up the oxygen. 

Oxygen packets are recommended for dry-pack canning for two reasons-
  1. their use quickly removes oxygen that could keep insects alive in what you’re storing, and
  2. removing oxygen extends the shelf life of a food.
 
Three things, more than any others,  shorten shelf life of foods once moisture has been reduced--oxygen, light, and heat.  If you can remove the oxygen, the food will last longer. This is especially true if you store it someplace dark or cool, and preferably both. 
 
But removing oxygen also creates a vacuum, which can seal the jars for you.  No seal-a-meal vacuum attachment needed. 
I’ve been dry-packing food in glass canning jars, as well as PET and PETE plastic bottles, for about ten years.   
PETE plastic bottles include those you buy juice in.  Check the bottom of the bottle, and if it says PET or PETE, you can use it.  You can also use food storage foil pouches, which can be cut to whatever size you like, and sealed all the way around.

Make sure your containers are clean and dry, then fill most the way with whatever food you’re placing in it.  Add an oxygen packet, screw on the lid, label, and store somewhere cool and as dark as you can find.  (I like to run a band of masking tape around the lid edge, so I can tell at a glance later if someone opened it—a real possibility in a houseful of children!) 

Simple, right?

But dry-canning in glass jars—vacuum canning-- has been a game-changer for me. You can use any size of canning jar, from the little 4-oz ones to the big 2-quart size.
 
Here’s how I do it:
Get jars, lids, and rings ready- they need to be totally clean and dry. 
Get your food ready- totally clean, with moisture levels below 10%

Get your oxygen packets ready- keep them in their sealed package or airproof jar until the last minute. 

Fill the jars up to the neck only, or a little below the neck.  You’ll need a little bit of extra space in there, and overfilled jars don’t seal well.  Set a new lid and ring (band) to the side of each one. Wipe off the top of each jar, to be sure you have a clean surface for the lid to seal to. Open up the oxygen packets, and, working quickly, drop a packet into each.  Quickly top each jar with a lid and screw the band on.  Label each jar with the contents (if not obvious) and the date (always).

Oxygen packets will start to absorb oxygen immediately, and you don’t want them using up all their power before they’re in the jar!  You can tell the packets are working because they warm up.      
Store the leftover packets in a glass jar with a lid and band firmly screwed on.  They’ll be ready the next time you need them.

The oxygen packets will do their job in the food jars over the next 48 hours, dropping the oxygen content down to .1%.  As this happens, suction is created inside the jar, making the lid seal.  It’s not as secure of a seal as you get with regular canning (steam, water bath, or pressure), but it almost always holds.  Avoid bumping the tops of the jars, since this can knock lids loose.  Leave the bands on for at least the full 48 hours.  You can leave them on the whole storage time if you like. 


I’ve have learned a few things along the way. 

Removing oxygen makes a huge difference, and I can even store foods with a high fat content (peanut M&Ms!) for a few years without them going rancid. 

When storing my homemade tomato powder the first year, I used oxygen packets with some jars, and not with others.  Dried foods are listed as ‘best within a year,’ though that depends a lot on storage conditions.  Two years later, there was a visible difference between the oxygen-free tomato powder and the untreated powder.  The ones with oxygen removed were still as brightly colored—and nicely flavored—as at the beginning, while the others had lost both color and flavor. 
 
How long does sealing and removing air extend shelf life? 

That depends.
 
When stored in my cool, dark basement, nuts have remained great for about 5-6 years.  I recently opened two jars of walnuts canned in 2010! One jar had remained sealed, but the other hadn’t. While the sealed-jar nuts were definitely better three years ago, they were still in the realm of ‘OK’.  Barely.  But the ones that had lost their seal?  Awful.   Really, truly awful.  The smell of rancid oil assaulted my nostrils as soon as the lid was lifted, and those nuts—stored side-by-side with the other jar—were several shades darker.  (I gave those to the chickens.  Not sure whether they got eaten or not.)   So the moral of the story is to ROTATE your food.  Use it.  I try to store the right amount of food to be able to go through it in the next two years, and that would have been great.  Try to use any high-oil-content food within at least five years.

But low-oil foods like rice and wheat?  They’ll store nearly indefinitely.  20, 25, 30 years or more are the estimates from BYU’s food studies. But still rotate using it.

Things I’ve successfully home dry-packed (stored in airtight containers with oxygen packets)

→Rice
→Vegetable powders- tomato, zucchini, pumpkin, beet
→Citrus sugar (dried zest from orange, lemon, or lime, added to sugar and run through the blender to form a powder.  I use it in place of orange or lemon extract.) https://www.theprovidenthomemaker.com/1/post/2010/10/garden-seeds-homemade-orange-flavoring-and-easy-marmalade.html
→Dried candied orange peel (also used to flavor recipes- see the same link as citrus sugar)
→Thoroughly cooked and dried crumbled sausage (all dry packed foods MUST be below 10% water content, or you risk botulism)
→Raw almonds, walnuts, pecans, macadamia nuts, pecan meal, pumpkin seeds, pine nuts, pistachios, smoked almonds, honey-roasted peanuts …
→Sesame seeds, flax seed,
→Spices
→Bridge mix
→Trail mix
And probably more that we’ve long since eaten and forgotten about.
 
I don’t dry-can dried fruit, because it lasts a few years anyway, we’re pretty good at rotating through it, AND I haven’t wanted to do the measuring and weighing to determine if the moisture content is low enough to dry-can it safely.
 
The things people usually dry can at home are wheat, rolled oats, beans, lentils, rice, etc.

So why did I put these other things in jars with oxygen packets?

There are 3 typical reasons- (1) something was at a really good price and I wanted to have it last, (2) I naturally had a lot of that thing, or (3) I was curious to see if it would work! 
 
In the case of all those nuts and seeds, there used to be a local nut packaging company that only allowed its wholesale customers to keep any particular product on the shelf for six months.  Whatever didn’t sell in that time was returned to the company, who would resell this ‘expired’ product for $1 per one-pound bag… no matter if the bag contained gummy bears or macadamias.  Most of the time the nuts were still very good—depending on how and where the store displayed them—in a hot window or on a cool, darker shelf.  As you can see from the photo and list of things I’ve vacuum-canned, my friends and I took full advantage of this!  
0 Comments

Week 31- Storing and Using Wheat

11/9/2019

0 Comments

 
Picture
To help with building your year's supply (this is Week 4 of 26), see this chart. 
 
If you’ve looked at the Year Supply food list at the link above, you’ve likely noticed that there are more wheat and other grains than any other food there.  (If you can’t eat wheat, try this list for gluten-free storage and adapt as needed.)

Why such a focus on grains? 

They’ve been known since ancient times as ‘the staff of life’—something to lean on, to support you, especially when you’re going through a rough spot. They can be eaten cooked whole, coarsely crushed and cooked, ground into flour and made into limitless cooked and baked foods including breads and pasta.

"There is more salvation and security in wheat than in all the political schemes of the world, and also more power in it than in all the contending armies of the nations.". – apostle Orson Hyde, Journal of Discourses, 2:207  

Wheat is the plump seed of a grass.  The kernels contain protein, fiber, antioxidants including Vitamin E, and an assortment of minerals—selenium, manganese, phosphorus, copper, and folate.  The uncooked kernels contain about 11% water, 10-15% protein, 60-65% carbohydrates (90% of which is starch), 11% fiber, and 2.5 % fat. 

Almost all of the vitamins, minerals, and starches are found in the bran and germ of the wheat; white flour is stripped of these.  To help, white flour is enriched with vitamins and minerals, but natural whole wheat, properly prepared, will always be better for you.

If you’re storing wheat, what can you do with it?

Many people who store wheat also buy a grain mill, so they can make fresh flour out of the wheat kernels.  Fresh flour smells and tastes so good!  It makes more flavorful bread, too. 

If that’s what you’re doing, there’s a tutorial here on the differences between types of wheat—red vs white, hard vs. soft.  

Here’s helpful information to use if you’re substituting whole wheat flour into regular white flour recipes: Cooking with Whole Wheat Flour. 

But what if you don’t have a grain mill?  Or maybe you do, but want more variety in what you do with your wheat. 

Wheat can be sprouted.  Wheat sprouts have Vitamin C and a whole host of vitamins that weren’t there before sprouting. 

Sprouted wheat, stopped and dried at the right stage, can even make malt. Diastatic malt is used in small recipes to get the bread to rise better.
 
Wheat can be cooked and eaten as a hot cereal, or substituted in recipes in place of rice, hamburger, or nuts. Here are a bunch of ways to use cooked wheat kernels. 

You can even make really good wheat bread without a mill.   


​What else do you wonder about wheat?


0 Comments

Which are cheaper foods- healthy, or not?

6/19/2012

0 Comments

 
Picture
In the last few years, we've all heard that it's more inexpensive to eat high-calorie, nutrient-sparse foods.    Are we then doomed to a life of either nasty nutrition or perpetual poverty because of our ballooning food budget?

Picture
No way!   The whole premise turns out to not really be true.


But then, those of you who cook your own food probably took the earlier studies with a grain of salt.


Fresh and whole foods are cheaper especially if eating from scratch... whole grains and legumes are especially inexpensive per serving (you know, that stuff that stores long-term really well!).

The original studies, we now learn, were comparing price per calorie in healthy vs. unhealthy foods.

Now, if you're comparing a fresh apple to a side order of fries, it looks something like this:

1 medium apple, about 5 ounces (141g) = about 80 calories    at $1.50/lb,  this costs $ .47  (if you buy them when they're on sale for $1/lb, then it's $ .31)

1 medium order of McDonald's fries, about 5 ounces (147 g) = 453 calories, in my city it costs $1.49

Both weigh approximately the same.  You'll feel about as full with each one; they both fill the same amount of space in your stomach.  According to the old numbers, though, the fries are much cheaper because   $1.49 divided by 453 calories gets you 3 calories per penny.  The apple, at $ .47 for 80 calories, comes out at 1.7 calories per penny. 

This would matter in a country where every calorie is precious.  Our problem here, though is the reverse.  Most of us eat too many calories, and being full with fewer calories is a helpful thing.

The price difference gets worse, too.  Here in Utah, sales tax on food is 3%.  Sales tax on food from a restaurant, however, is 8%.  That means you're paying one to two cents to the government when you buy the apple, and twelve cents when buying those French fries.  (Maybe that's where the money came from to fund that first study saying fast food was cheaper?!)

So is healthy food always cheaper than fast food?  No, not always.  Often.  It depends on what you buy.  (like Dave Ramsey says, eat "beans and rice; rice and beans" for those trying to live very frugally.) 

But your grocery budget already told you that.

************************************************
Click on the link below to read the article that sparked this blog entry:

http://www.foodnavigator-usa.com/Market/Are-healthy-foods-really-more-expensive-Not-necessarily-say-USDA-researchers

0 Comments

Baking with Whole Wheat Flour

5/26/2012

0 Comments

 
Picture
If you're new to cooking with whole wheat, I recommend you also read Wheat Basics.


If you’re using whole-wheat flour instead of all-purpose flour, there are a couple things to know for successful baking.  Whole grains contain fiber-rich bran and nutrient-rich germ, as well as the starchy endosperm.  Processed white flour contains only the starchy part, not the bran or germ.  Because of this, you'll need to adjust your ingredients a little bit, either reduce the amount of flour by 2-3 Tbsp. per cup used, OR increase liquid by 3-4 Tbsp. per cup used and increase leavening by about 1/3.   Otherwise, your baked goods will be more dense, heavy, and flat than they need to be.   See more on this below.

Bran
is the outer protective layer of the kernel, it's very high in fiber and minerals, and vitamins.  That fiber  is very absorbent.  Because of this, whole wheat flour (measured by weight) absorbs about 25% more liquid than processed white flour does.   Bran also makes it harder for gluten to form; its sharp edges tend to cut the tiny gluten strands.  Soaking the dough – mixing at least the flour and liquid, then letting it sit for a few hours or overnight - softens the bran.  That’s one reason European breads have long rise times. The technique works well for pancake batter and cake batter- leave eggs out of the batter until ready to bake, or soak covered in the refrigerator.

The germ is also high in vitamins and minerals, as well as protein, some fiber and fat (vitamin E).   Its name comes from the same Latin root as the word "germinate"; germen , which means to sprout or shoot.   The germ is the part of the grain that can grow into a plant.  It is dense and heavy, and therefore you'll need more leavening in the recipe.  The vitamin E, which is an oil, is the reason for whole wheat flour's short shelf life; this type of fat oxidizes quickly, which makes it slightly rancid.  Store fresh-ground flour in the fridge or freezer to prolong its life and vitamin content.  If you leave the flour at room temperature, it's at its best within 24 hours, but is still good (though less nutritious) for about a week.  It won't make you sick after that, just won't give you all the benefits it would have when more fresh.  Neither does it taste as good.  That's why bread made from freshly ground flour tastes so much better than bread made with whole wheat flour from a bag at the store.

To recap:  
either use about 20% less flour (2-3 Tbsp. less per cup used),
or increase water by about 3-4 Tbsp. per cup of liquid and add about 1/3 more of any leavening agent you’re using (1 tsp. more per Tbsp).  

Fresh-ground flour is fluffy and less packed in the cup, so there’s already less there.  For the most accurate measuring, go by weight, not volume.
0 Comments

Updated Cost and Quantity for Year Supply

8/6/2011

3 Comments

 
Picture
Members of The Church of Jesus Christ of Latter-day Saints are counseled to have three months’ worth of everyday food on hand, and then store more, longer-term storage foods, where possible.  This has typically been defined as a “Year’s Supply”, at least in the last couple generations.  Having food on hand is an invaluable part of being self-reliant.  It’s insurance, if you will, for times of unexpected illness, disability, unemployment, power outages, or for when a neighbor down the street needs a meal.  It’s also handy for sharing with a local food bank.  (Hint, hint: right now their supplies are very low!)

Once you get three months’ worth, how much will a year’s supply of food cost you?  When you look at your monthly grocery bill, is it overwhelming to think of buying more?  I looked an emergency supply store’s catalog; they advertise a basic year’s supply of food for ‘just’ $1,299.99.  For one person.  They list options of up to $3800 per person per year.  Is it really that much money to get a year’s supply?

Adding up all the 7 essentials, purchasing them mostly at the Home Storage Center, a month’s worth of food for one person is $25.31. This provides about 2200 calories a day; the catalog’s has 2000.

A year’s worth for one adult is $303.86. 

(It was $194.76 in 2010.  That’s an increase of 56%.  How’s that compare to your 401(k)? I’m quite sure food will go up more.  It is a great investment!  Wouldn’t you like to eat at last year’s prices?)

Figure in that you’re getting your year’s supply after building your three-month supply; that knocks it down to getting nine months’worth;

$227.90 per adult

 
SO, if you really want to spend $1299.99 plus tax, you could buy a year’s supply for not just one person, but for FOUR adults.  Yes, it’s different food than the ‘gourmet’ version ($3800), but here’s the counsel we’ve been given:          "We encourage members world-wide to prepare for adversity in life by having a basic supply of food and water and some money in savings.” “For longer-term needs….gradually build a supply of food that will last a long time  and that you can use to stay alive” (from All is Safely Gathered In, First Presidency pamphlet)

 If you’re storing food for children, plan on 50% of the amount for age 3 and under, 70% for ages 3-6, 90% for ages 7-10, and 100% for ages 11 and up.  Or store as much as you would for an adult, and have enough to share. 

For great recipes using this stored food, see my Favorite Resources page, under "Cooking and Recipes". 
____________________________________
Here is the cost breakdown:

Grains, 300 lbs- if you get 100 lbs each of wheat , rice, and oats, at the Home Storage Centers they cost between $11.45 and $15.45 for 25 lbs. depending on if you get white or red wheat,  rice, quick- or regular- oats.  If you average this out, it will cost you $13.55  per person, per month.  $162.60 per year’s worth. This category doubled in price from early 2010.  Your daily allotted amount would be about 2 ½ cups of flour, or about the size of a loaf of bread.

Milk, 16 lbs is $1.89/lb at the cannery, which is $2.52 per month, $30.24 per year.  Daily amount is just under ¾ cup of reconstituted milk.  This is enough to cook with, not enough to drink very often.  For instance, making your loaf of bread would/could use up this entire amount.

Sugar, 60 lbs is $ .85/lb there, $4.23 per month, $50.76 per year.  Daily amount is just about 1/3 cup, but keep in mind you’ll probably want to use it to help bottle fruit or make jam, as well as for making your bread or breakfast oatmeal.

Oil, 10 qts –this isn’t sold at the cannery, but the last good sale price I found was $2.50 for 1 ½ quarts (48 oz.) At that price, after tax, it’s $1.43 per month, $17.17 per year.  It’s only $14.38 if you buy it at Sam’s Club ($6.98 + tax for 5 qts.)  .)  Daily amount: about 2 ½ teaspoons; will also be used in making bread. Fat is necessary to help you digest fiber, as well as to access the fat-soluble vitamins A, D, E, and K.

Salt, 8 lbs- 4# box at Costco or Sam’s Club is a dollar; $ .16 per month, $2 per year.  Daily amount: about 2 tsp. It never hurts to store extra salt; it is an excellent preservative for meats and more.

Legumes, 60 lbs– the cannery sells black beans, pinto, and white, from $16.00 to $18.55 for 25 lbs.  Averaging the prices, it’s  $3.42 a month, $41.09 per year.  Daily amount: about ½ cup dry, or 1 ½ cups cooked.

In addition to the above, storing some water is an essential part of your home storage.  Plan on 1 gallon per person per day, for 2 weeks (14 days).  This is enough to drink, and not much else. 
Water, 14/gal/person-   You can store this for free by using 2- and 3- liter pop bottles, or juice containers (not milk jugs- they break down).  Or use the 5-gallons square jugs or big blue barrels; they’ll run you about $1 per gallon of storage. 

Total daily food allotment: 1 loaf of bread, 1/3 c. sugar for cooking or preserving, 1 ½ cups of beans, 2 ½ tsp. oil, a little salt, ¾ c. of milk.  You won’t get fat on this, but it will keep you alive.  It also stores in a fairly small amount of space.


When you’re done storing these items, you might decide to add a few ‘gourmet’ items- spices, flavorings,  and unsweetened cocoa are high on my list here, as are non-hybrid garden seeds.  Practice growing them now; you can save seeds from what you grow, for next year’s crop.

Notice that the costs were just for food, not containers to store them in. Most of my storage containers cost nothing.   You CAN get buckets for free, with a little effort- most bakeries give them away; all their frostings and fillings come in those buckets.  Plan on washing them at home.  There are two main sizes; 5 gallon and 2 ½  gallon.  I keep packages of dried fruit in the smaller buckets, also cornmeal or other things that I don’t use as much.  They are a great size for a pantry, too.  Some of the buckets have gaskets, some don’t.  The ones that don’t seal well are still good for storing sugar.

If you want all your wheat, powdered milk, sugar, and legumes in #10 cans from the cannery, it will cost you $86 more to get a full year’s worth, $65 to do 9 months.

I don’t can my wheat, sugar, or beans because we go through large quantities; one batch of bread would use a whole can.  It’s pretty silly storage for me.  Besides, it’s easier for me to find space for 10 buckets than 60 #10 cans; they hold about the same amount of food.

3 Comments

Preparing For- and Handling- Trials; Strawberry Leather; Group Orders

5/28/2011

0 Comments

 
Picture


Have you found good deals on strawberries?  Or are your plants starting to produce them?  We love to make and eat strawberry leather, though I often mix strawberry puree with applesauce or any other mashed fruit, to make the strawberries go farther.  For a simple way to make fruit leather, see http://www.theprovidenthomemaker.com/1/post/2010/11/what-to-do-now-in-the-garden-fruit-leather.html

___________________________ 

If you’re in the Salt Lake valley, I just learned about a lady who puts together group orders every month; she lives just a mile down the road from me.  The prices are great, and the food is good quality.  It comes from a Utah/Idaho farmers’ co-op; most of the items are even organic.  Her website is http://www.organicemily.com 

____________________________

The following excerpts from an article are from Ezra Taft Benson, published in the Ensign magazine, January 1974, entitled “Prepare Ye”.  He repeats D&C 38:30 three times in it (“if ye are prepared, ye shall not fear”), and this talk has been extensively quoted.  It contains at least 12 segments I’ve quoted or heard quoted.  Read through the talk, and see how many pieces of it you’ve heard before.


Here are some excerpts:

“In Matthew, chapter 24, we learn of “famines, and pestilences, and earthquakes. …” (Matt. 24:7.) The Lord declared that these and other calamities shall occur. These particular prophecies seem not to be conditional. The Lord, with his foreknowledge, knows that they will happen. Some will come about through man’s manipulations; others through the forces of nature and nature’s God, but that they will come seems certain. Prophecy is but history in reverse—a divine disclosure of future events.

Yet, through all of this, the Lord Jesus Christ has said: “… if ye are prepared ye shall not fear.” (D&C 38:30.)

…At the April 1937 general conference of the Church [of Jesus Christ of Latter-Day Saints], President J. Reuben Clark, Jr., of the First Presidency, asked: “What may we as a people and as individuals do for ourselves to prepare to meet this oncoming disaster, which God in his wisdom may not turn aside from us?” President Clark then set forth these inspired basic principles of the Church welfare program:

“First, and above and beyond everything else, let us live righteously. … Let us avoid debt as we would avoid a plague; where we are now in debt, let us get out of debt; if not today, then tomorrow.  Let us straitly and strictly live within our incomes, and save a little.

“Let every head of every household see to it that he has on hand enough food and clothing, and, where possible, fuel also, for at least a year ahead. You of small means put your money in foodstuffs and wearing apparel, not in stocks and bonds; you of large means will think you know how to care for yourselves, but I may venture to suggest that you do not speculate. Let every head of every household aim to own his own home, free from mortgage. Let every man who has a garden spot, garden it; every man who owns a farm, farm it.” (Conference Report, April 1937, p. 26.)

…There are blessings in being close to the soil, in raising your own food, even if it is only a garden in your yard and/or a fruit tree or two. Man’s material wealth basically springs from the land and other natural resources. Combined with his human energy and multiplied by his tools, this wealth is assured and expanded through freedom and righteousness. Those families will be fortunate who, in the last days, have an adequate supply of each of these particulars.”

…  “Healthful foods, proper rest, adequate exercise, and a clean conscience can prepare us to tackle the trials that lie ahead.”

0 Comments

Wheat Flour Basics

4/25/2011

1 Comment

 
Picture
Left- White Wheat
Right- Red Wheat

Picture
As you can see from the loaves, red and white wheat bake up nearly identically except for color.  They differ quite a bit in flavor.
"50%" means that the loaf is made of 50% whole grain, and 50% all-purpose flour.

Last time you made bread, was it coarse and crumbly once it sat for a while?

If it was, you had a gluten problem.  It could be that the dough wasn't kneaded enough to form good long gluten strands, or your flour may have not had enough gluten in it to begin with.   If so, use flour with a higher gluten content next time, or add gluten itself.  Cans of gluten are often sold with breadbaking supplies. 

Another thing that makes a big difference is how finely ground your flour is: if it's coarse, gluten can't form well.  Develop enough gluten, and you have small, even air bubbles in your bread, and a chewy texture.

Why is gluten so important?  

Gluten is the main protein in wheat.  It forms tiny elastic chains that allow the dough to stretch and hold together, and that matrix forms walls around the carbon dioxide bubbles produced by the yeast as it grows.   If there's not enough gluten, the cell walls break, leaving large, unevenly-shaped air bubbles.    Gluten is activated by liquid, warmth and kneading- which is why you use as little of those three when you're making pie crust.  That's one food that you want to avoid gluten forming.  Gluten makes great bread, but tough pastry.
 
Wheat comes in different colors and 'hardness', or protein content.  You can buy "soft white", "soft red", "hard white" and "hard red".   There are even distinctions among the hard wheats- it is often labeled as "spring wheat" or "winter wheat".  Winter wheat is planted in late fall, and grows using the moisture from winter snow and rain.   Spring wheat is planted in spring, and grows through the hot, dry summer.  The more water the wheat gets, the more grain it produces, but these higher yields result in lower protein content.  So hard spring wheat, growing when it's hot and dry, ends up with a higher protein content.  (This explanation is somewhat simplified- if you like scientific details, see here.)  If you buy a bag that just says "hard red wheat", assume it's winter wheat.  Being able to label wheat as "hard spring wheat" is a selling point, and the farmers get more money for higher-protein wheat. 

This also means that if you buy the cheapest 'hard' wheat, you'll most likely have lower protein content.  Which means it's gonna take a little more effort to make it into good bread.

Red Wheat, either hard or soft, has a deeper, heartier flavor, and a reddish-brown color.

White Wheat, hard or soft, has a more delicate flavor, and a light tan color.  If you're just starting with whole-wheat bread making, this is a good one, since the flavor is more subtle.  It tastes more like 'white bread', but better!  I love the taste and fragrance of freshly-ground wheat in bread.  Hard white wheats are relatively new to the market.

Hard Red or White Spring Wheat is usually between 12-15% protein (or gluten), the best-quality ones run between 14-15%.  This is what you want for good whole-wheat bread.

Hard Red or White Winter Wheat generally contains 11- 13% protein.

Soft Red or White Wheat only has about 6-10% protein. 

The protein content can be as low as 2%, or as high as 18%.  It depends on growing conditions, what variety the grain is, and even how moist the wheat is.  And not all the protein is gluten: only the amino acids "gliadin" and "glutenin" will become gluten.  That's why oats, though high in protein, will not make good yeast bread on its own.  They don't contain gliadin and glutenin as part of the amino acid profile.  This is also why celiacs can have oats.
(see here for more info on amino acids and celiac.)
----------------------------

Soft wheat is best in quickbreads and things where you DON'T want gluten forming: cookies, pastries, cakes, quickbreads. (This also means that non-gluten containing grains and seeds are good for this group of breads.)

Hard wheat is best for yeast bread, tortillas, and pasta. When I use 100% hard wheat flour in bread,  I still have to add something to increase the dough strength- crushed Vitamin C, lecithin, dough enhancer, gluten, extended soaking, or using part all-purpose flour; see Making Bread for suggested quantities. 

See here for info about baking with whole wheat flour.
1 Comment

Seasoned Flour; Brigham Young 'wheat vs. gold' quote

3/31/2011

1 Comment

 
Picture
image courtesy photos8.com

Picture
Seasoned flour is fabulous to coat any meat before cooking.  It's also delicious added to onion-ring batter.  All you do is mix 1 cup pancake batter with 1 Tbsp. seasoned flour.

Picture
Slice an onion and separate it into rings.  I like to leave the center tiny rings together.  Dip into batter, and drop into 375-degree oil.  It will take only 1-2 minutes per side to cook.  Drain on paper towels.

Picture
One giant onion (18 ounces!) and a half-hour later, we have a giant pile of delicious onion rings. 

This recipe is kind of a shake-and-bake thing, but cheaper and fresher.  It is really delicious with any kind of meat- chicken, beef, pork, fish, you name it.  Put ½ cup of this on a plate, then dredge (dip) raw meat in it, coating both sides.  The mixture is pretty salty, so use serving-sized chunks of meat.  If you’re going to coat chicken-nugget-sized pieces, combine mixture with an equal amount of cracker crumbs or flour, or the meat will be too salty.  (Lesson learned the hard way.)  Heat up 1-4 Tbsp. of oil in a saucepan on medium-high heat, then cook the meat until as done as you like.  Any leftover (used) seasoned flour can be kept in the freezer until you need it, or mix it into a batch of biscuits, breadsticks, or cornbread.  My new favorite use for seasoned flour is Onion Rings: make pancake batter (any recipe, don’t add oil or butter) but add 1 Tbsp. of Seasoned Flour to it for each cup of flour or pancake mix you used.  Slice an onion and separate it into rings, dip them into the batter, and deep fry a few at a time until golden.  NO restaurant onion ring in my memory can compare to this!

 Seasoned Flour 
4   cups   flour   
3   Tbsp.   seasoned salt
3   Tbsp.   garlic salt   
3   Tbsp.   onion salt   
3   Tbsp.   pepper   
3   Tbsp.   salt   

Mix together and store airtight in cupboard.  Makes about 4 ½ cups.

 If you don't have garlic salt or onion salt,  use 
4 cups flour
3 Tbsp. seasoned salt
1 1/2 tsp. garlic powder
1 1/2 tsp. onion powder
3 Tbsp. pepper
1/4 c. salt
 

If you don't want to keep more than a quart jar's worth, give the extra 1/2 cup to a neighbor to try- they'll want the recipe too!

_______________________ 
Have you heard this before?  It’s a quote from Brigham Young  (if you’re short on time, just read the bold):

  “Were I to ask the question, how much wheat or anything else a man must have to justify him in letting it go to waste, it would be hard to answer; figures are inadequate to give the amount. Never let anything go to waste. Be prudent, save everything, and what you get more than you can take care of yourselves, ask your neighbors to help you. There are scores and hundreds of men in this house, if the question were asked them if they considered their grain a burden and a drudge to them, when they had plenty last year and the year before, that would answer in the affirmative, and were ready to part with it for next to nothing. How do they feel now, when their granaries are empty? If they had a few thousand bushels to spare now, would they not consider it a blessing? They would. Why? Because it would bring the gold and silver. But pause for a moment, and suppose you had millions of bushels to sell, and could sell it for twenty dollars per bushel, or for a million dollars per bushel, no matter what amount, so that you sell all your wheat, and transport it out of the country, and you are left with nothing morethan a pile of gold, what good would it do you? You could not eat it, drink it, wear it, or carry it off where you could have something to eat. The time will come that gold will hold no comparison in value to a bushel of wheat. Gold is not to be compared with it in value. Why would it be precious to you now? Simply because you could get gold for it? Gold is good for nothing, only as men value it. It is no better than a piece of iron, a piece of limestone, or a piece of sandstone, and it is not half so good as the soil from which we raise our wheat, and other necessaries of life. The children of men love it, they lust after it, are greedy for it, and are ready to destroy themselves, and those around them, over whom they have any influence, to gain it” (Journal of Discourses, 1:, p.250).

Picture
The onion rings and some hushpuppies.  This was from a 2-cup batch of onion ring batter.  Next time I'll use 1 cup and a normal-sized yellow onion.

Picture
If you have extra batter, you can add a little oil or melted butter (for tenderness), and stir in cornmeal and/or flour until it's thick enough to get round spoonfuls.  Also nice with some dried parsley for color.  Drop the spoonfuls into the hot oil, flip to the other side after a minute.  Drain on paper towels, too.

1 Comment

More of the cookbook, more seeds from your kitchen

3/15/2011

0 Comments

 
Picture
courtesy photos8.com

Today you get the cookie recipes.  Lest you think the whole cookbook is for treats-- because last week was cakes & frostings-- I'm also giving you the table of contents and index.  (The truth of the matter is that the categories are in alphabetical order.)

Cookies card 1
Cookies card 2
Table of contents and index

A post last week had a short list of seeds you may not need to buy because you have them already.  Here's a longer list of them.  It includes ones I've mentioned before, to put the info in one place.
There are lots of seeds that you may already have at home, that you can plant outside. For instance:

-dry beans  (i.e. pinto beans, Great Northern, kidney, black-eyed peas, garbanzo, Lima, etc.)
-seeds inside a tomato (may or may not be hybrid- look it  up online if it matters to you.  What it grows into will NOT be a hybrid, though!)
-seeds from melons or any winter squash (some are hybrids)
-wheat kernels (good for sprouts, wheat grass, or let it grow to maturity)
-amaranth (good for greens, as well as the seeds)  or quinoa

-flax seed (gives you beautiful blue flowers, more seeds, and fiber if you're interested in spinning...)
-coriander (whole, not ground!) the plant it grows is cilantro; harvest the seeds for more coriander
-mustard seed- the greens are good eating, plus more seeds..
-fennel seed
-celery seed (actually is not celery, you grow this one for the celery-flavored seed)
-aniseed (anise seed)
-other whole spices or herb seeds
-raw unsalted sunflower seeds
-raw unsalted pumpkin seeds
-raw unsalted peanuts

And roots you can plant:

-carrots or parsnips (you'll get ferny foliage and lacy white flowers, followed by lots of seed for next year)
-other root vegetables- beets, turnips, radishes, etc- will give you seeds this season
-onions, garlic, or shallots that are starting to sprout (or not).  You'll get ball-shaped flowerheads, then seeds from them this year, too.
-potatoes that are shrivelling or sprouting- turn that one into several!  -don't throw them away!
-horseradish (a chunk of root from the grocery store will grow)- this is the 2011 Herb of the Year
-ginger root
-Jerusalem artichokes ('sunchokes')

And if you want a tree:

-raw tree nuts- walnut, pecan, hazelnut, almond, etc.
-avocado pits
-seeds from any citrus
-cherry, apricot, pear, plum, peach pits or seeds.  NOTE: these are almost always hybrids.  The fruit it grows will most likely not be the same as you ate.  But it's something, and it's food, and if you don't like it, you can always use it as rootstock for a graft from a neighbor's good tree.  Or firewood.   :D

It's helpful to look online to find the plant's ideal growing conditions and how many days until harvest. 

0 Comments

Top 10 Food Storage myths; Chicken Vegetable Soup

11/26/2010

0 Comments

 
 (originally from 4/25/10)
This great list was sent to me by one of my sisters-  enjoy!  It is written specifically for members of the Church of Jesus Christ of Latter-Day Saints; the information is good for everyone.

-Rhonda

Top 10 Food Storage Myths BustedBy Danielle Ellis, Desert Saints Magazine

A quick glance through any grocery store reveals that the average American food supply has come from far and wide. Produce from around the globe, grains from hundreds or thousands of miles away, canned goods from who-knows-where. A single calamity, whether man-made or an act of God, would leave those shelves empty, without much hope of a new supply.  For this reason, and many more, Latter-day Saints have long been counseled to have a year’s supply of food and basic supplies in their homes. Yet research has shown that never more than a small percentage of saints have complied with this vital instruction. We’ll bust some of the myths surrounding food storage that may be holding you back. Then make your plan and complete your year’s supply!

10  I Don’t Need Food Storage“There aren’t enough of us; my parents have mine; I don’t think I’ll ever need it.”  These are all ways of saying that you, for some reason, are exempt from prophetic counsel. You’re not. We have been told that our food storage will be as vital to us as boarding the ark was to Noah’s family. You need food storage!

9 There’s Food In The Bishop’s Storehouse“If something happens, I’ll go to the bishop’s storehouse.” Estimates are the bishop’s storehouse would be cleaned out in a matter of minutes. As President Monson advised over twenty years ago, “The best storehouse system that the Church could devise would be for every family to store a year’s supply of needed food, clothing, and, where possible, the other necessities of life.” Be your own storehouse.

8 I Don’t Have A Place To Store FoodIf you knew the lives of your family members depended on the food in your home, would you find a way to store it? Clear out some of your baggage (clutter) to provide for the future. You can find many places for storage. Make it a priority.

7 I Don’t Know What To Store Visit providentliving.org. If that’s too daunting, consider this: the Church advises storing 300 pounds of grains and 60 pounds of beans per adult per year. Break that up into breakfasts, lunches and dinners, and find some recipes. You know what you eat: store it.

6  I Don’t Know How To Store It If you’re confused by oxygen absorbers and gamma seals, don’t be. Get basic foods in your home and begin using them. Once you know how to use them, figure out how to store them for longer periods. You should be using and rotating your foods in an orderly plan, not keeping them for generations.

5  I Have Food Allergies You’re eating something now to stay alive. Figure out how to get a supply of that. If you want to store grains, try millet and oats. Millet is the least allergenic of all grains and oats contain no gluten. Quinoa is a totally different type of grain than wheat and is a nutritional powerhouse. Those with special dietary needs especially need food storage.

4  I Don’t Know How To Prepare It Brigham Young once said, “we need not ask God to feed us, nor follow us round with a loaf of bread begging of us to eat it. He will not do it….” It is our job, and nobody else’s, to figure out how to feed ourselves. There are many cookbooks created to use food storage ingredients. Find some and start using them.

3 The Food Will Go Bad The food will only go bad if you buy short-life products, then stick them under the bed and wait for “d-day.” Buy whole-food products, store them properly, use and rotate them and you’ll be in great shape.

2  I Hate Wheat Then find grains you like, or new recipes, or find different ways to use wheat. Sprouting wheat provides a new dimension of possibilities, as well as additional nutritional benefits- enzymes, extra vitamins and minerals. Try barley, buckwheat, bulgur, couscous, millet, oats, quinoa, rye. Or durum wheat for pasta. Whole grains have the longest storage life and great nutrition.

1It’s Too Expensive If you buy food you never use, you will never find “extra” money to purchase food storage or ways to use and enjoy it. I recently made a large purchase of grains. Including the cost of shipping them to my door, the grains ended up costing LESS THAN 35 CENTS/LB! Look at anything you buy from the grocery store- you are paying much more. Incorporating simpler, whole foods into your diet will improve your health and ease your pocketbook. Priceless.

* * * * * * *         

Menu suggestion- serve this soup with crunchy apple slices and 'Best Drop Biscuits'.  Turn on the oven first; it will be hot enough by the time you get the soup in the pot and the dough mixed.

Chicken Vegetable Noodle Soup 

2  ½   c.  water    (or use broth and omit the bouillon)
1 (8-oz). can  tomato sauce   
10-16 oz bag frozen mixed vegetables (or 2-3 cups fresh)   
A handful of noodles  or other pasta 
2   tsp. or 2 cubes  chicken bouillon   
2   c. cooked chicken (or turkey),  cut up

Combine water, noodles, sauce and veggies.  Bring to a boil, then simmer, stirring occasionally, 10 minutes.  Stir in chicken.  Bring to a boil, then simmer 5 minutes or until vegetables are tender. Makes about 6 cups. 
I frequently make this my clean-out-the-freezer soup; instead of adding a bag of mixed vegetables, I add all my frozen odds and ends


0 Comments

Storing Water: Benjamin Franklin quotes; Basic Bread

11/10/2010

0 Comments

 
Picture
from photos8.com

(originally from 6/03/10)
Have you stored water yet?  Benjamin Franklin wrote, “When the well is dry, they know the worth of water.”   Even a little bit helps.  Keep a few water-filled 2-liter bottles, or 2-quart juice containers, under the sink in the kitchen and bathrooms.  I screw the lids on REALLY tight because of my curious little ones….

These are great for when the city water suddenly goes out, or a pipe breaks in your house.  (Last winter we were out of water TWO times in two weeks because of broken pipes!)   Then figure a way to keep a lot more water stored someplace; President Hinckley told us to store at least a gallon per person per day, for two weeks.  The blue barrels are good for this, and can be kept in your garage. If you’re buying storage containers, figure a dollar for each gallon of storage capacity- $50 or under for 50 gallon barrel, $5 or so for a 5-gallon jug, etc. You can live a lot longer without food than you can without water.  If you want to have even MORE than the minimum, check out the super-size containers at
http://familywatertanks.com/    Our water already has chlorine in it, so it will stay clean and safe as long as the container is closed securely.   If/when we have a large-scale disaster (remember Sister Beck told us to prepare for ‘eventualities’….) the city can get to repairing much faster if they don’t have to spend all their time hauling water around to all of us.


Here are some more applicable quotes from Franklin, enjoy!


“Energy and persistence conquer all things.
                           *
“Well done is better than well said.
                           *
“God helps those who help themselves.
                           *
“It is hard for an empty sack to stand upright.”

* * * * * * * 
 Here’s the bread recipe I’ve eaten for the last 30+ years; it’s my mom’s recipe.  The beauty of bread is that is so adaptable.  Use this recipe to make anything from white sandwich loaves, to whole wheat bread, pizza, fluffy dinner rolls or mouthwatering cinnamon rolls.   See Making Bread for these variations and more.  The bread freezes well, so I always make an oven full; it’s no more work to make six than to make two.  I keep enough in the pantry for 3 days because it is fresh-tasting for only that long; I put the rest in the freezer as soon as it's cooled and sliced.  

 -Rhonda

          Basic Bread

Six loaves:                                        Two loaves:
2 Tbsp. salt                                          2 tsp. salt
2 Tbsp. yeast                                       2 tsp. yeast     
½ cup -1 cup sugar                             1/4 -1/3 cup sugar
½ cup oil                                             3 Tbsp. oil
6 cups hot water (hottest from           2 cups hot water
  faucet, not over 130 degrees)                   

8 cups flour to start- you will             3 cups flour to start, will be 5-6
  use around 16 c. total                          total


      Mix salt, yeast, sugar, oil, water, and first amount of flour in a bowl.  Beat about two minutes with a wooden spoon.  Stir in half of what’s left, then mix in more until too stiff to stir.  Dump out onto a floured counter and knead for 8-10 minutes, adding only enough flour to keep the dough from sticking to the counter.   The dough should be smooth and elastic after kneading.  (Yes, you could use a stand mixer for this, too….)

     Cover with a kitchen towel or plastic grocery bag and let rise 1 to 1 ½ hours, or until doubled.  Punch down and shape into loaves.  Place in greased 8x4 loaf pans and let rise about 45 minutes or until nearly doubled.  Bake at 350 degrees F for about 30 minutes (or at 375 for 25 minutes) or until the sides of the bread are brown.  (Tip a loaf out of the pan to check.)  Remove from pans and cool on a rack.

100% WHOLE WHEAT BREAD-
Follow above 6 loaf recipe, using all whole wheat flour, and also add one of the following:

1/4 c. lecithin, 1/4 c. gluten, 1/4 c. dough enhancer, or 1000 mg Vitamin C, crushed or dissolved in water.  These improve texture and reduce coarseness.  Any of the variations can be made with whole wheat.
0 Comments

Ezra Taft Benson garden quote; Using Wheat Without a Mill

11/9/2010

0 Comments

 
Picture
(originally from 6/17/10)
QUOTE OF THE DAY:
Ezra Taft Benson

"There are blessings in being close to the soil, in raising your own food, even if it is only a garden in your yard and a fruit tree or two.  Those families will be fortunate who, in the last days, have an adequate supply of food because of their foresight and ability to produce their own" (The Teachings of Ezra Taft Benson, p. 266).

In Google Docs there
 is a file with the recipes  I made for the basic-foods class today; Using Wheat Without A Mill.  It covers different ways to use your wheat (all without a mill- a grinder-), including sprouting it, cooking it whole or cracked, how to crack it in the first place, blender-wheat recipes (including a chart to help you convert your own recipes to use whole wheat with the blender), making malt, and soaking wheat before using it.  The last page also has links to some great recipes and resources for using your wheat.   These links are also listed below.
 
Please buy wheat!  You cannot beat it for price.  You can buy it by the bag at the Family Home Storage Center, you don’t have to get it in the cans. White wheat there is $5.80 for a 25 lb bag, which is about 23 cents per POUND, which is enough to make one whole loaf of bread.  You pay that much, or more, for each OUNCE of breakfast cereal.  If you don't have a grain mill (grinder), or don't know yet how to use wheat if it's not already flour, now is a great time to jump in and get some wheat anyway.  If you're worried that you won't be able to rotate/use it before it goes bad, don't let that stop you from following the commandment to build your food storage.  It lasts for a long, long time.  Decades or more, if stored right.  Get it, then learn how to use it.  It's healthy stuff to have on hand anyway! It’s also inexpensive insurance.  You'll be glad you have it, and I know you’ll be blessed for following the prophet's counsel.

-Rhonda

Notes from what we tasted and learned at the class- these and more are in the handout, link is above:

We sampled Blender Wheat Pancakes, Wheat Puree Bread, Wheat Salad with Chicken and Corn, Strawberry Nut Jello Salad (the 'nuts' are wheat), Gourmet Banana Nut Cookies, cooked wheat, cracked wheat, sprouted wheat, malt powder .  Also covered was the difference between COOKED and SPROUTED wheat, and how to make malt. 

Why  eat it:  it's CHEAP, stores a LONG time, high in fiber, high in some proteins, vitamins, minerals.

 (summary of the class):   How to eat it:  Grind in blender (2 cups for 1 ½ minutes) or food processor (the dry grains or soaked/cooked), crack in blender, cook whole or cracked, sprout and eat as kernels (as breakfast cereal, or ground beef extender, or rice/pasta/nut substitute), make malt, or sprout and eat as wheat grass or wheat grass juice.

Ways to cook wheat:  in a Thermos, rice cooker, crock pot, regular pan, use in breads (quick/yeast), cakes, salads, (including Jello).  You may cook them then freeze for later. 

Why soak grains before eating them- phytates (phytic acid, the form the phosphorus is in) are anti-nutrients, they bind with and so block absorption of minerals, especially zinc, that you need for proper growth and immune system strength. You inactivate phytates by making the grain think it’s sprouting- warm, moist. Also, soaking freshly ground grain in warm liquid also destroys the phytic acid by activating the enzyme phytase.  A diet rich in Vitamins D, C, A, and calcium help mitigate the effect of phytic acid on the body.  Sprouted wheat is a vegetable, does not lose gluten, but the amino acid profile and vitamins change and it becomes more easily digestible.

 Wheat Berries

2 cups hard red winter-wheat berries
7 cups cold water
1 teaspoon salt


Place wheat berries in a large heavy saucepan. Add water and salt.
 Bring to a boil over high heat, then reduce heat, cover, and simmer gently for 1 hour, stirring occasionally. Drain and rinse. To serve hot, use immediately. Otherwise, follow the make-ahead instructions. Makes about 4 1/2 cups.                    
MAKE AHEAD TIP: Cover and refrigerate  or freeze. 
For Cracked Wheat,  put ¼ to ½ cup of uncooked wheat in a blender, run for 30 seconds or til cracked. 

NUTRITION INFORMATION: Per 1/2 cup: 151 calories; 1 g fat (0 g sat, 0 g mono); 0 mg cholesterol; 29 g carbohydrate; 6 g protein; 4 g fiber; 263 mg sodium; 0 mg potassium.
2 Carbohydrate Servings
Exchanges: 2 Starch

Ready-made toppings for your cooked wheat:
Applesauce
Pure fruit spreads
Fruit butters, such as apple, apricot, prune, pear
Marmalades, jams, preserves, conserves
Frozen berries and fruits, with or without syrup
Nut butters- peanut, almond, cashew
Lemon and lime curds
Maple syrup
Pure honey, whipped, unfiltered or in unusual flavors such as sage, lavender, or chestnut
Chocolate-hazelnut and chocolate peanut butter spreads
Sundae toppings

Making malt: http://www.dryit.com/diastaticmalt.html 

Put 1 cup of wheat kernels in a quart jar, cover with water, and let soak for about 12 hours.  Drain the water (which has vitamins and minerals- save for broth, watering plants, or making bread), rinse, and drain completely.  Rinse and drain 1-3 times a day for 2 days, until the sprouted part is about the same length as the grain. Spread on cookie sheets to go in the sunshine or warm oven or in a dehydrator; dry thoroughly but don’t heat over 130 degrees, so you don’t kill the enzymes.  Grind in a mill or in your blender.  Makes about one cup.  Store tightly covered.  This will keep indefinitely in the fridge or freezer.  Use about 1-1 ½   teaspoon (1/10 of 1% flour) per loaf of bread.  More than this will give you sticky dough and is not beneficial. 

The enzyme in malt (diastase) converts starch in the dough to sugars (maltose) that the yeast can use; longer fermentation (rising) times are needed to be most effective.   Malt replaces sugar/honey and feeds the yeast, browns the crust.  It also has lots of enzymes and vitamins, and so makes your bread more digestible and more nutritious.  The enzymes also improve the flavor, make a finer texture, and increase shelf life.  If you wanted to make malt syrup, you would slowly cook the sprouted grain to get a dark syrup.

Also see:  http://makinghomemadewineandbeer.blogspot.com/2008/05/making-malt-extract.html 

Links:


http://everydayfoodstorage.net/training-cooking/grains, http://everydayfoodstorage.net/2008/10/12/pumpkin-blender-wheat-waffles-with-caramel-sauce/food-storage-recipes Pumpkin Blender Wheat Waffles with Caramel Sauce, http://everydayfoodstorage.net/category/long-term-food-storage/grains/wheat/blender-wheat  Red, White and Blue Blender Pancakes (blender pancakes with red and blue berries, whipped cream), http://everydayfoodstorage.net/2008/04/01/food-storage-gourmet-blender-wheat-cookie/food-storage-recipes Gourmet Blender Banana Wheat Cookie, http://everydayfoodstorage.net/2008/06/24/bring-one-of-these-one-of-a-kind-salads-to-your-next-gathering/food-storage-recipes Feta Wheat Berry Salad, Wheat Berry Salad with Apples and Cashews

http://selfreliantsisters.blogspot.com/search/label/Wheat%20Berries Black Bean, Edamame, and Wheat Berry Salad, Crockpot Wheat Berries, Stovetop Wheat Berries, Pressure Cooker Wheat Berries, Carroll Shelby’s Chili, Wheat Berry Pineapple Chicken Salad, Wheat Berry Salad, Wheat Nuts (like Corn Nuts); http://selfreliantsisters.blogspot.com/2010/02/4-blender-pancake-recipes.html 4 different blender pancake recipes to try

http://www.foodnetwork.com/search/delegate.do?fnSearchString=wheat+berry&fnSearchType=site  Wheat Berry Tapenade, Mushroom Wheat Berry Pilaf, Cumin-Scented Wheat Berry-Lentil Soup, Zesty Wheat Berry-Black Bean Chili, Rice, Red Lentil, and Wheat Berry Salad, Wheat Berries and Greens (Farro e Verdure)

http://www.foodnetwork.com/search/delegate.do?fnSearchString=wheat+berry&fnSearchType=site Easter Wheat Pie (Pastiera di Grano); the same type recipe baked in a springform pan to be a cake is as http://www.celtnet.org.uk/recipes/miscellaneous/fetch-recipe.php?rid=misc-la-pastiera-di-grano

http://www.ldspreparedness.com/Files/cookbook.pdf   The “New Ideas For Cooking with Food Storage” cookbook (20 pages).  Meat substitutes and extenders, Bulgur Wheat, another Blender Wheat Pancake recipe with variation for Waffles, Chinese Fried Wheat (instead of rice), Italian Fried Wheat, Spanish Fried Wheat, Cracked Wheat Casserole (includes burger too), Popped Wheat (similar to Corn Nuts), how to cook it: stovetop, Thermos, gas range’s pilot light, crockpot, as cracked wheat.

http://www.suegregg.com/  for whole foods, including lots of blender wheat recipes

0 Comments

    Need a Search bar?
    One day I may upgrade my website-- but until then, use your web browser search bar. Type in my web address and what you're looking for, like this-- 
    www.theprovidenthomemaker.com  pumpkin --  and you should get results.


    Author

    I'm a disciple of Christ, a member of the Church of Jesus Christ of Latter-day Saints, a family-defending, homemaking, and homeschooling mom of eight children, two of whom sometimes can't have milk or wheat. Growing up on a farm in a high mountain valley, my parents taught me to 'make do', work hard, smile, and help others.  I love cooking, learning, growing food and flowers, picking tomatoes, and making gingerbread houses --which CAN be made allergy-friendly-- with my children.  I hope you find something to help you on my site!

    Archives

    April 2024
    July 2023
    April 2022
    September 2021
    March 2021
    December 2020
    April 2020
    March 2020
    February 2020
    January 2020
    December 2019
    November 2019
    October 2019
    September 2019
    August 2019
    July 2019
    June 2019
    May 2019
    April 2019
    January 2016
    November 2015
    October 2015
    September 2015
    March 2015
    February 2015
    November 2014
    October 2014
    September 2014
    August 2014
    July 2014
    June 2014
    May 2014
    April 2014
    March 2014
    February 2014
    January 2014
    December 2013
    November 2013
    October 2013
    September 2013
    August 2013
    July 2013
    June 2013
    May 2013
    April 2013
    March 2013
    February 2013
    January 2013
    December 2012
    November 2012
    October 2012
    September 2012
    August 2012
    July 2012
    June 2012
    May 2012
    April 2012
    March 2012
    February 2012
    January 2012
    December 2011
    November 2011
    October 2011
    September 2011
    August 2011
    July 2011
    June 2011
    May 2011
    April 2011
    March 2011
    February 2011
    January 2011
    December 2010
    November 2010
    October 2010
    September 2010

    Categories

    All
    Alcohol
    Alternate Cooking
    Appearances
    Apple
    Apricots
    April Fools
    Aprons
    Bananas
    Beans
    Beef
    Beets
    Bench
    Beverages
    Bonnet
    Bread
    Breakfast
    Budget
    Budgeting
    Cake
    Candy
    Canning
    Carrots
    Cheese
    Chicken
    Children
    Chocolate
    Christmas
    Cleaning
    Coconut
    Comfrey
    Common Core
    Constitution
    Cookbook
    Cookies
    Cooking Oil
    Crafts
    Dairy Substitutions
    Dehydrating
    Dessert
    Dried Fruit
    Earth Oven
    Earthquake
    Easter
    Edible Weeds
    Eggs
    Emergency Prep
    Essential Oils
    Faith
    Family Home Evening
    Fertilizing
    Food Storage
    Fourth Of July
    Freezer
    Frosting
    Fudge
    Garden
    Gardening
    Gingerbread
    Gluten
    Gluten Free
    Gold
    Government
    Grains
    Gratitude
    Hat
    Herbs
    Home Remedies
    Home Repairs
    Homeschool
    Home Storage
    Honey
    Hope
    Inflation
    Leftovers
    Legumes
    Lemon
    Main Dishes
    Mixes
    Mothers
    Noah
    Non Artificial Colors
    Non-artificial Colors
    Nuts
    Oats
    Oil
    Orange
    Paint
    Peaches
    Pear
    Pie
    Pizza
    Plums
    Poem
    Popcorn
    Pork
    Potatoes
    Powdered Milk
    Prayer
    Preparedness
    Projects
    Prophecy
    Pruning
    Pumpkin
    Quick Bread
    Rhubarb
    Rice
    Salad
    Salt
    Sauces
    Self Reliance
    Self-reliance
    Sewing
    Shelf Life
    Shelves
    Sky
    Smoothie
    Snacks
    Soup
    Spices Or Seasonings
    Squash
    Strawberries
    Substitutions
    Sugar
    Summer Fun
    Three Month Supply
    Time
    Tomatoes
    Trees
    Truffles
    T-shirts
    Tuna
    Ultra Gel
    Valentine\'s Day
    Vegetables
    Water
    Watermelon
    Wheat
    Work
    Year Supply
    Zucchini

    RSS Feed

Web Hosting by iPage