The Provident Homemaker
  • Recipes and Info
    • Making Bread
  • My Blog
  • Favorite Resources
  • Documents and Files
  • 52 Weeks of Building Storage

Week 18- Make Your Own Cream of Tomato Soup

8/10/2019

0 Comments

 
Your weekly assignment- you have two this time!  B4-3, and do a quick inventory of nonfoods. These include toilet paper, shampoo, soap, dish soap, laundry soap, hygiene supplies. Record what nonfoods are open; note how much is in each. At the end of four weeks, go through them again.  Note how much of each you used; multiply by three to know what you need for 3 months’ supply, or by 12 to know for a year supply. (Purchasing these begins in one month.)

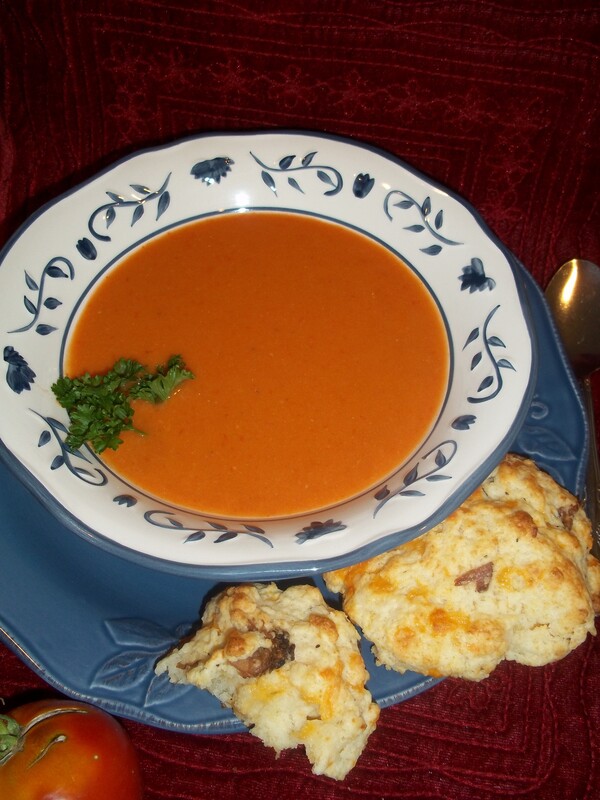
Tomatoes are in full production mode in my garden right n
ow.  I made a couple dozen jars of salsa this week, and picked tomatoes again this morning.  About half of them went into a giant, double-size lasagne for my son's birthday dinner, but there are a couple quarts of cherry tomatoes left over.  I'm debating whether to make a cherry tomato salad tomorrow (yes, it's the right link; scroll down), or this cream of tomato soup. 
It's simple and delicious. Using cherry tomatoes increases the natural sweetness; did you know that commercial versions almost always add sugar to their tomato soup?  

Another advantage to making it yourself is you can substitute out any ingredient you have food sensitivities to.  Can't have dairy?  Use a nondairy milk instead, or coconut cream for a richer version.  Can't have wheat or gluten?  Use cornstarch to thicken it instead of the flour. (You'll only need half as much, and don't add it to the hot vegetables; add it to the blender along with the broth and tomatoes.)


The biscuit recipe is a fast drop biscuit version- the butter is melted before mixing in, rather than cut in. In the photo below, the biscuits were made with cheddar cheese and crumbled bacon in the dough. ​Mmm.

BTW, the link to the cherry tomato salad has two tomato recipes- a surprisingly hearty tomato salad, and the most delicious vegetable gratin I've ever tried.  (Bonus- it uses tomatoes AND the extra zucchini or summer squash that seems to always hide under the leaves until it's big! 
Picture
0 Comments

Summery Fish and Vegetable Bake

9/2/2013

0 Comments

 
Picture
Can you tell it's zucchini and tomato season?  I've wondered before why so many recipes combine those two vegetables.  I now suspect that it's partly because the plain zucchini excels at tasting like whatever you cook it with, and very few things can top a fresh garden tomato in the flavor department.  This recipe also uses any mellow white fish, probably for the same reason.  The other ingredients both perk up and round out the flavor.  This one's a keeper.

Baked Fish and Vegetables

4 Tbsp. butter, softened
3 garlic cloves, minced
1 Tbsp. lemon juice
1 tsp. grated lemon zest or 2-3 drops lemon essential oil
1 lb. zucchini or summer squash,sliced 1/4" thick
1 lb. tomatoes (3 medium), sliced thin, OR cherry tomatoes, halved
1/2 c. minced fresh basil or 1 drop basil oil
salt and pepper
1 1/2 lbs. mild white fish 
2 Tbsp. white balsamic vinegar*

Preheat oven to 450 F and move an oven rack to the lowest position.  Mix together the butter, minced garlic, lemon juice, and zest.  If using basil oil, add it to this mixture.  Rub a little of the butter mixture on the bottom of a 9x13 pan.

Put the zucchini slices in the bottom of the 9x13 pan; add the tomatoes in a second layer.  Sprinkle with salt and pepper and with half of the basil (unless you used basil oil).  Pat the fish dry with paper towels, then place the fish on top of the tomatoes.  Dot the butter over the top, add the rest of the basil, and drizzle with the vinegar*.  Cover tightly with foil; bake about 20 minutes, or until the fish flakes when you twist a fork in it.  Serve immediately.

Serve over rice to pasta to soak up the delicious sauce!

*The original recipe, from America's Test Kitchen, calls for 1/4 cup dry white wine.  I don't cook with wine, so the white balsamic is what I found in my pantry to add the savory flavor.  Since it's strong, I used only half as much (2 Tbsp. instead of 1/4 c.).  If you have neither, chicken broth and a splash of soy sauce would give a similar depth.
0 Comments

Simple Marinara Sauce

9/1/2012

1 Comment

 
Picture

What is marinara sauce, you ask?

Call it spaghetti sauce.  Or a dip for fried mozzarella cheese sticks, breadsticks, or calzones.  It's a sauce for pan-fried cutlets.  Or pizza sauce.   It's just a spiced, meatless red sauce.   Stir in some cooked hamburger to make a meaty spaghetti sauce, or simmer meatballs in it until they're tender.   Try it instead of mayonnaise and mustard on a sandwich, on seafood, or over some grilled slabs of zucchini.  It's very versatile, and very easy!
Do you want all fresh ingredients, or all pantry ingredients?  Take your pick!  This is especially delicious if you use fresh garden tomatoes.

If using fresh herbs, you’ll need three times as much, i.e., 3 tsp. (1 Tbsp.) fresh oregano leaves.  

Marinara Sauce

    14-oz can crushed or diced tomatoes, OR 2 (8 oz.) cans of tomato sauce, OR 1 lb. pureed, or peeled and chopped fresh tomatoes
  1 (6-8) oz can sliced mushrooms, or 4-8 oz. fresh (optional but adds depth and ‘umami’)
  1 tsp. dried oregano leaves
  1/2 tsp. each thyme and basil, if you have them
  1/4-1/2 tsp. garlic powder (or 1-4 minced garlic cloves)
  pepper to taste


Stir everything together, simmer for 15 minutes if you want the flavors to blend well.

You can also add a dash of cayenne, or red pepper flakes, Tabasco sauce or whatever else smells good with it.  I like to add a few crushed fennel seeds to it because it adds to the aroma.  The cafeteria I worked at in college made it that way...

1 Comment

Cream of Tomato Soup and Cheesy Biscuits

10/7/2011

0 Comments

 
Picture
What better meal for a chilly, rainy, end-of-the-garden kind of day?

Picture warm, smooth, bright-flavored cream of tomato soup; tender, flavorful bacon and cheese biscuits with a crispy exterior.

The recipes are simple, and definitely beat store-bought for flavor and aroma!  I'll be teaching a class on this, with variations, next week (see Classes), and the recipes and variations come from my cookbook, The Chameleon Cook.

Cream of Tomato Soup
1 Tbsp. butter
1/2 medium onion
1/2 one carrot
1/2 one celery stalk
1-2 Tbsp. flour
1 lb. fresh, or 14 oz. can stewed, tomatoes
2 sprigs fresh parsley, 1 Tbsp. fresh basil, or 1 tsp. dried basil
1 c. chicken broth, or 1 c. water and 1 bouillon cube
1 c. evaporated milk, half-and-half, or cream
salt and pepper to taste

Cheesy Biscuits
1 cube butter, melted and cooled
2 c. flour
2 tsp. baking powder
1/2 tsp. baking soda
1/2 tsp. salt
1 tsp. sugar
1 cup cold buttermilk or sour milk
1/2 -1 cup shredded cheese
2 slices bacon, crumbled (optional)

Picture
If you're making both, start by turning on your oven to 475 degrees Fahrenheit. 

Chop half a medium onion, half a carrot (or 3-4 baby carrots), and half of one celery stalk. Cook over medium-high heat with 1 tablespoon butter or oil.  Stir once in a while, until the vegetables are tender, about ten minutes (depending on the

Picture
While the vegetables are cooking, start the biscuits.  Melt one stick of butter; set it aside to cool.  In a medium-sized mixing bowl, combine 2 cups flour, 2 tsp. baking powder, 1/2 tsp. baking soda, 1/2 tsp. salt, and 1 tsp. sugar. 

Stir one cup of very cold (right out of the fridge) buttermilk or sour milk into the butter.  As you stir, the butter should start to form clumps.  This is good; it gives you the same effect as "cutting in" the butter with the flour, but much quicker.   Pour all but about a tablespoon of it into the flour mixture, add 1/2 to 1 cup shredded cheese (the milder the cheese, the more you need), and a couple tablespoons cooked & crumbled bacon (optional).  If you like, you can also add 1/8 tsp. cayenne pepper and/or 1/2 tsp. mustard to accent the cheese flavor.  Stir just until combined.

Picture
Put big spoonfuls on an ungreased cookie sheet.  If you want a more structured biscuit shape, use a greased 1/4 c. measuring cup as a scoop. 

Dip a pastry brush into that last little bit of milk/butter; dab some on the tops of all the biscuits.  Put them into the oven to bake, then check on your vegetables.  These will take about 12-14 minutes to cook- you want the tops crusty golden, and the insides just set.

Picture
When the vegetables are tender, add 1-2 tablespoons of flour depending on how thick you want your soup. Cook and stir for one minute, to brown the flour a little. 

Picture
Put 1 pound of fresh tomatoes (or use one 14-oz. can of stewed tomatoes) in the blender or food processor.  Add the vegetables, one cup of chicken broth (or water and bouillon), and blend until smooth. 

Picture
Pour back into the saucepan.  To catch any little lumps or bits of tomato skin, set a fine-mesh sieve over the pan as you pour. (optional)  Add a couple sprigs of fresh parsley, a tablespoon of fresh basil, or a tespoon of dried basil.  Simmer for 10-20 minutes, to blend the flavors.

Picture
Stir in one cup of half-and-half, cream, or evaporated milk.  Add salt and pepper to taste; about 1/2 tsp. salt and 1/4 tsp. pepper. 
Serve hot, with those biscuits to dunk in it!

Now let that wind blow and rain patter against the windows!

0 Comments

Extending Your Harvest

9/29/2011

0 Comments

 
Picture
Ah, harvest time!

Our gardening days this season are numbered: according to the data at the KSL weather center, the average first frost of the fall in Riverton (they don't list South Jordan) is September 24, and the latest first frost was October 4th.  So enjoy that produce while it lasts! 

That first one is not necessarily a killing frost.  Even if it is, there are at least two simple ways to protect your plants: cover them with a sheet, blanket, or tablecloth; or turn your sprinklers on the garden overnight.  That will form a layer of ice that protects the plants from dropping below 32 degrees.  The plants won't die at the freezing point.  How do you know if it will freeze at your house?  The rule of thumb I use is: check the temperature outside at 10pm; it will drop about ten degrees more overnight. 

So-  if it's 42-44 degrees at 10pm, plan on protecting any plants you want to keep growing.


Things you can do in the garden right now, besides keeping up with the tomatoes and zucchini (!):

-trim asparagus plants to the ground

-put mulch around your rhubarb (it'll come up a little earlier that way)

 
and don't prune or fertilize bushes or trees right now; doing that now sends the plants a message to grow new branches.  Those new ones will not be tough before winter, leading to extra winter damage.

0 Comments

Roasted Vegetable Gratin, Fresh Tomato Salad

9/7/2011

1 Comment

 
Picture
Do you have summer squash and tomatoes coming out your ears?  This is a delicious way to use quite a bit of that summertime produce- zucchini and yellow squash baked with caramelized onions and sweet roasted tomatoes.  You can use 2 lbs of any summer squash, but the green and yellow here are pretty together.

Normally a dish like this would be soupy, since these high-water-content vegetables lose moisture as they cook.  These are salted while raw; the salt draws out water.  This makes a big difference.

Two 6-8" long zucchini equal about one pound.

Vegetable Gratin
1 lb. zucchini, sliced 1/4" thick
1 lb.  yellow summer squash, sliced 1/4" thick
2 tsp. salt
1 1/2 lbs. ripe tomatoes (3-4 large ones), sliced 1/4" thick
2 medium onions, halved then sliced thin pole to pole
3/4 tsp. black pepper
5 Tbsp. olive oil
2 cloves garlic, minced (or 1/2 tsp. garlic powder)
1 Tbsp. fresh thyme leaves (1 tsp. dried)
1/4 c. chopped fresh basil

Toss zucchini with 1 tsp. of the salt; put them in a colander over a bowl.  Let stand 45 minutes or until at least 3 Tbsp. liquid drains off.   Put the tomato slices on paper towels or a dish towel, sprinkle with 1/2 tsp. salt; let stand for 30 minutes.  Put another towel or paper towels on top of the tomatoes to press them dry.  Pat squash dry with a dish towel or paper towel. While the vegetables are all draining, brush a 9x13 pan with 1 Tbsp. of the olive oil, set aside.  Heat oven to 400 degrees.  Heat 1 Tbsp. oil in a 12" skillet over medium heat.  Add onions, 1/2 tsp. salt, 1/4 tsp. pepper.  Cook, stirring once in a while, until onions are caramelized: soft and dark golden, 20-25 minutes.  Set aside.

In a small bowl, combine garlic, the remaining 3 Tbsp. oil, 1/2 tsp. pepper, and thyme.  When the zucchini is drained and patted dry, toss the squash with half of the oil mixture.  Spread the squash along the bottom of the 9x13 pan.  Arrange onions on top, then put tomatoes on in a single layer, overlapping if needed.  Drizzle the rest of the garlic oil on top.  Bake about 40-45 minutes, until tomatoes start to brown on the edges.  Increase oven to 450 degrees.  Make the topping, below, and bake 10 minutes or until topping is lightly browned.  Sprinkle with basil and let sit 10 minutes before serving.

Topping:
1 Tbsp. olive oil
1 slice white bread, shredded or crumbled (food processor or blender works well)
2 oz. shredded Parmesan cheese (1 cup)
2 shallots, minced (1/4 c.- or use a mild onion)
 
Stir together.

Picture
Cherry Tomato Salad

4 cups halved cherry tomatoes
1/2 tsp. salt
1 Tbsp. olive oil
1-3 Tbsp. balsamic or other vinegar
2 garlic cloves, minced (or 1/2 tsp. garlic powder)
1 Tbsp. chopped or torn fresh basil (or 1/2 tsp. dried)
1/2 c. shredded Asiago or Parmesan (or use a cubed mild cheese, up to 8 oz)
2 slices good-quality bread, cubed (optional to use, and best if stale)
1/2 c. halved olives

Sprinkle tomatoes with salt and put them in a colander or on some paper towels.  Let sit 30 minutes to drain juices.  Pour them off (great added to salad dressing, soup, or cornbread batter).  Toss all ingredients together, add salt and pepper to taste. 
To meld flavors and soften the bread, it's best if it sits a couple hours in the fridge; or serve immediately.

1 Comment

Getting Going on Gardening, Companion Planting

6/10/2011

0 Comments

 
Picture
Catmint/catnip, to help your get more produce from your garden..... read on!

Photo credit: Jennifer Benner

What can I say?  --it’s been a strange year for gardening.  My garden has not been completely planted yet, and a lot of what was put in, didn’t make it.  We had enough rain and snow in May to hit half our precipitation average for the year.  Beans and corn were planted three weeks ago; the corn came up in crooked rows (I think they got washed out a little bit), and only two of the bean plants have made an appearance.  I may have to replant.  The volunteer tomatoes are finally up; they were this size a month earlier last year.  But they are up.  That’s good.   The plants that are doing well are the ones that were established before all the wet weather hit.  Onions and celery overwintered, and the volunteer lettuce came up in March or April.

If you’re still putting plants- or seeds- in the ground, consider companion planting.  The concept is that one plant can help another.  Garlic and onions tend to keep insect pests away from anything real close, and flowering plants attract pollinators.  Find something that the bees like, plant it close to your vegetables or fruits, and see your production go up. 

The plant in my yard that always has the most bees around it is catmint (nepeta).  I've been growing Walker's Low (which is named after a location, not how short the plant is- it's about 2 feet tall.) It  looks similar to lavender, blooms longer,  and can tolerate colder temperatures- down through USDA Zone 3.  See it at http://www.finegardening.com/plantguide/nepeta-x-faassenii-walkers-...

And here's a great find; a video series called "Home Grown/Home Made", produced by Fine Gardening magazine.  The description is "Welcome to Homegrown/Homemade, a video series from FineGardening.com and our sister site FineCooking.com. We're following a gardener (Danielle Sherry) and a cook (Sarah Breckenridge) as they plant, maintain, harvest, store, and prepare garden vegetables".  They include tomatoes, basil, squash, carrots, blueberries, potatoes, arugula, and peas.  Check it out, and see what you think!

0 Comments

More of the cookbook, more seeds from your kitchen

3/15/2011

0 Comments

 
Picture
courtesy photos8.com

Today you get the cookie recipes.  Lest you think the whole cookbook is for treats-- because last week was cakes & frostings-- I'm also giving you the table of contents and index.  (The truth of the matter is that the categories are in alphabetical order.)

Cookies card 1
Cookies card 2
Table of contents and index

A post last week had a short list of seeds you may not need to buy because you have them already.  Here's a longer list of them.  It includes ones I've mentioned before, to put the info in one place.
There are lots of seeds that you may already have at home, that you can plant outside. For instance:

-dry beans  (i.e. pinto beans, Great Northern, kidney, black-eyed peas, garbanzo, Lima, etc.)
-seeds inside a tomato (may or may not be hybrid- look it  up online if it matters to you.  What it grows into will NOT be a hybrid, though!)
-seeds from melons or any winter squash (some are hybrids)
-wheat kernels (good for sprouts, wheat grass, or let it grow to maturity)
-amaranth (good for greens, as well as the seeds)  or quinoa

-flax seed (gives you beautiful blue flowers, more seeds, and fiber if you're interested in spinning...)
-coriander (whole, not ground!) the plant it grows is cilantro; harvest the seeds for more coriander
-mustard seed- the greens are good eating, plus more seeds..
-fennel seed
-celery seed (actually is not celery, you grow this one for the celery-flavored seed)
-aniseed (anise seed)
-other whole spices or herb seeds
-raw unsalted sunflower seeds
-raw unsalted pumpkin seeds
-raw unsalted peanuts

And roots you can plant:

-carrots or parsnips (you'll get ferny foliage and lacy white flowers, followed by lots of seed for next year)
-other root vegetables- beets, turnips, radishes, etc- will give you seeds this season
-onions, garlic, or shallots that are starting to sprout (or not).  You'll get ball-shaped flowerheads, then seeds from them this year, too.
-potatoes that are shrivelling or sprouting- turn that one into several!  -don't throw them away!
-horseradish (a chunk of root from the grocery store will grow)- this is the 2011 Herb of the Year
-ginger root
-Jerusalem artichokes ('sunchokes')

And if you want a tree:

-raw tree nuts- walnut, pecan, hazelnut, almond, etc.
-avocado pits
-seeds from any citrus
-cherry, apricot, pear, plum, peach pits or seeds.  NOTE: these are almost always hybrids.  The fruit it grows will most likely not be the same as you ate.  But it's something, and it's food, and if you don't like it, you can always use it as rootstock for a graft from a neighbor's good tree.  Or firewood.   :D

It's helpful to look online to find the plant's ideal growing conditions and how many days until harvest. 

0 Comments

EP Moment; Mom's barbecue sauce

11/16/2010

0 Comments

 
Picture
Click here to download a PDF of
the Putting Down Roots pamphlet
(16MB).

Picture
Barbecue Sauce on beef


(originally from 5/27/10)
Here’s a great idea from Meridian Magazine: 

 the “Emergency Preparedness Moment: 

What emergency preparedness activity would you like to do this week for your family? Make this a matter of prayer and you will be surprised at the promptings you can receive. These few minutes every seven days during Family Home Evening can help your children be ready for a variety of emergencies. Problem solving skills, first aid skills, putting together backpack 72-hour kits, or any other kind of creative endeavor shows your family you love them and teaches them how to take care of themselves in tough scenarios. What will you choose this week?” 

You could also find a minute or two while you're driving kids to school or activities. A little bit of time each week can help you cover a LOT of ground. If you need resources, some great ones online are
http://www.fema.gov/areyouready/   http://ussc.utah.gov/publications/roots_earthquake_low.pdf    If you prefer a booklet you can HOLD, both of these are available, free of charge, at the city office building, from the city emergency planner.  Here in South Jordan that’s Dustin Lewis.  He’s happy to pass them out!

Maybe expand the “Emergency Preparedness Moment” into a “Self-Reliant Living Moment”?    See where the Spirit leads you in your quest… 

-Rhonda

 * * * * * * *
Mom's Barbeque Sauce       Makes about 3 cups

2   8-oz cans  tomato sauce (or 2/3 c. tomato powder and 1 1/3 c. water)   1   can/cup water (fill up one of the now-empty tomato sauce cans)   1 chopped onion (size is totally up to you)  or use a handful of dried
A couple sprinkles  of garlic   
pepper to taste   
3-4   shakes   of Worcestershire sauce   
1 Tbsp. vinegar, optional
Sugar, honey, or molasses to taste, anywhere from none to ½ cup

Simmer everything together until flavors combine, at least 10 minutes, or an hour if you have it, to let it thicken and become rich.  This will be even better the next day or later in the week.  Leftovers freeze well.  If using this with hamburger, you can cook the hamburger with the onion and then add the rest and simmer.

If you want to change the flavor a bit, add a spice or two. Some good ones for this are cloves (try 1/8-1/4 tsp.), oregano (about 1 tsp.), chili powder (1-3 tsp.), or Liquid Smoke (1/2-1 tsp.), mustard (1 tsp. dry, or up to ¼ c. of the stuff in a squeeze bottle), a dash of cayenne, a little Tabasco sauce. Basically any spice that you like!  Another idea is to use pineapple juice in place of the water.  With that one, try just a tablespoon or two of brown sugar.  Or use orange juice and honey with ½ tsp. ginger.

 
Picture
To make BBQ Beef, brown a roast in a couple tablespoons of hot oil.  Pork or chicken are also good.

Picture
Add all the Barbecue Sauce ingredients.  If you have a tight-fitting lid, or are using a crockpot, don't add the cup of water.   A little vinegar in the sauce will help tenderize the meat.  In this batch, I used 2 Tbsp. apple cider vinegar, and 1/4 c. honey. 

Picture
When the meat is cooked and tender, remove the lid and boil until the sauce thickens enough to coat. 

Picture
Shred or slice the meat, then stir together with the sauce.  Delicious!  Just the right amount of sweetness for me.  Store-bought sauce is always too sweet, in my opinion.  I still buy it when it's cheap, but mix it with some plain tomato sauce.

0 Comments

Tomatoes in the garden; edible playdough, and PB Fingers

11/6/2010

0 Comments

 
Picture
from photos8.com

(originally 7/08/10)

Here in the Salt Lake Valley, we still have a couple months of the growing season left; it’s not too late to plant some things.  Beans, beets, carrots, and turnips are good ones to put in right now.  You can even grow cool-season crops like peas, lettuce, spinach, chard, and cabbage, if you wait a couple more weeks for temperatures to drop a bit.

Here are a few quick tips for growing tomatoes- 

*fertilize with 1 Tbsp. nitrogen (34-0-0) at four and eight weeks after transplanting.  For me, that’s right about now. Put the fertilizer on the ground, to the side of the plant.  Gardeners call this “side dressing”.

*Give them 1-2 inches of water per week, water deeply and infrequently.  To know how often to water, dig a 4” deep hole, feel the soil at the bottom.  If it feels cool and moist, you don’t need water yet.  Wait until the top four inches dry out, then water again.  Mulch around them to keep moisture in and to reduce weeds.  *It will take about 25-35 days for a flower to become a ripe tomato.  It seems to speed up ripening if you break off a few little branches.  This tells the plant it had better hurry up and produce seeds before something happens to it.


for more info on tomatoes, including what causes blossom end rot: http://extension.usu.edu/files/publications/factsheet/HG_2004-05.pdf

info on planting beans:

http://extension.usu.edu/files/publications/factsheet/pub__7948214.htm

and information on growing about any fruit, vegetable, or herb: 

https://extension.usu.edu/yardandgarden/htm/vegetables-fruits-herbs    

Here are a couple great quotes I ran across recently:

"Self-reliance is a product of our work and under-girds all other welfare practices. It is an essential element in our spiritual as well as our temporal well-being. Regarding this principle, President Marion G. Romney has said: “Let us work for what we need. Let us be self-reliant and independent. Salvation can be obtained on no other principle. Salvation is an individual matter, and we must work out our own salvation in temporal as well as in spiritual things.” - (In Welfare Services Meeting Report, 2 Oct. 1976, p. 13.), quoted in “In the Lord’s Own Way” Elder Russell M. Nelson, Ensign, May 1986

"There is more salvation and security in wheat than in all the political schemes of the world". - Orson Hyde, Journal of Discourses, 2:207  Or in whatever food you end up storing.

Now for the recipes:

The two below are almost the same thing:  the first is stiff because of the large amount of milk powder and powdered sugar, the second starts with the same ratio of PB and honey, but thickens it up with cereal/oats and just a little milk powder.  Just goes to show you can do your own variations if you like.  On those days that we’re out of bread and don’t know what to do for lunch, we’ll whip up a batch of these Peanut Butter Fingers (though we usually shape them in balls) and eat those.  It’s our peanut-butter-sandwich, fun-sized.  If you go by what the PB jar says is a serving (2 Tbsp.), the PB Fingers recipes only feeds 3 people. 


 Edible Playdough  - makes about 2 cups’ worth, 1 ¼ lbs.

1   cup   peanut butter   
1   cup   dry milk powder   
1   cup   powdered sugar   
1/2   cup   honey   

Mix peanut butter and honey together until smooth.  Stir in milk powder, then add powdered sugar.  Stir as much as you can, then dump out on counter and knead with your hands until it all sticks together.

 
           Peanut Butter Fingers  (small batch)

Yield: about 20  (2”) "fingers"

1/3   cup   peanut butter   
3   Tbsp.   honey   
1/2   cup   corn flakes   
1/2   cup   quick-cooking rolled oats   
1/4   cup   dry milk powder   
1/4   cup   raisins or dried fruit bits    
Sesame seed, if you like   

In a medium mixing bowl stir together the peanut butter and honey until smooth.  Put corn flakes in a plastic sandwich bag.  Close the open end.  With your fist, crush the corn flakes into small pieces.  Add corn flakes, oats, milk powder, and raisins to the peanut butter mixture in the bowl.  With your hands, mix well.  If mixture is too dry to hold together, mix in a few drops of water. 

       Using a well-rounded teaspoonful for each, shape into logs 2 inches long and 1/2 inch wide, or about the size of your finger.     Spread the sesame seed (if you're using it) in a pie plate.  Roll peanut butter fingers in the sesame seed.      Store in the refrigerator in an airtight container.  If they don’t disappear first.

 
0 Comments

Summer squash and pumpkin powder, Foolproof Pancakes

10/27/2010

4 Comments

 
Picture
I love these powders!  Left to right: tomato powder, pumpkin powder, yellow summer squash powder, dried crumbled greens to put in soups in the winter.  (These greens are pigweed leaves- one of the wild edible weeds in my yard.)

Picture
Hot, fresh pancakes are simple to make. 

What else can you do with all that summer squash you have?  Make it into leather!  Yes, I know your children won’t think that’s the best snack around, but it’s not for them.  At least not by itself.  Better yet, turn it into powder.

The idea behind this is that pureed squash can be added to soups and breads (as in Zucchini Bread), and it takes a LOT less storage space when it’s dried.  There are at least two ways to get dried pureed squash:

(1)  Puree it, pour it on food dehydrator sheets, dry, and roll up, and

(2)  Slice the squash (1/4” wide is good), dry it like that, then run it through your blender when it’s crispy-dry.   This vegetable powder takes up even less storage space than the leather, plus it reconstitutes faster. If you're doing this with pumpkin, steam it before slicing; it will dry quite a bit faster and not have that raw taste.

(3)  Store it in something fairly airtight, in a dark area.  Canning jars are great, especially if you seal them by using a new lid, the ring, and an oxygen packet. (see Dry Canning.)

Now, how do you use it in recipes?  And how much do you use?  Remember thinking in school that you’d NEVER use  math in ‘real life’?  Ha!  It’s incredibly useful in the kitchen, especially when you start doing your own thing.

Measure and write down the quantity you start with, then measure and write down what you end up with.  Write it on your storage container, trust me, you’ll forget otherwise.   For instance, I started with 2 ½ lbs of yellow squash, which is 5 cups of puree.  I ran it through the blender, poured it on my (SPRAYED) dehydrating sheets, and turned on the dehydrator until it was dry and curling up on the edges and thin spots.  My sheets can fit two cups of puree each, which is one pound, so each roll of ‘leather’ is worth that much in a recipe.  To use it in a recipe, tear it up in pieces and soak it in just under 2 cups of hot water, for probably 30 minutes or so.   Then use it just like fresh puree, in whatever recipe you have.  There are photos and more detailed information on the Zucchini Powder post.

For making the powdered squash: the latest batch, 5 cups of puree, became just 10 tablespoons after drying and powdering.  That means to make one cup of puree, use 2 Tbsp. powder along with just under 1 cup hot water.   Isn’t that amazing? Think of the space that saves!  Five cups, which would have taken up freezer space, now stores in the space of about 2/3 of a cup.  The pumpkin I dried requires 3 Tbsp. plus water to make a cup.  This pumpkin powder bakes up beautifully in pies and breads.

 
When I make vegetable powder, it usually sticks to itself in a big lump after storing a little while.  Normally I just whack it a couple times to break off what I need, or chop around in the jar with a butter knife.  This time something new occurred to me- sometimes a little cornstarch is added to powdered sugar to keep it from lumping.  It’s a good moisture absorber, so my most recent batch has a little cornstarch added to it.  So far, so good.  We’ll see in six months how it really works.  Just in case that quantity messes with my recipes, I wrote how much cornstarch is there, on the jar of powder.  In this case, it’s 1 Tbsp. cornstarch per 2 cups reconstituted puree.  It looks like maybe more than necessary, but so far nothing is sticking!


You can powder about anything- think what you ever use in a pureed form, and make that into vegetable powder.  Tomato powder is great, it can be used to replace tomato paste, tomato sauce,  or tomato juice, depending on how much powder you use with how much water.  Mushroom powder is nice for cream-of-mushroom soup, or for extra flavor in soups and stews, onion powder goes almost without saying, carrot powder is good, too, and beet powder is sneaky but awesome. Throw it in almost anything.  I mostly use it to color frosting, though, since one of my boys can’t have artificial colors without his eczema flaring. It’s also great way to use beets that stayed in the garden a little too long and became a bit woody.  Try this out, and see what you think!


           Foolproof Pancakes -for my size family, we triple this
Makes 10 3" pancakes        (You can also turn this recipe into Pumpkin Pancake mix.)

1   cup   flour   (white or whole wheat)
1   cup   buttermilk or sour milk   
1   tsp.   sugar   
1/2  tsp.   baking soda   
1/2  tsp.   salt   
1   egg   
2   Tbsp.   butter, melted, optional

Combine all and whisk lightly.  Cook on a greased or non-stick skillet,  on medium-high, using 1/4 cup batter per pancake.  Cook until bubbles form around outside edges, then flip and cook until other side is browned.

The original recipe called for 3/4 cup buttermilk and 1/4 cup whole milk, but what I've got above works great.
For blueberry pancakes, stir 3/4 cup of blueberries into batter. 
For banana pancakes, slice one banana into batter. 
Picture
Cook pancakes on high heat, either on a greased or nonstick surface.  When the bubbles around the edges stay 'popped' and the edges are not runny, flip the pancake.

Picture
Cook until the other side is golden as well.  The pancake will puff up when you first flip it, and then it will stop rising.  If you're not sure if it's done, poke one in the center.  It shouldn't be runny.  If you flip the pancakes a second time, they will deflate and be more dense and flat.

4 Comments

Making and using tomato powder

10/6/2010

5 Comments


Picture
Making tomato powder: start by partly-filling your blender or food processor with COMPLETELY dried tomatoes.

Picture
Run blender until ground to a powder.  I usually add a tablespoon of cornstarch to this, to help absorb moisture so they don't clump during- or after- storage.

Picture
Pour into a canning jar or some other airtight container. 

Picture
Label the jar with the year and what's in it.  My label reminds me that there's a little bit of cornstarch in it.  Store someplace cool and dark for the best shelf life.  It should retain most of the vitamins for a year, and the calories and minerals for longer than that.  If you add an oxygen packet, use a new canning lid, and screw the ring on tight, the oxygen absorbtion will create a seal.  I don't know how much longer the powder will store with the oxygen removed, but I figure it's got to be at least double or triple. 

Picture
One use for your tomato powder- this is going to be pizza sauce, as soon as the hot water is added.  For 8 ounces of sauce, use 1/4 cup tomato powder, 1/4 tsp. salt, a few sprinkles each of garlic powder, black pepper, basil, and oregano, and a few fennel seeds if you like.  Stir in 1/2 cup hot water, then let it sit for a few minutes.

Instead of canning tomatoes, I've started dehydrating them.  This was really handy when I first had too many tomatoes to eat, but not enough for a full canning batch.  Once they're REALLY dried, I run them through the blender or food processor to make powder.  My kids can do all the cutting, then load them on the trays.  I fill a quart jar, add an oxygen packet (from the Church cannery), put on a new lid, screw on a ring, and they seal within about twenty minutes.  Six quarts' worth of tomatoes fit in one quart jar, this way.

 
Use the powder in place of any tomato product- tomato paste, tomato sauce, crushed tomatoes, tomato juice, whatever you need.

 
It takes 1/4 c. powder, 1/2 c. hot water, and 1/8- 1/4 tsp. salt to yield one 8-oz can of tomato sauce.  Add spices to  turn it into pizza sauce.

 
More details on making the powder: if the tomatoes are small (cherry tomato size, I cut them in halves or quarters, otherwise I slice them about 1/4" thick.  Dry until they are completely dried. I fill the blender (food processor would work, but I don't have one) to about the 4-cup mark, add a tablespoon of cornstarch to act as a moisture absorber during storage (optional), and turn it on until well powdered.  To store, I've been putting them in canning jars, adding an oxygen packet, then topping with a new lid and a jar ring.  This way, they seal.  

It is not necessary to use the oxygen packet, and I don't have facts on how much it extends the shelf life.  Most dehydrating books say that you still have maximum vitamin content in dehydrated for for one year, and that's without the packet.  My line of reasoning is that taking out the oxygen should at least double or triple the shelf life, plus sealing the jar keeps humidity out.   Just make sure there is no moisture in your food before powdering it, or it will clump and maybe mold.  It often clumps after opening a jar, when I keep it in my cooking cupboard, but it's still completely usable, and the cornstarch can help prevent clumping.   When drying, though, the essentials are to get the food as dry as possible, and store it at least fairly airtight, dark and cool is ideal.

 To use tomato powder , I usually just toss in enough  to 'make it taste right" into whatever soup I'm making, but if you want conversions,  here's what I've figured out:

one 6-oz can of tomato paste: 1/4 c. tomato powder, 1/4 c. hot water, 1/4 tsp. salt
8-oz can of tomato sauce: 1/4 c. powder, 1/2 cup hot water, 1/4 tsp. salt
14-16-oz can crushed tomatoes: 1/4 c. powder, 3/4 c. hot water, 1/4-1/2 tsp. salt
8 oz. tomato juice: 2-4 Tbsp  powder, just under 1 cup hot water, 1/16-1/8 tsp. salt

So the tomato powder-to-water ratio for each one is:

Tomato paste: 1:1
Tomato Sauce 1:2
Crushed tomatoes: 1:3
Tomato juice: 1:4-8

And, of course, you may add any herbs or spices you like.


5 Comments

    Need a Search bar?
    One day I may upgrade my website-- but until then, use your web browser search bar. Type in my web address and what you're looking for, like this-- 
    www.theprovidenthomemaker.com  pumpkin --  and you should get results.


    Author

    I'm a disciple of Christ, a member of the Church of Jesus Christ of Latter-day Saints, a family-defending, homemaking, and homeschooling mom of eight children, two of whom sometimes can't have milk or wheat. Growing up on a farm in a high mountain valley, my parents taught me to 'make do', work hard, smile, and help others.  I love cooking, learning, growing food and flowers, picking tomatoes, and making gingerbread houses --which CAN be made allergy-friendly-- with my children.  I hope you find something to help you on my site!

    Archives

    April 2024
    July 2023
    April 2022
    September 2021
    March 2021
    December 2020
    April 2020
    March 2020
    February 2020
    January 2020
    December 2019
    November 2019
    October 2019
    September 2019
    August 2019
    July 2019
    June 2019
    May 2019
    April 2019
    January 2016
    November 2015
    October 2015
    September 2015
    March 2015
    February 2015
    November 2014
    October 2014
    September 2014
    August 2014
    July 2014
    June 2014
    May 2014
    April 2014
    March 2014
    February 2014
    January 2014
    December 2013
    November 2013
    October 2013
    September 2013
    August 2013
    July 2013
    June 2013
    May 2013
    April 2013
    March 2013
    February 2013
    January 2013
    December 2012
    November 2012
    October 2012
    September 2012
    August 2012
    July 2012
    June 2012
    May 2012
    April 2012
    March 2012
    February 2012
    January 2012
    December 2011
    November 2011
    October 2011
    September 2011
    August 2011
    July 2011
    June 2011
    May 2011
    April 2011
    March 2011
    February 2011
    January 2011
    December 2010
    November 2010
    October 2010
    September 2010

    Categories

    All
    Alcohol
    Alternate Cooking
    Appearances
    Apple
    Apricots
    April Fools
    Aprons
    Bananas
    Beans
    Beef
    Beets
    Bench
    Beverages
    Bonnet
    Bread
    Breakfast
    Budget
    Budgeting
    Cake
    Candy
    Canning
    Carrots
    Cheese
    Chicken
    Children
    Chocolate
    Christmas
    Cleaning
    Coconut
    Comfrey
    Common Core
    Constitution
    Cookbook
    Cookies
    Cooking Oil
    Crafts
    Dairy Substitutions
    Dehydrating
    Dessert
    Dried Fruit
    Earth Oven
    Earthquake
    Easter
    Edible Weeds
    Eggs
    Emergency Prep
    Essential Oils
    Faith
    Family Home Evening
    Fertilizing
    Food Storage
    Fourth Of July
    Freezer
    Frosting
    Fudge
    Garden
    Gardening
    Gingerbread
    Gluten
    Gluten Free
    Gold
    Government
    Grains
    Gratitude
    Hat
    Herbs
    Home Remedies
    Home Repairs
    Homeschool
    Home Storage
    Honey
    Hope
    Inflation
    Leftovers
    Legumes
    Lemon
    Main Dishes
    Mixes
    Mothers
    Noah
    Non Artificial Colors
    Non-artificial Colors
    Nuts
    Oats
    Oil
    Orange
    Paint
    Peaches
    Pear
    Pie
    Pizza
    Plums
    Poem
    Popcorn
    Pork
    Potatoes
    Powdered Milk
    Prayer
    Preparedness
    Projects
    Prophecy
    Pruning
    Pumpkin
    Quick Bread
    Rhubarb
    Rice
    Salad
    Salt
    Sauces
    Self Reliance
    Self-reliance
    Sewing
    Shelf Life
    Shelves
    Sky
    Smoothie
    Snacks
    Soup
    Spices Or Seasonings
    Squash
    Strawberries
    Substitutions
    Sugar
    Summer Fun
    Three Month Supply
    Time
    Tomatoes
    Trees
    Truffles
    T-shirts
    Tuna
    Ultra Gel
    Valentine\'s Day
    Vegetables
    Water
    Watermelon
    Wheat
    Work
    Year Supply
    Zucchini

    RSS Feed

Web Hosting by iPage