The Provident Homemaker
  • Recipes and Info
    • Making Bread
  • My Blog
  • Favorite Resources
  • Documents and Files
  • 52 Weeks of Building Storage

Homemade Anna and Elsa dolls

5/3/2014

0 Comments

 
Picture
My 11-year-old daughter had decided she really, really wanted some Frozen dolls.  However, having used all her spending money previously on a couple plush My Little Pony toys, the ones we found were way out of her price range.

She flipped through a girls' sewing book, spent a couple days thinking about how to possibly make the dolls instead, and came up with this plan:  find a picture, use it for a pattern, sew two identical pieces together, color, stuff, and stitch closed.

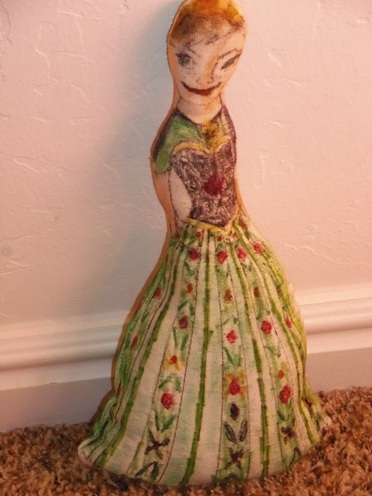
We used plain white knit fabric from my fabric stash so the doll would be softer and a little more forgiving, stuffed it with plain old fiberfill For the Anna doll, we used this coloring page 
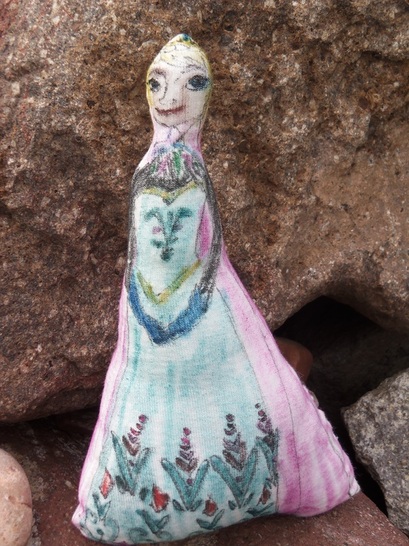
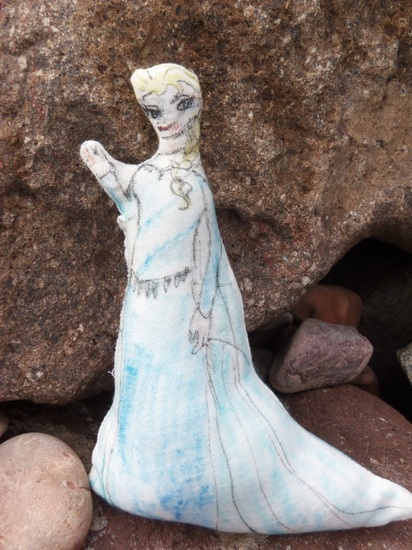
Elsa:  in her coronation dress, or with one hand out.  (The one hand out was pretty tricky to turn right-side out, but it worked.)

You'll need a picture, 1/3 yd of fabric (for 11" high dolls, but you'll have enough width for 4 dolls!), needle and thread, sewing machine (optional), a handful or two of fiberfill, and some non-water-soluble markers  (we used a combination of Sharpies and fabric markers).

1- Resize the picture to make the size doll you'd like. 
2- Add 3/8" all the way around the picture*, for a seam allowance, and cut this paper pattern.
3- Pin onto a double layer of fabric, and cut this out.
4- Unpin the pattern from the fabric, take ONE of the fabric pieces, put the pattern piece behind it, hold it up on a window, and, using a Sharpie or fabric marker, trace all the lines you'll need to color later.  Draw in the facial features, neck, dress design, etc. Invent what the back should look like, for the second fabric piece. :)
5- Put the right sides (drawn-on sides) together, and sew 3/8" from the edge, almost all the way around.  Be sure to backstitch when you start and stop!  Leave 2" open.
6- Turn the fabric right-side out, stuff with a handful of fiberfill.
7- Turn the raw edges of the opening inward, and stitch closed, knotting well at both ends.  
8- Color your doll with the markers, front, back, and sides.

*On the coloring pages, the necks are too narrow to pull the rest of the body through when turning the fabric right-side-out after sewing, so shoot for a finished measurement of 1" wide, and just draw the neck the width it should be.

She had a lot of fun marking these- so much that she also made Kristof and Olaf the same way.  

The only question she has left is how much of the ink will survive their first trip through the washer and dryer!

Picture
Picture
0 Comments

Suzy Snowflake costume

12/14/2013

0 Comments

 
Picture
Did you ever learn the song that starts, "Here comes Suzy Snowflake"? Our family was asked to come up with a musical number for a party... and that's what we chose.  And my girls got some great dress-up skirts out of it.  (I told them they're early Christmas presents... and now that we've performed, the skirts get wrapped and put under the tree.)
Picture
On the Youtube video below, she shows you a quick way to cut strips of netting: roll the tulle without creating wrinkles; cut the roll into 3” strips.  She used 4 colors, 1 yd each, for a 2-4-year-old’s skirt.  For that shorter skirt, she cuts each strip in half.  She says it takes about 45 minutes to make one; we spent about an hour apiece but that was with my 11-year-old doing most of the tying.
I  used her method but made longer skirts- the biggest of the two was 27" long, the small one was 24" long. So I made the strips 54" long for the first, 48" long for the second. When I got to the fabric store, I found that the more delicate-looking Illusion netting, 108" wide! so I could get twice as many strips per yard- was on sale for $1/yd, so I got that instead of the coarser netting.  I used almost 5 yard for the bigger skirt and about 4 1/2 yards for the smaller one. For the larger snowflake overlay skirt (18" long), I bought turquoise sparkle tulle, folded it in sixths cut a circle with a 22" radius (needed 1 ¼ yds); cut out a circle for the center, and cut it like a very simple snowflake.  The smaller overlay (14" long) only required 1 yard.    By the way, there's a great website that allows you to create snowflakes online and see what they'll look like before having to cut any actual paper.

The snowflake crowns were cut from the bottom of a plastic gallon-sized milk jug, then my girls colored the snowflakes blue.  See the slideshow for photos of that.
0 Comments

Solar-power Woodburning Art

6/8/2013

0 Comments

 
Picture
Picture
There's nothing that stimulates creativity like boredom does.
My 15-year-old was bored yesterday and came up with this idea:

Draw on wood using the power of the sun.

Normally I'm not a fan of solar power:  a couple years ago, a solar panel manufacturing company was considering building in my city.   Our city council starting reading the research and crunching numbers, and eventually declined the move.  Why?  The council members discovered that when you add up everything it really takes to build and run a solar plant, it takes MORE energy to produce each panel that it will generate in its lifetime.  

Anyway, back to this solar-powered art:

A magnifying glass, when held close to something with bright sunlight behind it, creates a concentrated beam of light, as most any inherently pyromaniac 12-year-old boy might tell you.  

So he used that as his woodburning technique, holding the magnifying glass steady in one spot until a little wisp of smoke appeared, then moving it over a fraction of an inch.  (See the light beam below?)  He freehand drew it as he went, though you could sketch in pencil first (which is erasable!) and then burn over those lines.

Note: there are some safety considerations here, obviously.  One of them is keeping an eye on your child if they try this.  And I recommend doing this in a nice green grassy area that is not prone to catching fire.  Another is protecting yourself from the sun.  He wore a jacket with a hood, since he sat with his back to the sun for about 2 hours to make this.  Too bad he didn't think to put on pants instead of shorts.

Voila!  Wood burning with no specialty tools necessary except a cheap dollar-store plastic magnifying glass!

Picture
0 Comments

Red Cabbage- food and chemistry!

7/20/2012

0 Comments

 
Picture
My 12-year-old science nut convinced me to buy a red cabbage-  why?   

While walking through the produce section together, I had told him that the vegetable could be used to make a pH indicator.  He was excited.   You can see how to do this in the one-minute video, below.
Meanwhile, you don't need the whole head of cabbage for such a project, so it got chopped up into a creamy, flavorful, no-mayonnaise coleslaw.  The recipe is below this cabbage video. 
Isn't that simple?  If you don't have a coffee filter, any other absorbent paper will work, including (white) construction paper or paper towels.  My favorite is the construction paper.  You can read more about why this works here. 

*  *  *  *  *  *  *  *  *  *  *  * 
Coleslaw with Bacon and Buttermilk (or Kefir) Dressing
adapted from America's Test Kitchen

If you are going to eat this coleslaw RIGHT AWAY, you can skip the salting step, which keeps the cabbage from releasing water and diluting the dressing as it sits.  However, if you’re not a fan of raw onion, cook it along with the bacon; salting the onion also mellows it.

½ medium head of red or green cabbage, shredded
1 large carrot or apple, grated
½ medium onion, sliced thin
Salt
6 slices bacon, chopped, cooked and drained
½ c. buttermilk or kefir
2 Tbsp. oil (I used coconut oil)
2 Tbsp. apple cider vinegar
½ Tbsp. caraway seeds
¼ tsp. mustard (dry or prepared)
2 tsp. sugar or honey
Black pepper to taste

Combine the cabbage, carrot/apple, and onion in a colander; sprinkle with 1 tsp. salt. Let stand over a bowl until the veggies wilt, 1-4 hours.  Rinse, drain, and pat dry.  Add in the bacon (and onion if you cooked them together.)  Stir together the buttermilk/kefir, oil, vinegar, caraway, mustard, and sugar.  Pour over the salad, and toss to coat.  Add salt and pepper to taste.

0 Comments

Got pallets?

6/27/2012

0 Comments

 
Have you seen pallets lying around your town?  Have you wondered what to do with them?  This video has rapid-fire ideas; some I've seen, most I hadn't! 

Since it's so fast, though, my personal suggestion is to watch it straight through, then watch it again with your cursor on the 'pause' button.

(If you like the tune, it's "Popcorn" by Gershon Kingsley;  my  favorite version is  with the Swedish Chef from The Muppets.  But I digress...)
0 Comments

Watching a solar eclipse

5/19/2012

0 Comments

 
Picture
Since I live in the area where tomorrow's eclipse is visible (see shadowandsubstance.com for a map) , I looked at the local planetarium's website to see what they recommended doing.  I remember, way back in Elementary school, making a box with a hole in one end to watch the eclipse.  It worked pretty well. 

The website I visited has instructions on making one of these 'pinhole projectors'... read all the way through the comments to find a helpful tip on sizing the hole.  Also in the comments was a simpler method- to use a pair of binoculars backwards... 

Here are the instructions.

"Hold a pair of binoculars with the big end pointed toward the Sun. You only need one barrel of the binocs for this, you can leave the lens cover on the other unused barrel.
The binocular will then project an image of the Sun out of the eyepiece. Tape a piece of white copy paper onto a large piece of cardboard and use it as a projection surface for the image coming out the back of the binocular. Experiment with distance from the eyepiece to hold the paper. A foot or two distance between the binoc eyepiece and the projection surface seems to work best for me. Experiment for yourself.
You’ll see what I mean when you try it."
-from http://clarkplanetarium.org/how-to-make-a-pinhole-projector/

BTW, you do NOT want to look at an eclipse without a special viewing device.  Sunglasses don't count, either.  You can severely damage your retinas.   A funny video that shows what can happen is Brian Regan's "Big Family Stuff", the sun part starts at about 2:58.
0 Comments

Between-Stud Storage Shelving

7/11/2011

1 Comment

 
Or, how to make storage space out of 'no space'.
Picture
A while back, I was looking through dehydrate2store.com and ran across this video on building a shelf for your dried food.  It got me thinking about my utility room: a narrow room, no space to set a shelf, but with unfinished walls, with studs exposed.  That could be turned into in-wall shelving.  So I sorted through my pile of wood, pulled out the electric saw, and learned how to use a nail gun.  (It’s loud, but quite fun; an amazingly fast tool.) Of course, you don’t need power tools; use whatever you have available.   Just cut boards slightly narrower than the width between studs.  Don't assume the studs are the same width apart the whole way down; most of mine weren't.  Where you can, nail through the stud into the board.  Where you can't do that, nail at an angle through the bottom of the shelf, so that it goes into the stud.  Put shelves far enough apart that whatever you want to store will fit, plus an extra inch or two to allow you to tip out the jar, can, or bottle. To keep things on the shelf, I ran nylon rope across the fronts of the jars.  It's anchored on both sides by looping it around nails sticking out of the studs.

If you want to build these someplace out in the open, you can use dowels instead of rope- drill holes through the sides of the studs for them to run through.  Or tack across some thin finish molding.  The whole thing will also look much nicer with some molding put on like a picture frame around the entire shelf.


Picture
This was a dividing wall, so there was sheetrock on the back of it.  I got some washable wallpaper for cheap at Big Lots (love the clearance there!), and covered the sheetrock with it before putting in the shelves.  I figured that it would (1)lighten up the area (2)protect and strengthen the wall behind, and (3) make cleaning it a whole lot easier, should something ever spill. 

I also hung a thermometer with a humidity sensor; to see what kind of storage conditions the room really provided. 

So, out of six feet of otherwise useless space, I can now store several dozen jars or cans. 


1 Comment

The One-Hour Bench

7/5/2011

0 Comments

 
Picture
Simple, quick, and a nice size to use almost anywhere.

An old gardening neighbor, years ago, told me, "Make sure you have a place to sit on every side of your house, to enjoy your yard and nature."  This is a cheap and quick way to help with that.

Last week there was a baby shower at my house.  In addition to my kitchen-table chairs, I have about four folding chairs, which clearly wasn't going to cut it for the 43 who were invited.  What to do? 
About a week before the party, I happened to be flipping through the January/February 2011 issue of Fine Gardening magazine. (Reviews here, cheapest here.)
The magazine had instructions and photos for a “one hour bench”.  It looked very simple, and I have a big pile of old boards sitting around, so I decided to build three.  We didn't have exactly the right size boards, but made do.  For instance, the top is supposed to be made of two 2x8's.  I had 2x4's and 2x10's, so I used one of each.  It was time my 13-y-o learned how to build something.  He pulled out the table saw, then measured and cut with me.  (In hindsight, a chopsaw or circular saw would have been simpler.) I put the first one together while he watched, then he built the other two.  Afterwards, he and a younger son painted on some stain/sealer.  The only thing I had to buy for the project was the screws.  Very nice.

So does the bench really only take one hour?  Well, that depends. The magazine gave a list of what wood you needed, cut to which lengths.  If you went to Lowe’s, and had them cut it for you (which they will), and your wood was already cut, then YES, even a newbie could have this together in under an hour.  You might even get the stain on in that time.


So how did having the benches work out?  Well, they look great, are sturdy, and have been sat on a couple  times, by my kids.  The weather didn’t allow for us to be outside last-minute.  I borrowed chairs from a neighbor to use indoors.  Oh well. 

Picture
Upside-down, so you can see how it's assembled.  The 2x2's are the white boards here, sitting flush inside against the legs.  Use two screws to connect the 2x2's to the legs.  Then use four screws to go through the bottom of the 2x2's into the seat boards. 
This way, you have no screws showing on top. 
The 1x6's are connected to the bench by screwing them to the sides of the legs, 2 screws each side of a leg.  This makes a huge difference in the stability of the bench.

For a similar bench, see here or here.  If this isn't what you want, try 'the mega-guide to free garden bench plans'.  Some of the links don't work anymore, but it still has a lot to offer.

Materials list:

1x6 boards, 2 each 4 feet long, ends cut at 45 degrees, for the side reinforcement

2x12’s, 2 each 16 inches long, for the legs

2x2’s, 2 each 11 ¼ inches long, for inside reinforcement

2x8’s, 2 each 4 feet long, for the seat

12  2 1/2 –inch galvanized decking screws, to go in the 2x2's

8    1 ¾ -inch galvanized decking screws, to go in the 1x6's

Stain or sealer, if you want.

0 Comments

Earthquake shelves, quick soft breadsticks

10/6/2010

0 Comments

 
Picture
I found this method of securing jars, by accident, just trying to maximize my shelf space.  The metal shelves we bought have a wide lip, which normally means there is a 2" space between the top of your food and the bottom of the shelf up.  It turns out that the lip can be used to keep jars on the shelf. 

Picture
I have to tip the jar to get it in, and then it stays put!  About 3/4" of the top of the jar is hidden- and trapped- by the upper lip of the shelf.

Picture
Another option is to run rope, thick string, or bungee cords in front of the jars. Usually I just wrap the rope around the endposts of the shelf to secure each one, but do whatever works.  

Another thing to consider is keeping your shelves from tipping over.  You can buy an L-shaped metal bracket at Home Depot or Lowe's for a couple dollars, use a couple screws to secure one side of the L to the top of your shelf, the other side to the wall.  MAKE SURE IT'S SCREWED INTO A STUD! This works well for bookshelves, too, which is a good thing for people like me whose children often climb when I'm not looking.... 

Picture
This week's information is on earthquake preparedness. Have you read up on the local earthquake hazards?  I read a rather lengthy report on hazards in Utah, and just laughed at the section on earthquakes-  pretty much any scenario that might happen somewhere in the world, can happen here on the Wasatch fault.  Some of these things sounded wild- like the whole valley floor tipping and allowing Utah Lake to fill up most of the Salt Lake Valley, or liquefaction of soils (basically, the ground turns to quicksand during shaking, and tall buildings fall over on their sides).  There are 2 main types of "events", as they're called, and we're due for both of them.  For instance, one type (non-surface-faulting, if you want the name) happens every 300-400 years, and it's been 350 years since the last one.  If the LDS Church decided it was important enough to spend the money to retrofit the Tabernacle, and to build the Conference Center to far exceed earthquake building standards, don't you think it's worth doing the simple things at home you can?

Most injuries are from things falling, not from building collapse.  Plus, I don't know about you, but I'd sure hate to lose a summer's worth of canning because they rattled off their shelves.  Or to have my storage area full of broken glass, nevermind the food that had been in them.  There are some very simple, cheap things you can do to secure your food storage.  I don't know how they'd do in the worst-case-scenario earthquake, but it'd be better than nothing.  The pictures above show a couple options. 

The State of Utah recently published a booklet about planning for earthquakes, "Putting Down Roots in Earthquake Country".  It's full of good info. Pages 22-23 have more information about keeping your belongings from crashing all over during an earthquake. Here's the link:

http://ussc.utah.gov/publications/roots_earthquake_low.pdf     

 
And for those of you in my neighborhood who ever wondered if there was anything good about our dirt here, there is a silver lining to all that nasty rock in our yards- our soil here in Glenmoor (South Jordan), combined with the location, has the lowest chance of turning to quicksand (liquefaction).   We're also as far from a faultline as you can be in this valley.  (Which really isn't saying much, but every little bit helps!)

 
P.S.   Do you know what our schools' emergency plans are?  Where and when do you get your children if they're at school?    I called our elementary and  middle schools to find out, and the short answer is- stay home until THEY (the schools) contact YOU.  They'll go in lockdown if they need to, or stay outside in good weather, or in case of bad weather or a severely damaged school, the Glenmoor church building is the fallback for Welby; the Dunsinane building and/or Walmart (really!) is the one for Elk Ridge.  When things are safe, they'll allow the students to call home, or you'll get a message via the radio, TV, Internet, etc.

 
Now for the recipe....

Quick Soft Breadsticks

Ready in 20-30 min. Yield: 12 breadsticks

1 1/4 cups flour (measure this one by scooping, NOT by spooning it into the cup)
2 tsp. sugar
1 1/2 tsp. baking powder
1/2 tsp. salt
2/3 cup milk
3 Tbsp. butter melted
2 tsp. sesame seeds

Mix flour, sugar, baking powder and salt. Gradually add milk and stir to form a soft dough. Turn onto a floured surface; knead gently 3-4 times. Roll in a rectangle, 10"x5" and 1/2" thick. Cut into 12 breadsticks. (A pizza cutter works best for this.) Place butter in a 9x13 pan. Place breadsticks in butter and turn to coat. Sprinkle with sesame seeds. Bake at 450 14-18 minutes or til golden. Serve warm.    We double this for my family, and bake on a 12x18" cookie sheet.

This dough is very soft. If it's too sticky for you, use lots of flour on the counter when rolling, and be sure to cut with a pizza cutter!

 
0 Comments

    Need a Search bar?
    One day I may upgrade my website-- but until then, use your web browser search bar. Type in my web address and what you're looking for, like this-- 
    www.theprovidenthomemaker.com  pumpkin --  and you should get results.


    Author

    I'm a disciple of Christ, a member of the Church of Jesus Christ of Latter-day Saints, a family-defending, homemaking, and homeschooling mom of eight children, two of whom sometimes can't have milk or wheat. Growing up on a farm in a high mountain valley, my parents taught me to 'make do', work hard, smile, and help others.  I love cooking, learning, growing food and flowers, picking tomatoes, and making gingerbread houses --which CAN be made allergy-friendly-- with my children.  I hope you find something to help you on my site!

    Archives

    April 2024
    July 2023
    April 2022
    September 2021
    March 2021
    December 2020
    April 2020
    March 2020
    February 2020
    January 2020
    December 2019
    November 2019
    October 2019
    September 2019
    August 2019
    July 2019
    June 2019
    May 2019
    April 2019
    January 2016
    November 2015
    October 2015
    September 2015
    March 2015
    February 2015
    November 2014
    October 2014
    September 2014
    August 2014
    July 2014
    June 2014
    May 2014
    April 2014
    March 2014
    February 2014
    January 2014
    December 2013
    November 2013
    October 2013
    September 2013
    August 2013
    July 2013
    June 2013
    May 2013
    April 2013
    March 2013
    February 2013
    January 2013
    December 2012
    November 2012
    October 2012
    September 2012
    August 2012
    July 2012
    June 2012
    May 2012
    April 2012
    March 2012
    February 2012
    January 2012
    December 2011
    November 2011
    October 2011
    September 2011
    August 2011
    July 2011
    June 2011
    May 2011
    April 2011
    March 2011
    February 2011
    January 2011
    December 2010
    November 2010
    October 2010
    September 2010

    Categories

    All
    Alcohol
    Alternate Cooking
    Appearances
    Apple
    Apricots
    April Fools
    Aprons
    Bananas
    Beans
    Beef
    Beets
    Bench
    Beverages
    Bonnet
    Bread
    Breakfast
    Budget
    Budgeting
    Cake
    Candy
    Canning
    Carrots
    Cheese
    Chicken
    Children
    Chocolate
    Christmas
    Cleaning
    Coconut
    Comfrey
    Common Core
    Constitution
    Cookbook
    Cookies
    Cooking Oil
    Crafts
    Dairy Substitutions
    Dehydrating
    Dessert
    Dried Fruit
    Earth Oven
    Earthquake
    Easter
    Edible Weeds
    Eggs
    Emergency Prep
    Essential Oils
    Faith
    Family Home Evening
    Fertilizing
    Food Storage
    Fourth Of July
    Freezer
    Frosting
    Fudge
    Garden
    Gardening
    Gingerbread
    Gluten
    Gluten Free
    Gold
    Government
    Grains
    Gratitude
    Hat
    Herbs
    Home Remedies
    Home Repairs
    Homeschool
    Home Storage
    Honey
    Hope
    Inflation
    Leftovers
    Legumes
    Lemon
    Main Dishes
    Mixes
    Mothers
    Noah
    Non Artificial Colors
    Non-artificial Colors
    Nuts
    Oats
    Oil
    Orange
    Paint
    Peaches
    Pear
    Pie
    Pizza
    Plums
    Poem
    Popcorn
    Pork
    Potatoes
    Powdered Milk
    Prayer
    Preparedness
    Projects
    Prophecy
    Pruning
    Pumpkin
    Quick Bread
    Rhubarb
    Rice
    Salad
    Salt
    Sauces
    Self Reliance
    Self-reliance
    Sewing
    Shelf Life
    Shelves
    Sky
    Smoothie
    Snacks
    Soup
    Spices Or Seasonings
    Squash
    Strawberries
    Substitutions
    Sugar
    Summer Fun
    Three Month Supply
    Time
    Tomatoes
    Trees
    Truffles
    T-shirts
    Tuna
    Ultra Gel
    Valentine\'s Day
    Vegetables
    Water
    Watermelon
    Wheat
    Work
    Year Supply
    Zucchini

    RSS Feed

Web Hosting by iPage