The Provident Homemaker
  • Recipes and Info
    • Making Bread
  • My Blog
  • Favorite Resources
  • Documents and Files
  • 52 Weeks of Building Storage

Meal Ideas for Menu Planning

3/28/2020

0 Comments

 
Picture
 Easy everyday main dishes or meals—ideas for your 3 month supply menus

Here is a menu plan for my family
​
Taco Soup  (Homemade Taco Seasoning here)                                         
Spaghetti
"Leftovers" Soup 

Baked Potato with Broccoli and Cheese 
Hawaiian Haystacks  
Pigs in a Blanket (hotdogs baked inside of bread dough or biscuit dough)                                    
Chicken Nuggets (or fish sticks) and French Fries
Orange Chicken (or cauliflower) and rice                               
BBQ Chicken and rice pilaf or biscuits
Pot Pies- made with canned biscuit dough   
Chicken Noodle Soup
Pizza Pockets (Homemade version here)
Taco Salad   
Tacos- beef, fish, chicken, shredded pork, or shrimp
Tamale Pies (mini)   
Mango-Berry Salad, with a sandwich if needed
​Swiss Steak and Tomato Gravy over rice
Hamburgers
Tuna Burgers
Bean Burgers
Red Beans and Rice   
Crockpot (or Instant Pot) Rosemary Pork Roast and Vegetables                
Grilled Cheese sandwiches with Tomato Soup
Spanish Rice with chopped meat stirred in   
Chef Salad with homemade croutons
Chicken Caesar Salad
Sweet Potato Curry with Turkey/Chicken
Ramen       
Ramen-Chicken/Turkey Salad         
​Weeknight BBQ Beef                                          
Individual pizzas- on tortillas or English muffins
​Pizza on Zucchini Crust 
Quesadillas- beans inside or to the side       
French bread pizzas- split lengthwise, add toppings
Chicken Strips and rice or tator tots              
Canned soup with bread and butter
Macaroni and cheese 
Fend for Yourself Night    
Beans, warm homemade bread, cottage cheese, and tomatoes or salsa (sounds weird, but it was my mom's staple on bread baking day)    
Black Beans and Southwestern Zucchini Cakes                           
Breakfast for dinner:
   French Toast                                            
   Pancakes or Waffles with fruit puree or jam
   V8 and nuts and toast                                                
   Hardboiled or scrambled eggs with muffins
   Eggs with fried potatoes or hashbrowns                                                   Muffins and yogurt, cut fruit
   Omelet
   Frittata
   Sausage and Gravy (or sausage gravy!) over Biscuits
   Fruit and Yogurt Parfaits
   German Pancake (try this microwaved version)
Curry over rice
theprovidenthomemaker.com/my-blog/two-minute-egg-and-cheese-breakfast-sandwichBurritos
Enchiladas
Chicken and Ramen salad 
Cheesy drop biscuits and soup                                 
Navajo Tacos    
Spanish Rice – add diced meat or cheese               
Clean out the Fridge night                             
Ham or Spam Fried Rice                               
Sour Cream Chicken Enchiladas
Vegetable Fried Rice                                     
Potato Bar (clean out the fridge for toppings)
Goldenrod Eggs                                             
Meatloaf and baked potatoes
Chicken Gravy over Rice     
​Egg Toast                         
Bread in Milk (basically Egg Toast without the eggs)
Beef stroganoff over noodles                         
Lentil Soup
13-Bean Soup                                                
White Chicken Chili
Chili                                                                
Two-Minute Egg and Cheese Sandwich  
Tuna sandwiches
Chicken salad sandwiches                            
Egg salad sandwiches
Potato salad with eggs, cheese, ham           
Crab salad on bread or lettuce leaves
Teriyaki stir-fried vegetables over rice          
Porcupine Meatballs (made from rice and hamburger, not porcupine!)
 
What else should I add? 
0 Comments

Week 32-  Storing grains and more – dry pack and vacuum method

11/16/2019

0 Comments

 
Picture
To help with building your year's supply (this is Week 6 of 26), see this chart. 

How do you keep your dry foods safe?  That depends on a number of factors, including the local climate, humidity levels, if your storage area is cool and dark or not, and how long you need to store it. 
  
One good option is the ‘dry pack’ method. 
You pack (or pour) dry food into an airtight food grade container.
 
There are better and worse ways to do this. (See here for ALL about it!)
 
Several years ago I attended a class at a local grocery store where the teacher showed us how to extend the shelf life of dry foods.  Some of those foods were wheat and rice, but she included chocolate and nuts.  You can store peanut M&Ms?!  She said this was an experiment, but they’d stored beautifully for a year and she didn’t know how much more to expect.
 
She used glass canning jars, lids, and a seal-a-meal (vacuum packaging)  attachment for canning lids. 

I don’t have the attachment, but discovered something else that works-- oxygen packets!  A 300cc oxygen pack will remove oxygen from filled containers up to a gallon in size. The cheapest way I’ve found to buy these is through the Church’s website, in quantities of 100.  If you’re buying them elsewhere, know that a 100cc oxygen pack is powerful enough for any container of one quart or less.

Oxygen packets are little squares—about 2” across and mostly flat—that contain iron powder.  Oxygen crosses through the packaging material, where it causes the iron inside to rust.  This permanently locks up the oxygen. 

Oxygen packets are recommended for dry-pack canning for two reasons-
  1. their use quickly removes oxygen that could keep insects alive in what you’re storing, and
  2. removing oxygen extends the shelf life of a food.
 
Three things, more than any others,  shorten shelf life of foods once moisture has been reduced--oxygen, light, and heat.  If you can remove the oxygen, the food will last longer. This is especially true if you store it someplace dark or cool, and preferably both. 
 
But removing oxygen also creates a vacuum, which can seal the jars for you.  No seal-a-meal vacuum attachment needed. 
I’ve been dry-packing food in glass canning jars, as well as PET and PETE plastic bottles, for about ten years.   
PETE plastic bottles include those you buy juice in.  Check the bottom of the bottle, and if it says PET or PETE, you can use it.  You can also use food storage foil pouches, which can be cut to whatever size you like, and sealed all the way around.

Make sure your containers are clean and dry, then fill most the way with whatever food you’re placing in it.  Add an oxygen packet, screw on the lid, label, and store somewhere cool and as dark as you can find.  (I like to run a band of masking tape around the lid edge, so I can tell at a glance later if someone opened it—a real possibility in a houseful of children!) 

Simple, right?

But dry-canning in glass jars—vacuum canning-- has been a game-changer for me. You can use any size of canning jar, from the little 4-oz ones to the big 2-quart size.
 
Here’s how I do it:
Get jars, lids, and rings ready- they need to be totally clean and dry. 
Get your food ready- totally clean, with moisture levels below 10%

Get your oxygen packets ready- keep them in their sealed package or airproof jar until the last minute. 

Fill the jars up to the neck only, or a little below the neck.  You’ll need a little bit of extra space in there, and overfilled jars don’t seal well.  Set a new lid and ring (band) to the side of each one. Wipe off the top of each jar, to be sure you have a clean surface for the lid to seal to. Open up the oxygen packets, and, working quickly, drop a packet into each.  Quickly top each jar with a lid and screw the band on.  Label each jar with the contents (if not obvious) and the date (always).

Oxygen packets will start to absorb oxygen immediately, and you don’t want them using up all their power before they’re in the jar!  You can tell the packets are working because they warm up.      
Store the leftover packets in a glass jar with a lid and band firmly screwed on.  They’ll be ready the next time you need them.

The oxygen packets will do their job in the food jars over the next 48 hours, dropping the oxygen content down to .1%.  As this happens, suction is created inside the jar, making the lid seal.  It’s not as secure of a seal as you get with regular canning (steam, water bath, or pressure), but it almost always holds.  Avoid bumping the tops of the jars, since this can knock lids loose.  Leave the bands on for at least the full 48 hours.  You can leave them on the whole storage time if you like. 


I’ve have learned a few things along the way. 

Removing oxygen makes a huge difference, and I can even store foods with a high fat content (peanut M&Ms!) for a few years without them going rancid. 

When storing my homemade tomato powder the first year, I used oxygen packets with some jars, and not with others.  Dried foods are listed as ‘best within a year,’ though that depends a lot on storage conditions.  Two years later, there was a visible difference between the oxygen-free tomato powder and the untreated powder.  The ones with oxygen removed were still as brightly colored—and nicely flavored—as at the beginning, while the others had lost both color and flavor. 
 
How long does sealing and removing air extend shelf life? 

That depends.
 
When stored in my cool, dark basement, nuts have remained great for about 5-6 years.  I recently opened two jars of walnuts canned in 2010! One jar had remained sealed, but the other hadn’t. While the sealed-jar nuts were definitely better three years ago, they were still in the realm of ‘OK’.  Barely.  But the ones that had lost their seal?  Awful.   Really, truly awful.  The smell of rancid oil assaulted my nostrils as soon as the lid was lifted, and those nuts—stored side-by-side with the other jar—were several shades darker.  (I gave those to the chickens.  Not sure whether they got eaten or not.)   So the moral of the story is to ROTATE your food.  Use it.  I try to store the right amount of food to be able to go through it in the next two years, and that would have been great.  Try to use any high-oil-content food within at least five years.

But low-oil foods like rice and wheat?  They’ll store nearly indefinitely.  20, 25, 30 years or more are the estimates from BYU’s food studies. But still rotate using it.

Things I’ve successfully home dry-packed (stored in airtight containers with oxygen packets)

→Rice
→Vegetable powders- tomato, zucchini, pumpkin, beet
→Citrus sugar (dried zest from orange, lemon, or lime, added to sugar and run through the blender to form a powder.  I use it in place of orange or lemon extract.) https://www.theprovidenthomemaker.com/1/post/2010/10/garden-seeds-homemade-orange-flavoring-and-easy-marmalade.html
→Dried candied orange peel (also used to flavor recipes- see the same link as citrus sugar)
→Thoroughly cooked and dried crumbled sausage (all dry packed foods MUST be below 10% water content, or you risk botulism)
→Raw almonds, walnuts, pecans, macadamia nuts, pecan meal, pumpkin seeds, pine nuts, pistachios, smoked almonds, honey-roasted peanuts …
→Sesame seeds, flax seed,
→Spices
→Bridge mix
→Trail mix
And probably more that we’ve long since eaten and forgotten about.
 
I don’t dry-can dried fruit, because it lasts a few years anyway, we’re pretty good at rotating through it, AND I haven’t wanted to do the measuring and weighing to determine if the moisture content is low enough to dry-can it safely.
 
The things people usually dry can at home are wheat, rolled oats, beans, lentils, rice, etc.

So why did I put these other things in jars with oxygen packets?

There are 3 typical reasons- (1) something was at a really good price and I wanted to have it last, (2) I naturally had a lot of that thing, or (3) I was curious to see if it would work! 
 
In the case of all those nuts and seeds, there used to be a local nut packaging company that only allowed its wholesale customers to keep any particular product on the shelf for six months.  Whatever didn’t sell in that time was returned to the company, who would resell this ‘expired’ product for $1 per one-pound bag… no matter if the bag contained gummy bears or macadamias.  Most of the time the nuts were still very good—depending on how and where the store displayed them—in a hot window or on a cool, darker shelf.  As you can see from the photo and list of things I’ve vacuum-canned, my friends and I took full advantage of this!  
0 Comments

Week 21- Making Your Own Taco Seasoning, Weekly Assignment

9/1/2019

0 Comments

 
Picture
Weekly Assignment:   B4-3- This is the last week of doing this for your 3-month food supply items! Next week you’ll start ‘B4-3’ with your nonfood items like hand soap, laundry soap, and toilet paper.

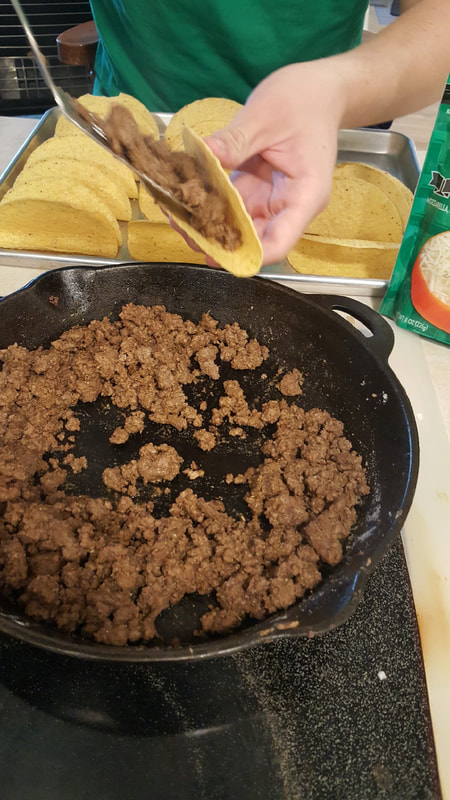
Why spend extra on pre-made seasoning packets when you likely already have all the ingredients? Save some money by making your own seasoning packets, or adding the spices directly to your meat.

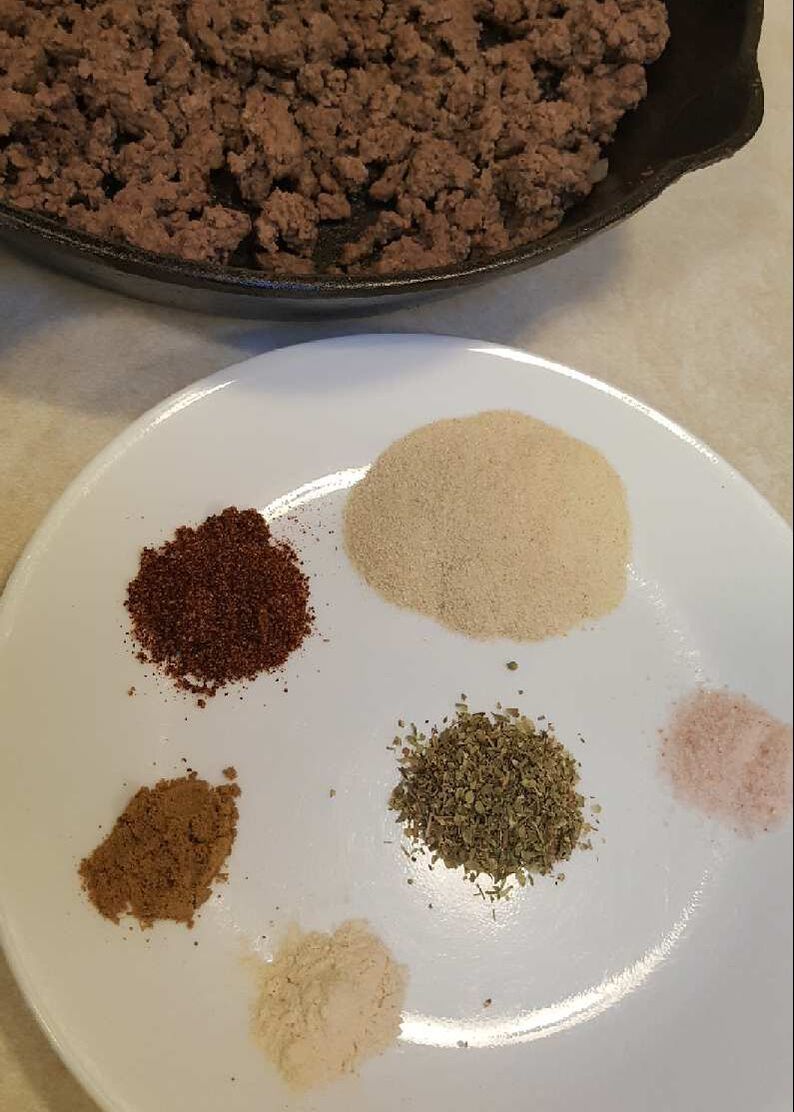
Taco Seasoning
2 Tbsp. dried onion
1 tsp. oregano
1½ tsp. chili powder
½ tsp. garlic powder
½ tsp. cumin
½ tsp. salt

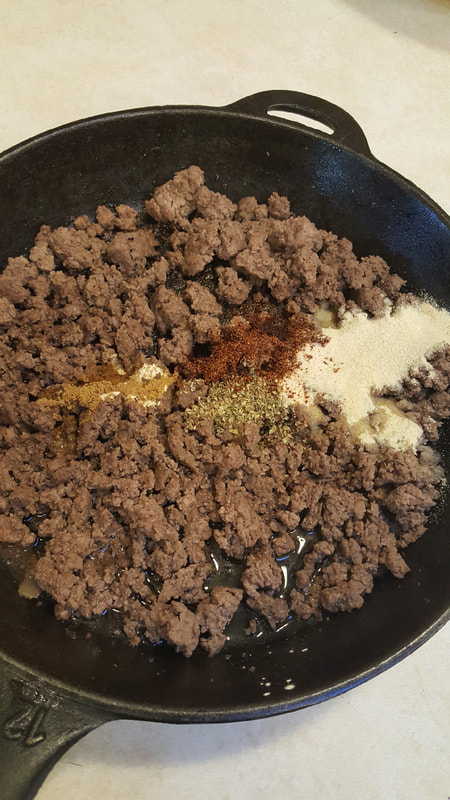
This is enough seasoning for 1 pound of ground beef or turkey, or a pound of freshly cooked pinto or black beans.  Cook the meat until browned, add the seasonings and ½ c. water or 8 oz tomato sauce; simmer for a few minutes until it’s the consistency you like. Want to make your meat go further?  Add any of these: 1 cup of cooked rice, a handful of quick-cooking oats and a bit of extra water (or 1/4 c to 1 c. leftover cooked plain oatmeal), a can of beans (drained), 1/2- 1 c. shredded vegetable like carrot or zucchini, 1-2 c. cooked cracked wheat.

The seasoning can be adjusted to your own tastes; if you like cumin, up to 1½ tsp. can be good.  I’ve also seen people add crushed red pepper or cayenne pepper, black pepper, smoked paprika, and a couple tablespoons of brown sugar.  What if you overdo the spices?  See how to fix that, here.  

Something to know about chili powder is that there are two general kinds-- the first is nothing but powdered chili peppers, with a huge range of heat, depending on the type of pepper used. (If it's a spicy one, 1 1/2 tsp. of this in your recipe will likely be too much!)   The second kind of chili powder is a mixture of spices-- including powdered chili peppers- but also including things like cumin, oregano, garlic, salt, and more.  Check the label of your spice bottle to see what yours is made of; if it has salt, you may need to reduce the separate amount of salt. If it doesn't have salt, you may want to add 3/4 tsp instead of 1/2 tsp.

Multi-batch Taco Seasoning (some for now, some for later)
½ c. dried onion
1 Tbsp + 1 tsp oregano
2 Tbsp. chili powder
2 tsp. garlic powder
2 tsp. cumin
2 tsp. salt (use 1 Tbsp if your chili powder doesn’t contain salt)
 
Stir together in a small bowl.  You can keep the whole batch in a glass spice jar and use 3 Tbsp each time you cook 1 lb of burger for tacos, or store single-use quantities in snack-size ziptop bags.  For single use size, divide into four roughly equal portions.  Put each one in a small ziptop bag or other airtight container.  Label, date, and store in the cupboard or freezer.
 
Store in a dark cupboard or in your freezer.

You can even add tomato powder (see here how to make it and how to use it in your recipes)


Use this mix in taco salad, soups (1 batch of seasoning for 1-2 quarts of liquid), salad dressings, dips, Mexican dishes, as a rub for meat, on kebabs, and of course for tacos. (Add 1 tsp seasoning mix to one drained can of beans.)

Want to make more home-seasoned basics?  


Marinara sauce
​

BBQ sauce

Or maybe you're needing ways to use all the tomatoes your garden is producing:

https://theprovidenthomemaker.com/my-blog/category/tomatoes
Picture
Picture
0 Comments

Week 8- Canning meat, beans, and vegetables

5/30/2019

0 Comments

 
Your ​Week 8 assignment-- Going off your  Inventory Shopping List and this week’s sales, buy the 3 months’ worth of as many different food items as you can (= Buy For 3) as your new budget allows.  Only 10 more weeks of this step!

This week's skill:
Did you know that you can bottle meat, beans, stew, and chili at home?  When you find a great sale price on meat, you can buy a bunch and save yourself a lot of money in future months!  For instance, a couple months ago I found boneless skinless chicken for $1/lb. I bought a case (40 lbs), froze about 10 lbs in meal-sized quantities, and bottled the rest.  The bottled chicken makes for quick meals, and I know exactly what was added to it.  In this case, that meant chicken and salt.  Other times I’ve put sliced carrots, celery, onions, and herbs in the jars with the meat, to have a great base for a quick, wholesome chicken noodle soup or pot pie. My food storage includes home-bottled chicken, beef, salmon, pork broth, chicken broth, black beans, pinto beans…

Did you watch the video at the top, on making bottled stew?  Do you have some of the dehydrated diced carrots from the Home Storage Center?  They're great for adding to canned foods.  It helps to soak them in hot water for at least 10-20 minutes first, so they don't soak up all the water in your jar while it cooks.

Meat, beans, and vegetables (except tomatoes) are in the category called ‘low acid’, compared to things like tomatoes and fruits, which are ‘high acid’, or contain higher acidity.  Higher acid foods may be processed using a big pot with boiling water to heat the jars and food, but low acid foods have to be heated to a higher temperature.  This means the only way to safely bottle them is with a pressure canner—a pressure cooker made to hold 7 or more jars at a time.  They start around $65 and go up from there, but you may have a friend who is willing to let you try it out at her house, or borrow it if you’re the confident type.  (I have one. It's very similar to the one in the video above. Come on over!)

Where can you find instructions on pressure canning?  Most pressure canners come with an instruction book and charts, and there are great resources online.
 
The first place to know is your local Extension Office.  In Utah, that’s the Utah State University Extension office, and somebody there knows the answer to just about any question you come up with on the topics of food, kitchens, preserving, budgeting, gardening, yard care, house and garden pests, and more. They’ll even test your pressure cooker gauge every year for $2.

https://nchfp.uga.edu/ has lots of canning information; one of its pages is this one.  It has instructions on canning
Chicken, Rabbit, Chicken or Turkey Broth, Chili, Meat (ground or chopped), Meat (strips, cubes, or chunks), Meat Stock, Meat and Vegetable Soup, Mincemeat Pie Filling, Clams, Crab, Fish (fresh or smoked), Oysters, and Tuna!

This page has info on how canning preserves food, how to make sure your food is safe, what jars, lids, and canners to use, how to know if the jars sealed correctly, canning food for special diets (including baby foods), and more.
 
Other good resources are The Ball Blue Book  and its online counterpart, https://www.freshpreserving.com/home

The Ball Complete Book of Home Preserving

So Easy to Preserve    (388 pages of instructions and recipes from the Extension Office in Georgia)

There are lots more.  Look for USDA-tested recipes.
​_____________ 

Are you ready to try this?? It's great!
0 Comments

Creamy High-Protein Pasta, Dairy Free

3/23/2015

2 Comments

 
Picture
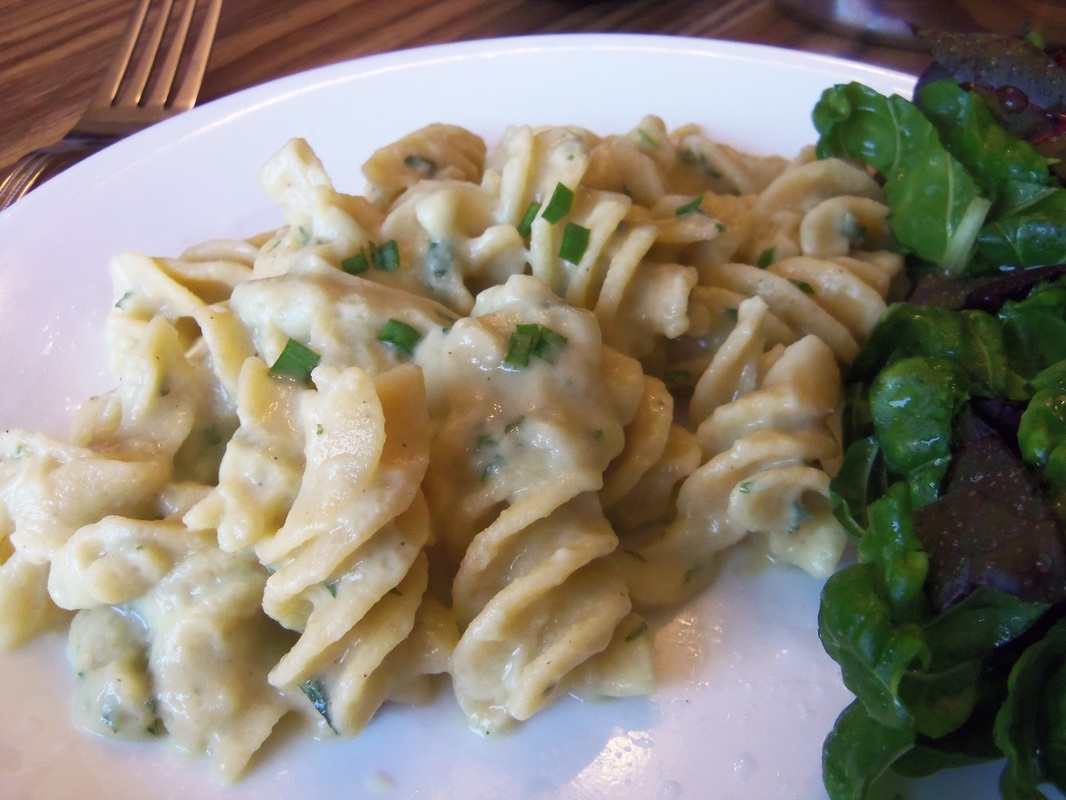
This is meat-free, dairy-free, and in the photo above, also made using gluten-free pasta.  Its rich and creamy taste would never make you suspect there are so many 'normal' ingredients missing.  You will not taste the avocado, and surprisingly, it doesn't even make the sauce look green.  It adds richness along with those healthy, satisfying fats.  
If you used canned chickpeas, you'll have about one cup extra; you can either stir those in with the pasta, or save them for another use.
If you don't have an avocado, or don't want to use one, omit it and increase the chickpeas to three cups instead.

12-16 oz. pasta, cooked according to directions; save the cooking water
1 Tbsp. olive oil
3 cloves garlic, minced
2 cups cooked chickpeas- or use 2 cups from two (14-oz) cans, drained
one 6" sprig fresh rosemary, or 1-2 tsp. dried rosemary
1/4 tsp. red pepper flakes
1 medium avocado, peel and pit removed
1 Tbsp. lemon juice
salt and freshly ground black pepper to taste
1/4 c. chopped fresh parsley, or 1 1/2 Tbsp. dried parsley

While the pasta is cooking, heat 1 Tbsp. olive oil in a small skillet over medium-high heat. Add the garlic; cook and stir 2-3 minutes or until fragrant.

In a blender, combine 3 cups of the pasta cooking water (may also use the water drained off the cans of chickpeas), chickpeas, rosemary, red pepper, avocado, and lemon juice.  Blend on high until smooth.  Add salt and pepper to taste (start with 1/2 tsp. salt), and stir in parsley.  
Pour over pasta and toss to coat.  
If the sauce is too thick, add water 1 Tbsp. at a time until it's the consistency you like.  


2 Comments

Which are cheaper foods- healthy, or not?

6/19/2012

0 Comments

 
Picture
In the last few years, we've all heard that it's more inexpensive to eat high-calorie, nutrient-sparse foods.    Are we then doomed to a life of either nasty nutrition or perpetual poverty because of our ballooning food budget?

Picture
No way!   The whole premise turns out to not really be true.


But then, those of you who cook your own food probably took the earlier studies with a grain of salt.


Fresh and whole foods are cheaper especially if eating from scratch... whole grains and legumes are especially inexpensive per serving (you know, that stuff that stores long-term really well!).

The original studies, we now learn, were comparing price per calorie in healthy vs. unhealthy foods.

Now, if you're comparing a fresh apple to a side order of fries, it looks something like this:

1 medium apple, about 5 ounces (141g) = about 80 calories    at $1.50/lb,  this costs $ .47  (if you buy them when they're on sale for $1/lb, then it's $ .31)

1 medium order of McDonald's fries, about 5 ounces (147 g) = 453 calories, in my city it costs $1.49

Both weigh approximately the same.  You'll feel about as full with each one; they both fill the same amount of space in your stomach.  According to the old numbers, though, the fries are much cheaper because   $1.49 divided by 453 calories gets you 3 calories per penny.  The apple, at $ .47 for 80 calories, comes out at 1.7 calories per penny. 

This would matter in a country where every calorie is precious.  Our problem here, though is the reverse.  Most of us eat too many calories, and being full with fewer calories is a helpful thing.

The price difference gets worse, too.  Here in Utah, sales tax on food is 3%.  Sales tax on food from a restaurant, however, is 8%.  That means you're paying one to two cents to the government when you buy the apple, and twelve cents when buying those French fries.  (Maybe that's where the money came from to fund that first study saying fast food was cheaper?!)

So is healthy food always cheaper than fast food?  No, not always.  Often.  It depends on what you buy.  (like Dave Ramsey says, eat "beans and rice; rice and beans" for those trying to live very frugally.) 

But your grocery budget already told you that.

************************************************
Click on the link below to read the article that sparked this blog entry:

http://www.foodnavigator-usa.com/Market/Are-healthy-foods-really-more-expensive-Not-necessarily-say-USDA-researchers

0 Comments

How much does a year’s supply cost? and Best Drop Biscuits

10/26/2010

0 Comments

 
Picture
Once the dough is mixed, if you use a greased/sprayed 1/4 measuring cup to scoop the dough, you'll get a more traditionally-shaped biscuit.

Picture
Yum.  Tender and light on the inside, crunchy on the outside.  This batch was made with 1 cup whole wheat flour.

How much will your year’s supply cost you?  I just got an emergency supply store’s catalog in the mail; they advertised a year’s supply of food for ‘just’ $3649.95.  For one person.  Is it really that much money to get a year’s supply?

Adding up all the essentials, a month’s worth of food for one person is $16.23

                            A year’s worth for one person is  $194.76

Figure in that you’re getting your year’s supply after building your three-month supply; that knocks it down to getting nine months’worth;

                                                            $146.07 per adult.   

You CAN afford to get your home storage! 

If you really want to spend $3649.95 plus tax, you could buy a year’s supply for not just one person, but for NINETEEN people.  Yes, basic storage is different food than that ‘gourmet’ version, but here’s the counsel we’ve been given:          
"We encourage members world-wide to prepare for adversity in life by having a basic supply of food and water and some money in savings.” “For longer-term needs….gradually build a supply of food that will last a long time  and that you can use to stay alive” (fromAll is Safely Gathered In, First Presidency pamphlet)


Here is the cost breakdown:


Grains, 300 lbs- if you get just wheat and oats, at the cannery they cost between $5.80 and $8.15 for 25 lbs. depending on if you get white or red wheat, quick or regular oats.  If you average this out, it will cost you $6.98 per person, per month.  $83.70 per year’s worth.

Milk, 16 lbs is $1.40/lb at the cannery, which is $1.87 per month, $22.40 per year.

Sugar, 60 lbs is $ .56/lb there, $2.80 per month, $33.60 per year.

Oil, 10 qts –this isn’t sold at the cannery, but the price at Macey’s last week was $2.50 for 1 ½ quarts (48 oz.) At that price, after tax, it’s $1.43 per month, $17.17 per year.  It’s only $14.38 if you buy it at Sam’s Club ($6.98 + tax for 5 qts.)

Salt, 8 lbs- 4# box at Costco or Sam’s Club is a dollar; $ .16 per month, $2 per year.

Legumes, 60 lbs– the cannery sells black beans, pinto, and white, from $14.10 to $16.30 for 25 lbs.  Averaging the prices, it’s  $2.99 a month, $35.92 per year.

Water, 14/gal/person-   You can store this for free by using 2- and 3- liter pop bottles, or juice containers (not milk jugs- they break down).  Or use the 5-gallons square jugs or big blue barrels; they’ll run you about $1 per gallon of storage. 

When you’re done storing these items, you might decide to add a few ‘gourmet’ items- but that’s just extra stuff.

Notice that the costs were just for food, not containers to store them in. Most of my storage containers cost nothing.   You CAN get buckets for free, with a little effort- most bakeries give them away; all their frostings and fillings come in those buckets.  Plan on washing them at home.  There are two main sizes; 5 gallon and 2 1/2  gallon.  I keep packages of dried fruit in the smaller buckets, also cornmeal or other things that I don’t use as much.  They are a great size for a pantry, too.  Some of the buckets have gaskets, some don’t.  The ones that don’t seal well are still good for storing sugar. 

If you want all your wheat, powdered milk, sugar, and legumes in #10 cans from the cannery, it will cost you $85.83 more to get a full year’s worth, $65 to do 9 months' worth.

Here’s the year’s worth breakdown and quantities:    51 cans of wheat $137.80, 11 cans of beans $48.95, 10 cans of sugar $46.50, 4 cans of powdered milk $28.20.

 I don’t can my wheat, sugar, or beans because we go through large quantities; one batch of bread would use a whole can.  Pretty silly storage for me.  Besides, it’s easier for me to find space for 10 buckets than 60 #10 cans; they hold about  the same amount of food.


Best Drop Biscuits
 adapted from Cooks Country
Makes 12

 1 cube butter, melted and cooled a few minutes- set aside 1 Tbsp. of this.
1 cup cold buttermilk or sour milk  (1-2 Tbsp. vinegar in 1 cup regular milk)
2 c. flour
2 tsp. baking powder
½ tsp. baking soda
½  tsp. salt  (3/4 tsp. if you used unsalted butter)
1 tsp. sugar

 Heat oven to 475 degrees, no, that’s not a typo.  Mix together the butter (except reserved) and buttermilk; stir until the butter forms clumps.  (This is a faster way of getting the same results as ‘cutting in’ the butter.)  Mix all the dry ingredients together, then pour in buttermilk mixture.  Stir until just mixed in and dough pulls from side of bowl.   Drop onto  greased or parchment-lined cookie sheet.  A greased  ¼ c. measuring cup makes the perfect size scoop.    Brush with reserved butter.  Bake until tops are crisp and golden, about 12-14 minutes.    Serve warm.  These also reheat well the next day (10 minutes at 300 degrees) and freeze well, too.

You can use powdered milk in this: mix in 3 Tbsp dry milk powder when you’re stirring together the dry ingredients.  Use ice water  and 1-2 Tbsp. vinegar to make 1 cup, stir with the melted butter.

 
0 Comments

Year's Supply quantities, Roast Chicken Dinner with rice, and apple crisp

10/26/2010

0 Comments

 
Hi,

Remember  this?

"We encourage members world-wide to prepare for adversity in life by having a basic supply of food and water and some money in savings.” “For longer-term needs….gradually build a supply of food that will last a long time  and that you can use to stay alive” (from All is Safely Gathered In, First Presidency pamphlet)

Here is what a basic supply of food includes:  it will provide about 2200 calories a day, which means you’ll probably get 1800 and your husband will get 2600.  This is less than most people are used to, especially if you're suddenly living a 'more active' lifestyle, but it will keep you alive!

300 lbs grains- includes Wheat, Rice, Rolled Oats, Dried Corn, Popcorn, Flour, Pasta Products, Dried Potatoes.  Some lists say 400 lbs per person, but the current Church site says 300.  Take your pick, according to what you can handle.  Storage-wise or hunger-wise; that extra 100 lbs provides an extra 435 calories per day.

16 lbs. powdered milk- this is just enough for cooking, about ¾ cup per day.  You can store instant, regular powder, and canned milk.  It takes about 5 (12-oz) cans to equal one pound of powdered milk

60 lbs sugar- this includes white sugar, brown sugar, powdered sugar, honey, molasses, jam/jelly, corn syrup, fruit drink mix, gelatin.  If you have honey that crystallizes, set the bottle in the sun on a warm day, or put it in a pan of water on lowest heat overnight.  It will become liquid again.  You will want more sugar than 60 lbs. if you can your own fruit.

10 quarts cooking oil (2 ½ gallons)- yes, YOU NEED FAT.  Your brain is made mostly of fat.  Guess what happens if you don’t get any fat in your diet?  Plus, it’s a lot of calories for very little storage space.  The darker & cooler you keep it, the longer it lasts.  Fats include shortening, cooking oil, butter/margarine, mayonnaise, peanut butter.

8 lbs salt per person-  this is the cheapest of them all!   In addition to the round canisters, you can buy salt in 4-lb rectangular boxes; these stack together more efficiently.  At Sams’ Club, these boxes are just under $1.  Woo-hoo!  Two bucks and you have your personal salt for the year!

60 lbs. legumes, dried- includes soybeans, pinto beans, white beans, kidney beans, lima beans, anything that ends with ‘bean’ (unless it begins with ‘jelly’), black-eyed peas, split peas, and lentils.  These are a great, inexpensive source of protein.  Store the same as wheat- dry, clean, dark and cool  if possible. It takes 4 ½ (15 oz) cans to equal one pound of dry beans.

14 gallons water per person.  This is just 2 weeks’ supply, for drinking and a tiny bit for washing; the minimum our church leaders have counseled.  You may also want a way to purify water for longer-term use.  To purify, you can boil water for 2 minutes, or use chlorine bleach (plain only, not scented!)  If the water is clear, use ½ tsp. per 5 gallons of water.  If the water is cloudy, use double; 1 tsp. per 5 gallons of water.

Children do not need a full adult’s portion.  For them, figure age 3 and under= 50%, ages 4-6= 70%, ages 7-10= 90%, ages 11 and up= 100%.

Obviously, kids' ages are always changing, so when I calculate what to have on hand ( I inventory every Conference), I project out six months to a year. For instance, if someone is 6 years old, I count that child as 7 years. That way I'm not always slightly behind when it's time to replenish.

 * * * * *

Recipes today are for a whole meal….

Roast Chicken               From Living On a Dime, Jan 2010.  
Here is a very basic but yummy recipe. You can also put this in a crock pot to slow cook all day.


1 (3 lb.) whole chicken
Salt and pepper to taste
1 Tsp. onion powder
1/4 cup butter or margarine 
1 stalk celery, leaves removed

Season the whole chicken inside and out with salt, pepper and onion powder. Place breast side down in pan placing margarine and celery into cavity. Bake at 350° for 1 hour and 15 minutes or until internal temperature is 180° (82° C). You can baste with juices or melted margarine once or twice. Remove from oven and cover with foil for 30 minutes and let it rest before cutting.

You can easily adapt this recipe to your own likes and dislikes. For example, you might use garlic powder instead of the onion powder, you could slide slices of lemons or garlic cloves or even onion slices under the skin. Try other seasonings, too.

The main thing that makes this recipe great is cooking it breast side down, which makes it extra juicy.

Cheesy Peas and Rice

2 1/4 cups rice, cooked                                              
1 (10 oz.) pkg. frozen peas, thawed

1 (6 oz.) can of mushrooms, drained                          
6 oz. Velveeta, cubed*


Combine all the ingredients in a greased 1 1/2 qt. baking dish. Cover and bake at 350° for 20 minutes.

I didn't used to buy Velveeta because it was more expensive than other cheeses, but since it is the same price or less than cheddar now, I buy it more often.


Apple Butterscotch Crisp

This recipe is good served with ice cream or, for something different, try a slice of cheese or a dollop of sour cream.

 5 large (7 small) apples, sliced and peeled               
1 tsp. cinnamon

1 cup brown sugar, depending on your apples           
1/2 cup flour

1/2 cup quick cooking oatmeal                                      
1/2 cup butter or margarine, cold                                     

1 pkg. (3.5 oz.) cook and serve  
          
butterscotch pudding


Place apples in a greased 9x13 pan. Mix everything else in a bowl, cutting in* the butter until it resembles coarse crumbs. Sprinkle over apples. Bake at 350° for 40-45 minutes or until apples are tender.

You can leave out the butterscotch pudding; it won't throw off the recipe. It will still be delicious. 

*Whenever a recipe says to cut in something, that means to take a pastry cutter and mix the butter, margarine or shortening in with the dry ingredients until the mix gets crumbly looking. (I just use my fingers. It is easier for me to wash them than a pastry cutter.)

Roast Chicken Leftovers:

Chicken Spaghetti Bake-  Make your favorite spaghetti, mixing noodles and sauce. Instead of adding hamburger to it or leaving it without meat, add some cubed leftover chicken. Put it in a 9x13 greased pan sprinkle with mozzarella cheese and grated Parmesan cheese. Bake at 350° until heated through and cheese is melted.

Make Chicken Soup with leftovers- see the recipe for turkey soup.  Use ¼ the amount of water and spices for chicken because it’s so much smaller!

Leftover Leftovers- If you have any of this soup left, thicken it with a little cornstarch or flour mixed in water. Make a batch of biscuits or use any leftover biscuits you have and pour the thickened soup (now like gravy) over it.
0 Comments

    Need a Search bar?
    One day I may upgrade my website-- but until then, use your web browser search bar. Type in my web address and what you're looking for, like this-- 
    www.theprovidenthomemaker.com  pumpkin --  and you should get results.


    Author

    I'm a disciple of Christ, a member of the Church of Jesus Christ of Latter-day Saints, a family-defending, homemaking, and homeschooling mom of eight children, two of whom sometimes can't have milk or wheat. Growing up on a farm in a high mountain valley, my parents taught me to 'make do', work hard, smile, and help others.  I love cooking, learning, growing food and flowers, picking tomatoes, and making gingerbread houses --which CAN be made allergy-friendly-- with my children.  I hope you find something to help you on my site!

    Archives

    April 2024
    July 2023
    April 2022
    September 2021
    March 2021
    December 2020
    April 2020
    March 2020
    February 2020
    January 2020
    December 2019
    November 2019
    October 2019
    September 2019
    August 2019
    July 2019
    June 2019
    May 2019
    April 2019
    January 2016
    November 2015
    October 2015
    September 2015
    March 2015
    February 2015
    November 2014
    October 2014
    September 2014
    August 2014
    July 2014
    June 2014
    May 2014
    April 2014
    March 2014
    February 2014
    January 2014
    December 2013
    November 2013
    October 2013
    September 2013
    August 2013
    July 2013
    June 2013
    May 2013
    April 2013
    March 2013
    February 2013
    January 2013
    December 2012
    November 2012
    October 2012
    September 2012
    August 2012
    July 2012
    June 2012
    May 2012
    April 2012
    March 2012
    February 2012
    January 2012
    December 2011
    November 2011
    October 2011
    September 2011
    August 2011
    July 2011
    June 2011
    May 2011
    April 2011
    March 2011
    February 2011
    January 2011
    December 2010
    November 2010
    October 2010
    September 2010

    Categories

    All
    Alcohol
    Alternate Cooking
    Appearances
    Apple
    Apricots
    April Fools
    Aprons
    Bananas
    Beans
    Beef
    Beets
    Bench
    Beverages
    Bonnet
    Bread
    Breakfast
    Budget
    Budgeting
    Cake
    Candy
    Canning
    Carrots
    Cheese
    Chicken
    Children
    Chocolate
    Christmas
    Cleaning
    Coconut
    Comfrey
    Common Core
    Constitution
    Cookbook
    Cookies
    Cooking Oil
    Crafts
    Dairy Substitutions
    Dehydrating
    Dessert
    Dried Fruit
    Earth Oven
    Earthquake
    Easter
    Edible Weeds
    Eggs
    Emergency Prep
    Essential Oils
    Faith
    Family Home Evening
    Fertilizing
    Food Storage
    Fourth Of July
    Freezer
    Frosting
    Fudge
    Garden
    Gardening
    Gingerbread
    Gluten
    Gluten Free
    Gold
    Government
    Grains
    Gratitude
    Hat
    Herbs
    Home Remedies
    Home Repairs
    Homeschool
    Home Storage
    Honey
    Hope
    Inflation
    Leftovers
    Legumes
    Lemon
    Main Dishes
    Mixes
    Mothers
    Noah
    Non Artificial Colors
    Non-artificial Colors
    Nuts
    Oats
    Oil
    Orange
    Paint
    Peaches
    Pear
    Pie
    Pizza
    Plums
    Poem
    Popcorn
    Pork
    Potatoes
    Powdered Milk
    Prayer
    Preparedness
    Projects
    Prophecy
    Pruning
    Pumpkin
    Quick Bread
    Rhubarb
    Rice
    Salad
    Salt
    Sauces
    Self Reliance
    Self-reliance
    Sewing
    Shelf Life
    Shelves
    Sky
    Smoothie
    Snacks
    Soup
    Spices Or Seasonings
    Squash
    Strawberries
    Substitutions
    Sugar
    Summer Fun
    Three Month Supply
    Time
    Tomatoes
    Trees
    Truffles
    T-shirts
    Tuna
    Ultra Gel
    Valentine\'s Day
    Vegetables
    Water
    Watermelon
    Wheat
    Work
    Year Supply
    Zucchini

    RSS Feed

Web Hosting by iPage