The Provident Homemaker
  • Recipes and Info
    • Making Bread
  • My Blog
  • Favorite Resources
  • Documents and Files
  • 52 Weeks of Building Storage

Summer Fun with kids

6/30/2011

2 Comments

 
Picture
When everyone's out of school, what do you like to do? 

I've always been the kind of person who wonders where that side road goes, who likes to stop and read all the historical markers, and who likes to explore little areas to look at trees, or rocks, or whatever is there.  Last year I decided it was time to start doing some of those things, instead of just wondering what was out there and feeling trapped in a rut.  And have fun with my children, exploring with them.

I started with a brainstorming list; local places I'd wanted to visit.  Then I asked my children what places they wanted to go.  Not surprisingly, most of their 'wish list' places charge money to go to.  We go on a little 'field trip' once a week, while my husband is at work.   The biggest way to keep my teenagers happy is by including a 'food stop'.  For instance, when we go on a hike to the waterfall up Battle Creek canyon, we first stop at Daylight Donuts, a cute old house that's been converted to a drive-through donut shop.  When we go to visit friends in Cache Valley, we either visit the Gossner cheese factory to get fresh cheese curds ("squeaky cheese"!), or drive up to the Pepperidge Farms factory to see what goodies are at their outlet.   And we 'have to' visit the Climbing Tree at the mouth of Blacksmith Fork canyon- a fabulous old willow with some branches that obligingly rest on the ground so little ones can climb up.   Before we go, I also like to look up history or tidbits about the area, so I can talk to my kids about it as we drive, or point out things like the old trail along the road, or where the railroad used to run, or where the pioneers built their first reservoir.
When we drive into the mountains and come out through a different canyon, I pull out our map when we're home, and show them how the canyons and mountains connect.  Most of what we do just costs gas money, plus whatever snack we stop and buy to eat.  About once a month we'll do something that costs more. 

What's interesting in your area?  Ask neighbors, a random mom at the grocery store, look online, call your city's tourism center.  Here's part of our Ideas List:  (Everything's more fun when you invite another mom and kids to come with you!  And as you can see, we never get everything done in one summer!)

-drive all the way up Emmigration Canyon, loop across to Heber.  Stop at Granny's for shakes, stop at the old train depot to see the Heber Creeper.  Go home through Provo Canyon, stop to play and eat lunch at Vivian Park (bonus if the Heber Creeper comes puffing in while we're there).  One of these times I'll let my older kids tube down the river, too. This route passes 5 reservoirs- tell my kids their names and a little history, including which one supplies our family's water.

-visit Stansbury Island (west side of the Great Salt Lake) to see the oolitic sand.  Float in the lake.  

-dig for geodes near Dugway

-
ride bikes over to the nearby lake, play in the stream and lake, watch the clouds go by.

-find some of the hot springs in the area

-drive back to the family farm (2 hrs away), walk by the river, hike up the old cabins, then climb the hill.

-visit the Fremont Indian sites to see the hieroglyphics; see the Anasazi dwellings (takes more gas money, this is in the "more expensive' category)

-visit This Is The Place Heritage Park- try to time it so the mulberries are ripe on the trees lining the dirt street.  Remember a little money to buy old-fashioned candy from the glass jars in the General Store.

-drive through Parleys Canyon (originally the Golden Pass Toll Road), brush up on the history of the canyon, Sentinel/Suicide Rock,  and Park City.  (Great family history; Parley P. Pratt is an ancestor of mine.)  Drive home through Provo Canyon, stop to hike to Bridal Veil Falls.  Stop at La Brioche, an Argentinian bakery started by a former neighbor of mine, for their bread-apart bread ($1.79/lb, similar in taste to French bread) and Dulce de Leche-filled meringue cookies.

-hike to the Y, visit my sister, and get ice cream at the BYU Creamery.  If we're not worn out, also go through the Monte L. Bean Life Science Museum(which is free; it's also one place I worked when putting myself through college).  Maybe make it a separate trip and also see the Museum of Paleontology. 

-Visit the Kennecott (Rio Tinto) copper mine again.

-Spend a day at the Thanksgiving Point Gardens (probably just the Children's Discovery Garden, for them- shrub mazes, water features to splash in, miniature lighthouse to climb....)  Maybe have lunch at Porter's (or at the Garden), or drive a few more miles to The Peppermint Place's outlet.


-
day trips with just the older kids: hike Mt. Olympus, or Timpanogos.  Visit Timpanogos Cave.

- Go to Fault Line Park, have races rolling down the steep hill, which is a fault scarp.  Eat lunch there, drive over to the G.K.Gilbert Geologic Park, (also see here)  which is on another part of the fault line, as well as on a glacial moraine.

-spend a morning at the Wild West Jordan Park.  Munch on Conchas,  Cochinitos, and/or bolillos from  Alicia's Panaderia (Mexican bakery) nearby.

If you want more Utah ideas, check outUtah Family magazine's "No Bored Kids" summer calendar    or Utah Outdoor Activities.  If you're in a different area, try a search for similar terms.
2 Comments

Fluffy Frostings That Are Not Too Sweet, non-artificial colors

6/23/2011

1 Comment

 
Picture
Do you have to go colorless when avoiding artificial colors?
 
The NYTimes recently ran an article called "Colorless Food?  We Blanch", claiming nobody would want to eat food anymore if manufacturers didn't use artificial colors.   It was a little ridiculous.   One response to it is found here.

Yesterday I needed to make a pink and purple unicorn cake for my daughter.  And one extra issue- use no artificial colors, or one son couldn’t have any of the cake.  At least not with any frosting.

Picture
My husband now has a new favorite frosting, as does a neighbour who stopped by:  Fluffy Blueberry Cheesecake Frosting, which was my answer to needing a purple mane, tail, and border. 

(If you just want the frosting recipe, go to the bottom of this post.  To read about making a non-artificial pink-and-purple unicorn, read on.)


To make the basic pony part, I greased a pony-shaped cake pan, mixed up 4 cups of liquid with enough gelatin, and let it set up in the fridge.  I use unflavored gelatin; Knox comes that way in packets, but I buy it in the bulk section of a local health food store.  To make the pony pink, I used fruit punch as 3 cups of the liquid, and 1 cup sour cream (or plain yogurt; I used kefir ‘cause that’s what was in the fridge!) to make it opaque pink instead of transparent red.  Use twice as much gelatin as you would normally; otherwise it will fall apart when you flip it out of the pan. (Mine did, thus the recommendation to double the gelatin!)  It might anyway, but at least you’ll be upping the chance for success.

I baked a rectangular cake big enough for the pony to fit on and frosted it with Fluffy Cheesecake Frosting.   I set the pony pan in a sink of hot water for just a couple seconds, then flipped the pan over the cake so the pony landed in the right place.  Then I decorated with the purple frosting, and carved a horn out of a stick of jicama.  (I was going to use the tip of an ice cream cone, but we were having jicama for dinner.)  Voile!  Everyone’s happy!

Fluffy Blueberry Cheesecake Frosting- makes about 2 1/2 cups
(See here for Strawberry Cheesecake Frosting)
1 cup fresh or frozen blueberries (or 6 oz. other berries)
½ c. sugar
1 Tbsp. Ultra Gel
8 oz. cream cheese, softened
4 oz butter, softened
½ tsp. vanilla 

Combine blueberries and sugar; either puree them in a blender until smooth, OR cook and stir until boiling; cool.   Beat cream cheese until smooth, add butter, sugar, blueberry mixture (cooled if you cooked it),  Ultra Gel, and vanilla.  Beat until smooth and fluffy.  Let stand 5 minutes. 

_____
Ultra Gel needs five minutes to fully absorb liquid; that’s why I’ve added the 5-minute wait time.  These frostings are easy to adjust- if too thick or pasty, add a little (1-2 tsp.) water, or as needed.  If too thin, sprinkle on another 1 tsp. Ultra Gel and beat it in. 


The cream cheese frosting recipe I tweaked to get this, above, as well as the white base layer:

No-cook “cooked”
Fluffy Cheesecake Frosting
½ c. sugar

1 Tbsp. Ultra Gel
8 oz. cream cheese
4 oz butter (1 stick), softened
¼ c. milk
½ tsp. vanilla

Stir together sugar and Ultra Gel, set aside.  Beat cream cheese until smooth, add butter, milk, vanilla, and sugar mixture.  Beat until smooth and fluffy, about 2 minutes.  Let stand 5 minutes.


Another variation I’ve come up with, in case you don't use table sugar at your house:

Fluffy Honey –Cheesecake Frosting

8 oz. cream cheese
4 oz. butter, softened
1/3 cup honey
3 T. water, milk, or cream
½ tsp. vanilla
2 Tbsp. Ultra Gel

Beat cream cheese until smooth; add butter, honey, water, and vanilla.  Sprinkle the Ultra Gel  on top, then beat all until smooth and fluffy, about 2 minutes.  Let stand 5 minutes.

1 Comment

Nifty Apron Bonnet

6/17/2011

2 Comments

 
Picture
Picture
An interfaced brim holds its shape, see here for the whole photo, which is not mine.


Picture
If there's no interfacing, crinoline, or something similar, the brim flops, like this.  Click here to see this one as an apron; it's very cute!

Showtime’s  almost here- our LDS stake will have the youth participate in a pioneer trek reenactment next week.  I went to a local store that sells pioneer costumes, “just to see”.  One apron, one skirt, and one bonnet  totaled $60.    If don’t want to pay an arm and a leg, and you’re looking to make a simple bonnet, have I got a pattern for you!  I stumbled across it while looking for an easily-collapsible hat to put in my 72-hour kits. 

Introducing... th
e handy-dandy, old-fashioned
Apron Bonnet Pattern  

I made one for myself, but my 8-year-old daughter begged for it.  It easily adjusts to fit either one of us, as well as adjusting to give you lots of shade, or just a little.  One other thing I love about it is that you can use it as a waist apron later, so it doesn’t just sit in the costume box somewhere.  Or wear it as a bonnet when you’re out in the garden.   The pockets are big, too; I’ve heard the suggestion that they would be great for holding clothespins in, if you hang laundry on a clothesline.  This pattern has you stitch down the middle, to make two pockets, but you could leave it as one big pocket.

You need only ½ yard of fabric, two buttons, and some crinoline or stiff interfacing.  The crinoline is optional, but I love how the brim keeps its shape when you use it.   See the photos, above.   I found crinoline for about $7 per yard at both local fabric stores.  One yard is enough to line four bonnet brims.  If you can’t find crinoline, you can line it with a layer or two of interfacing, or some stiff fabric, or cut a couple pieces of cardstock (or plastic) to fit. 

A couple words of advice about the pattern-  the ruffle above the waistband  becomes the neck shade.  Keep that in mind when deciding how tall to make that ruffle.  The bottom curve becomes the bonnet brim.  I put gathered lace along the sides and bottom of the pocket, but not along the top of the pocket.  Just my preference.  Use any trim you like-- ribbon, ric-rac, flat lace, gathered lace, crochet trim, soutache-- or none at all.  Also, the pattern pieces’ edges do not match up as intended.  Ignore “Diagram 2” and cut another of “Diagram 1” for the pocket, except make it only 9” tall, measuring from the bottom.  If you want to see other people’s comments on the pattern, see here. 

Have fun!
2 Comments

Natural Herbal Insect Repellents

6/15/2011

0 Comments

 
Picture
Daisies, in the chrysanthemum family. They contain a chemical bugs hate.


Have you been looking for an alternative to DEET bug sprays?  I use the conventional sprays on occasion, but they give me a headache, and remind me way too much of the agricultural pesticides  you’re supposed to cover up before using.  Are there other options?

I have seen natural repellents at about any store that sells herbs- in my area, that includes Dave's Herbs, Herbs for Health, Whole Foods Market (the store that used to be "Wild Oats"), Sunflower Markets, Smith's Marketplace.  It seems like several of their repellents have Neem oil as their base.  Neem oil is an extract of the seeds and fruit of a semitropical evergreen, Azadirachta indica.  It's shown to be quite effective against insects, both for people to use, as well as for growing crops, but there are some cautions to be aware of.  On testing with rats, it caused abortion of fetuses when ingested within a few days of conception.  So don't use neem oil if you're pregnant or trying to conceive.   See here for one source of more information.l

 The Chrysanthemum family of plants contain pyrethrum or pyrethrin, which is a natural repellent.  (Permethrin is the synthetic version of this.) It's also been used for hundreds of years.  You can crush the plant and rub it on you, or dry it, powder it, and mix it with water.  (DON"T DRINK IT!!!).  Some of the plants in this family include the white daisies with yellow centers, mums, and Gerbera daisies.  

You can use essential oils as repellents- dilute with a carrier oil first- a little goes a long way!.  Ones that turned up in my search include lavender oil, lemon balm, catnip, tea tree oil (also called melaleuca), neem oil (again), basil, garlic, geranium, tansy, thyme.  A carrier oil is just a plain vegetable oil- olive oil, canola oil, coconut oil, whatever you want to use. 

Several years ago, I read that lemon thyme had repellent properties.  I planted a mat of it underfoot my garden swing.  We brushed our feet on it as we would swing in the evening.  It smelled wonderful to us, and I hardly ever was bothered by mosquitoes.  We even had a large pond  (perfect mosquito breeding ground) nearby.  My recent reading indicates that lemon thyme’s effect lasts only about 20 minutes when rubbed on your skin, so be aware you may need to do some personal experimenting here.  (Use common sense!)

Here are two sites with some instructions on making your own repellent, if that's what you're after:

http://www.buzzle.com/articles/homemade-natural-insecticide-and-repellent-recipes.html 


http://www.anniesremedy.com/remedy_use137.php 


And a recipe, from Mother Earth News (disclaimer- though they have some great information, they are very pro- ‘save the planet’-forget those invasive humans).  They adapted this one from The Green Pharmacy.  

Herbal Insect Repellent

2 ½  teaspoons  total of any combination of the following essential oils (available at health food stores): basil, cedarwood, citronella, juniper, lemon, myrrh, palmarosa, pine, rose geranium and/or rosemary

1 cup 190-proof grain alcohol (available in liquor stores)

Put everything in a jar with a tight-fitting lid and shake it hard. Store in small bottles; glass is best. To use, rub a small amount on any exposed skin (test first to be sure you're not allergic to the repellent!) or dab it on clothing. You might put it in a small spray bottle.


Experiment a little to find which essential oils work best with your body chemistry. If you're lucky, you also will like the way they smell; otherwise, add a few drops of peppermint oil to fine-tune the fragrance.

recipe from http://www.motherearthnews.com/Nature-Community/2003-08-01/Outsmarting-Mosquitoes.aspx?page=5  

0 Comments

Getting Going on Gardening, Companion Planting

6/10/2011

0 Comments

 
Picture
Catmint/catnip, to help your get more produce from your garden..... read on!

Photo credit: Jennifer Benner

What can I say?  --it’s been a strange year for gardening.  My garden has not been completely planted yet, and a lot of what was put in, didn’t make it.  We had enough rain and snow in May to hit half our precipitation average for the year.  Beans and corn were planted three weeks ago; the corn came up in crooked rows (I think they got washed out a little bit), and only two of the bean plants have made an appearance.  I may have to replant.  The volunteer tomatoes are finally up; they were this size a month earlier last year.  But they are up.  That’s good.   The plants that are doing well are the ones that were established before all the wet weather hit.  Onions and celery overwintered, and the volunteer lettuce came up in March or April.

If you’re still putting plants- or seeds- in the ground, consider companion planting.  The concept is that one plant can help another.  Garlic and onions tend to keep insect pests away from anything real close, and flowering plants attract pollinators.  Find something that the bees like, plant it close to your vegetables or fruits, and see your production go up. 

The plant in my yard that always has the most bees around it is catmint (nepeta).  I've been growing Walker's Low (which is named after a location, not how short the plant is- it's about 2 feet tall.) It  looks similar to lavender, blooms longer,  and can tolerate colder temperatures- down through USDA Zone 3.  See it at http://www.finegardening.com/plantguide/nepeta-x-faassenii-walkers-...

And here's a great find; a video series called "Home Grown/Home Made", produced by Fine Gardening magazine.  The description is "Welcome to Homegrown/Homemade, a video series from FineGardening.com and our sister site FineCooking.com. We're following a gardener (Danielle Sherry) and a cook (Sarah Breckenridge) as they plant, maintain, harvest, store, and prepare garden vegetables".  They include tomatoes, basil, squash, carrots, blueberries, potatoes, arugula, and peas.  Check it out, and see what you think!

0 Comments

Making Herbal Ointment; Comfrey

6/7/2011

3 Comments

 
Picture
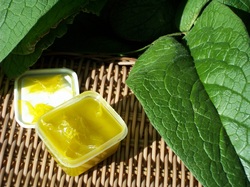
Comfrey ointment: simple to make, and very useful.  Of course, be smart about using home remedies, and use a doctor when you need to!


The only only ointment  I've made to date is comfrey .  The first apartment we moved into, after getting married, had a comfrey plant growing in the flower bed.   I had bought The Complete Medicinal Herbal, and comfrey sounded like an interesting plant to learn about.  So I made a batch.

We had hardly any bruises, breaks, road rash, strains, or sprains in the next decade, so that's how long I kept the ointment.  It seemed to still work well at the end there, though the sooner you use it, the more potent it is.  The next batch (same size!) lasted us only about 18 months; one son had FOUR broken bones within a year (trampoline, trampoline, trampoline, and scooter).  Glad that's over (knock on wood...)!  When he broke both his ankles simultaneously, I rubbed comfrey ointment on them twice a day.  The doctor was amazed at the healing by his two-week checkup.

I crushed my ring finger between two weights; it turned purple clear down to my wrist.  I splinted it with a popsicle stick and put comfrey on it once or twice a day (depending on how often I remembered!).  The nail had threatened to fall off, but it didn't, and it grew back straight and smooth.  The finger was almost completely healed in two to three weeks.  And I don't heal very quickly.

An ointment doesn't blend into your skin, but forms a layer over it.  It's especially good for places where the skin is weak, or where you need a barrier from moisture (like in diaper rash).  You could make this with coconut oil, which is solid at less than 75 degrees F, instead of petroleum jelly, but that's  closer to the definition of a cream  since that version will more easily soak into the skin.
 
Use any herb you want.

You can use the same amount of oil instead of the petroleum jelly, but that's called an 'infusion' instead of 'ointment'.  (For a cold infusion, see bottom of page.)   Old-timers used lard or other animal fats as the base; I'll try coconut oil for my next batch.  It's supposed to have healing qualities itself. 

Comfrey Ointment 
16 oz/2cups petroleum jelly (like Vaseline)  -or coconut oil
2 oz. dried herb       (or 500 g petroleum jelly, 60 g dried herb)


Melt jelly in double boiler, stir in herbs, heat gently for a couple hours (2-3)until herbs become crisp.  Strain through cheesecloth or muslin, squeeze to get as much liquid out as possible.  Be careful and/or use gloves, the mixture is very hot.  Pour while hot into clean storage containers.  Best if used within a year.  Good for arthritis, broken bones, bruises, inflamed bunions, torn ligaments, etc. 

Comfrey's "country name" was "knitbone".  It contains allantoin; this encourages cell growth in bone, cartilage, and muscle.  My experience is that it heals skin, too.  Use the above-ground parts; the leaves and flowers have the most allantoin. 
You can mash/crush the leaves to make a poultice for broken bones, including ribs and hairline fractures.  My book says the powdered root, mixed with water to make a paste, is good for varicose ulcers, stubborn wounds, and bleeding hemorrhoids.  I haven't needed that remedy yet.  :-)  Best to harvest the root in spring or fall, when the plant is putting its energy into its roots. ( As a side note, yes, this is correct grammar in “its roots”; there is no apostrophe in a possessive “it”.  I’ve been seeing “it’s” so much lately I was wondering if I learned the wrong rules.  Here’s my proof of what’s correct, a webpage called It’s “its”! )


A related remedy is for burns: mix equal amounts honey (raw, if you have it) and olive oil.  Chop or mash comfrey; add enough to the honey/oil to make a paste.  Apply to burns; wrap loosely with gauze or lightweight cotton so it stays put.  Put it on as needed.  I used this when a red-hot coal landed on my bare foot one day last summer.  I put the paste on, and promptly forgot about it.  When I remembered later in the evening, all that remained was a slight red mark.  No blister, no pain. 


For a "cold infusion", to extract the plant's helpful compounds without cooking it, pack a quart jar full of the herb you want.  Pour two cups of oil (olive oil, sunflower oil are better choices) over it, screw a lid on, and let it sit on a sunny windowsill for two or three weeks.  Strain into clean bottles, amber-colored ones are helpful in protecting it from damage from the light.  Store it cool and dark.
 
3 Comments

Apple Butterflies

6/3/2011

1 Comment

 
Picture
Simple, and lots of fun to eat!

Yes, they could be fancier, but they're still cute!  This way I'm willing to give each child a whole apple's worth of butterflies.  It takes almost no extra time to cut them this way. 
Picture
Cut an apple into quarters, then cut the seeds out using a shallow 'V' cut.  This gives a curve to the outside edges of your butterflies' wings.

Then cut each piece so you have eight more-or-less-equal wedges.

Picture
Cut carefully, starting at what was the center of the apple (the narrow side of the wedge).  Cut almost through, stopping about 1/8- 1/4 " from the last bit of edge.  

 I like to make the uncut part about 1/3 the way down the outside edge, it makes the butterflies look a little more realistic.

Picture
Open the two pieces, leaving that skin 'hinge' intact.

Picture
See how it's attached still?  If you accidentally cut all the way through, just set them back-to-back.  They just aren't quite as much fun to eat that way.

Picture
This is as fancy as I like to get when I'm trying to get lunch on the table quickly.  The antennae are strings off a stalk of rhubarb in the garden. 

You could get really fancy and creative here, if you have the time and inclination.  Strings of licorice would also work for antennae, but kinda defeats the purpose of the healthy snack.  (Besides, you know what happens once a package is opened...)
You could also decorate using raisins, other dried fruit (think colors here), mini chocolate chips, colored sprinkles, even paint on the wings with diluted food color, or a finger dipped in a natural color-- cocoa powder, blueberry juice, turmeric or curry powder, crushed safflower, dried powdered beet or tomato.

1 Comment

    Need a Search bar?
    One day I may upgrade my website-- but until then, use your web browser search bar. Type in my web address and what you're looking for, like this-- 
    www.theprovidenthomemaker.com  pumpkin --  and you should get results.


    Author

    I'm a disciple of Christ, a member of the Church of Jesus Christ of Latter-day Saints, a family-defending, homemaking, and homeschooling mom of eight children, two of whom sometimes can't have milk or wheat. Growing up on a farm in a high mountain valley, my parents taught me to 'make do', work hard, smile, and help others.  I love cooking, learning, growing food and flowers, picking tomatoes, and making gingerbread houses --which CAN be made allergy-friendly-- with my children.  I hope you find something to help you on my site!

    Archives

    April 2024
    July 2023
    April 2022
    September 2021
    March 2021
    December 2020
    April 2020
    March 2020
    February 2020
    January 2020
    December 2019
    November 2019
    October 2019
    September 2019
    August 2019
    July 2019
    June 2019
    May 2019
    April 2019
    January 2016
    November 2015
    October 2015
    September 2015
    March 2015
    February 2015
    November 2014
    October 2014
    September 2014
    August 2014
    July 2014
    June 2014
    May 2014
    April 2014
    March 2014
    February 2014
    January 2014
    December 2013
    November 2013
    October 2013
    September 2013
    August 2013
    July 2013
    June 2013
    May 2013
    April 2013
    March 2013
    February 2013
    January 2013
    December 2012
    November 2012
    October 2012
    September 2012
    August 2012
    July 2012
    June 2012
    May 2012
    April 2012
    March 2012
    February 2012
    January 2012
    December 2011
    November 2011
    October 2011
    September 2011
    August 2011
    July 2011
    June 2011
    May 2011
    April 2011
    March 2011
    February 2011
    January 2011
    December 2010
    November 2010
    October 2010
    September 2010

    Categories

    All
    Alcohol
    Alternate Cooking
    Appearances
    Apple
    Apricots
    April Fools
    Aprons
    Bananas
    Beans
    Beef
    Beets
    Bench
    Beverages
    Bonnet
    Bread
    Breakfast
    Budget
    Budgeting
    Cake
    Candy
    Canning
    Carrots
    Cheese
    Chicken
    Children
    Chocolate
    Christmas
    Cleaning
    Coconut
    Comfrey
    Common Core
    Constitution
    Cookbook
    Cookies
    Cooking Oil
    Crafts
    Dairy Substitutions
    Dehydrating
    Dessert
    Dried Fruit
    Earth Oven
    Earthquake
    Easter
    Edible Weeds
    Eggs
    Emergency Prep
    Essential Oils
    Faith
    Family Home Evening
    Fertilizing
    Food Storage
    Fourth Of July
    Freezer
    Frosting
    Fudge
    Garden
    Gardening
    Gingerbread
    Gluten
    Gluten Free
    Gold
    Government
    Grains
    Gratitude
    Hat
    Herbs
    Home Remedies
    Home Repairs
    Homeschool
    Home Storage
    Honey
    Hope
    Inflation
    Leftovers
    Legumes
    Lemon
    Main Dishes
    Mixes
    Mothers
    Noah
    Non Artificial Colors
    Non-artificial Colors
    Nuts
    Oats
    Oil
    Orange
    Paint
    Peaches
    Pear
    Pie
    Pizza
    Plums
    Poem
    Popcorn
    Pork
    Potatoes
    Powdered Milk
    Prayer
    Preparedness
    Projects
    Prophecy
    Pruning
    Pumpkin
    Quick Bread
    Rhubarb
    Rice
    Salad
    Salt
    Sauces
    Self Reliance
    Self-reliance
    Sewing
    Shelf Life
    Shelves
    Sky
    Smoothie
    Snacks
    Soup
    Spices Or Seasonings
    Squash
    Strawberries
    Substitutions
    Sugar
    Summer Fun
    Three Month Supply
    Time
    Tomatoes
    Trees
    Truffles
    T-shirts
    Tuna
    Ultra Gel
    Valentine\'s Day
    Vegetables
    Water
    Watermelon
    Wheat
    Work
    Year Supply
    Zucchini

    RSS Feed

Web Hosting by iPage