The Provident Homemaker
  • Recipes and Info
    • Making Bread
  • My Blog
  • Favorite Resources
  • Documents and Files
  • 52 Weeks of Building Storage

Week 43 - Fats and Oils in Your Food Storage

2/10/2020

2 Comments

 
To help with building your year's supply (this is Week 17 of 26), see this chart. 

A long time ago, in an article on the importance of storing fats and cooking oils, I read about how having oil lets you turn ‘nearly nothing’ into satisfying, filling foods.  Squash blossoms are one example.  They’re nearly nothing, calorie-wise. But mix up a little thin pancake batter, dip the blossoms, and fry them—and then they’re really something!  Squash plants produce male flowers and female flowers; you pick and cook with the male flowers, leaving the female flowers to grow into squash. Because the male flowers can’t.  (If anyone knows where that earlier article was, I'd love to know!)

Here’s a recipe for .cheese-stuffed fried squash blossoms  How about stuffing them with your own cheese, made from your sour milk or powdered milk?
 
What do you need to know about storing fats and oils?  Here’s the Cliff Notes version--
  • Any kind of fat or oil can be stored, but some last longer than others. 
  • Use what you store
  • Store oil or fat as cool and dark as you can. It makes a big difference.
  • Nothing is so sure as change—and the science of what we know about fats has caused some major shifts.
 
Here’s the longer version-- I’ve modified what is in the “Bee Prepared Pantry Cookbook”, available as a free pdf. 
 
Contents
WHY STORE FAT?. 
FATS? OIL? WHAT’S THE DIFFERENCE?. 
STORING FATS AND OIL. 
STORAGE LIFE. 
TYPES OF FATS. 
USING FATS AND OILS. 
 

WHY STORE FAT?
We need fat! Fat is essential in every diet.  Fats and oils play an important role in our perception of taste and texture and their absence would make many foods more difficult to prepare and consume.  A small amount of dietary fat is necessary for our bodies to properly absorb fat-soluble vitamins like A, D, E, and K.  Coconut oil, cooking oils, butter, ghee, peanut butter, mayonnaise, and shortening are suggested for storage. (“Shortening” is really a term that means a fat that is solid at room temperature, so it includes lots more than the stuff that comes in a big paper can.)
 

FATS? OIL? WHAT’S THE DIFFERENCE?
All oils are fats, but not all fats are oils. They are very similar to each other in their chemical makeup, but what makes one an oil and another a fat is the percentage of hydrogen saturation in the fatty acids of which they are composed.  The fats and oils which are available to us for culinary purposes are actually mixtures of differing fatty acids—saturated fats are solid at room temperature (70 F) and the unsaturated fats we call oils are liquid at room temperature. For dietary and nutrition purposes, fats are generally classified as saturated, monosaturated, and polyunsaturated. This is just a further identifying of the amount of saturation of the particular composition of fatty acids in the fats. 
 

STORING FATS AND OIL
Exposure to oxygen, light, and heat are the greatest factors to rancidity.   Transparent glass and plastic containers should be stored in the dark, such as in a box.  They should be stored at as cool a temperature as possible and rotated as quickly as is practical. 
 
Oxygen is eight times more soluble in fats than in water and it is the oxidation resulting from this exposure that is the main cause of rancidity. Generally, the more polyunsaturated a fat is, the faster it will go rancid.  This may not at first be readily apparent because vegetable oils have to become several times more rancid than animal fats before our noses can detect it.

STORAGE LIFE
Unopened cooking oils have a shelf life of about a year or two before becoming rancid, so you need to be using what you store!  Eating rancid fats—in addition to having off-flavors—can lead to vitamin and protein deficiency, since the rancid fats destroy them.  Vitamins A, D, E, and B7 are among those at risk. Oils don’t magically go rancid after hitting their ‘best by’ date; it’s a process. My personal experience is that oils stored below 70°F, in the dark, take at least twice as long to go rancid as those stored in brighter conditions above 70°F.
 
Once opened, some oils should be refrigerated. (See here for an explanation.)  If the oil turns cloudy or solid, it is still perfectly usable and will return to its normal liquid, clear state after has warmed to room temperature.  Left at room temperatures, opened bottles of cooking oils can begin to become rancid in anywhere from a week to a couple of months, though it may take several more months to reach such a point of rancidity that it can be smelled.

Olive oil also oxidizes as it sits; after a year or two, even your extra virgin olive oil would no longer pass the EVOO tests.
 
The culinary fats with the longest shelf life as they come from the store are coconut oil, cans of shortening, and sealed jars of ghee.  Butter is sometimes canned too. (Red Feather sells butter in sealed metal cans, with a long shelf life.) See here for what you need to know about canning butter at home. Solid shortening now is usually composed of partially hydrogenated vegetable oils and/or naturally saturated palm oil, but there are some that also contain animal fats.
 

TYPES OF FATS
For a list of some of the healthiest fats, see here. 
 
Monounsaturated fat remains liquid at room temperature but may begin to solidify if refrigerated. 

Polyunsaturated fat is liquid at room temperature and when refrigerated.
 
Omega-3 fatty acids are polyunsaturated fats found mostly in seafood as well as flaxseeds, flax oil, and walnuts.  Eating Omega-3 fatty acids appear to decrease inflammation in the body.  The latest research indicates we do best eating a 1:1 ratio of Omega-6 and Omega-3 fats.
 
Saturated fat is usually solid at room temperature.
 
Trans fat is the result of adding hydrogen to vegetable oil.  This makes it solid and gives it a longer shelf life but causes inflammation. Look for the words “partially hydrogenated” or “fully hydrogenated” on the ingredient list to detect trans fats.
 

USING FATS AND OILS
The conventional wisdom used to say that to increase good fats and decrease bad fats, use canola oil when baking. It appears now that’s wrong.  Coconut oil is the healthier fat – and new evidence points to nutrition benefits of using butter; both work wonderfully in baking. The more processing it takes to make an oil or fat, the more it tends to promote inflammation.
 
Use olive oil, coconut oil, or ghee instead of butter when sautéing; they have a higher smoke point.
 
Use olive oil rather than vegetable oil in salad dressing. You can use olive oil or avocado oil in making homemade mayonnaise, and there are even recipes for making it with coconut oil. (Homemade mayo is worlds above store-bought!)
 
Store what you use, and use what you store.
 
If oil has gone rancid, it can still be useful in your storage—it can be used for light and heat.
 
What other questions do you have about storing and using fats and oils?


2 Comments

Week 36- Two Minute Fudge - and Make Your Own Sweetened Condensed Milk

12/21/2019

0 Comments

 
Picture
To help with building your year's supply (this is Week 10 of 26), see this chart. 

Have you ever been to a store that sells fudge?  They display pan after pan of luscious flavors.  Well, now you can make them in mere minutes!  This recipe includes not only the basic semisweet chocolate fudge, but eighteen other flavors. 

Fudge can be made in advance, kept airtight in the refrigerator for a month, or wrapped well and frozen for 2-3 months. This recipe is super simple, and can be turned into lots of flavors.  My family’s favorites are Orange Crème Fudge and Cookies and Cremesicle Fudge. (Yes, that’s not the normal spelling, but ‘creamsicle’- regular spelling- is trademarked.)  My favorites include Caramel Swirl Fudge- in either vanilla or chocolate- Strawberry-Truffle-Layer Fudge. With pecans, please.

See here for more classic candy recipes-- toffee, penuche, truffles, fondant, and more base fudge recipes.
Picture
When making a batch of fudge, if it’s too firm or too soft, it can be fixed.

If it’s too soft, there are at least two approaches.

1- you can refrigerate or freeze it and serve it cold.  Once it’s chilled, you can eat it plain in the traditional squares, or scoop into tablespoon-sized balls.  Roll in powdered sugar or unsweetened cocoa powder, and serve as truffles.
2- make it even softer and turn it into hot fudge sauce. To do this, scrape the fudge into a microwave-safe bowl, add ¼ cup milk, cream, or evaporated milk, and heat for a minute or two, until you can stir it.  Stir until smooth.  If it’s still too thick for sauce, add more milk or cream.
 
If the fudge is too firm, scrape the fudge into a microwave-safe bowl, add 1-2 Tbsp. milk, cream, or evaporated milk, and heat for a minute or two, until you can stir it.  Stir until smooth.  Pour into a newly buttered pan.
 
If you want a healthier version of fudge, try Clean Eating Fudge. It’s Paleo! -and even works for those who can’t have dairy.


The fudge below can be made with a regular can of sweetened condensed milk, a homemade version, or even with a homemade dairy-free version. If you don't have any of those 3 options available, you can boil 7 ounces of cream, evaporated milk or (naturally dairy-free) coconut cream with 1 cup of sugar. Stir to dissolve the sugar, and you have a great substitute for sweetened condensed milk.

Two-Minute Fudge* 

3 cups semisweet chocolate chips (1 ½ 12-oz bags)
1 (14 oz.) can sweetened condensed milk (make your own here)
1 tsp. vanilla, optional
pinch of salt, optional
1 c. toasted and chopped nuts, optional
 
*Approximately two minutes of cooking time. 
 
Line an 8x8 pan with aluminum foil, waxed paper, or plastic wrap.  Spray with nonstick spray, or butter it. Set aside.
Stir together chips and milk.  Heat in microwave for one minute. Stop and stir. Repeat until the mixture is melted, stirring every minute. Stir in vanilla and salt.
 
Pour into lined and buttered 8x8 pan. Chill until firm- this will take about 2 hours in the refrigerator or 20 minutes in the freezer.
 
Makes 2 lbs. without the nuts.
 
To cut the recipe in half, 7 oz. of sweetened condensed milk is just over 1 ¼ cups.
 

Milk Chocolate Fudge
Increase chocolate to 4 cups (2 12-oz. bags). Makes almost 2 ½ lbs. without nuts.

Peanut Butter or Butterscotch Fudge
Use 4 c. peanut butter chips or butterscotch chips.

Vanilla Fudge
Use white chocolate chips, increasing to 4 cups.

Cherry Vanilla Fudge
Stir in 1 c. quartered candied cherries, replace half the vanilla with
almond extract, use almonds for the nuts.


Cookies and Creme Fudge
Break each of 16 chocolate sandwich cookies into fourths; stir into Vanilla Fudge. (see below)

Cremesicle Fudge (Orange Creme Fudge)
Make a batch of vanilla fudge, pour 3/4 of it into prepared pan. To remaining fudge, add 3 drops yellow food color, 2 drops red, and 1 tsp. orange extract.
Drop by spoonfuls onto top, swirl in.


Caramel Swirl Fudge
Melt 4 oz (about 18 squares) of caramel with 1-2 tsp. of water, drop by spoonfuls onto top, then swirl.

Candy Bar Fudge
Melt 4 oz caramel with 1-2 tsp. water, stir in 3/4 c. peanuts. Drop on top and either swirl in or cover the top with 1 c. chocolate chips, melted.

Chocolate-Peanut Butter Fudge
Add 2 Tbsp. peanut butter to hot mixture, before powdered sugar is added. Top with chopped peanuts if you like, pressing them in slightly.

Mint Layer Fudge
Make chocolate fudge; spread in pan. Melt together 1 c. white chips, 2 Tbsp. milk, 1/4-1/2 tsp. mint extract, and 1/8 tsp. green food color. Mix well, spread on top.

Orange-Pecan Fudge
Make vanilla fudge, stir in 1 Tbsp. orange zest, finely chopped, and 1 c. pecans.

Peanut Butter Swirl Fudge
Make chocolate fudge, melt ½ c. peanut butter, drop on top of fudge; swirl.

Rocky Road Fudge
Use nuts, and stir 2 c. mini marshmallows into fudge before spreading into the pan.

S’mores Fudge
Leave out nuts, stir in 1 c. mini marshmallows and 4 whole grahams, broken.

Strawberry Fudge
Replace half the condensed milk with 1 1/4 c. strawberry jam. Swirl about 2
Tbsp. jam on top. Especially good with pecans or walnuts.


Strawberry ‘Truffle Layer’ Fudge
Spread regular fudge in pan, melt together 1 c. (6 oz.)semisweet chips with 2 Tbsp. butter. Stir in 1/4 c. strawberry jam. Spread on top.

Toasted Coconut Fudge
For either chocolate or white fudge, toast 1 c. coconut, stir in 3/4 c, along with 1 c. chopped toasted pecans. Sprinkle remaining 1/4 c. coconut on top, press in. If using a fudge recipe that calls for milk or evaporated milk, you may also substitute an equal amount of coconut milk.

Wonka Bar Fudge
substitute 4 whole graham crackers, broken into small chunks, for the nuts.


Picture
Cremesicle Fudge.  
0 Comments

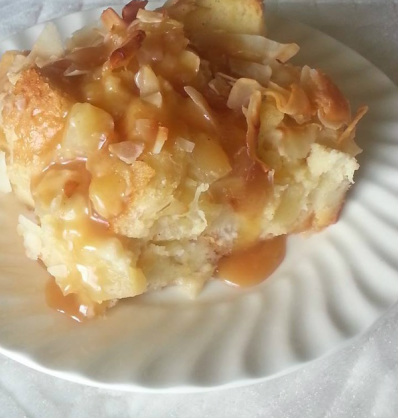
Pineapple Coconut Bread Pudding

1/23/2016

1 Comment

 
Picture


Pineapple-Coconut Bread Pudding 
1 (20-oz) can crushed pineapple
¾ cup sugar, divided
2 c. cream or coconut cream*
½ tsp. salt, divided
1 loaf stale French bread, cut in 1" cubes, or a pound of other bread, cubed
1/2 tsp. cardamom
3-4 eggs 
1 c. whole milk or coconut milk
2 tsp. vanilla
1/2 c. shredded coconut

If your bread isn't already stale and dry, put the bread cubes in the oven at 375 until they're dried out.  
Make a caramel sauce- combine 2 Tbsp. juice from the canned pineapple with 1/2 c. sugar in a saucepan.  Heat on high until brown, stirring often.  Add 3/4 c. cream; stir until the caramel chunk has dissolved.  Add 1/4 tsp. salt.  Pour about half of this into the bottom of a greased 9x13 pan.  Save the rest.
Mix together bread, undrained pineapple and cardamom.  Dump into a 9x13 pan.  Using the same bowl as before, beat the eggs, then stir in 1/4 c. sugar, the remaining cream, milk, vanilla, and 1/4 tsp. salt.  Mix until  sugar dissolves.  Pour all of this over the bread and let sit for 5-20 minutes to soak.  Sprinkle the coconut over the top.                                          

Bake at 375 degrees for 30-35 minutes, until center is set.  Serve warm, with a little of the remaining caramel sauce drizzled on top.

*If you don't have cream, use milk instead, for a total of 3 cups.  Also melt 1/4 c. butter and beat it in with the eggs.


1 Comment

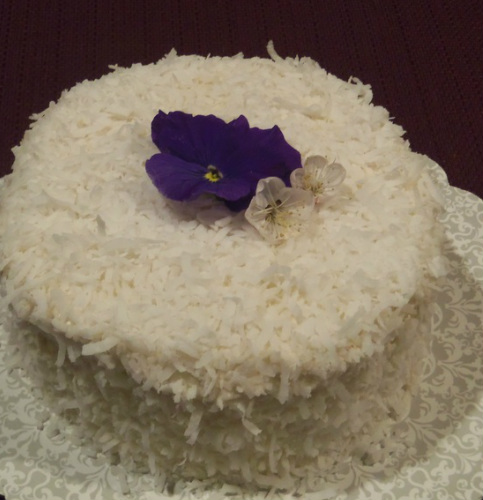
Coconut Cake- using coconut flour and agave

4/1/2014

0 Comments

 
Picture
This gluten-free cake is high in fiber, but you'd never know it when eating it.  It just tastes like a moist coconut cake.  It also has a delicious cream cheese frosting that you can sweeten using agave or honey, and a lemon-cream cheese filling between the layers.  This makes a small cake, 6" round if two layers, or a single 8" layer:  a much better size for most people!

Coconut Cake:

4 large eggs
1/2 c. melted coconut oil
1/2 c. agave nectar
1 Tbsp. vanilla
1 tsp. coconut extract
1/2 c. coconut flour
1 tsp. baking soda (this is too much, I can taste it and the cake overbrowned)
1/4 tsp. salt
1/8 tsp. xanthan gum
1/2 c. shredded coconut, either sweetened or unsweetened
Cream Cheese Agave Frosting (recipe below)
1 1/2 Tbsp. orange or lemon marmalade
1 cup sweetened shredded coconut 

Preheat oven to 350 degrees.  Grease sides and line bottom of a 6" round pan* with a circle of parchment paper.  Set aside.

Whisk eggs until light in color and a little foamy, about 2 minutes.  Add the coconut oil, agave, vanilla, and coconut extract; mix well.  Add coconut flour, then put the baking soda, salt, and xanthan gum on top of the coconut flour, and mix all together.  The batter will be very thin at first, but will thicken within minutes as the coconut flour begins absorbing liquid.  Stir in the 1/2 c. shredded coconut.

Pour into the prepared pan.  Bake until center no longer jiggles and toothpick inserted in center comes out clean, about 45 minutes.  Run a knife around the outside edge of the cake to loosen it.  Cool cake, in the pan, on a cooling rack for 10 minutes.  Remove from pan/s and cool completely.

When cool, split the 6" cake into two layers.  Frost the first half with lemon-cream cheese filling.  Place the other layer on top of the filling, then frost the entire cake.   Pat coconut onto the sides of the cake, then sprinkle it all over the top.
  
*If you don't have a 6" round, you may use either one 8" round (reduce baking time to about  30- 35 minutes), a 9x5 loaf pan (about the same baking time), 12-15 cupcakes (about 30-35 min. of baking), or four 4" round pans (reduce baking time to  18-20 minutes each).

Cream Cheese Agave Frosting:  use the recipe for Fluffy Honey-Cheesecake Frosting, except substitute agave for the honey.

To make the lemon-cream cheese filling (or orange-cream cheese filling), take  3/4 cup of the Cream Cheese Agave Frosting and put it in a small bowl.  Add 1 1/2 Tbsp. marmalade and stir.  
0 Comments

    Need a Search bar?
    One day I may upgrade my website-- but until then, use your web browser search bar. Type in my web address and what you're looking for, like this-- 
    www.theprovidenthomemaker.com  pumpkin --  and you should get results.


    Author

    I'm a disciple of Christ, a member of the Church of Jesus Christ of Latter-day Saints, a family-defending, homemaking, and homeschooling mom of eight children, two of whom sometimes can't have milk or wheat. Growing up on a farm in a high mountain valley, my parents taught me to 'make do', work hard, smile, and help others.  I love cooking, learning, growing food and flowers, picking tomatoes, and making gingerbread houses --which CAN be made allergy-friendly-- with my children.  I hope you find something to help you on my site!

    Archives

    April 2024
    July 2023
    April 2022
    September 2021
    March 2021
    December 2020
    April 2020
    March 2020
    February 2020
    January 2020
    December 2019
    November 2019
    October 2019
    September 2019
    August 2019
    July 2019
    June 2019
    May 2019
    April 2019
    January 2016
    November 2015
    October 2015
    September 2015
    March 2015
    February 2015
    November 2014
    October 2014
    September 2014
    August 2014
    July 2014
    June 2014
    May 2014
    April 2014
    March 2014
    February 2014
    January 2014
    December 2013
    November 2013
    October 2013
    September 2013
    August 2013
    July 2013
    June 2013
    May 2013
    April 2013
    March 2013
    February 2013
    January 2013
    December 2012
    November 2012
    October 2012
    September 2012
    August 2012
    July 2012
    June 2012
    May 2012
    April 2012
    March 2012
    February 2012
    January 2012
    December 2011
    November 2011
    October 2011
    September 2011
    August 2011
    July 2011
    June 2011
    May 2011
    April 2011
    March 2011
    February 2011
    January 2011
    December 2010
    November 2010
    October 2010
    September 2010

    Categories

    All
    Alcohol
    Alternate Cooking
    Appearances
    Apple
    Apricots
    April Fools
    Aprons
    Bananas
    Beans
    Beef
    Beets
    Bench
    Beverages
    Bonnet
    Bread
    Breakfast
    Budget
    Budgeting
    Cake
    Candy
    Canning
    Carrots
    Cheese
    Chicken
    Children
    Chocolate
    Christmas
    Cleaning
    Coconut
    Comfrey
    Common Core
    Constitution
    Cookbook
    Cookies
    Cooking Oil
    Crafts
    Dairy Substitutions
    Dehydrating
    Dessert
    Dried Fruit
    Earth Oven
    Earthquake
    Easter
    Edible Weeds
    Eggs
    Emergency Prep
    Essential Oils
    Faith
    Family Home Evening
    Fertilizing
    Food Storage
    Fourth Of July
    Freezer
    Frosting
    Fudge
    Garden
    Gardening
    Gingerbread
    Gluten
    Gluten Free
    Gold
    Government
    Grains
    Gratitude
    Hat
    Herbs
    Home Remedies
    Home Repairs
    Homeschool
    Home Storage
    Honey
    Hope
    Inflation
    Leftovers
    Legumes
    Lemon
    Main Dishes
    Mixes
    Mothers
    Noah
    Non Artificial Colors
    Non-artificial Colors
    Nuts
    Oats
    Oil
    Orange
    Paint
    Peaches
    Pear
    Pie
    Pizza
    Plums
    Poem
    Popcorn
    Pork
    Potatoes
    Powdered Milk
    Prayer
    Preparedness
    Projects
    Prophecy
    Pruning
    Pumpkin
    Quick Bread
    Rhubarb
    Rice
    Salad
    Salt
    Sauces
    Self Reliance
    Self-reliance
    Sewing
    Shelf Life
    Shelves
    Sky
    Smoothie
    Snacks
    Soup
    Spices Or Seasonings
    Squash
    Strawberries
    Substitutions
    Sugar
    Summer Fun
    Three Month Supply
    Time
    Tomatoes
    Trees
    Truffles
    T-shirts
    Tuna
    Ultra Gel
    Valentine\'s Day
    Vegetables
    Water
    Watermelon
    Wheat
    Work
    Year Supply
    Zucchini

    RSS Feed

Web Hosting by iPage