The Provident Homemaker
  • Recipes and Info
    • Making Bread
  • My Blog
  • Favorite Resources
  • Documents and Files
  • 52 Weeks of Building Storage

Preparing with Confidence- Turning from Panic into Power

3/27/2020

0 Comments

 
Below I'll cover Why to prepare, and a quick outline of How to do it.

The overview of how to do it is found on the page 52 Weeks of Building Storage.
 
Why prepare?
To be more secure, self-reliant
Picture
Picture
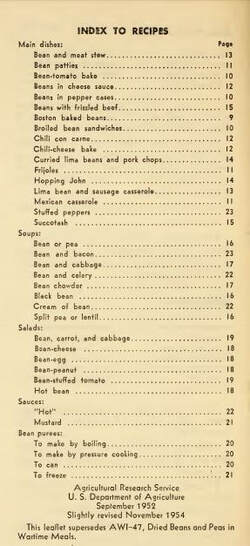
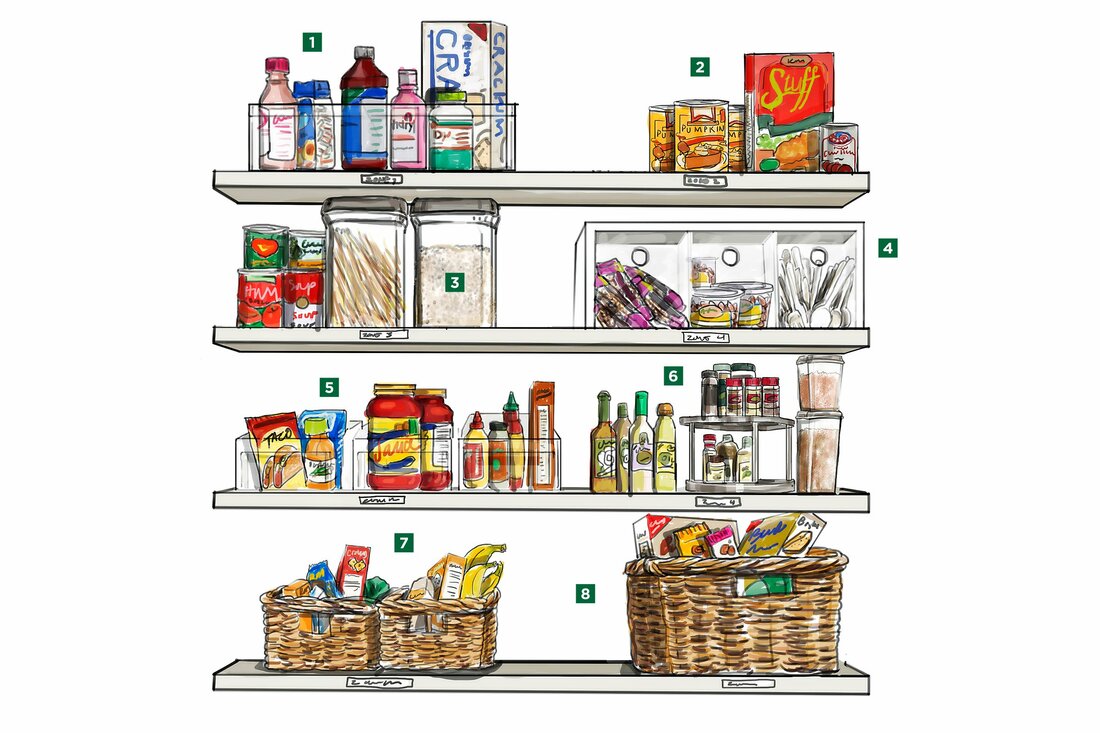
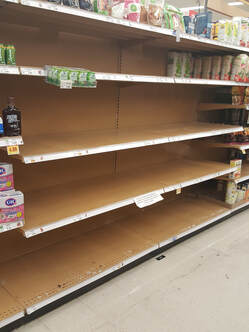
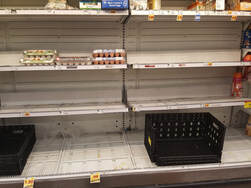
When all the crazy started happening here a few weeks ago, I took a couple of my teens to a store around the corner to just observe.  We took pictures (including the ones above), noticed what was gone, what was mostly gone, and what was left.
We were able to be calm and logical because my family is OK. I’ve stored food since I left for college as an older teen. Back then it was limited to a cardboard bushel box in my closet, filled with cans and packages. But it was something.
 
 A friend and I were talking yesterday about storing food, and she asked, “Isn’t it a little too late now?” 

That depends.

It’s too late to do anything in advance of this part of this crisis, but there’s time to be smart in the middle of it. And there’s time to prepare for whatever else may happen in our personal lives. I think these recent events have put us on the level of much of the rest of the world, seeing limited resources at the stores. My church has emphasized food storage and financial preparation for decades. They even teach this to people in Argentina who can’t afford to buy an extra pound of sugar—but they can save a tablespoon at a time.  You can always do something, whether it’s growing, gleaning, creating, purchasing, or wasting less.

When I was 10, my family moved to a farm and ranch in a tiny valley in eastern Utah. We were very low-income- less than we'd make simply going on welfare. But my mom was powerful. Smart. Hard working. Determined and good at creating and conserving.
 
A scripture has stuck in my head the last couple weeks; “She is not afraid of the snow for her household.” 
Here is part of the chapter that is from:

“Who can find a virtuous [Chayil: ‘a force’; strong or powerful] woman? for her price is far above rubies….She is not afraid of the snow for her household: for all her household are clothed with scarlet. [this suggests warmth and comfort, and faith in Jesus]…Strength and honour are her clothing; and she shall rejoice in time to come. [this is better translated as ‘smiles at the coming day’, not fearing it.]  She looketh well to the ways of her household, and eateth not the bread of idleness [what she has not worked to earn]. Her children arise up, and call her blessed; her husband also, and he praiseth her. Many daughters have done virtuously [been powerful or strong], but thou excellest them all.  Favour is deceitful, and beauty is vain: but a woman that feareth the LORD, she shall be praised. Give her of the fruit of her hands [what she has made and created]; and let her own works praise her in the gates.” (Proverbs 31, verses 10,21,25,27-31)
 
We have this kind of power, this opportunity, in our homes! That’s what being a wife and mother is about.  Confidence and true power comes from learning and living correct principles. God will help you on this journey to building a family storehouse.
Picture
Picture
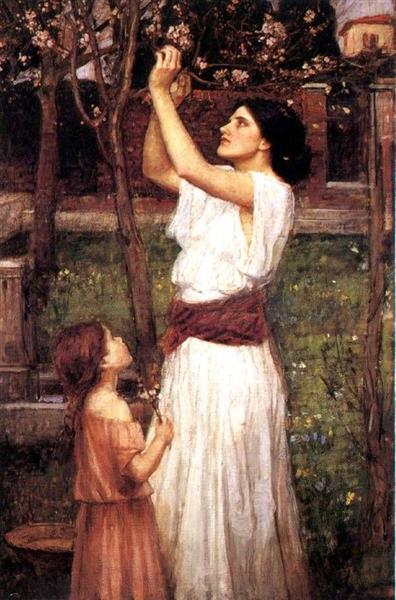
Painting: Gathering Almond Blossoms, John William Waterhouse.
That farm we lived on was two hours from stores. We shopped once a month, for our family of 9. We drank 6 gallons of milk a week, and there was no way to fit 24 gallons of milk in the fridge after shopping. So Mom bought 6 gallons each month. She always kept a storeroom full of basic foods, including powdered milk. As we needed milk, each jug was mixed with 3 gallons of powdered milk, to make 4 gallons. That way the 6 gallons became 2 dozen.
We raised beef cattle, so we had our own beef. A neighbor across the river raised hogs, and we’d trade him beef for pork. We had a huge garden- we grew almost all of our vegetables, and Mom was insistent on that 5 or more servings a day of fruits and vegetables. The only vegetables I remember buying were frozen peas and tomato sauce. Elderberries, chokecherries, and currants grew wild on the farm, so we picked and made jelly from them. We grew strawberries and had a huge raspberry patch. We stored our garden carrots  through the winter in an insulated pit in the garden. We canned and bottled a lot, froze corn, zucchini, asparagus, spinach. If we didn’t have something for a recipe we wanted, we came up with a substitute, or went without.

It was a different mindset, a different way of living.  What we’re seeing now reminds us of how fragile our modern way of life is, and helps us better appreciate traditional ways, including making and filling a family storehouse. Now I live in a valley with one million other people, and I can’t do all the things we did on the farm.  But I can grow food and preserve it, store and waste less.

What about Hoarding?

People who store are sometimes accused of hoarding. And sometimes they ARE hoarding.  So what is the difference between preparing and hoarding?
​
‘Hoarding’ involves selfishness or coveting on one or both sides of the equation. On one side, it could merely mean somebody is upset at what you have-- coveting-- and on the other side, you might be acting like a dragon clutching its pile of gold and belching fire at anyone who comes near. There’s God’s way of preparing for the future, and there are a whole bunch of other ways.  God’s way includes loving your neighbor as yourself. Use that as your guideline for building and using food storage. Don’t build in a way that takes from others who need it.  Building a godly family storehouse is “is founded on the doctrines of love, service, work, self-reliance, and stewardship”.

What is the ideal to work towards in building a family storehouse?

A two-week basic water supply, a financial reserve,  a three-month supply of everyday food and recipes to use it, a good supply of basic foods that store a very long time, and the skills to use them. That will give you stability and security, and helps you be calm through new adjustments.  That supply of basic foods that have a 10-30+ year shelf life will help you and your neighbors weather some of the worst life-storms.
Real peace comes through loving and serving God and your fellow men. Sometimes ‘feeding his sheep’ is literal, especially with those in your house.

How to do it

You’ll want to make a plan and implement it carefully, wisely, and lovingly. Don’t go into debt for it, purchase more when prices and demand are low. Purchase less when prices and demand are high.  Learning to waste less will go a long way toward helping you build your family storehouse.
Details of how to do this are on the page called “52 Weeks of Building Storage”. Read through the links beginning on Week 1.  There are more helps on that page, including- charts for how to build a 3-month supply in 6 months or less, and a buying schedule for building a year supply in 6 months or less.

How do I begin building my family storehouse? Find info from Week 1

First, be determined that this is going to happen, starting today. "All we have to do is to decide, commit to do it, and then keep the commitment. Miracles will take place"!  Pray to see how to do this. 


The next step in getting your family storehouse is to  take inventory of what you have.   (All stores have to take inventory! At least yearly.) Get a notebook or a clipboard, and write down all the food you have in the house.  Group them in categories that make sense to you.  

Go through your budget and see where you can free up some money; you can build a 3 month supply in 6 months , under normal circumstances, with about an extra $15-20/person/week.

My experience has been that because of the way you ideally shop for this short-term storage, it costs considerably less than your regular-meals budget.  Can you afford it?  The way I see it, I can’t afford NOT to have a family storehouse.  Most of my shelf-stable grocery items are purchased when each is on sale, usually at 30-70% off the regular price.

Where Do I Get the Money?

-Waste Less
-Cut money somewhere else. Vacations. Gifts. Extras. 
-Grow and Glean
-Buy Smart!

.
  • Waste less—the average family of 4 throws away more than $2000 of food every year. That alone could fund your food storage!
  • Budget it in. This is much easier when you’re shopping sales and reducing what you waste.
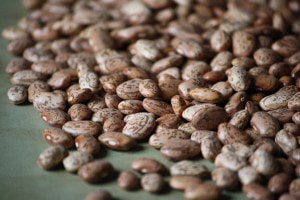
    • Replace more meat with a cheaper protein source like beans or eggs.
    • Cut your entertainment or eating-out budget.
    • Sell a ‘luxury item’
    • Skip a vacation; buy food and supplies instead
  • Grow and Glean
  • Shop Smart – SOS method
    • Buy when others don’t want it
    • Shop sales—for what’s on your list. Stick to the foods on your plan
    • Know your prices.  Then you recognize when something is a stock-up price.
      ​
​Now where in the world are you going to fit the necessary food into your house?  If you have a cool, dark room available, that's perfect. 
find a place you can store shelf-stable food, Get a shelf, and Set it up.
That's it!

There are posts on my website with FAQs, including what you need to know about expiration dates on cans and packages. Skim through that 52 Weeks page to find them.

What is the point of being more self reliant?

The most obvious is family security. But if we stop there, we’ve missed the point. We’re all family.  Self reliance allows us to help and strengthen others.  Our families are the basic foundation of society. How goes the family, goes the nation. 

You can be a chayil woman, a powerful force for good in your home and in your neighborhood.


Do you have any questions?  Leave a comment, or email me at [email protected] 

0 Comments

Week 45- Beans, and Aunt Gen

2/22/2020

3 Comments

 
Picture
To help with building your year's supply (this is Week 19 of 26), see this chart. 
 
This week I’ve been thinking a lot about old-time things.  My aunt Gen (short for Genevieve) died on Tuesday. She’s my great-aunt, and her last remaining sibling on earth is my grandma. They and their brothers were born in the Mormon colonies in Mexico. All of them lived well past 90 years old. Gen was born in 1918, the year of the great Flu Pandemic, just after her family returned to Mexico after being evacuated during the Mexican Revolution. She was one tough and smart cookie, and one of the kindest people I know. She grew up without electricity, running water, or indoor plumbing. She was a young mother in the last years of the Great Depression. She cooked over fire and charcoal; her first home as a bride had a brick stove with a hole on top in which to put charcoal. She got herself a 5-gallon metal bucket, turned it on its side, cut a door, set a rack inside it, and placed it over that hole. That was her oven.  “I couldn’t bake very large of loaves,” she said, “but it worked.”  The first car her family owned was purchased when she was in her mid-30s.
 
When I was younger, she lived about halfway between my family’s house in Utah and my grandparents’ home in El Paso.  We’d often stop and spend the night with Aunt Gen. Even in the 80s and 90s, she had no TV in the house, which made for lots of times sitting and telling stories or playing games. And she always—always!—made us lemon sugar cookies.  (Maybe I’ll post that recipe soon.  Twenty years ago or so I tried to duplicate it several times-- and failed—until I called her one day and learned the secret.)

​She moved next door to her son in Utah about 30 years ago and had been there ever since, gardening and canning with his wife and children, teaching the kids to crochet, bake apple pies, and shuck corn. When she was in her 80s, they found her one day on the roof, leaning over the edge with a big straw hat on. She was cleaning out the rain gutter with a running hose and a screwdriver to loosen the packed leaves.  She was sick her last little while—though even in her last ten years she didn’t take a single prescription medication. She had a homemade cure for everything-- and they worked!  ("For a bee sting, soak a tomato leaf in rubbing alcohol, then put it on the sting.")

What a lot of things she saw and did in her 101 years!  And her older brother, Uncle Elvin, made it even longer. He was 103. 
​
I sometimes wonder if and when we'll need those same skills and ingenuity that her generation had. 
 
One food she was very familiar with was beans. They were a cheap, filling, healthy source of protein, B vitamins, iron, calcium, and magnesium. She and I both learned from her mom (my great-grandma Lillie) how to make the most delicious caramel for dipping apples, spreading on cakes, or digging into with a spoon. It didn’t have beans in it but was served at many bean meals. This is why:

She’d take a can of sweetened condensed milk, remove the label, wash the can, and set it in the bottom of a big pot. A stockpot type one, taller than the can was. Then she’d pour in some dry beans, carefully picked through to remove any little rocks or dirt clods, measure in some salt, and add enough water to cover the top of the can. Then the beans would be simmered for three or four hours until they softened through. (We didn’t ever let the pot boil dry, or the can could possibly have exploded.) When the beans were done, the caramel was done.  We had to be patient while the can cooled down enough to open without spurting hot caramel on us. And the wait was worth it.
 
Do you wonder what the differences are between all the different kinds of beans?  They’re all from the same sort of plant, and can be interchanged pretty freely. There are different sizes, colors, textures, and flavors.  For that information, see the first two pages of the USU publication, Dry Beans and Peas. It also tells you how to cook them, whether you prefer the quick-cook method, the overnight soak method, or using a pressure cooker, slow cooker, stove top, or microwave.

If you’d like more old-time recipes, there are lots. Let's look at two that Aunt Gen would likely have been familiar with while raising her children.
 
“99 Ways to Share the Meat” is a brochure created in 1943 to help Americans cook under the new meat food rationing. 

It includes advice on what to put with beans to flavor them.  For we modern folks who might not know, ‘salt pork’ is bacon that is cut thick like steak, rather than sliced.  Bacon is a great substitute.  Same flavor, same cut, different shape.

85. For plain cooked beans, soak, simmer slowly in a covered pan. Flavor with something salt[y], sour, fresh, crisp, bright, or spicy.

86. Bake beans long and slowly.  Good seasonings are molasses, mustard, salt pork, onion.

87. For better bean soup, add finely chopped peanuts… tomatoes… carrots… or a few slices of frankfurter or bits of cooked ham or sausage.

88. Hearty bean sandwich fillings. Combine baked beans with onion, pickle, relish, or catsup… Moisten with salad dressings… Combine chopped peanuts and baked beans.

97. Press cooked [beans] through a coarse sieve or grind in a food grinder
[food processor] for pulp to make soup, croquettes, loaves, souffles.

98. Use cold [bean] pulp as filling for sandwiches.  Mix with chopped onion and enough salad dressing
[we’re talking mayo or Miracle Whip type stuff here] or milk to make it easy to spread.

Picture
There was a WWII-era, government-sponsored recipe book called “Dried Beans and Peas in WarTime Meals”. I haven't managed to find anything but references to it, but did find its replacement from 1952, a 28-page booklet called Dry Beans, Peas, Lentils …modern cookery. The photo to the left is the index to those recipes.

The pamphlet begins by telling us, “Dry beans and their close cousins, the dry peas and lentils, are food bargains, budget-wise and nutritionwise.  When buying, you can figure that a pound of one of these dry foods will provide 7 to 9 servings.”  And then it tells about nutrition and getting the best protein value from them, which ones need soaked ahead of time, how much water to use when cooking them, and shortcuts for soaking and boiling them.  Of course, recipes follow. (It also tells you how to can bean puree; disregard that, as it doesn’t fit within current USDA safety guidelines.)
 
What bean recipes do you love?

3 Comments

Week 40- Free Cookbooks for Using Food storage

1/19/2020

2 Comments

 
Picture
To help with building your year's supply (this is Week 14 of 26), see this chart. 
 
Do you have some food storage now, but need more recipes to use it? Check out these eleven FREE cookbooks, plus some extra resources like a book that teaches you how to can food, one on nutrition and one on REALLY frugal cooking and homemaking.
Picture
1. Bee Prepared Pantry Cookbook. 67 amazing pages.  

Picture
2. New Ideas for Cooking with Home Storage (also found here)--
​created to be used with the foods at the dry-pack canneries of the Church of Jesus Christ of Latter-day Saints.  You can no longer dry pack food there, but can still purchase products already packaged. 
 
​

Picture
3. A Guide to Food Storage for Emergencies—compiled by the USU Extension Office. 120 pages. 
 

Picture
4.The Wooden Spoon Cooking School collection- this was a pilot program by the Church of Jesus Christ of Latter-day Saints.  The same ladies who created the Bee Prepared Pantry Cookbook were commissioned to create the class materials, so this is basically an expanded version of Bee Prepared. There are individual sections on the following topics: 
Introduction (note that the ‘length of storage’ information is outdated, per BYU Food Studies)  
Intro- Commodities, Family Assessment, Family Plan, Skills & Equipment
Legumes
Oats, Honey, and Sugar
Wheat
Rice and Pasta
Powdered Milk
Seasonings
A Meal in a Bag- quick meals with everyday, three-month supply foods


Picture
5. All Is Safely Gathered In: Family Home Storage Basic Recipes—compiled by the Church of Jesus Christ of Latter-day Saints, and sent with food storage boxes/kits.  4 pages, 11 recipes. 

Picture
6. Shelf Stable Recipes-- family favorite pantry recipes submitted by readers of FoodStorageMadeEasy.net   
​58 pages.  Uses long-term storage foods as well as some shorter-term ones. 
​

Picture
7. Use it or Lose It— another “food storage cooking school,” compiled by the Utah State University Extension Office. 17 pages. About half of the pages have recipes, with a focus on wheat and dry milk powder; the rest is good information on how to obtain, store, and rotate your food.

Picture
8. Cooking with Dry Beans—compiled by the USU Extension Office. 13 pages.

Picture
9. Whole Kernel and Bulgur Wheat: Preparation and Usage—compiled by the USU Extension Office.  57 pages, so you know there’s a lot of variety. It doesn’t mention hard white wheat vs hard red wheat partly because white wheat had not quite hit the public scene in 1992. ​

Picture
Short term food storage rotation
​
10. 3x5 card/photo album cookbook—3x5-sized cards to cut out and fit inside a small photo album that holds 72 photos. ​

Picture
11. Crockpot Freezer Meals with Five Ingredients of Less, from TheFamilyFreezer.com.   25 main dish recipes to use your short-term (“regular food”) storage. Go to the main webpage, https://thefamilyfreezer.com/ for many more recipes. 


Other great resources:

Nutrition and Diet—includes charts on vitamins and their role in the body. Church of Jesus Christ of Latter-day Saints, 26 pages.

USDA Guide to Home Canning – a self-taught course in how to can. 
 
Frugal pioneer recipes- ten recipes, printed in the July 1972 Ensign magazine.

American Frugal Housewife, 1838. The twenty-second edition.(!)

“Dedicated to those who are not ashamed of economy” and “Economy is a poor man’s revenue; extravagance, a rich man’s ruin.”  The introduction begins, “The true economy of housekeeping is simply the art of gathering up all the fragments, so that nothing be lost.  I mean fragments of time, as well as materials…and whatever the size of a family, every member should be employed either in earning or saving money… The sooner children are taught to turn their faculties to some account, the better for them and for their parents.  In this country, we are apt to let children romp away their existence, till they get to be thirteen or fourteen.  This is not well. It is not well for the purses and patience of parents; and it has a still worse effect on the morals and habits of the children. Begin early is the great maxim for everything in education. A child of six years old can be made useful; and should be taught to consider every day lost in which some little thing has not been done to assist others.”
__________________________

If you like old cookbooks, this website has more than 75 of them, all waiting for you in digital format. 
 
Thanks to prepperssurvive.com for alerting me to the old cookbook digital collection!

2 Comments

Reducing Food Waste-- What to do with Sour Milk -- Make Cheese and More!

5/18/2019

0 Comments

 
Week 6 assignment-- Going off your  Inventory Shopping List and this week’s sales, buy the 3 months’ worth of as many different items as you can (= Buy For 3) as your new budget allows.    You'll do this through Week 21.
_______________

A big part of food management at home is reducing waste.  There are many ways to do this. 

Serve only what you’ll eat.  Refrigerate, freeze, or re-purpose leftovers. Or share with a neighbor.  A friend of mine regularly fixes a plate of leftovers immediately after dinner, and takes it across the street to an elderly widow.

You can use a lot of your food prep trim - lemon peels can be used to flavor things, clean kitchen disposals, make homemade lemon extract and lemon sugar. Shriveled lemons, orange, grapefruit, or limes are good for making marmalade. Tops and bottoms of celery can be frozen and saved to make broth or to add flavor when you cook dry beans. Broccoli stems can be trimmed and cooked along with florets, or chopped and added to salad for a nutritious crunch.  Things you can't re-purpose or eat can be fed to chickens, and many can be added to the compost pile.

If you wonder how much improvement you could make-- and how much money you could save on food!-- remember this:
“What’s measured gets managed.”

For one week, notice, measure, and take notes on what gets thrown out. 
 Aramark, a food service contractor, began doing this, and has reduced their food waste by nearly half (44%). For them, that was 479 tons of food saved from being sent to landfills. 

This is an interesting article on what some restaurants have done to reduce waste. Most of what they've tried works in homes, also.

You may have heard that in the US we waste 40% of our food-- 63 million tons of it per WEEK. But do you know where that waste is happening?

The largest share of it (43%) is happening in our homes-- 27.1 million tons of it per year. That's about 51 ounces per person, per week, or 3.17 pounds. If my family was average, that would mean the 8 of us currently at home would be throwing out 25 pounds of food every week. Shocking!
​
That would count food trimmings when I'm cooking, vegetables and fruits that went bad before getting used, whatever is wasted on a plate, leftovers that didn't get eaten in time, and anything that got burned too badly to eat. :)

We waste much less than average, though, and truthfully throw out very little. We belong to the "Clean Your Plate Club" that my grandma and mom talked about; all but the tiniest kids have learned to only serve up what they are willing to eat. We serve the 2- and 4-year-olds their food, and only in small amounts. If they want more, they get it after the other food on their plate is gone. Usable trimmings get saved for soup or broth. Unusable ones go to the chickens. Produce that went bad gets washed and trimmed; any good parts are used, bad parts go to the chickens. (We call these, "chicken treats"!) Bananas and apples that are getting mushy get put in smoothies or in baked goods. We understand what "expiration" dates mean on food, and so use our senses of smell, sight, and taste to know if they're still fine. (And they ARE, for much, much past those dates.)   When I miss a container of leftovers in the back of the fridge and find it after a week, that goes to the chickens too. Somehow we had THREE gallons of milk go sour this week, so they were turned into quick cheese; the whey went in muffins and bread. 

Let’s look at how to reduce waste with one item- MILK.

What can you do when milk goes sour?  This applies whether it happens before the ‘sell by’ date or after. Why does milk go sour? Does that mean it will make you sick?


Milk is high in lactose, which is the natural sugar found in milk.  When bacteria are introduced to the milk, they eat the sugars and convert them into lactic acid (=fermentation).   This means the milk has less sweetness, and more sourness.   This is the process used and controlled when making yogurt, cultured buttermilk, cottage cheese, and more.  

Some bacteria can make you sick, others are perfectly safe.  Because you don’t know which bacteria made your milk go sour, using uncooked sour milk has a possibility of making you sick.  Cooking with it, however, kills the bacteria, and is therefore safe.

Ways to use sour milk
 

-use it in place of buttermilk in pancakes, biscuits, chocolate cake, cornbread, wheat   bread, or any other recipe. 
-freeze it for using in recipes next time.

-pour a cup around your garden plants- it’s good fertilizer!  Milk is used to help grow     giant pumpkins, and helps prevent blossom end rot in tomatoes.  
- feed to chickens, pigs, or dogs (boil it first if you’re concerned for your dogs)
- make CHEESE! 


That’s right, you can take sour milk and turn it into cheese.  The fastest, easiest ones to make are cottage cheese and Queso Fresco, a mild fresh cheese. The method for both is the same until after the cheese curds are drained.

One gallon of milk will make about one pound of cheese.
 

Cheese from Sour Milk
You will need:

Sour milk
Salt
Vinegar or lemon juice—maybe.
 
Spray the inside bottom of a heavy saucepan with nonstick cooking spray.  Heat over low for about a minute to form a coating-- this helps the milk proteins NOT stick to the bottom of your pan.(You can skip the spray and still be fine.  Just stir more.)  Add your sour milk, and heat over medium-high until the milk starts to steam, stirring often.  If your milk is sour enough, it will start to curdle-- separating into curds and whey.  (Remember "Little Miss Muffet"?  Curds are the white clumps, whey is the yellowish liquid left behind.)  If your milk isn’t separating on its own, add up to ¼ c. of vinegar or lemon juice, a few DRIPS at a time, stirring after each addition.  The milk will immediately start to curdle.  Remove from heat and let it rest for one minute. 

Put a fine-mesh sieve over a large bowl and pour the curds and whey into the sieve.  Move the sieve to the sink, and rinse with hot water to get the acid out.  Rinse with cold water for about a minute, until no more whey is in it.  Add salt, ½ tsp. per cup of curds.

Cottage Cheese-
For each cup of curds, stir in 2-4 Tbsp. of yogurt or sour cream.  Cover and refrigerate.  This works great in recipes like lasagna.  I can make a batch of cottage cheese (using dry milk powder) faster than I can drive to the store and purchase it. (That’s saying something; the store is about a mile away.)
 
Queso Fresco-
After draining, rinsing, and salting the curds, put them in a couple layers of cheesecloth or on a flat (non-terrycloth!) dish towel.  Twist the top of the fabric closed, and tightly squeeze the cheese over the sink.  More liquid will come out.  Attach the twisted part of the towel (your ‘bag’) to a cupboard handle, and set a bowl under it to catch any more drips.  Let hang overnight.

If you want a nice flat, round shape, instead of hanging the bag, set it inside something round—a clean, empty 29 oz peach can, a food storage container, or whatever you have.  Set something on top of the cheese, and put something heavy on top of it to press it down.  Let that sit overnight. 
In the morning, wrap and refrigerate the cheese.  Use within a week or two; this one doesn’t have a long shelf life.  Here are ways to use it. https://www.thekitchn.com/queso-fresco-the-cheesemonger-91408
 
 ---------------------------------------
Now you have leftover whey - a yellowish, clear liquid that contains protein, carbs, calcium, phosphorus, and several B vitamins.
 
The resulting whey in this recipe is ‘acid whey’ (versus ‘sweet whey’) because it is a little acidic.  How to use it?  Very much as you would sour milk or buttermilk.  Use in most recipes that call for water or milk.  Use it as a tenderizing marinade for meat; add flavors and spices as you like.  Use it to make whey lemonade, feed it to animals (chickens love it!), or as a last resort, pour in your compost bin.  It’s also reportedly used as a great hair rinse, but I haven’t tried it yet.

What else have you done with sour milk, or with whey?
0 Comments

Week 4- Where do I get the money?

5/4/2019

0 Comments

 
The week 4 assignment:
Going off your new Inventory Shopping List and this week’s sales, buy the 3 months’ worth of as many different items as you can as your new budget allows. This plan calls for buying your 3 month foods each week over the next 18 weeks. From now on, I'll refer to this as B for 3. 

My friend Heidi recommends this inventory app- you scan items and they’re automatically entered.  I can’t vouch for it yet, but she loves it.

How can you afford to buy all this extra food?

Waste less- this saves $$ on your regular food budget, freeing up money. Did you know the average family of 4 throws away more than $2000 of food every year?  (See ways to waste less, here.)  This alone has the potential to completely fund your food storage!

Budget it in- in addition to freeing up money by reducing the food you waste, there are other ways to find money you already have.    Plan on finding $14/person/week.  Vaughn J. Featherstone gave a talk years ago on how to get your full year’s worth of food within just one year.  He recommends sitting down as a family and deciding on ways.  Some of his suggestions include

-skip going on a vacation; use the money for food storage, and spend the time on growing a garden.

-at Christmas time, designate 25-50% of the regular gift budget for food storage.
-make your clothes last longer.  Don’t replace anything that still has good use in it, and mend or repair what can be.

- cut your entertainment budget by 50%.  Find memory-building activities that are free.

-Sell a ‘luxury item’ like a snowmobile, ATV, boat, camper, etc.  (Modern note: If you have a storage unit, sell what’s in it; use the proceeds --and the rent savings-- for food.)

-watch the grocery sales, buy extra when what you need is on sale.

-reduce the meat you buy and switch in a protein source that costs less. Buy less ice cream, candy, chips, magazines… whatever is tempting to you there.  Spend the difference on what’s on your inventory purchase list.
 
If after going through Elder Featherstone’s suggestions it still looks impossible, pray to see what you can do.  Ways will open. God is still a God of miracles!

Grow and Glean- Grow the food you can- berry bushes can fit easily in a landscape, as can fruit trees, herbs, and vegetables.  Gleaning- when a neighbor has too many zucchini or tomatoes, volunteer to take some.  Use them in recipes, freeze them, bottle them, dehydrate them-- seasoned dried zucchini slices are great for snacking! Very often there are people around who have fruit trees they don't harvest. Knock on a door and ask!  Usually they're a little sad about it going to waste otherwise, and grateful to have someone use it.

Buy smart – My dad laughingly said he learned in college about the ‘SOS’ Method. This can mean Stay Out of Stores or Stock up On Sales.  Both have their place and their limits.

Stay Out of Stores-- the fewer times a week or month you visit stores, the less money you will spend there!  

Stock up when things are on sale- know what the regular prices are, so you can recognize a good price.  Buy as much of your 3 month's worth as you can fit in the budget.  (Remember it’s only a ‘deal’ if you were going to buy it anyway.  Don’t buy stuff just because it’s on sale. Be intentional!)  If chicken is an amazing price, you can buy a case or however much your family will use; divide it into meal-size freezer bags, raw or cooked, or bottle it to store on the shelf.

Buy when others don’t want it.  Buy foods that are marked down because they are at or near the ‘best by’ date.  (The date matters much less on some foods than others.)  Work this week’s sale produce into your meals and snacks.  Ask the produce guy at the grocery store if they have too many bananas; several times I’ve been able to buy a 40-lb case of bananas for $10 or even $5.  That’s enough for about three rounds of filling my dehydrator with sliced bananas, plus a batch or two of banana bread for the freezer.  (My kids adore home dried bananas.)   Some stores give away their day-old bread and other bakery items rather than marking them down.  If you’re local, give me a call; I have access to some of this and am looking for people to share with!

Know the best places to buy things - call around or look online. But don’t spend too much time running from place to place. Remember the first SOS.

Two places you might not have considered that have great deals are the Home Storage Centers -- you can buy in person or order online-- and NPS-- a store that sells inventory overage, lost and missing freight.(This is in Salt Lake and Utah counties only.  Other areas may have similar stores.)
Again, if you’re local, I’m glad to show you around at either place.  NPS has amazing deals- including on GF and dairy-free items-- but not everything there is inexpensive. I tend to shop there once every couple months, and get a lot of what’s good.


How can you afford to build your food storage?  
-Waste Less
-Budget it In
-Grow and Glean
-Buy Smart!
0 Comments

Three Month Supply FAQs

4/27/2019

1 Comment

 
Picture
Why store three months of regular food? Is this instead of a year’s supply?

For decades, the Church of Jesus Christ of Latter-day Saints has counseled its members to have at least a year’s supply of food on hand.  That is still the counsel.  
Our modern eating and cooking habits, though, have made it necessary to adjust that storage. The year-supply, long-term storage foods are ones that require cooking skills and time that many people don’t take.  There are many reasons that food storage is a lifesaver—loss of employment, long-term illness, bills that eat up more of the budget than they normally do, natural disasters, and economic upheaval— but if your body is not used to eating whole wheat and beans every day, switching your diet suddenly is a recipe for another hospital stay.  It can even be deadly.  Having 3 months of foods you are used to eating provides a buffer for your time, your diet, and your skill level.  Most family emergencies are over within 3 months. If yours isn’t, though, that 3 months buys you time to start gradually working the long-term storage foods into your diet, so your body adjusts to them. And it gives you time to try out new food storage recipes a little at a time.
The current counsel from our church leaders is to have a three-month supply of foods we normally eat, AND a year’s supply of long-term basic foods.

How much will this cost? Will it be as much as my monthly food budget times three?

Most likely, it will not even be close. To buy your complete three month supply within six months, using the strategies and habits I’ll share next week, will cost around $2/day per person, or $14/person/week.  That may be less than you pay for cell phone service, to say nothing of the cost for the phone itself. 
My experience has been that because of the way you ideally shop for this short-term storage, it costs considerably less than your regular-meals budget.  Can you afford it?  The way I see it, I can’t afford NOT to have a family storehouse.  Most of my shelf-stable grocery items are purchased when each is on sale, usually at 30-70% off the regular price.
 
How often does this food need rotated?  Do I store it and forget it?

That depends largely on what kind of food you get.  Lettuce and cucumbers won't last.

One good storage method has you rotate food once a year, putting the soonest-to-expire shelf-stable foods in your pantry.  Another method—the way I do it—is to treat it as your personal, well-stocked storehouse.  Buy on sale, use what you purchased on sale. That frees up even more of your budget to get food storage!  Freeze-dried, dehydrated, and dry-pack foods can be stored and left alone for a long time.
 
Don’t my regular foods have too short of a shelf life to store this long?

Again, that depends mostly on what they are and how you store them.  The enemies of food are light, heat, water, oxygen, and pests (mostly insects and rodents).  Many fruits and vegetables can store for months at a time in the right temperature and humidity. There are canned versions of most of them. And you can store vegetable seeds as backup for next year’s food.  Well-packaged frozen foods can stay good for a year or more.  (The biggest risk is freezer burn, but the food is still usable, especially when added to soups.)


What about those dates on boxed and canned food?   

The date on the box or can is NOT the date by which the food will spoil; it’s an arbitrary date the manufacturer stamped on it for purposes of guaranteeing its quality.  Boxed and bagged food-- including breakfast cereal-- when stored properly, can easily last 2-3 years before developing off-flavors. (High-fat foods can get rancid before then; it won't hurt you, but doesn't taste good!) 

Are canned foods safe after their 'best by' date?

While canned foods do eventually lose some of their vitamins and texture, they remain safe and able to sustain life as long as the seal is intact. I know of at least two accounts of separate ships that sank with canned food aboard
.  More than 100 years later, the boats were found, the cans brought up and cleaned off.  Some of the cans were opened and tested; the food was safe and still contained the protein and minerals.  

Here is a statement directly from the Canned Food Alliance--
 “Canning is one of the safest ways to preserve foods. To retain peak quality, the shelf life of canned food is at least two years… The food maintains its high eating quality for more than two years and is safe to eat as long as the container is not damaged in any way.”

If a can is damaged, bulging, or weeping, the seal may have been broken. Toss it out.  The exception to this is tomato products; if they bulge slightly or spurt when you open it, this is not from microbial growth, but from electrolysis between the acidic tomato and the metal can. It forms gas as a by-product.

And the biggest question--

How do I know how much to store?? 
That question gets its own blog post. 

What questions do you still have? Ask in the comments below, and your question may get added to the FAQs.


1 Comment

Homemade Vegetable Broth Powder

1/23/2014

1 Comment

 
I have the HARDEST time finding bouillon that doesn't contain MSG.  Here's a solution:  no MSG, no fillers, no preservatives.  Only what you choose to put in it.

This recipe was adapted from Traci's Transformational Health Principles by Traci J. Sellers

Vegetable Broth Powder     (makes about 1 1/2 cups)
​
1 cup Nutritional Yeast (to make your own, see here)
1/4 cup RealSalt (or Himalayan salt; something with those trace minerals)
1 Tbsp. onion powder (see how to make your own, here)
1 1/2 tsp. turmeric
1 1/2 tsp. dried parsley
1 tsp. dried dill weed
1 tsp. marjoram or oregano, optional
1 tsp. dried lemon peel, optional
1/2 tsp. celery seed
1/2 tsp. dry basil
1/2 tsp. ground thyme 

 Put everything except parsley in a blender or food processor, in the order given.  Blend until
 powdered.  Add parsley, pulse just enough to chop it a little bit (you're aiming for small bits).  Store in an airtight container indefinitely.  

To use, add a heaping 1/2 tsp. per cup of water, or 1 Tbsp. of powder  for every quart of water.

1 Comment

Sweet Potato Curry with Turkey

11/28/2013

0 Comments

 
Picture
Curry is becoming known as a  bit of a superfood.  The spice blend's famous color is from one of its ingredients, turmeric.  Turmeric is now known to reduce inflammation- brain, systemic, and joints.  Here's a great way to use up some leftovers in a flavorful, healthy way!
Curry has an affinity for sweet, so it mixes perfectly with sweet potatoes or yams.

When I was in college, I lived in the cheapest off-campus apartment around.  There were several foreign students in the complex, and one day we had a potluck dinner together.  
One of the first foods on the table was an amazingly yellow... something.  So I asked what it was.  "Curry," she responded, "It's a food from Korea.". 
Further down the table was another bowl of yellow food.  I asked about it.  "Chicken Curry," she explained, "The Jamaicans invented it."  
Another friend walked up with a now-familiar color.  I asked. 
"Curry.  It's from Africa."

It was good.  All three were.  Good enough I could see why everybody claimed it was from their own native country.

Since my roommate was the Jamaican, that's whose recipe I got, though I had to watch her make it and estimate the amounts at the time.  This recipe is based on hers, though she used bone-in chicken thighs, less onion but added a couple green onions,  potatoes instead of sweet potatoes, and serve it not only over rice, but also with thick, chewy 'Jamaican Dumplings'.  The recipe is flexible.

Curry.  From America.

Sweet Potato Curry with Turkey- makes about 6 cups

2 Tbsp. oil
1-2 Tbsp. curry
2 medium onions, sliced into rings
1 c. cooked turkey, cubed (can use chicken instead)
1 lb. sweet potatoes, peeled and cubed*
1/2 tsp. salt
1/4- 1/2 tsp. pepper, to taste
water

*I used raw sweet potatoes, but feel free to use cooked ones- you can even get away with using leftover Thanksgiving baked sweet potatoes as long as they're not too saccharine; reduce cooking time accordingly.

Heat oil on medium-high heat until shimmering-hot.  Add the curry powder- amount depends on how strong you like it.  (I like it strong.)  Stir, and let it heat for about a minute to 'bloom' the flavor.  It's done when it starts to smell delicious and a little toasty. DON'T burn it.  (Nasty, bitter flavor!...)  Reduce heat to medium, add onion; cook until they are tender, stirring occasionally.  
Stir in turkey, then add sweet potatoes, salt, and pepper.  Add water until the food is nearly covered.  Put a lid on the pan and simmer, covered, for about 20 minutes or until just tender.  Remove lid, increase heat and gently boil until liquid is reduced by about half.  

Serve hot by itself or over rice.

Optional:sprinkle with any of the following:
chopped peanuts
green peas
mandarin orange segments
shredded coconut
diced apple
dollop of sour cream or unsweetened yogurt
chopped hardboiled eggs
bits of dried fruit

0 Comments

Two-minute Egg and Cheese Breakfast Sandwich

10/23/2013

0 Comments

 
Picture
Today I read a research article about how having breakfast as your biggest meal of the day  rather than dinner can lead to both better insulin sensitivity and increased fertility.  In the study, they had women consume about 980 calories at breakfast, which was just over half the amount for the whole day.  If you use two slices of homemade or other good-quality whole-wheat bread (about 120 calories apiece), one large egg  (80 cal), and a one-ounce slice of real cheese (about 100 cal), you're almost halfway there.  I love to eat this with a fresh apple (a medium-large apple is about 100 calories).  

OK, so that's still not up to the numbers in the study.  But it's a great breakfast anyway.  Maybe make two?  

In less time than it takes to go through the drive-through, you can have a breakfast sandwich you made yourself.  At the bargain-hunting prices I pay for food (including making the bread), a two-slice sandwich costs just under $ .30.  (The bread costs me about $ .50 for a 1 1/2 pound loaf.  See the recipe here.)  
Dress it up with anything you want on it, or leave it simple.  I don't add salt to the egg because the cheese and bread are salty enough for me. For more flavor, add a sprinkle of oregano or other seasoning.  You can make it as healthy as you like; I use homemade whole-wheat bread for a breakfast that sticks with me for more than an hour.

Here are the quick instructions:  microwave one beaten egg for about 45 seconds, top it with a slice of cheese, put this on top of a slice of toast.
If you want a sausage-and-egg sandwich, before cooking your egg, put one precooked sausage link into the cereal bowl, chop it up with the fork, then add the egg and beat it. 

The photos below have more detailed instructions.
0 Comments

Great-tasting Beet Greens

8/17/2013

0 Comments

 
Picture
The last time I cooked beet greens for my family was about three years ago.  I grew up eating them because I 'had to', and continued it because their nutrition content reads like a fantastic multi-vitamin:  protein, fiber, folic acid, phosphorus, zinc, calcium, iron, magnesium, copper, manganese, potassium, Vitamins A, C, E, K, and three different B vitamins.
But I'll tell you what- after that last time cooking and eating those soggy, bitter greens (I might have burnt them a bit too) all by myself-- sort of plugging my nose as I did-- cuz, dang it, they're good for me!  I thought that'd be the last time I cooked them.

When I pulled the first beets out of the soil this year, though, the old "you oughtta" came back.  This time I was prepared with The Best Vegetable Recipes cookbook from the America's Test Kitchen people.  They had a recipe that could be completed in under ten minutes and sounded like it might not be as terrible as my last attempt.

It was so good I ate seconds.  My husband ate seconds.  My kids at least ate firsts.  And I shared this and Pink Potato Salad with a couple 'foodie' neighbors, who also loved them.  

Not that anyone'd choose this over chocolate; maybe it was just that the greens were much better than anyone's latest memory of them, especially with the crunchy, fragrant nuts and the bit of sweet from the currants.

The amounts and technique will work on any moderately thick green like kale or chard.  (The chard's up next in my yard.)  The original recipe called for cutting out the stems, but they're also good, just take a bit of extra cooking to tenderize.  They can be a little bitter, but the currants countered any of that.

The quantities I used were approximately
1-2 lbs. beet greens
1-2 Tbsp. olive oil
2 cloves garlic (or 1/2 tsp. garlic powder)
1/4 c. pine nuts, chopped  (or other nut you like)
2 Tbsp. currants (chopped raisins work too)

See the slide show for instructions.
0 Comments

Almost Taco Salad

3/20/2013

0 Comments

 
Picture
Why is it almost Taco Salad?  Because there's no tostada or chips with it.  If you want full-blown Taco Salad, just add some.  Pretend they're corn-chip croutons.  I didn't use those because of a sudden urge to make roasted potatoes and didn't want a lot more carbohydrates in the meal.  Besides, if I opened a bag of chips, the whole thing would disappear, and that's anywhere from $1- 2.50, depending on if we're using cheap tortilla chips or Fritos.  The potatoes, as our carb, cost about $ .50 instead.  Yum.

Almost-Taco Salad

 ½ lb. ground beef
1 Tbsp. tomato powder
2 Tbsp. chili powder
Salt to taste
1 head of lettuce (or a half head each Iceburg and red leaf lettuce)
½ green bell pepper
½ red bell pepper
½ c. shredded cheese
1 tomato, cut in wedges
Optional: thin-sliced onion, sliced avocado, jicama cubes, cooked black beans, drained canned corn, canned green chilies....

Cook the beef until browned.  Meanwhile, wash and chop lettuce and veggies.  Put the lettuce in, then add the vegetables and most of the cheese; mix slightly.  When the burger is done, drain off grease, then add tomato powder and chili powder.  Stir to coat, taste and add salt if needed.  Spread out the meat on a plate to cool more quickly.    When it’s cool, top the salad with it and the remaining cheese.

My family thought it was good without salad dressing, but if you want something to drizzle on top, Ranch is a good choice- especially if you mix a little chili powder into it-, OR this:

Creamy Garlic Dressing:

¼ c. plain yogurt or sour cream
1 Tbsp. water or milk
½ tsp. garlic powder
Salt to taste
1/2 tsp. dried parsley, optional, if you want it to look prettier

Whisk until smooth.
Serve with oregano-roasted potato wedges and vegetable sticks.

0 Comments

When only one of you can't have wheat

3/2/2013

2 Comments

 
Picture
Surely many of you are in the same boat.

Out of the eight of us in the house, we've learned that one child can't have wheat.  She's so sensitive that eating one 1/4" piece of bread caused her arms to turn hot pink and start to weep.  But the rest of us are fine.  We're still in the process of determining if she reacts to gluten, or to just the wheat itself, so for now everything must be wheat-free AND gluten-free.  And dairy-free, while we're figuring out if that's an issue too.  For some strange reason, I prefer to cook only one meal, per meal.  And special 'gluten-free' foods are pricey.  Really pricey.  So I'll let you know how I've adapted.  Hopefully it'll help you or someone else having to adapt to whatever allergy or special needs diet strikes just one or two in your family.  


Eight Tips for feeling (more) normal when someone has special dietary needs

1- Plan on preparing most of your family's foods.  
Unless you have nothing against quadrupling your family's food budget.  Not kidding.   If you didn't cook much before, brush up on the basics.  They'll do for now.  And for a while.

2- Eat naturally wheat-free foods
Keep a list around so you can focus on what CAN be eaten rather than all the CAN'Ts.  It's empowering and encouraging.  While you're still getting used to what's okay and not, go through your kitchen and pantry, and write down everything that is GF already, including all plain spices and herbs (blends might not be; check), canned/fresh/frozen fruits and vegetables, rice, plain beans, flax, buckwheat, meat in its natural state, eggs, peanut butter, olives, potato chips, popcorn, jam, ketchup...  See a bigger list here, halfway down the page.  There's a GF year-supply list here.  You know, I've been telling myself for years that we oughta eat more rice and beans.  They're cheap, store well, and are filling. 
Those have suddenly become more popular at my house.

3- Make a list of 10-15 meals your family likes that are gluten/wheat-free and can be made using what you typically have on hand.  Include both super-quick meals and more involved ones.  Be willing to spend about an hour doing this; it'll save you much more time than that in the long run.  Get input from your kids.  Tape the list someplace handy like the inside of your cooking supplies cupboard.  No more panic or feeling helpless at a change of dinner plans!

4- When you cook some specialty gluten-free food, go ahead and make a big batch.  Then freeze the rest in individual serving sizes.  For my 10-year-old, the ziptop "snack size" baggies are the perfect size.  There's a gallon-sized ziptop bag labeled for her in the freezer. What's in it changes often.  Right now it has GF waffles and breadsticks, spaghetti (made with specialty GF pasta) and sauce, seasoned rice, dairy-free homemade ice cream (made in my blender), and GF chocolate chip cookies.  Remember treats. They've saved my daughter from feeling deprived with all these new "don't"s.  Whenever my husband pulls out the ice cream, she pulls out her freezer bag and gets something sweet too.  I also keep one loaf of GF bread in the freezer, for sandwiches and toast.  She pulls out a couple slices whenever needed.

5- Keep a small plastic bin full of GF baking supplies, like the photo above. It's handy for all kinds of things. My 'essentials' include a bag of GF flour mix (homemade or storebought), xantham gum, some white flour like rice, tapioca, or potato starch, and a whole-grain GF flour like brown rice, lentil, oat, or sorghum.  Mine also has a bag of dairy-free chocolate chips in it, good for a lot more than just cookies.  I've found flours like tapioca, potato starch, and rice flour at the Asian market for a fraction of the price.

6- Try a new GF recipe at least once a week.  And maybe only once a week, depending on how overwhelming it is to you.  Have that other family member cook with you, so she'll learn to cook for herself later.  If you love bread, stick with the quickbreads for a while.  They're much simpler.  I think the easiest way to learn, other than just trying a new GF mix each week, is to buy a copy of of Living Without magazine.  Or sign up for their free weekly newsletter, which includes a recipe.   I love the magazine format because you can learn in 5-minute increments.

7- Remember to watch out for cross-contamination
I think this is actually the hardest one.  You might want to have TWO jars of mayonnaise and jam open, one of each labeled as GF.  Otherwise it's really easy for bread crumbs from one person to end up in the jar, where they'll cause the allergic person grief.  Remember that toasters carry crumbs.  Wipe the counters really well.  Consider having a second set of measuring cups, possibly mixing bowls and cooling racks too, depending on severity of reaction.  If you have a regular wheat grinder you can grind your own GF flours, using things like rice, beans, oats, lentils, quinoa, etc, BUT only use a mill that has not been used for wheat.  Unless you want to invite problems.  Some things can be ground in a blender, like oats, if those are OK for your family member.

And,
8- Read labels.  Always.  Always.
Learn which ingredients have hidden gluten.  You'll be surprised at what you find.  Sometimes good surprises.  Sometimes lame ones.  Realize too that sometimes companies change their ingredients, and something that didn't have gluten/wheat in it before, might the next time you buy it.  Knowing exactly what you're eating is a good idea anyway.


You can do this!  :D

Love, Rhonda
2 Comments

Swiss Steak (er, Burger)

2/22/2013

0 Comments

 
Picture
Swiss Steak was made, in the beginning, to be a budget-friendly main course.  You take a cheap steak, pound flour and seasonings into it, and braise with tomatoes and onions until the tougher cut becomes tender.


Cheap steak is still pretty expensive in my book.

Hamburger is cheaper, and results in something that tastes just as delicious, even if the texture is different than having a solid piece of meat.  That's OK with me.  I was a little doubtful about the 'tomato gravy' when I first saw the recipe, but it is superb!  
The original recipe came from America's Test Kitchen, but I've modified it a few ways...


Swiss Steak with Tomato Gravy
Serves 8

2 lbs. ground beef or 8 (4 oz) patties
salt and pepper
1 onion, sliced thin
1 Tbsp. cornstarch or flour
2 (14.5 oz) cans diced tomatoes OR one quart home-canned tomatoes (OR one can diced tomatoes and one can of chicken broth)
3 garlic cloves, minced
1/2 tsp. dried thyme OR 1 1/2 tsp. fresh OR 1 tiny drop thyme essential oil
1 Tbsp. chopped fresh or dried parsley
Cooked rice or noodles

Set an oven rack to the highest position and turn on the broiler.  Shape burger into 8 patties (if they're not shaped already); set them on a rimmed baking sheet or in a 9x13 pan.  Set onions on the baking sheet too.  Sprinkle meat with salt and pepper.  Broil patties and onions for 2-4 minutes or until they have a good browned crust at least around the edges.  Turn off broiler and heat oven to 350 degrees.

Meanwhile, put the cornstarch in a medium saucepan and stir in about 2 Tbsp of the juice from the canned tomatoes.  Stir until smooth, then gradually stir in the remaining tomatoes, plus broth if using it.  Add garlic and thyme.  Stir over high heat until it comes to a boil.  

After the meat has come out of the oven, add the parsley and pour the tomato gravy over top.  Return it all to the oven and bake 20 minutes or until done and tender. 
Serve over rice or noodles, spooning sauce over.
0 Comments

Leftover Cheese Ball?

1/10/2013

1 Comment

 
You know how they say "great minds think alike"?   Three neighbors gave me cheeseballs as a Christmas gift.  One of them (Juliette's) was so good I made a batch of Juliette's Green Chili Cheese Ball to give out (and eat too).  The result was that I had a tad too much cheeseball in the fridge.  Granted, it will last a couple weeks if wrapped well- 

but I also had some leftover smashed potatoes.

And the two leftovers turned out to make a beautiful couple.  What's a cheeseball?  Cream cheese, shredded cheese, seasonings... all stuff that goes well with potatoes.

Maybe you'll find a cheeseball on clearance at the grocery store, or maybe get handed the leftovers at a party, or maybe you'll make one...

At any rate, here's a new favorite side dish.  I cooked some leftover-from New-Year's-Eve sliced summer sausage to go along with it, and served with a salad and sliced apples.  I'd even eat it as a main dish; we often cook meatless meals.  (It's cheaper.  And probably healthier.)

Leftover Cheese Ball Potatoes
4-6 cups mashed potatoes
1/2 cup (4 oz) leftover cheese ball
2 eggs (these make the casserole puff as it cooks, plus adds protein)

Mash everything together and spread in an 8x8 pan.  Bake uncovered at 350 degrees for 45 minutes.
OR, to make it faster, reheat the mashed potatoes in the microwave before adding everything, bake at 375 degrees for 20 minutes, then move it to the top rack in the oven.  Broil for 2-4 minutes (check at two minutes!!), until browned on top.
Picture
1 Comment

Utah voting- Constitutional Amendment proposals

10/27/2012

0 Comments

 
Picture
There's just over a week left until Voting Day...

And people here in Utah have been asking what they need to know about the proposed Utah constitutional amendments.  There is a state voting website, vote.utah.gov , where you can read what the proposed change is along with a "for" essay and an "against" one, but I think some dialogue is missing.  This is what I'd like others to know about the proposals this year:


Constitutional Amendment A-  Joint Resolution on Severance Tax  

There are a few problems I see with this proposal.
1- the budget shortfall it creates until 2044 or whenever the interest generated catches up to the annual amount pulled out of use.

2- the inflexibility of the mandate.  Do we need RULES for everything?  They tend to discourage the use of reason and common sense in each year's budget.  How about understanding and living by principles instead? Yes, there are ways to access the severance tax fund in an emergency, but this seems too restrictive for the time we're in; see #3:

3- this appears to actually TAKE from future generations:  it takes away our ability to pay down our current debt. According to the Utah Debt Clock, our state has $19.5 billion in debt.  This is where we are truly stealing from future generations.  The greater favor we can do for them is to pay off our debt now, then have our state representatives learn to stay within a budget.   

If you made $40K each year but spent $46K annually, would you put money aside into a low-yield savings account while you were $39K in debt?  Those are the numbers that Utah Debt Clock translates to. 

This proposal would most likely be a great thing if we were debt-free. But we're not.
The smart thing would be to pay off debt as fast as you could with everything available, then live within (= BELOW) our means.  That's how we prepare for the needs of future generations.
My vote: No on Constitutional Amendment A


Constitutional Amendment B- Joint Resolution on Property Tax Exemption for Military Personnel

No 'against' statement was given at vote.utah.gov.  When I called the Lieutenant Governor's office to ask why, they said those 'for' or 'against' statements must be submitted, before a certain deadline, by the senators who voted for or against it.  Nobody submitted the 'against', though there were some who did not vote for it. You can go to le.utah.gov to see who voted for or against this resolution.

This is not a matter of if I/we appreciate military sacrifices or not, though it's painted as such.  It is a matter of if an additional expense is justified in our state budget.  See budget numbers above.

This amendment proposes something that equates to a pay increase.  If it is truly justified, let's have a straightforward pay raise, then, rather than adding further complication to our tax system.  

Are our military people going to be in favor of this amendment?  Most likely.  It would be very tempting to me to push for something that exempted me from paying property tax; the only ones who like the tax are the cities and departments being handed the money to spend.   In addition, this proposal will decrease revenue, leading to "the government taxing entity" increasing property taxes on the rest of us.  I'm tired of being slowly bled to death by 'minor' fees.  They add up.  Furthermore, I will never truly own my own land, as it can be confiscated if I fail to pay property taxes.  It is not fair to say that some of us are subject to that threat and others are not.

Sympathy and gratitude do not justify further mandatory redistribution, especially in a manner that is easier to hide.  

Daniel McCay, a state representative from Riverton, voted against this resolution.  When I spoke with him, he said he voted 'no' because there are better- more straightforward- ways to deal with this than waive tax requirements. He was also concerned that this opens a new door- if we exempt active military, then what about firemen?  Police?  Teachers?  Other public sector workers? 
My vote: No on Constitutional Amendment B


Proposal for Salt Lake County Bond- Open Space, Natural Habitat, Parks, and Community Trails

This is a vote to allow additional debt of $47 million on a 20 year loan, plus interest, plus additional annual expenditures of $581,000, all paid for by tax revenue. General Obligation bonds, like this, are paid for through raising property taxes.

As of June 30, 2012, Salt Lake County itself has nearly $254 million in 'general obligation' bond debt.  This one proposal would take us to $300 million in debt. In 2004 we had $106 million in debt.  Let's not make it worse. Last year SL County paid out $21 million in interest (see chart pg. 155).
My vote: No on County Bond

0 Comments

Hidden Inflation

8/10/2012

0 Comments

 
Picture
Have you noticed packages shrinking? 

One caught me by surprise the other day.  I had not noticed anything when buying some cake mixes, but once I was mixing one up, I happened to look at the net weight written on the front.  If you click on the picture above, you can see closer.  (The one on the right says 19.5 ounces.)  The mix shrunk by more than three ounces, or about 2/3 of a cup!  Same brand, same price, purchased about a year apart.  To make it even less noticeable, the instructions remain the same as before: you add the same amount of water, the same 3 eggs, and the same quantity of oil.  You end up with about 1/2 cup less cake batter, though, which means your cake will be a little less tall. 

I checked all the cake mix brands at the store after this, and found that nearly every one had shrunk the same amount.  The only exception there was the Western Family brand. 

The first shrinking package I remember seeing was for ice cream.  As early as I know, the regular carton size held 2 quarts, which is 64 ounces.  A few years ago they shrunk to 58 ounces, and now many of them are 48 ounces.  That's 3/4 of what it used to be.  That means IF the price per carton remained the same, prices actually increased 25%.  But prices have gone up, as well.

When expenses rise for the manufacterers, they have two choices:
*raise the price of what they're selling- which often discourages customers from buying as much- or
*reduce the amount of food in the package.  Most people don't notice.  To be fair, sometimes a smaller package is all the modern family wants.  However, when the price of a newly-smaller box is the same as the older bigger one was, you know something's happening.

Tuna fish cans used to hold 6 ounces, as recently as about 5 years ago.   Now they're 5 ounces, which is about 17% less food.

So when you're shopping, noticing the quantity in the package will help you understand the real inflation numbers!
0 Comments

    Need a Search bar?
    One day I may upgrade my website-- but until then, use your web browser search bar. Type in my web address and what you're looking for, like this-- 
    www.theprovidenthomemaker.com  pumpkin --  and you should get results.


    Author

    I'm a disciple of Christ, a member of the Church of Jesus Christ of Latter-day Saints, a family-defending, homemaking, and homeschooling mom of eight children, two of whom sometimes can't have milk or wheat. Growing up on a farm in a high mountain valley, my parents taught me to 'make do', work hard, smile, and help others.  I love cooking, learning, growing food and flowers, picking tomatoes, and making gingerbread houses --which CAN be made allergy-friendly-- with my children.  I hope you find something to help you on my site!

    Archives

    April 2024
    July 2023
    April 2022
    September 2021
    March 2021
    December 2020
    April 2020
    March 2020
    February 2020
    January 2020
    December 2019
    November 2019
    October 2019
    September 2019
    August 2019
    July 2019
    June 2019
    May 2019
    April 2019
    January 2016
    November 2015
    October 2015
    September 2015
    March 2015
    February 2015
    November 2014
    October 2014
    September 2014
    August 2014
    July 2014
    June 2014
    May 2014
    April 2014
    March 2014
    February 2014
    January 2014
    December 2013
    November 2013
    October 2013
    September 2013
    August 2013
    July 2013
    June 2013
    May 2013
    April 2013
    March 2013
    February 2013
    January 2013
    December 2012
    November 2012
    October 2012
    September 2012
    August 2012
    July 2012
    June 2012
    May 2012
    April 2012
    March 2012
    February 2012
    January 2012
    December 2011
    November 2011
    October 2011
    September 2011
    August 2011
    July 2011
    June 2011
    May 2011
    April 2011
    March 2011
    February 2011
    January 2011
    December 2010
    November 2010
    October 2010
    September 2010

    Categories

    All
    Alcohol
    Alternate Cooking
    Appearances
    Apple
    Apricots
    April Fools
    Aprons
    Bananas
    Beans
    Beef
    Beets
    Bench
    Beverages
    Bonnet
    Bread
    Breakfast
    Budget
    Budgeting
    Cake
    Candy
    Canning
    Carrots
    Cheese
    Chicken
    Children
    Chocolate
    Christmas
    Cleaning
    Coconut
    Comfrey
    Common Core
    Constitution
    Cookbook
    Cookies
    Cooking Oil
    Crafts
    Dairy Substitutions
    Dehydrating
    Dessert
    Dried Fruit
    Earth Oven
    Earthquake
    Easter
    Edible Weeds
    Eggs
    Emergency Prep
    Essential Oils
    Faith
    Family Home Evening
    Fertilizing
    Food Storage
    Fourth Of July
    Freezer
    Frosting
    Fudge
    Garden
    Gardening
    Gingerbread
    Gluten
    Gluten Free
    Gold
    Government
    Grains
    Gratitude
    Hat
    Herbs
    Home Remedies
    Home Repairs
    Homeschool
    Home Storage
    Honey
    Hope
    Inflation
    Leftovers
    Legumes
    Lemon
    Main Dishes
    Mixes
    Mothers
    Noah
    Non Artificial Colors
    Non-artificial Colors
    Nuts
    Oats
    Oil
    Orange
    Paint
    Peaches
    Pear
    Pie
    Pizza
    Plums
    Poem
    Popcorn
    Pork
    Potatoes
    Powdered Milk
    Prayer
    Preparedness
    Projects
    Prophecy
    Pruning
    Pumpkin
    Quick Bread
    Rhubarb
    Rice
    Salad
    Salt
    Sauces
    Self Reliance
    Self-reliance
    Sewing
    Shelf Life
    Shelves
    Sky
    Smoothie
    Snacks
    Soup
    Spices Or Seasonings
    Squash
    Strawberries
    Substitutions
    Sugar
    Summer Fun
    Three Month Supply
    Time
    Tomatoes
    Trees
    Truffles
    T-shirts
    Tuna
    Ultra Gel
    Valentine\'s Day
    Vegetables
    Water
    Watermelon
    Wheat
    Work
    Year Supply
    Zucchini

    RSS Feed

Web Hosting by iPage