The Provident Homemaker
  • Recipes and Info
    • Making Bread
  • My Blog
  • Favorite Resources
  • Documents and Files
  • 52 Weeks of Building Storage

Canning Butter?

2/25/2013

0 Comments

 
Have you heard that you can bottle butter at home to store for later, without refrigeration?  

The first time I heard about it was from my aunt a few years ago.  Then I kept hearing about it, here and there and everywhere!

It sounded kind of strange.  And scary-- what about botulism?  So I did some research.

The FDA discourages canning butter, as do the USU Extension offices around the country, because of the risk of botulism growth in canned butter.  HOWEVER, it looks to me that this is a case of erring on the safe side.  They, as government entities, are very averse to any kind of risk.  Botulism has about a 10-17% death rate in those who get it, though with the low incidence of this kind of food poisoning, it translates to 2-4 deaths in the US per year. Lightening kills way more people (about 55-75/yr).

Botulism does not grow if the water "activity level" is below .94; salted butter has a water activity rate of .91-.93.  The added salt helps 'tie up' the water, making it unavailable.  That should be in the perfectly safe range, but is apparently too close to comfort for the FDA, who require a water activity rate of .85 in commercially-sold foods. I would not can unsalted butter; its water activity rate is .99 or higher. Another option is to make the butter into ghee before canning, well-made ghee has no water remaining in it. I wasn't able to find what the water activity rate of ghee is, but logic leads me to believe it is under even the FDA comfort range.  I've canned both salted butter and ghee.  I'm more comfortable with the ghee.


If you'd like to read more about it to decide if canning butter or ghee is okay with you, here are some of the sources I learned from:

http://www.ecolab.com/our-story/our-company/our-vision/safe-food/microbial-risks/c-botulinum    

http://books.google.com/books?id=ylWey_KBv7UC&pg=PA337&lpg=PA337&dq=%22water+activity%22+of+%22salted+butter%22&source=bl&ots=18uZLS840j&sig=W8RCozWeTS_FcDIa-MkuRJPJu6I&hl=en&sa=X&ei=jeYFUcTWEc6tygHixICQDA&ved=0CEQQ6AEwAQ#v=onepage&q=%22water%20activity%22%20of%20%22salted%20butter%22&f=false     

http://www.ncbi.nlm.nih.gov/books/NBK50952/ )


0 Comments

Swiss Steak (er, Burger)

2/22/2013

0 Comments

 
Picture
Swiss Steak was made, in the beginning, to be a budget-friendly main course.  You take a cheap steak, pound flour and seasonings into it, and braise with tomatoes and onions until the tougher cut becomes tender.


Cheap steak is still pretty expensive in my book.

Hamburger is cheaper, and results in something that tastes just as delicious, even if the texture is different than having a solid piece of meat.  That's OK with me.  I was a little doubtful about the 'tomato gravy' when I first saw the recipe, but it is superb!  
The original recipe came from America's Test Kitchen, but I've modified it a few ways...


Swiss Steak with Tomato Gravy
Serves 8

2 lbs. ground beef or 8 (4 oz) patties
salt and pepper
1 onion, sliced thin
1 Tbsp. cornstarch or flour
2 (14.5 oz) cans diced tomatoes OR one quart home-canned tomatoes (OR one can diced tomatoes and one can of chicken broth)
3 garlic cloves, minced
1/2 tsp. dried thyme OR 1 1/2 tsp. fresh OR 1 tiny drop thyme essential oil
1 Tbsp. chopped fresh or dried parsley
Cooked rice or noodles

Set an oven rack to the highest position and turn on the broiler.  Shape burger into 8 patties (if they're not shaped already); set them on a rimmed baking sheet or in a 9x13 pan.  Set onions on the baking sheet too.  Sprinkle meat with salt and pepper.  Broil patties and onions for 2-4 minutes or until they have a good browned crust at least around the edges.  Turn off broiler and heat oven to 350 degrees.

Meanwhile, put the cornstarch in a medium saucepan and stir in about 2 Tbsp of the juice from the canned tomatoes.  Stir until smooth, then gradually stir in the remaining tomatoes, plus broth if using it.  Add garlic and thyme.  Stir over high heat until it comes to a boil.  

After the meat has come out of the oven, add the parsley and pour the tomato gravy over top.  Return it all to the oven and bake 20 minutes or until done and tender. 
Serve over rice or noodles, spooning sauce over.
0 Comments

GF CF Chocolate Chip Cookies

2/19/2013

0 Comments

 
Picture
NOTE:  If wheat is not a problem for you (and it's not for me, that I know of...)  this recipe can be made using regular all-purpose flour.

I've been playing around with gluten-free foods for a while now, and sometimes the food is a   little disappointing.  Not so with these.  They were soft and chewy in the center, crispy on the edges, with good texture and flavor.  The recipe was adapted from two nearly-identical recipes from "Life Tastes Good Again" and from the box of SunFlour Mills gluten-free Pastry Flour.  The only thing was, the recipe called for butter and a box of vanilla pudding mix, both of which contain dairy.  Here's the gluten-free AND dairy-free version:

Soft and Chewy GF CF Chocolate Chip Cookies

1 cup dairy-free 'butter', like this recipe (or use real butter if you're OK with it)
3/4 c. packed brown sugar
1 c. granulated sugar
1/4 c. Ultra Gel (a no-cook food starch)
2 eggs
2 tsp. vanilla
2 1/4 c. gluten-free flour blend, like Sunflour Mills GF Pastry Flour  or whatever you prefer
1 1/2 tsp. xanthan gum (omit if using regular all-purpose flour)
1/4 tsp. salt
1 tsp. baking soda
2 c. chocolate chips (dairy free, gluten free) OR 1 c. each nuts and chocolate chips

Preheat oven to 375 degrees.   Cream together the butter, both sugars, and Ultra Gel (or pudding mix).  Beat in the eggs and vanilla.  Add 1 cup of the GF flour, the xantham gums, salt, and baking soda.  Beat until smooth, then mix in the remaining 2 1/4 c. GF flour.  Stir in chocolate chips and nuts if using them.

Drop by heaping tablespoonfuls onto an ungreased cookie sheet.  Bake about 7-9 minutes, or until just browned on the edges and centers still look wet.  Let cookies sit on cookie sheet for 4-5 minutes before removing to a cooling rack.  (They'll fall apart if you move them too soon.)  Makes about 30 cookies.   Store any extras in an airtight container at room temperature or in the freezer.
If you like cookies crispy, cook them until the centers look done.  If you want them chewy, it's critical to essentially underbake them a bit, hence the wet centers.  Baked goods continue to cook even after they come out of the oven. 

*If dairy is not a problem for you either, then you can use a box of instant vanilla pudding in place of 3/4 cup of the sugar, 1/8 tsp of the salt, 1 tsp. of the vanilla, and 1/4 c. Ultra Gel. 

0 Comments

Orange-Apricot-Pecan Yeast Bread

2/16/2013

0 Comments

 
Picture
Start with regular bread dough- and turn it into a treat!

I love the flavor combination here- the bright flavor of candied orange peel, the sweet-tartness of snipped dried apricots, and the hearty depth from pecans. This bread is at its best after a day so the orange has a chance to permeate the whole loafwhen toasted: great with butter, but heavenly with cream cheese.  Yum.  I like it for breakfast.

This batch was made using 100% whole wheat dough, but use whatever you're making anyway.

Mix up a batch of dough (like this one).  Set aside one loaf's worth of dough.  Stretch or roll it to about 8x16 inches.  Sprinkle evenly with 1/3 cup diced candied orange peel, 1/3 cup (2 oz) dried apricots, snipped, and 1/3 c. pecan pieces.  Roll up starting with the narrow end.  Place in a greased 8x4 loaf pan, seam side down.  Let rise and bake as usual, adding 1-2 extra minutes to the baking time.  Cool and slice.


0 Comments

Cupcakes for Two

2/13/2013

0 Comments

 
Picture
Picture
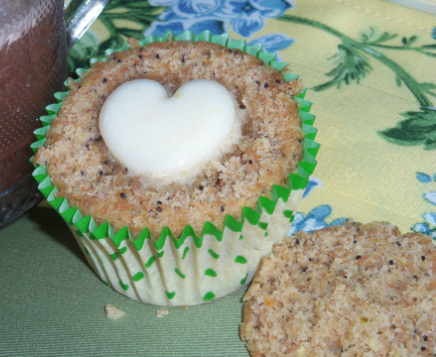
Are you craving a moist, flavorful cupcake?  Maybe you'd like gourmet cupcakes to serve your sweetie on Valentine's Day?
The 'extras' added here- coconut extract, shredded coconut, lime juice and zest- make these cupcakes Coconut-Lime.  Feel free to substitute whatever other flavors you like.  Any flavor cake mix will work.  You could make a pretty pink-speckled frosting for Valentine's Day by using one mashed strawberry in the frosting.  Since it's contributing liquid, omit the lime juice.


Cupcakes:
1/2 cup white cake mix
1/4 cup water
a little coconut extract (about 1/16th tsp)- or other flavor, optional

Put a paper cupcake liner in each of two custard cups or microwaveable mugs.  Beat the mix, water, and coconut extract together until smooth.  Divide between the two liners. Microwave each one for about 35-45 seconds or until there's just a small wet-looking spot in the center.  Let cool.

A very simple filling is a spoonful of vanilla Greek yogurt.  Poke a hole in the cupcake with a spoon, lift the torn part up, and drop about a tablespoon of  Greek yogurt.  Jam is a good filling, as is pie filling or frosting. Just use less of these because they're so sweet.

Frosting:
1 Tbsp. butter, softened
1 Tbsp. sour cream (or Greek yogurt, cream cheese, or butter, depending on the flavor you want)
dash of salt
a little vanilla (1/16th tsp)
about 2 tsp. lime juice (or lemon if that's all you have.  I used lemon juice and added a drop or two of lime essential oil.)
powdered sugar (about 1 cup)

Beat together the butter, sour cream, and salt.  Stir in the vanilla and lime juice.  Add 1/2 cup powdered sugar and stir until smooth.  If it's not thick enough yet, add more powdered sugar until it is.

Spread on the cooled cupcakes, then top with some toasted coconut and finely grated lime zest.

If you want chocolate frosting, simply add 2 Tbsp. cocoa powder to it.
0 Comments

Homemade Dairy-free Spreadable Butter

2/9/2013

12 Comments

 
Picture
Picture
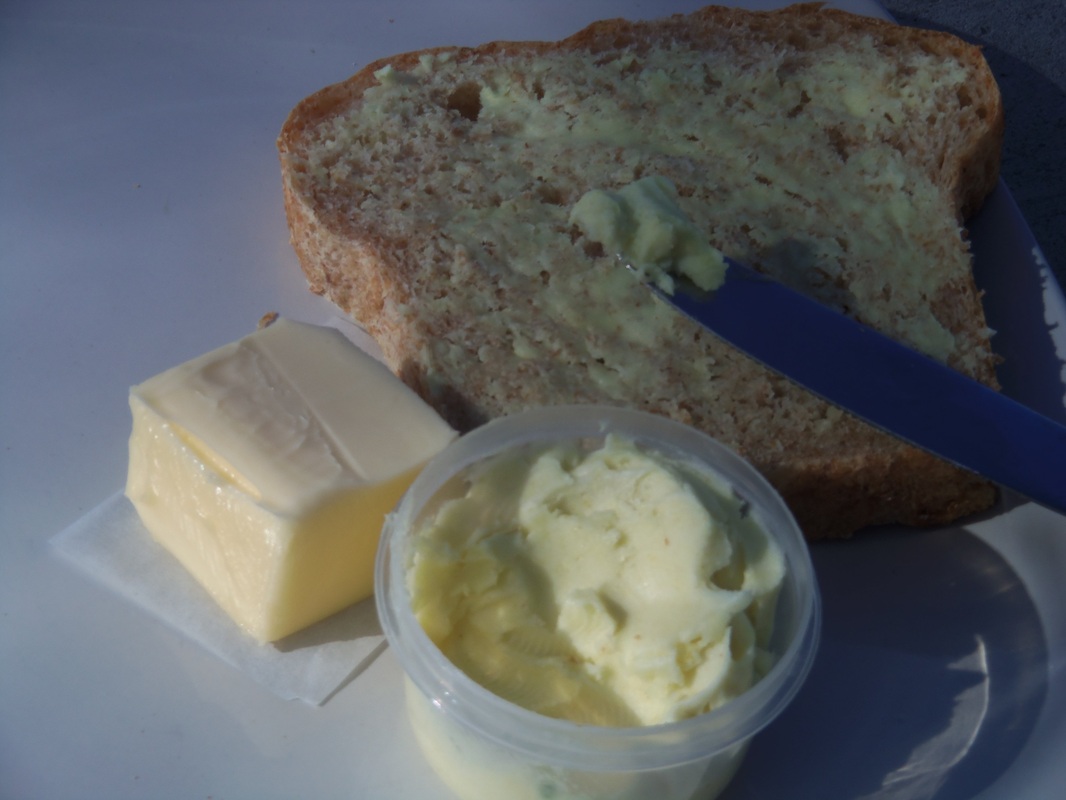
My no-butter spread still tastes like butter plus is made with healthy fats. The spread is in the container; dairy butter is on the left for comparison.
I am so excited!

But first- if you've noticed a shift towards gluten-free and dairy-free recipes lately, good noticing!  I. Love. Dairy.  I even milked a cow every day as a teenager so I had the fresh great stuff.  But sometimes people have health problems with certain foods.  So far we've discovered that two of my children get stomach aches when they drink milk.  One of my daughters has excema on her arms that just has not cleared up.  It usually comes and goes, especially in the winter, but she's had it for two months straight.  So I've taken all dairy and wheat items out of her diet to see if those common allergens could be a reason for it.  I'm still cooking normally for everyone else, but have necessarily been experimenting with this other way of cooking.  And here's the latest and greatest:

Butter.  Sort of.  It tastes like it, anyway.  And spreads beautifully.  It even cooks like butter.  I've creamed it with sugar and made a cake, made brownies, melted it on muffins, spread on toast, made honeybutter, and made dairy-free cream of broccoli soup with it.  Yum.

The idea was sparked by reading a label on a small tub of honey butter.  Turns out there was no butter in it at all, but tasted as though it did.  Reading through the list- hydrogenated soybean oil, honey, citric acid, soy lecithin, artificial colors and flavors- it occurred to me that if THEY could make something taste and spread like butter, then maybe I could, too.  So I started researching what the flavor components were in butter and what other foods contain them too.  It was fun to read about- ketones, diacetyl, acetoin, reactions between aldehyde and niacin.  (But, dang it, how come if I was setting a good example of work, study, and loving to learn, I had to remind my daughter every 20 minutes to get back to her schoolwork?!)

Anyway, I found some foods that naturally have some of the same flavor components as butter, and used one that covered the bases.  It's the ingredient that makes ALL the difference in flavor here.  Liquid aminos.  Or just use soy sauce, which is about the same thing.  If you prefer to avoid soy completely, nutritional yeast flakes will give a similar flavor.  Vinegar also works, in the same tiny amount.  The cornstarch, coconut flour, or xantham gum thicken the water so it will better stay mixed with the oils.

This is spreadable when used straight from the fridge.  It’s fantastic on toast, muffins, and waffles.   It has about the same fat-to-water ratio as dairy butter (80:20).  You can cook with it just like real butter, too.  It can be creamed with sugar for cakes and cookies.  Use it cold from the fridge to do this, and don’t beat it longer than about 45 seconds or it begins to melt a little.  This spread can be mixed with an equal amount of honey to make honey butter.

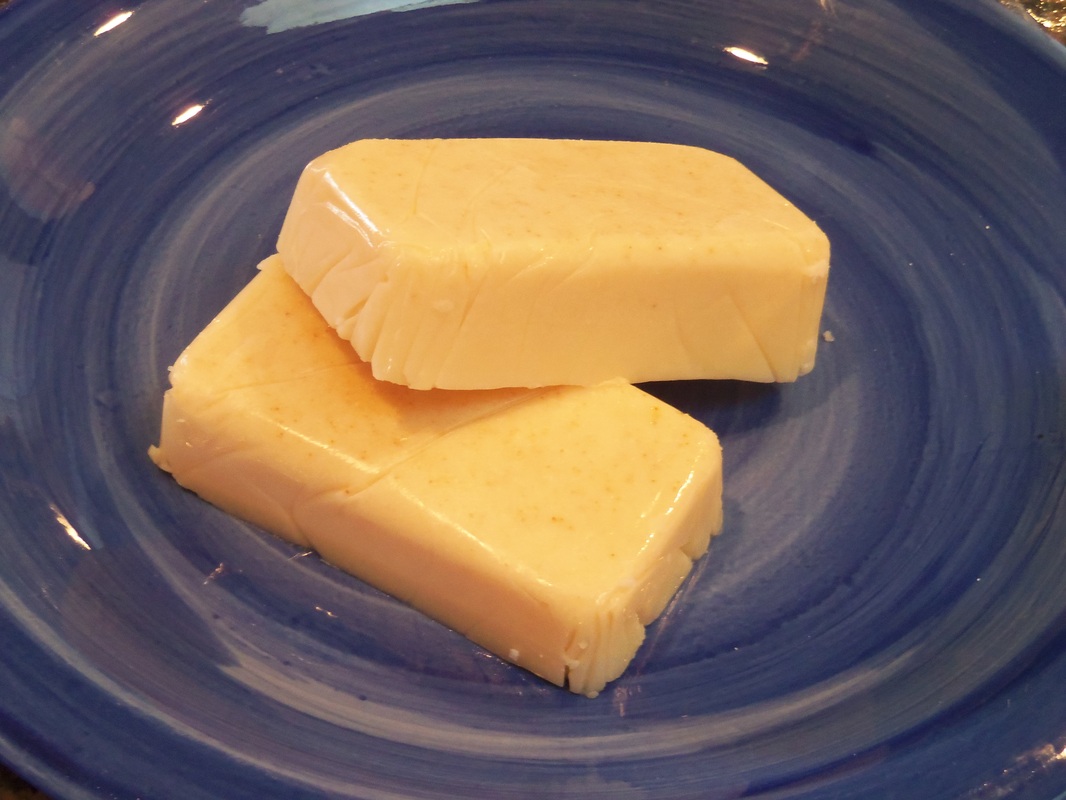
If you’d like a firmer consistency, like sticks of butter, increase coconut oil to ¾ cup and reduce liquid oil to ¼ cup.

Turmeric and paprika give it a nice color without  affecting the flavor.  Turmeric adds bright yellow so a little goes a long way, and paprika lends a warm pinkish orange.  Both will deepen after a day. Combine a pinch of each (just under 1/16 tsp) for the best color.  If you make this using olive oil, the buttery spread has a greenish hint to it which paprika helps eliminate.

Dairy-free Buttery Spread

2 Tbsp. water
1 tsp.  cornstarch OR coconut flour OR 1/4 tsp. xantham gum
1/8 tsp. liquid aminos or soy sauce or vinegar OR scant ½ tsp. nutritional yeast
½ tsp. salt
A pinch each turmeric and paprika, optional (for color)
½ c. coconut oil, softened just til creamy and stirrable
½ c. olive oil or other liquid oil like canola

In a glass 1-cup measuring cup, stir together water and coconut flour.  Microwave until it boils, stir until smooth.  (You’ll need 3 T water if boiling this in a pan on the stove.) Mix in the liquid aminos, salt, turmeric and paprika.  Set aside to cool. 

After it’s cooled to nearly room temperature, mix in the coconut oil, then whisk in olive oil until smooth.  Put mixture in the fridge to chill.  Stir after it starts to thicken, about 15-30 minutes. 

Store covered in the refrigerator.  Makes just over 1 cup. (9 ½ oz, or 3 T. more than 2 sticks of butter)

If you want a firmer consistency to form “sticks” of butter, after it’s just started thickening in the fridge and you’ve stirred it, pack it into whatever molds you have.  I use mini loaf pans, filling them on a scale so each stick weighs 4 ounces.  Put in the freezer to solidify. After they’re hard, pop them out of the molds and store in ziptop bags or wrapped in plastic.  Label and keep in the freezer for longer storage, or keep in the fridge for shorter-term use.

Picture
12 Comments

How to decorate pretty Valentine Cookies

2/6/2013

0 Comments

 
Picture
While standing in line at the supermarket one day before Christmas, I picked up a cooking magazine that had some gorgeous cookies on the cover.  As I studied the picture, the cashier noticed, laughed a little, and said, "they have nice pictures, but do YOUR cookies ever look like that?"

She was shocked when I answered, "Um, actually, yes."

You don't need to be a professional baker.  You don't even need fancy decorating equipment, though I really appreciate a good pastry bag and frosting tips.  (If you don't have these- you can buy a small set for under $10 at Walmart, ShopKo or hobby stores- a ziptop freezer bag with a corner snipped off will work.)   

The trick to making those beautiful, glossy cookies is to use two consistencies of frosting- one thin, one thick, and to give yourself enough time to let one layer dry a bit before adding the next.  The thin frosting becomes your canvas, the thicker one is used to make the details.  Make it easy on yourself by only mixing two or three colors.  Rather than using the liquid food color drops, try paste or gel food colors.  They are much easier to work with because a little goes a long way and they won't make your frosting runny. 
******
The thin frosting can be as simple as powdered sugar and water, or if you want the surface to be shiny when dry, make Royal Icing. A regular batch produces a thick icing; to get the thin frosting, mix in water a little at a time to get the right consistency. The recipe below is for the Royal Icing, which also dries very hard, making your cookies a little less likely to get damaged.  This is the same frosting I use on gingerbread houses.

Royal Icing  (thick frosting)
3 egg whites (use clean eggs with absolutely no cracks in them)
1 16-oz bag or box of powdered sugar (about 4 3/4 cups)
1/2 tsp. cream of tartar
1/8 tsp. salt
1 tsp. vanilla, lemon, or almond extract

Put everything in a large, absolutely grease-free mixing bowl.  Beat on high speed using an electric mixer until very stiff, about 7-10 minutes.  Use right away and keep the bowl covered at all times with a damp kitchen towel, to avoid drying it out.  Makes about 3 cups.  To color it, divide into smaller bowls and stir gel or paste food color into it.  For the cookies below, I divided into three bowls; one remained white, one was tinted pink, the last colored red.

Thin frosting
Put the amount of frosting you think you need, already colored, in a bowl.  Add water a little bit at a time, stirring until smooth.  The right consistency is when a little bit of frosting drizzled from a spoon takes from 5-10 seconds to disappear back into the rest.

Spread a thin layer of frosting on each cookie.  If adding sprinkles or edible glitter, add it while the frosting is wet so they'll stick.  Let the cookies sit until a crust starts to form over the frosting, then decorate using the thick frosting in a pastry bag.    

If you're new to frosting, tips, and pastry bags, Wilton has a great getting-started page
Picture
Picture
Start with white as the base, let dry. Next use pink with a basketweave tip like #47. Finish off with tip #3 grids and squiggle border.
Picture
Just like the previous one except simpler: white base, let dry, add tip #3 grids in pink, then a tip #3 red squiggle border.
Picture
Or how about that same white background, but using only red and tip #3?
Picture
White base, sprinkle with edible glitter, dry. Add tip #3 dots in white, then a red squiggle border also using tip #3.
0 Comments

Creamy Fruit Salad- CF

2/1/2013

0 Comments

 
Picture
One of my children is needing to avoid dairy for a while, but I found strawberries on sale and wanted a creamy salad using them.  Add some pudding?  Not an option.  Yogurt?  Nope. Whipped cream?   No, but... I had coconut cream.  The thick, creamy, good stuff you find at the top when you open a can of coconut milk.  So I used that.  It worked beautifully.  Everyone was happy.

It's super fast, too.  If you feel like making it fancier, you can whip chilled coconut cream (yes, it whips, just like dairy cream, but goes flat faster if it warms up).

Creamy (Dairy-free) Fruit Salad
1/2 pint fresh strawberries, hulled and sliced
2 bananas, peeled and sliced
1 apple, cored and chopped (I leave the peel on)
3 Tablespoons coconut cream
3 drops lime or orange essential oil, optional
2 Tablespoons shredded sweetened coconut

Combine fruit in a medium bowl.  In a small bowl, stir together the coconut cream and essential oil, until smooth.  Pour over fruit and stir gently to coat.  Sprinkle with coconut.
(If you like things sweet or if your strawberries are sour, add 1 Tbsp. honey to the coconut cream mixture
Serves 4-6


0 Comments

    Need a Search bar?
    One day I may upgrade my website-- but until then, use your web browser search bar. Type in my web address and what you're looking for, like this-- 
    www.theprovidenthomemaker.com  pumpkin --  and you should get results.


    Author

    I'm a disciple of Christ, a member of the Church of Jesus Christ of Latter-day Saints, a family-defending, homemaking, and homeschooling mom of eight children, two of whom sometimes can't have milk or wheat. Growing up on a farm in a high mountain valley, my parents taught me to 'make do', work hard, smile, and help others.  I love cooking, learning, growing food and flowers, picking tomatoes, and making gingerbread houses --which CAN be made allergy-friendly-- with my children.  I hope you find something to help you on my site!

    Archives

    April 2024
    July 2023
    April 2022
    September 2021
    March 2021
    December 2020
    April 2020
    March 2020
    February 2020
    January 2020
    December 2019
    November 2019
    October 2019
    September 2019
    August 2019
    July 2019
    June 2019
    May 2019
    April 2019
    January 2016
    November 2015
    October 2015
    September 2015
    March 2015
    February 2015
    November 2014
    October 2014
    September 2014
    August 2014
    July 2014
    June 2014
    May 2014
    April 2014
    March 2014
    February 2014
    January 2014
    December 2013
    November 2013
    October 2013
    September 2013
    August 2013
    July 2013
    June 2013
    May 2013
    April 2013
    March 2013
    February 2013
    January 2013
    December 2012
    November 2012
    October 2012
    September 2012
    August 2012
    July 2012
    June 2012
    May 2012
    April 2012
    March 2012
    February 2012
    January 2012
    December 2011
    November 2011
    October 2011
    September 2011
    August 2011
    July 2011
    June 2011
    May 2011
    April 2011
    March 2011
    February 2011
    January 2011
    December 2010
    November 2010
    October 2010
    September 2010

    Categories

    All
    Alcohol
    Alternate Cooking
    Appearances
    Apple
    Apricots
    April Fools
    Aprons
    Bananas
    Beans
    Beef
    Beets
    Bench
    Beverages
    Bonnet
    Bread
    Breakfast
    Budget
    Budgeting
    Cake
    Candy
    Canning
    Carrots
    Cheese
    Chicken
    Children
    Chocolate
    Christmas
    Cleaning
    Coconut
    Comfrey
    Common Core
    Constitution
    Cookbook
    Cookies
    Cooking Oil
    Crafts
    Dairy Substitutions
    Dehydrating
    Dessert
    Dried Fruit
    Earth Oven
    Earthquake
    Easter
    Edible Weeds
    Eggs
    Emergency Prep
    Essential Oils
    Faith
    Family Home Evening
    Fertilizing
    Food Storage
    Fourth Of July
    Freezer
    Frosting
    Fudge
    Garden
    Gardening
    Gingerbread
    Gluten
    Gluten Free
    Gold
    Government
    Grains
    Gratitude
    Hat
    Herbs
    Home Remedies
    Home Repairs
    Homeschool
    Home Storage
    Honey
    Hope
    Inflation
    Leftovers
    Legumes
    Lemon
    Main Dishes
    Mixes
    Mothers
    Noah
    Non Artificial Colors
    Non-artificial Colors
    Nuts
    Oats
    Oil
    Orange
    Paint
    Peaches
    Pear
    Pie
    Pizza
    Plums
    Poem
    Popcorn
    Pork
    Potatoes
    Powdered Milk
    Prayer
    Preparedness
    Projects
    Prophecy
    Pruning
    Pumpkin
    Quick Bread
    Rhubarb
    Rice
    Salad
    Salt
    Sauces
    Self Reliance
    Self-reliance
    Sewing
    Shelf Life
    Shelves
    Sky
    Smoothie
    Snacks
    Soup
    Spices Or Seasonings
    Squash
    Strawberries
    Substitutions
    Sugar
    Summer Fun
    Three Month Supply
    Time
    Tomatoes
    Trees
    Truffles
    T-shirts
    Tuna
    Ultra Gel
    Valentine\'s Day
    Vegetables
    Water
    Watermelon
    Wheat
    Work
    Year Supply
    Zucchini

    RSS Feed

Web Hosting by iPage