The Provident Homemaker
  • Recipes and Info
    • Making Bread
  • My Blog
  • Favorite Resources
  • Documents and Files
  • 52 Weeks of Building Storage

Indoor S'Mores

7/17/2014

0 Comments

 
Picture
The fastest, simplest S'mores ever!  My 6-year-old had a blast making these nearly by herself.  If you have a toaster oven, you can make just a few and hardly heat the kitchen up at all.  Even a big batch doesn't make your whole kitchen hot, or make you smell like campfire, or have the neighbors wondering what's on fire.  
If you use GF/CF chocolate chips and GF grahams, these are also a gluten-free, dairy-free treat.

For a big batch, you will need:

1 cup chocolate chips (milk chocolate or semisweet, you choose)
one 10-oz bag regular marshmallows
1/2 cup graham cracker crumbs (I used precrushed ones) OR 4-5 crackers, crushed
Also:
A cookie sheet, an oven with a broil setting, and a sheet of parchment if you want the easiest cleanup.

Put the oven rack in the highest position.  Dump the chocolate chips into a microwaveable bowl; I used a Corelle cereal bowl.  Microwave for one minute; stir.  If it's not quite melted, microwave 30 seconds more; stir. Repeat if needed, but once you get past 2 minutes it overheats and clumps.  (You can rescue it by stirring in 1-2 tsp. oil.)

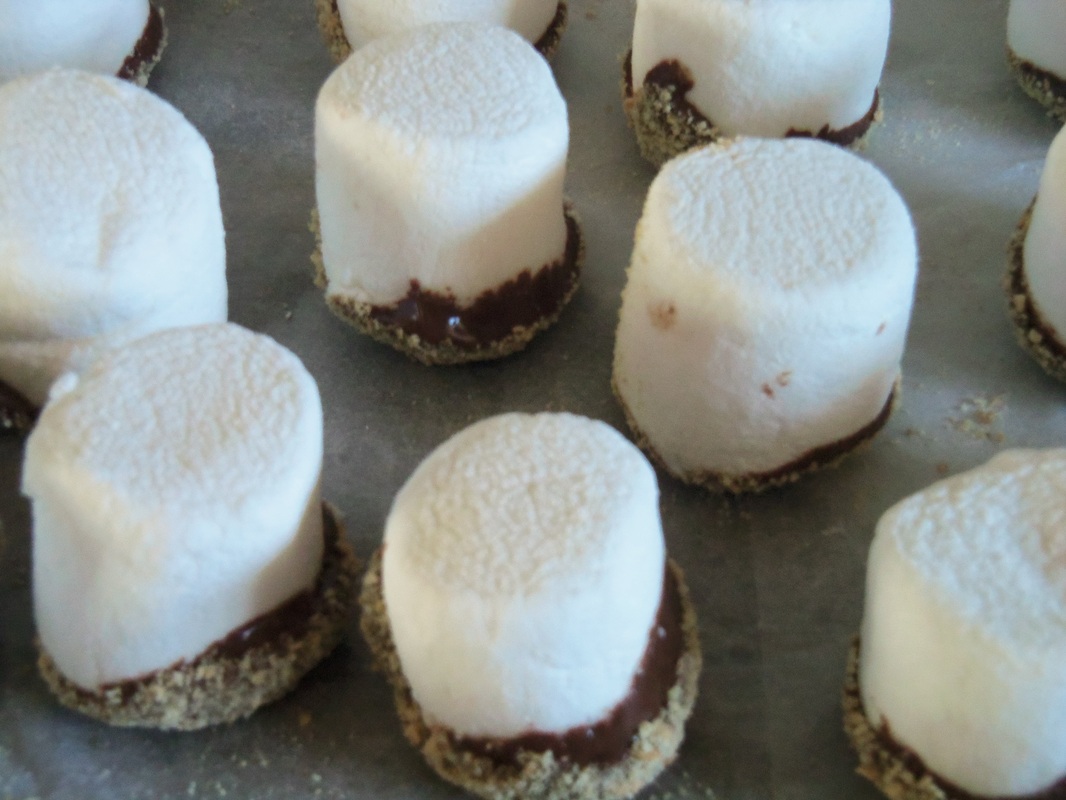
Dip the bottom half of a marshmallow into the chocolate, then dip into graham cracker crumbs.  Place on cookie sheet, at least 1/2" apart.

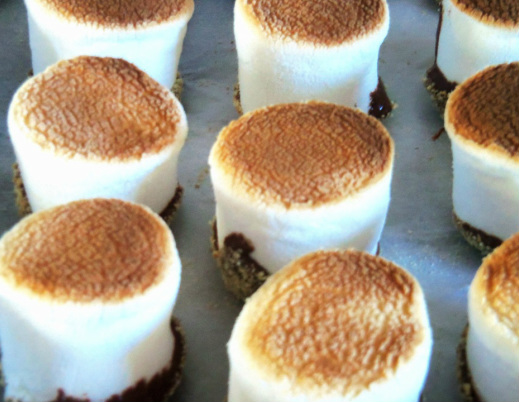
Turn the broiler on and put the marshmallows in.  If you have HI and LO options, here's what happened in my oven with them:

HI:  browned at 35-40 seconds.  Centers were still firm.
LO:  browned at 1 1/2- 2 minutes.  Nearly the whole marshmallow was now melted and gooey.  

Either way, watch these things closely!   Don't walk away for even a few seconds or they may be black when you get back.  Flaming marshmallows over a campfire in the dark may be entertaining, but they're not nearly as amusing in the house!
Picture
The marshmallows ready to be broiled.
0 Comments

Baggie Fudge 

3/22/2014

0 Comments

 
Picture
Bonus- this fudge can be made dairy-free and still have that creamy, melt-in-your mouth texture!

This week in Joyschool I taught the kids about the process of making chocolate.  I had a library book that had pictures of each step, from cacao tree to wrapped chocolate bars, and I brought hands-on things, as well.  They got to see, smell, and taste bits of roasted cocoa beans (didn't like them!- it's like eating unsweetened chocolate but crunchier.), see and smell cocoa powder, see, smell, and have cocoa butter rubbed into their skin, we melted and molded chocolates (cute little Easter shapes)... and then made this baggie fudge.  If you're making it yourself or have careful children, a single bag is fine, but for this group that includes a few 3-year-old boys, I double-bagged it. :)  This could be a fun Family Home Evening activity AND treat. 
Our batch was made using the coconut oil and coconut cream, since 3 of the kids can't have dairy.

I had brought walnuts in the shell to use in the fudge, but the kids had so much fun cracking the nuts first and eating the bits inside that they were all gone before the fudge was ready.  It's good fudge either way!

Baggie Fudge
1/2 c. coconut oil or butter, softened or melted
1/2 c.  cocoa powder
1/3 c. coconut cream, OR 1/4 c. water and  1/2 c. nonfat dry milk powder
a pinch of salt
1 tsp. vanilla 
1 lb. powdered sugar (about 4 cups unsifted)
1/2 c. chopped nuts (optional)

Put the ingredients in a gallon-sized ziptop bag.  Put this bag inside another bag if  it seems like a good idea.  Squish, knead, or pound the bag until everything is well mixed.  (Giving the kids 30 -second turns seemed to work the best- and gave them practice counting.)  

Once it's mixed, squish the mixture into a rectangular shape near the top, making the rectangle about an inch narrower on each side than the bag.  Put the bag on a cutting board or similar surface.  Cut down one side of the bag and across the bottom with scissors. Cut fudge into squares, or use small cookie cutters to make cute shapes.  Makes about 1 1/2 pounds.

If fudge is a little too soft, let it chill in the fridge or freezer for a few minutes to firm up.


0 Comments

Healthy Peanut Butter-Chocolate Banana Bars

3/23/2013

1 Comment

 
Picture
These have fiber, protein, and are much lower in sugar than almost any baked treat!  And they really are good.  My family snarfed down this batch. 

Besides all that, they're also wheat-free and dairy-free.

Healthy Peanut Butter-Chocolate-Banana Bars

1 1/2 cups cooked white beans (one can, drained and rinsed)
2 eggs
2 ripe medium bananas
1/2 c. peanut butter
1/4 c. brown sugar or honey (or 1/2 c sugar, if you like things on the sweeter side)
2 tsp. vanilla
1 tsp. baking powder
1/2 tsp. salt
1/2 cup quick-cooking oats
1/3 c. chocolate chips (the darker the better)

Preheat oven to 350 F.  Put the beans, eggs, bananas, peanut butter, brown sugar, and vanilla in a food processor or high-powered blender.  Run until very smooth.  Stir in the baking powder, salt and oats.  Spread in a greased 8x8 pan then sprinkle with chocolate chips.  Bake 30 minutes or til test done with a toothpick.  Cool at least 15 minutes before cutting.  These are even better the next day.

For a variation on this, substitute pumpkin puree for the banana, increase sugar/honey to 1/2 c., replace almond or cashew butter for the peanut butter, then add 1-2 tsp. pumpkin pie spice.
1 Comment

Edible Playdough

5/11/2012

0 Comments

 
Picture
I hate playdough.  It gets stuck in the carpet, smells funny, dries out, and gets thrown away.  My children, however, love playdough. 

Here's a way to let them have fun with playdough, have it over and GONE in one session, and not waste anything!  Whatever the kids roll out gets baked- as crackers!

Other things you can use as playdough: yeast dough, homemade Tootsie Rolls, Peanut Butter Balls (all recipes are also in my cookbook)

Edible Playdough

1/3 c. water
1/3 c. quick oats (or one envelope instant oatmeal and an extra 1 to 1 1/2 Tbsp. water)
1/2 c. flour
pinch of salt
1 tsp. baking powder, optional
2-6 drops food color, optional

Bring the water to a boil, add oats.  Let sit a couple minutes to plump and cool slightly.  If adding color, it's easiest to do right before adding the flour.  Stir in flour, salt, and baking powder (a pinch of sugar is always popular; omit if using sweetened instant oatmeal).  Stir until you've worked in at least half of the flour, then dump everything onto the counter and knead until smooth.  Mixing in the flour while dough is warm or hot helps it become more elastic.   (So does cooking the oats.)

If you have a toaster oven, it's the perfect size to bake in.  Oil or spray a cookie sheet, and bake at 400 degrees until the crackers are crisp.  This may be anywhere from 10-25 minutes, depending on how thick they are.  (Hint- the thinner, the better they'll be!)  Anything thicker than about 1/4 " will never be crisp, just hard.  Teething biscuits.  Entertaining to chew on.

The baking powder is not necessary, but it helps lighten the crunch of the baked product.  This is nice because those little fingers rarely roll out the dough evenly.
Picture
This color is from adding about 1 1/2 tsp. dried beet powder when cooking the oats.  After this, my daughter said she wanted purple- so I added 3 drops blue food color.


I make beet powder when my garden beets become too big and a little tough to eat normally.  To make the powder, slice the beets thinly, dehydrate until completely dry, then put them in a blender or food processor.  Grind to a powder.  Store in an airtight container, like a jar with a screw-on lid.  Best nutrition within one year.

Picture
Picture
The ideal thickness is about 1/8" thick, but...  it's for fun, with a bonus snack at the end!  My kids love that they're making actual food.

0 Comments

Easy Pico de Gallo (yummy salsa)

2/4/2012

0 Comments

 
Picture
I've seen mango salsa before, or peach salsa, but it had never occured to me to try adding fruit to regular salsa. 

Try it, you'll like it!

Pico de Gallo           

16 oz. jar salsa (mild, medium, hot, whatever you prefer)
1 large apple, diced
4 drops lime essential oil OR use the juice and zest of one fresh lime

Stir together, and use as any salsa.
Peach or mango can be used in place of the apple.  Other fruits could be good, too- strawberry, raspberry, pear, ...

The idea came from a recipe for
Tangy Lemon Coconut Salad.  The recipe was a tad too complicated for dinner that night, plus I had no fresh tomatoes.  I pulled out a jar of salsa, added the recipe ingredients that weren't already in the salsa, and put it with the salad.  It was amazing!
0 Comments

Brown-bag Popcorn

7/29/2011

2 Comments

 
Picture
When I walked over to a friend's house early this week, she had brown paper bags of popcorn on the counter.  "Look at this!" she exclaimed, and told me all about it.  Now I'm excited to share it with you!

You don't need the overpriced, often chemically-laden bags of microwave popcorn; only a brown paper bag (lunch-sized), plain popcorn kernels, and toppings of your choice.

Picture
Put 1/4 to 1/3 cup of popcorn in a bag, and fold it over once. The original instructions, on Allrecipes.com, said to staple it once.  While I was surprised to find the metal caused no problem, I also found it wasn't necessary.  So I just fold the top over.  The original also said to add oil to the popcorn before cooking.  It works just as well without, and the oil soaks mostly into the bag, not into the popcorn.

Stand it upright, then microwave on high power until there are about 2 seconds between pops. On my microwave, that's right at 2 minutes.  My neighbors' takes 2 1/2 minutes.  Plan on between 2-3 minutes. 

Do not walk away during this time! There are reports of bags catching fire- so don't let it cook too long!

Picture
The bag will fall over during the last bit of cooking.  That's fine.

Top off your popcorn with a drizzle of melted butter and some salt, close the bag, and shake to coat.  I prefer 1-2 teaspoons of butter for a bagful, but use whatever you like.  It's easier to shake if you used the 1/4 cup of kernels.

You could also use butter spray, or olive oil, or coconut oil, Parmesan, cinnamon/sugar, Seasoned Salt, Ranch dressing mix powder, or cheese powder and a bit of cayenene and mustard powder.  The sky's the limit.

Enjoy!
2 Comments

Apple Butterflies

6/3/2011

1 Comment

 
Picture
Simple, and lots of fun to eat!

Yes, they could be fancier, but they're still cute!  This way I'm willing to give each child a whole apple's worth of butterflies.  It takes almost no extra time to cut them this way. 
Picture
Cut an apple into quarters, then cut the seeds out using a shallow 'V' cut.  This gives a curve to the outside edges of your butterflies' wings.

Then cut each piece so you have eight more-or-less-equal wedges.

Picture
Cut carefully, starting at what was the center of the apple (the narrow side of the wedge).  Cut almost through, stopping about 1/8- 1/4 " from the last bit of edge.  

 I like to make the uncut part about 1/3 the way down the outside edge, it makes the butterflies look a little more realistic.

Picture
Open the two pieces, leaving that skin 'hinge' intact.

Picture
See how it's attached still?  If you accidentally cut all the way through, just set them back-to-back.  They just aren't quite as much fun to eat that way.

Picture
This is as fancy as I like to get when I'm trying to get lunch on the table quickly.  The antennae are strings off a stalk of rhubarb in the garden. 

You could get really fancy and creative here, if you have the time and inclination.  Strings of licorice would also work for antennae, but kinda defeats the purpose of the healthy snack.  (Besides, you know what happens once a package is opened...)
You could also decorate using raisins, other dried fruit (think colors here), mini chocolate chips, colored sprinkles, even paint on the wings with diluted food color, or a finger dipped in a natural color-- cocoa powder, blueberry juice, turmeric or curry powder, crushed safflower, dried powdered beet or tomato.

1 Comment

Banana Pops and Snacks e-cookbook

11/9/2010

1 Comment

 
(originally from 6/24/10)

First I need to make a clarification from last week- for those of you wondering what “wheat berries” are, that’s just the chef’s term for what we simply call WHEAT.   Uncooked, whole, wheat; what we buy in those 25- or 50-pound bags. 


Here’s a great link, and while I disagree slightly with what the author calls “healthy”, there are some good recipes in it.  Here it is:

Free e-book of healthy snacks http://www.favediets.com/Snacks/The-Ultimate-List-of-Healthy-Snacks-40-Healthy-Snack-Recipes-Free-eCookbook#

This is one of the recipes in it- something sweet, cold, and delicious for these hot days we’re now getting into….

 
Banana Pops

Slice bananas into disks.

Roll banana discs into PLAIN yogurt (you can use vanilla yogurt or other flavored yogurt; it's just sweeter)

Add any kind of topping you wish. We rolled our disks in chopped pecans. I know that's expensive, but we love pecans so much. After freezing these we ate them and you wouldn't believe the taste! It was like eating a frozen candy bar. Okay, maybe not that good, but they were sweet and refreshing, and I didn't have to put a limit on how many the kids could eat.

Other toppings that work well: chopped raisins, granola, any kind of nut (cashew, peanuts, almonds), peanut butter (this would be without the yogurt), and of course, melted chocolate or chocolate chips.

My son is not a fan of bananas, but he really liked this treat. You can even eat them plain. Oh, yeah, another topping we did was a cinnamon/sugar mixture. Believe it or not, it was good too!

I will warn you that it's messy because of the yogurt. And super messy if the kids help! But you don't have the guilt of giving them something unhealthy, and it's a cheap "popsicle."
1 Comment

Tomatoes in the garden; edible playdough, and PB Fingers

11/6/2010

0 Comments

 
Picture
from photos8.com

(originally 7/08/10)

Here in the Salt Lake Valley, we still have a couple months of the growing season left; it’s not too late to plant some things.  Beans, beets, carrots, and turnips are good ones to put in right now.  You can even grow cool-season crops like peas, lettuce, spinach, chard, and cabbage, if you wait a couple more weeks for temperatures to drop a bit.

Here are a few quick tips for growing tomatoes- 

*fertilize with 1 Tbsp. nitrogen (34-0-0) at four and eight weeks after transplanting.  For me, that’s right about now. Put the fertilizer on the ground, to the side of the plant.  Gardeners call this “side dressing”.

*Give them 1-2 inches of water per week, water deeply and infrequently.  To know how often to water, dig a 4” deep hole, feel the soil at the bottom.  If it feels cool and moist, you don’t need water yet.  Wait until the top four inches dry out, then water again.  Mulch around them to keep moisture in and to reduce weeds.  *It will take about 25-35 days for a flower to become a ripe tomato.  It seems to speed up ripening if you break off a few little branches.  This tells the plant it had better hurry up and produce seeds before something happens to it.


for more info on tomatoes, including what causes blossom end rot: http://extension.usu.edu/files/publications/factsheet/HG_2004-05.pdf

info on planting beans:

http://extension.usu.edu/files/publications/factsheet/pub__7948214.htm

and information on growing about any fruit, vegetable, or herb: 

https://extension.usu.edu/yardandgarden/htm/vegetables-fruits-herbs    

Here are a couple great quotes I ran across recently:

"Self-reliance is a product of our work and under-girds all other welfare practices. It is an essential element in our spiritual as well as our temporal well-being. Regarding this principle, President Marion G. Romney has said: “Let us work for what we need. Let us be self-reliant and independent. Salvation can be obtained on no other principle. Salvation is an individual matter, and we must work out our own salvation in temporal as well as in spiritual things.” - (In Welfare Services Meeting Report, 2 Oct. 1976, p. 13.), quoted in “In the Lord’s Own Way” Elder Russell M. Nelson, Ensign, May 1986

"There is more salvation and security in wheat than in all the political schemes of the world". - Orson Hyde, Journal of Discourses, 2:207  Or in whatever food you end up storing.

Now for the recipes:

The two below are almost the same thing:  the first is stiff because of the large amount of milk powder and powdered sugar, the second starts with the same ratio of PB and honey, but thickens it up with cereal/oats and just a little milk powder.  Just goes to show you can do your own variations if you like.  On those days that we’re out of bread and don’t know what to do for lunch, we’ll whip up a batch of these Peanut Butter Fingers (though we usually shape them in balls) and eat those.  It’s our peanut-butter-sandwich, fun-sized.  If you go by what the PB jar says is a serving (2 Tbsp.), the PB Fingers recipes only feeds 3 people. 


 Edible Playdough  - makes about 2 cups’ worth, 1 ¼ lbs.

1   cup   peanut butter   
1   cup   dry milk powder   
1   cup   powdered sugar   
1/2   cup   honey   

Mix peanut butter and honey together until smooth.  Stir in milk powder, then add powdered sugar.  Stir as much as you can, then dump out on counter and knead with your hands until it all sticks together.

 
           Peanut Butter Fingers  (small batch)

Yield: about 20  (2”) "fingers"

1/3   cup   peanut butter   
3   Tbsp.   honey   
1/2   cup   corn flakes   
1/2   cup   quick-cooking rolled oats   
1/4   cup   dry milk powder   
1/4   cup   raisins or dried fruit bits    
Sesame seed, if you like   

In a medium mixing bowl stir together the peanut butter and honey until smooth.  Put corn flakes in a plastic sandwich bag.  Close the open end.  With your fist, crush the corn flakes into small pieces.  Add corn flakes, oats, milk powder, and raisins to the peanut butter mixture in the bowl.  With your hands, mix well.  If mixture is too dry to hold together, mix in a few drops of water. 

       Using a well-rounded teaspoonful for each, shape into logs 2 inches long and 1/2 inch wide, or about the size of your finger.     Spread the sesame seed (if you're using it) in a pie plate.  Roll peanut butter fingers in the sesame seed.      Store in the refrigerator in an airtight container.  If they don’t disappear first.

 
0 Comments

What to do now in the garden; fruit leather

11/5/2010

0 Comments

 
Picture
from photos8.com

(Originally 7/15/10)

JULY in the garden:
• Plant beets and turnips for fall harvest.
• Thin out plants and fertilize.
• Fertilize potatoes with nitrogen.
• Watch watering on tomatoes! Even deep watering is better than frequent shallow watering to avoid blossom end rot.
• Irrigate at ground level rather than over head spray to avoid diseases.
• Keep looking for any signs of pests. Use insecticides only as necessary.
• Stake tomatoes if you haven’t already.
• Remove suckers and pinch back tomatoes as necessary.

This was from Glover Nursery’s website; see it for a month-by-month checklist. 

Remember that you can also plant shorter-season crops; the seed envelope will tell you how many days until harvest for that variety.  The official information for our area (data from Riverton) is that the earliest-ever fall freeze was Sept. 13, average date is Sept. 24, and latest was Oct. 4.  So worst-case scenario is 58 frost-free days remaining, best-case is 80 days, plus whatever length you can extend your growing season by covering your garden with a sheet or blanket for those first frosts.  

 
Now, for that fruit that some of you have coming out your ears-  our favorite way to eat it is ‘Fruit Leather’. 

Here are two samples of how much to use:

Apricot leather:
1 c. apricot puree (1 ½ c. pitted apricots)
1 Tbsp. lemon juice
Around 3 Tbsp.* sugar or honey

*2023 update- over the last several years I've reduced the sugar and lemon in this.  1 Tbsp. sugar/honey for every 1 Tbsp. lemon juice is plenty. I've even dropped it to 1 Tbsp. each per quart of puree, and it tastes delicious. It does sometimes brown more though.


Cherry leather:
1 c. cherry puree (1 ½ c. pitted cherries- or use the food mill for this one)
1 Tbsp. lemon juice

Dry until there are no more sticky spots, roll up and store in an airtight jar.  We’re still eating leather made two summers ago, it’s holding up fine.

 The best leather is made with overripe fruit, too, which is helpful!  Basically, you puree or mash fruit, or send it through a food mill, sweeten it to taste, then dry it.  You can sweeten it with concentrated fruit juice, or with sugar, or honey.  We like it best with sugar because that way the fruit leather crystallizes over time, rather than getting tougher.  You can also add a little lemon juice to keep the leather from turning brown as much.

Whatever you’re going to dry it on/in needs sprayed with Pam or oiled first.  Trust me, you don’t want to forget that step.   Leather is no fun to chip off of trays!  Pour about a ¼” layer, and put it someplace to dry.  It’ll be done in about 24 hours in a dehydrator.  You can also dry it on cookie sheets in your oven (lowest setting, door slightly ajar for air circulation), or in a car parked outside on a hot day. 

A good article on drying is at http://www.backwoodshome.com/articles/shaffer58.html


0 Comments

Gladness and Cheer, Just-Fruit-and-Nut Bars

10/27/2010

0 Comments

 
Picture
Picture
Picture
(Originally 9/2/10)

I love this time of year!  The temperatures have dropped enough that the roses are reblooming, the grass is having an easier time, and the mornings and  late evenings have the smell of earth and coolness.  The garden is in full swing, tomatoes are fragrant and sweet,  most of the lumps that come out of my garden are potatoes instead of rocks, and I get to be creative using squash again.  What a fulfilling time, enjoying the fruits of our labors (or others’ labors, if you prefer the farmers’ market or grocery store).  It brings to mind   D&C 59:18-19 “Yea, all things which come of the earth, in the season thereof, are made for the benefit and the use of man, both to please the eye and to gladden the heart;

   Yea, for food and for raiment, for taste and for smell, to strengthen the body and to enliven the soul.”

I’m grateful for the beauties of the earth that the Lord has given us, for the wonderful things he’s put here for us to wisely enjoy.  The recipe at the end of the email uses nothing but some of these things that grow for us. Enjoy!


Here is a bit from Elder Maxwell, from a talk he called “Be Of Good Cheer”- both sobering and encouraging. 


“We are living in a time in which we shall see things both wonderful and awful. There is no way that we can be a part of the last days and have it otherwise. Even so, we are instructed by our Lord and Exemplar, Jesus Christ, to “be of good cheer.” (D&C 61:36; D&C 78:18.)

Jesus has given that same instruction to others before, when the stressful circumstances in which they found themselves were anything but cheerful.

“In the world ye shall have tribulation: but be of good cheer; I have overcome the world.” (John 16:33; italics added.)

What precious perspective we obtain from the gospel of Jesus Christ concerning things that really matter—against which we measure the disappointments of the day!

Jesus calls upon us to have a deliberate trust in God’s unfolding purposes, not only for all humankind but for us individually. And we are to be of good cheer in the unfolding process. The Lord has made no secret of the fact that He intends to try the faith and the patience of His Saints. (See Mosiah 23:21.) We mortals are so quick to forget the Lord: “And thus we see that except the Lord doth chasten his people with many afflictions … they will not remember him.” (Hel. 12:3.)

Given the aforementioned grand and overarching reasons to rejoice, can we not “be of good cheer” in spite of stress and circumstance?

President Brigham Young said of a geographical destination, “This is the place.” Of God’s plan of salvation, with its developmental destination, it can be said, “This is the process”!   

(from “Be of Good Cheer” by Neal A. Maxwell,  Oct. 1982 Conference) http://lds.org/ldsorg/v/index.jsp?hideNav=1&locale=0&sourceId=1ca9c5e8b4b6b010VgnVCM1000004d82620a____&vgnextoid=2354fccf2b7db010VgnVCM1000004d82620aRCRD
If you can make the time, please read the whole thing, it’s wonderful!


Now for the recipe: these fruit/nut bars are basically the same as the old-old recipe for ‘fruit balls’ or ‘dried fruit candy’, if you’ve run across those before.  The dates are there both for sweetness and stickiness to hold the whole thing together.  

Just-Fruit-and-Nut Bars (the original 'energy bar') and naturally gluten-free!

1/3 cup chopped pecans - toasting the nuts will increase the flavor
1/3 cup chopped dates
1/3 cup chopped dried apples 

 Put the pecans in a food processor (or blender?) and chop until finely ground.  Remove and do the same with dates and apples.  Add the nuts back in, add a pinch of cinnamon, and process until it holds together.  Divide into 6 pieces, mold each one into a bar, and wrap tightly in plastic wrap, waxed paper, or parchment.  81 calories each, if you care.   (I’m thinking these things ought to be double-sized- plus I’ll make my batch with 1 cup of each ingredient.)

If you can’t have nuts: the nuts are there to give body and fat for shaping, digestibility and energy, so try a combination of chopped-up rolled oats and coconut oil (or butter)

Variations:

Apricot-Almond: use equal amounts dried apricots, dates, and almonds

Cherry Tart:  equal parts dried cherries, dates, and walnuts or almonds

Peanut Cookie: use peanuts and only dates (2/3 cup).  Add a pinch of salt and a bit of vanilla.

Cashew Cookie: same as Peanut Cookie, except use cashews.

How about using dates, dried pineapple, macadamias, then rolling in coconut?

Or use any nut and dried fruit you have, or whatever else sounds good…..

 
0 Comments

Cooking and storing pumpkins, root cellaring

10/16/2010

0 Comments

 
Picture
You can even store summer squash alongside your pumpkins, if the summer squash is very mature, with a hard rind.

Picture
A bowl of thick, tasty Pumpkin Chili.  Don't tell your kids, and they'll never know....
Want to know what nutrients you're getting with that pumpkin?  A whole cup of it has only 49 calories, but is loaded with fiber, Vitamin C, riboflavin, potassium, and lots and lots of Vitamin A.  For the numbers, see nutrition for cooked pumpkin puree.
For the facts on its seeds, which are a great source of protein, Omega-6's, magnesium, potassium, zinc, copper, and manganese, see nutrition for pumpkin seeds.

Hi everyone,

This week we had a pumpkin class at my house.  It was fun, and I think everyone learned at least one new thing.  I have two different ‘handouts’; one is the Pumpkin class handout, two pages from the class; the other is a big collection of recipes I started in college, The Great Pumpkin Cookbook  (If it won't load, get it in two parts, here: The Great Pumpkin Cookbook part 1 and The Great Pumpkin Cookbook part 2).  I had asked a roommate if I could have her jack-o-lantern after Halloween.  When I told her I was going to make pie out of it, she incredulously responded with, “You can do that?  How?”  So I started by typing up instructions, and one thing lead to another…    

The Great Pumpkin Cookbook includes information on cooking pumpkin, canning, dehydrating, freezing, and ‘root cellar’ing it, plus things like Pumpkin Cheesecake, Pumpkin Shake, and Pumpkin Pancakes.  

If you want to learn more about storing vegetables through the winter, with or without a ‘real’ root cellar, click on Storing Vegetables At Home, which is a chart and information from the Wisconsin Extension Office.  
 

Here’s something to chew on, from the LDS Family Home Storage pamphlet; italics are mine:

Dear Brothers and Sisters:

Our Heavenly Father created this beautiful earth, with all its abundance,
for our benefit and use. His purpose is to provide for our needs
as we walk in faith and obedience. He has lovingly commanded us to
“prepare every needful thing” (see D&C 109:8) so that, should adversity
come, we may care for ourselves and our neighbors and support bishops
as they care for others.
We encourage Church members worldwide to prepare for adversity
in life by having a basic supply of food and water and some money in savings.  

 
And another, related, quote:

“Can we see how critical self-reliance becomes when looked upon as the prerequisite to service, when we also know service is what godhood is all about? Without self-reliance one cannot exercise these innate desires to serve. How can we give if there is nothing there? Food for the hungry cannot come from empty shelves. Money to assist the needy cannot come from an empty purse. Support and understanding cannot come from the emotionally starved. Teaching cannot come from the unlearned. And most important of all, spiritual guidance cannot come from the spiritually weak.  President Heber J. Grant declared, “Nothing destroys the individuality of a man, a woman, or a child as much as the failure to be self-reliant.”  -The Celestial Nature of Self-Reliance, Marion G. Romney

 
I challenge you to expand your home storage efforts, to find some part of it to learn more about, to try for the first time (or try better for the second-- or tenth-- time), to do something that will help you become a little bit more self-reliant. The Lord doesn’t ask us to do everything, all at once, but he does ask us to be diligent.  (See Mosiah 4: 27)  I know our capacity and freedom will increase as we do this.

-Rhonda

Here's some great information I found at http://www.americanpreppersnetwork.net/viewtopic.php?f=122&t=2166
"Only fresh and sound produce should be root-cellared. The food should be free from cuts, cracks, bruises, insects and mechanical damage. When I prepare produce for winter storage, I inspect it carefully. Items with any damage are either eaten quickly or canned or frozen. Apples and pears can be made into sauce, squash roasted and frozen, and beets pickled.

Quantities for a family of four:

Apples: 5 bushels
Carrots: 40 to 60 pounds
Cabbage: green, 20 heads; red, 10 heads
Beets: 20 pounds
Celeriac: (celery root, use instead of celery) 10 to 20 heads
Leeks: 40 plants
Potatoes: 100 pounds or more
Jerusalem artichoke: 10 pounds
Onions: 40 pounds
Garlic: 10 to 20 pounds
Winter radish: 10
Parsnip: 20 pounds
Squash: 40 ‘Delicata’ and 30 pounds butternut
Pumpkin: 5 to 10
Turnip and rutabaga: 10 or more"
0 Comments

    Need a Search bar?
    One day I may upgrade my website-- but until then, use your web browser search bar. Type in my web address and what you're looking for, like this-- 
    www.theprovidenthomemaker.com  pumpkin --  and you should get results.


    Author

    I'm a disciple of Christ, a member of the Church of Jesus Christ of Latter-day Saints, a family-defending, homemaking, and homeschooling mom of eight children, two of whom sometimes can't have milk or wheat. Growing up on a farm in a high mountain valley, my parents taught me to 'make do', work hard, smile, and help others.  I love cooking, learning, growing food and flowers, picking tomatoes, and making gingerbread houses --which CAN be made allergy-friendly-- with my children.  I hope you find something to help you on my site!

    Archives

    April 2024
    July 2023
    April 2022
    September 2021
    March 2021
    December 2020
    April 2020
    March 2020
    February 2020
    January 2020
    December 2019
    November 2019
    October 2019
    September 2019
    August 2019
    July 2019
    June 2019
    May 2019
    April 2019
    January 2016
    November 2015
    October 2015
    September 2015
    March 2015
    February 2015
    November 2014
    October 2014
    September 2014
    August 2014
    July 2014
    June 2014
    May 2014
    April 2014
    March 2014
    February 2014
    January 2014
    December 2013
    November 2013
    October 2013
    September 2013
    August 2013
    July 2013
    June 2013
    May 2013
    April 2013
    March 2013
    February 2013
    January 2013
    December 2012
    November 2012
    October 2012
    September 2012
    August 2012
    July 2012
    June 2012
    May 2012
    April 2012
    March 2012
    February 2012
    January 2012
    December 2011
    November 2011
    October 2011
    September 2011
    August 2011
    July 2011
    June 2011
    May 2011
    April 2011
    March 2011
    February 2011
    January 2011
    December 2010
    November 2010
    October 2010
    September 2010

    Categories

    All
    Alcohol
    Alternate Cooking
    Appearances
    Apple
    Apricots
    April Fools
    Aprons
    Bananas
    Beans
    Beef
    Beets
    Bench
    Beverages
    Bonnet
    Bread
    Breakfast
    Budget
    Budgeting
    Cake
    Candy
    Canning
    Carrots
    Cheese
    Chicken
    Children
    Chocolate
    Christmas
    Cleaning
    Coconut
    Comfrey
    Common Core
    Constitution
    Cookbook
    Cookies
    Cooking Oil
    Crafts
    Dairy Substitutions
    Dehydrating
    Dessert
    Dried Fruit
    Earth Oven
    Earthquake
    Easter
    Edible Weeds
    Eggs
    Emergency Prep
    Essential Oils
    Faith
    Family Home Evening
    Fertilizing
    Food Storage
    Fourth Of July
    Freezer
    Frosting
    Fudge
    Garden
    Gardening
    Gingerbread
    Gluten
    Gluten Free
    Gold
    Government
    Grains
    Gratitude
    Hat
    Herbs
    Home Remedies
    Home Repairs
    Homeschool
    Home Storage
    Honey
    Hope
    Inflation
    Leftovers
    Legumes
    Lemon
    Main Dishes
    Mixes
    Mothers
    Noah
    Non Artificial Colors
    Non-artificial Colors
    Nuts
    Oats
    Oil
    Orange
    Paint
    Peaches
    Pear
    Pie
    Pizza
    Plums
    Poem
    Popcorn
    Pork
    Potatoes
    Powdered Milk
    Prayer
    Preparedness
    Projects
    Prophecy
    Pruning
    Pumpkin
    Quick Bread
    Rhubarb
    Rice
    Salad
    Salt
    Sauces
    Self Reliance
    Self-reliance
    Sewing
    Shelf Life
    Shelves
    Sky
    Smoothie
    Snacks
    Soup
    Spices Or Seasonings
    Squash
    Strawberries
    Substitutions
    Sugar
    Summer Fun
    Three Month Supply
    Time
    Tomatoes
    Trees
    Truffles
    T-shirts
    Tuna
    Ultra Gel
    Valentine\'s Day
    Vegetables
    Water
    Watermelon
    Wheat
    Work
    Year Supply
    Zucchini

    RSS Feed

Web Hosting by iPage