The Provident Homemaker
  • Recipes and Info
    • Making Bread
  • My Blog
  • Favorite Resources
  • Documents and Files
  • 52 Weeks of Building Storage

Elsa Cape

10/24/2014

0 Comments

 
Picture
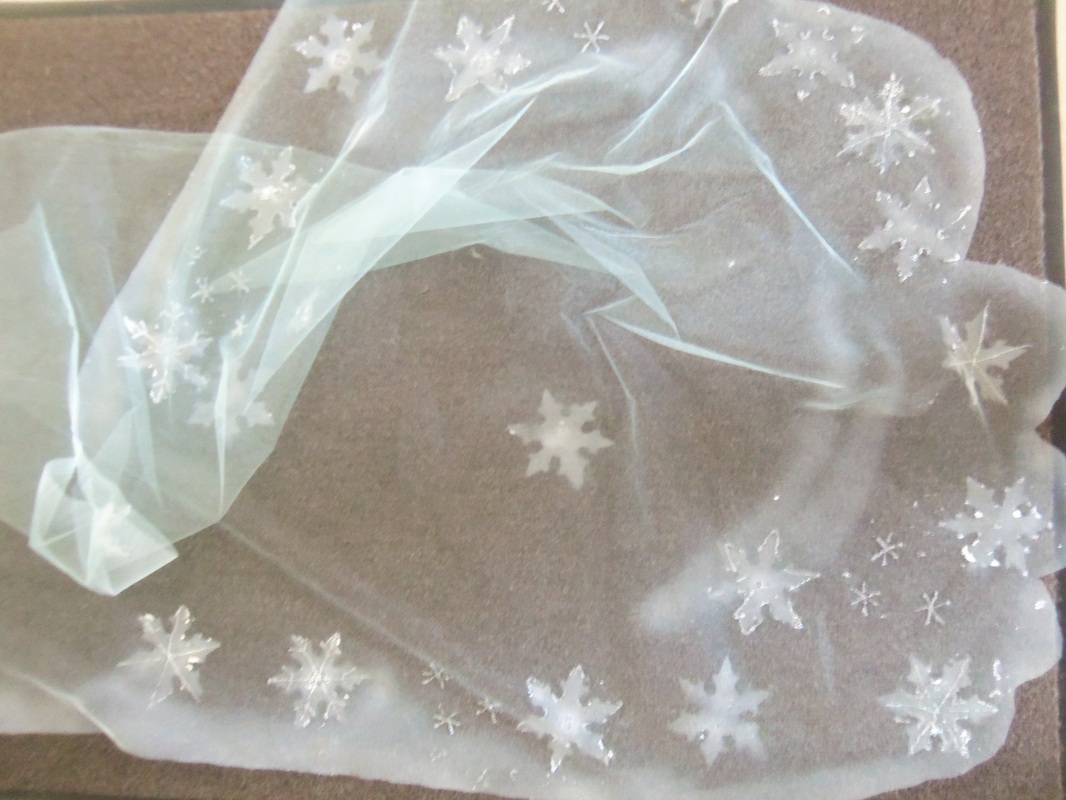
Here's a simple way to make a frosty cape for an Elsa costume.  My daughter and I are delighted with how it turned out:  so dainty and elegant!  You'll need one full-size sheet of paper, a can of white spray paint, and fabric.  For my 6-year-old's costume, I bought 1 1/3 yards of 60" wide nylon tulle, pale turquoise color.  Sheer nylon tricot or sheer chiffon would also work, and be less prone to ripping.  (No, ours has not ripped yet.)

Lay out the fabric and fold in half lengthwise, so it's 60" long and half the width you bought.  Cut 4-6" wide scallops along one narrow end.  

Fold the paper and cut out a simple six-pointed star.  Mine was about 4" across.  I reinforced the paper (now my stencil) and helped it lie flat by running 2" wide packing tape in a square around the snowflake.

  Spread the fabric on top of something clean that you don't care if paint gets on.  Darker colors under will make it easier to see the white paint.  In my case, I spread this on the lawn; we have a frosty decoration on it until next mowing!

Spray into your stencil, focusing on the center first, then spraying the points.  Continue until you have all you want, occasionally stopping to wipe excess paint off the stencil (the grass was good for this, too). 

Once the snowflakes are sprayed, 'frost' the edges and scallops of the cape by spraying along the edges.  

With some silver glitter glue or silver sparkle paint, draw on the snowflakes. Add some smaller ones made with only the silver.    Let dry completely.
0 Comments

Homemade Anna and Elsa dolls

5/3/2014

0 Comments

 
Picture
My 11-year-old daughter had decided she really, really wanted some Frozen dolls.  However, having used all her spending money previously on a couple plush My Little Pony toys, the ones we found were way out of her price range.

She flipped through a girls' sewing book, spent a couple days thinking about how to possibly make the dolls instead, and came up with this plan:  find a picture, use it for a pattern, sew two identical pieces together, color, stuff, and stitch closed.

We used plain white knit fabric from my fabric stash so the doll would be softer and a little more forgiving, stuffed it with plain old fiberfill For the Anna doll, we used this coloring page 
Elsa:  in her coronation dress, or with one hand out.  (The one hand out was pretty tricky to turn right-side out, but it worked.)

You'll need a picture, 1/3 yd of fabric (for 11" high dolls, but you'll have enough width for 4 dolls!), needle and thread, sewing machine (optional), a handful or two of fiberfill, and some non-water-soluble markers  (we used a combination of Sharpies and fabric markers).

1- Resize the picture to make the size doll you'd like. 
2- Add 3/8" all the way around the picture*, for a seam allowance, and cut this paper pattern.
3- Pin onto a double layer of fabric, and cut this out.
4- Unpin the pattern from the fabric, take ONE of the fabric pieces, put the pattern piece behind it, hold it up on a window, and, using a Sharpie or fabric marker, trace all the lines you'll need to color later.  Draw in the facial features, neck, dress design, etc. Invent what the back should look like, for the second fabric piece. :)
5- Put the right sides (drawn-on sides) together, and sew 3/8" from the edge, almost all the way around.  Be sure to backstitch when you start and stop!  Leave 2" open.
6- Turn the fabric right-side out, stuff with a handful of fiberfill.
7- Turn the raw edges of the opening inward, and stitch closed, knotting well at both ends.  
8- Color your doll with the markers, front, back, and sides.

*On the coloring pages, the necks are too narrow to pull the rest of the body through when turning the fabric right-side-out after sewing, so shoot for a finished measurement of 1" wide, and just draw the neck the width it should be.

She had a lot of fun marking these- so much that she also made Kristof and Olaf the same way.  

The only question she has left is how much of the ink will survive their first trip through the washer and dryer!

Picture
Picture
0 Comments

Dish Towel Apron

7/3/2012

1 Comment

 
Picture
The apron is made with two 15x25" flat-weave dish towels from a local discount store.  The apron below is from two dish towels from the dollar store.  The orange ones were in the Halloween decoration section, the red and blue in a Fourth of July decorations section.  It would have been cute to add a star-shaped pocket on the red and blue one, but that would require a third dish towel, since I wanted a flounce at the bottom of the apron.  

The whole thing takes under an hour to make if you're used to sewing.  How much less, I don't know because of my Mommy Sewing Method... you know the drill!   -Cut, iron, start stitching, pull out lunch for everybody, sit and eat with everyone, sit and sew, stop to get the Table-Clearer child back to do his job, iron, sew a little more, stop to get the youngest child down for a nap, sit and sew some more...

You could use the terrycloth dish towels for an extra-absorbent apron.  There are some cute dish towels sometimes!
Picture
1 Comment

Turtleneck SKIRT

4/28/2012

3 Comments

 
Picture
No, it doesn't have a turtleneck...

it used to BE one!

In the spirit of repurposing t-shirts, here's another option.

By the time you hit late March, most clothing stores are pretty desperate to clear out their winter clothing.  This shirt was marked down to 99 cents!  Turtlenecks often have the steepest discount- who wants to wear them when it's sunny and warm?

Hey, I'll wear one if it's now a skirt!  I decided that skirts were going to be my go-to clothing item this summer.  I love wearing them, and jeans aren't the most comfortable thing on a hot day anyway.  Plus I get a little bit of a tan.  Below the knee, anyway...

3 Comments

Making knit pants out of a t-shirt

3/8/2012

2 Comments

 
Picture
My first-grade son needs a sea turtle costume...  and my daughter needs to be a (green?) mermaid the day before that.

We parents were told that the turtles need a long-sleeved green shirt, and either green leggings or green tights. 

Green tights seemed impractical - would I use them again?  He wouldn't!  And green leggings... well, same problem.  Besides, I didn't find either of them at the store.  I got thinking that maybe I'd just buy some green fabric and make them-

and then I stumbled across some way-too-big t-shirts on clearance, $2 apiece.  I looked at their long cuffed sleeves, and it hit me- they're the right size for small-boy-legs!  So, here's what I did.   I'll probably add a sparkly green posterboard tail to make it a mermaid.
If the elastic instructions are confusing, you can just make a regular casing and thread elastic through it.  Cut the elastic 1/2" longer for the casing method.  When you apply elastic the way I did in the slide show, the elastic is permanently stretched a little bit, requiring a tiny bit less length.
2 Comments

Make a skirt or dress from a T-shirt

2/1/2012

0 Comments

 
Here's a new, quick project: turn a T-shirt into a straight skirt; no sewing needed!  It's called the "30-second skirt".  I doubt anyone's first attempt will take that little time, but five minutes sounds like plenty!  Click on the photo to go to the instructions.  (remember, where it says "stitch" on the sleeves, you can ignore that, or use glue!)

Picture
Picture
Here's a way to use a T-shirt to make a toddler dress- made from one adult t-shirt, no extra fabric required. 
http://www.instructables.com/id/Make-a-toddler-dress-from-a-t-shirt/


Picture
Notes for photos below- click on any photo to go to the instructions page:

Top left :  This one starts with a "proper-sized" shirt, you cut it off however high or low you want the waistline, and sew fabric onto the bottom.  You don't need to limit yourself to plain-color shirts, either.

It's pretty much the same as the pattern for the pencil-drawing picture, to the left, but this one uses a pre-ruffled knit fabric.  I spotted some of this at Hobby Lobby earlier this month, it's likely at most fabric stores.  Or check at RuffleFabric.com (pricy but lots of options).

Top middle
: Or leave the t-shirt long and add layers of ruffles yourself. 

Top right : This is the kind of T-shirt dress I remember my mom making for my little sisters: you cut a piece of fabric about twice as wide as the bottom of the shirt, hem it along the bottom, gather it at the top, and sew it to the bottom of the shirt.   If you're nervous about gathering or just want another option, you could cut a circle skirt.

Bottom : make it a patchwork skirt, with a big bow in back.
Picture
After seeing the ruffled-skirt dress above, I decided that was just the thing for my daughter needing a Sunday dress.  I never did find a t-shirt I liked for the project, though.  Instead, I just made a dress bodice, and then gathered a full width (selvage to selvage) of the ruffle fabric for the skirt.  It only required 19" of length for this size 4 dress.

Picture
I added a sewn-to-the-front sash, as well.

0 Comments

Tablecloth Apron

11/25/2011

0 Comments

 
Picture
Maria VonTrapp had a great idea when she made those playclothes....

This apron is made from a damask tablecloth and an embroidered fabric placemat.  

Since the tablecloth is designed to be spilled on, this should be a pretty stain-resistant apron!

Why wear aprons?  You mean besides the fact that I always splash or spill when cooking?  And that I feel more feminine and domestic when wearing a pretty one?   Read through my favorite-ever story about aprons: Apron Evangelism, from Hillbilly Housewife.

Picture
Another "tablecloth apron"; since the tablecloth was labeled "harvest", it was on clearance for $2.  The contrast trim and pocket are cut from a fabric napkin, also on clearance ($ .50). 

Other cheap sources of fabric can include new or used tablecloths you already have or from thrift stores (cut around any stains), sheets, curtain panels.  I've used all of these to make dresses before, too.   Make sure the drape of the fabric is what you want on your finished product.  A crisp sateen sheet will give a much different look than a silky damask tablecloth or satin sheet.

Picture
This one is a rough copy of a mid-1900's vintage apron.  I was able to make 3 of these from one 60" round tablecloth ($5).

Picture
After cutting out the main apron body, cut pieces of the placemat to fit where you want them.  Cut them out a little bigger than you need, to allow for seams. 

Picture
Iron under any edges that need to be hidden, pin in place, then stitch. 

Picture
This placemat was two layers thick, and so was difficult to turn under for a clean edge.  I found some 1/8" white ribbon, set that over the edge to hide the little frayed bits, then used a zigzag satin stitch the same width as the ribbon. 


The red tablecloth was 60x120"; I can get 4-5 of these flounced aprons from it, or twice as many if they're straight and simple.  And the placemat will be enough for trim and a pocket on two aprons. The green tablecloth was 60x72; it will only make two; the flounce is cut in a circle and takes up a lot of fabric.

For 50 free apron patterns, see here; it's also listed on my Favorite Resources page, 2/3 the way down, under "sewing".

Just think of the possibilities!
0 Comments

Nifty Apron Bonnet

6/17/2011

2 Comments

 
Picture
Picture
An interfaced brim holds its shape, see here for the whole photo, which is not mine.


Picture
If there's no interfacing, crinoline, or something similar, the brim flops, like this.  Click here to see this one as an apron; it's very cute!

Showtime’s  almost here- our LDS stake will have the youth participate in a pioneer trek reenactment next week.  I went to a local store that sells pioneer costumes, “just to see”.  One apron, one skirt, and one bonnet  totaled $60.    If don’t want to pay an arm and a leg, and you’re looking to make a simple bonnet, have I got a pattern for you!  I stumbled across it while looking for an easily-collapsible hat to put in my 72-hour kits. 

Introducing... th
e handy-dandy, old-fashioned
Apron Bonnet Pattern  

I made one for myself, but my 8-year-old daughter begged for it.  It easily adjusts to fit either one of us, as well as adjusting to give you lots of shade, or just a little.  One other thing I love about it is that you can use it as a waist apron later, so it doesn’t just sit in the costume box somewhere.  Or wear it as a bonnet when you’re out in the garden.   The pockets are big, too; I’ve heard the suggestion that they would be great for holding clothespins in, if you hang laundry on a clothesline.  This pattern has you stitch down the middle, to make two pockets, but you could leave it as one big pocket.

You need only ½ yard of fabric, two buttons, and some crinoline or stiff interfacing.  The crinoline is optional, but I love how the brim keeps its shape when you use it.   See the photos, above.   I found crinoline for about $7 per yard at both local fabric stores.  One yard is enough to line four bonnet brims.  If you can’t find crinoline, you can line it with a layer or two of interfacing, or some stiff fabric, or cut a couple pieces of cardstock (or plastic) to fit. 

A couple words of advice about the pattern-  the ruffle above the waistband  becomes the neck shade.  Keep that in mind when deciding how tall to make that ruffle.  The bottom curve becomes the bonnet brim.  I put gathered lace along the sides and bottom of the pocket, but not along the top of the pocket.  Just my preference.  Use any trim you like-- ribbon, ric-rac, flat lace, gathered lace, crochet trim, soutache-- or none at all.  Also, the pattern pieces’ edges do not match up as intended.  Ignore “Diagram 2” and cut another of “Diagram 1” for the pocket, except make it only 9” tall, measuring from the bottom.  If you want to see other people’s comments on the pattern, see here. 

Have fun!
2 Comments

    Need a Search bar?
    One day I may upgrade my website-- but until then, use your web browser search bar. Type in my web address and what you're looking for, like this-- 
    www.theprovidenthomemaker.com  pumpkin --  and you should get results.


    Author

    I'm a disciple of Christ, a member of the Church of Jesus Christ of Latter-day Saints, a family-defending, homemaking, and homeschooling mom of eight children, two of whom sometimes can't have milk or wheat. Growing up on a farm in a high mountain valley, my parents taught me to 'make do', work hard, smile, and help others.  I love cooking, learning, growing food and flowers, picking tomatoes, and making gingerbread houses --which CAN be made allergy-friendly-- with my children.  I hope you find something to help you on my site!

    Archives

    April 2024
    July 2023
    April 2022
    September 2021
    March 2021
    December 2020
    April 2020
    March 2020
    February 2020
    January 2020
    December 2019
    November 2019
    October 2019
    September 2019
    August 2019
    July 2019
    June 2019
    May 2019
    April 2019
    January 2016
    November 2015
    October 2015
    September 2015
    March 2015
    February 2015
    November 2014
    October 2014
    September 2014
    August 2014
    July 2014
    June 2014
    May 2014
    April 2014
    March 2014
    February 2014
    January 2014
    December 2013
    November 2013
    October 2013
    September 2013
    August 2013
    July 2013
    June 2013
    May 2013
    April 2013
    March 2013
    February 2013
    January 2013
    December 2012
    November 2012
    October 2012
    September 2012
    August 2012
    July 2012
    June 2012
    May 2012
    April 2012
    March 2012
    February 2012
    January 2012
    December 2011
    November 2011
    October 2011
    September 2011
    August 2011
    July 2011
    June 2011
    May 2011
    April 2011
    March 2011
    February 2011
    January 2011
    December 2010
    November 2010
    October 2010
    September 2010

    Categories

    All
    Alcohol
    Alternate Cooking
    Appearances
    Apple
    Apricots
    April Fools
    Aprons
    Bananas
    Beans
    Beef
    Beets
    Bench
    Beverages
    Bonnet
    Bread
    Breakfast
    Budget
    Budgeting
    Cake
    Candy
    Canning
    Carrots
    Cheese
    Chicken
    Children
    Chocolate
    Christmas
    Cleaning
    Coconut
    Comfrey
    Common Core
    Constitution
    Cookbook
    Cookies
    Cooking Oil
    Crafts
    Dairy Substitutions
    Dehydrating
    Dessert
    Dried Fruit
    Earth Oven
    Earthquake
    Easter
    Edible Weeds
    Eggs
    Emergency Prep
    Essential Oils
    Faith
    Family Home Evening
    Fertilizing
    Food Storage
    Fourth Of July
    Freezer
    Frosting
    Fudge
    Garden
    Gardening
    Gingerbread
    Gluten
    Gluten Free
    Gold
    Government
    Grains
    Gratitude
    Hat
    Herbs
    Home Remedies
    Home Repairs
    Homeschool
    Home Storage
    Honey
    Hope
    Inflation
    Leftovers
    Legumes
    Lemon
    Main Dishes
    Mixes
    Mothers
    Noah
    Non Artificial Colors
    Non-artificial Colors
    Nuts
    Oats
    Oil
    Orange
    Paint
    Peaches
    Pear
    Pie
    Pizza
    Plums
    Poem
    Popcorn
    Pork
    Potatoes
    Powdered Milk
    Prayer
    Preparedness
    Projects
    Prophecy
    Pruning
    Pumpkin
    Quick Bread
    Rhubarb
    Rice
    Salad
    Salt
    Sauces
    Self Reliance
    Self-reliance
    Sewing
    Shelf Life
    Shelves
    Sky
    Smoothie
    Snacks
    Soup
    Spices Or Seasonings
    Squash
    Strawberries
    Substitutions
    Sugar
    Summer Fun
    Three Month Supply
    Time
    Tomatoes
    Trees
    Truffles
    T-shirts
    Tuna
    Ultra Gel
    Valentine\'s Day
    Vegetables
    Water
    Watermelon
    Wheat
    Work
    Year Supply
    Zucchini

    RSS Feed

Web Hosting by iPage