The Provident Homemaker
  • Recipes and Info
    • Making Bread
  • My Blog
  • Favorite Resources
  • Documents and Files
  • 52 Weeks of Building Storage

Elsa Cape

10/24/2014

0 Comments

 
Picture
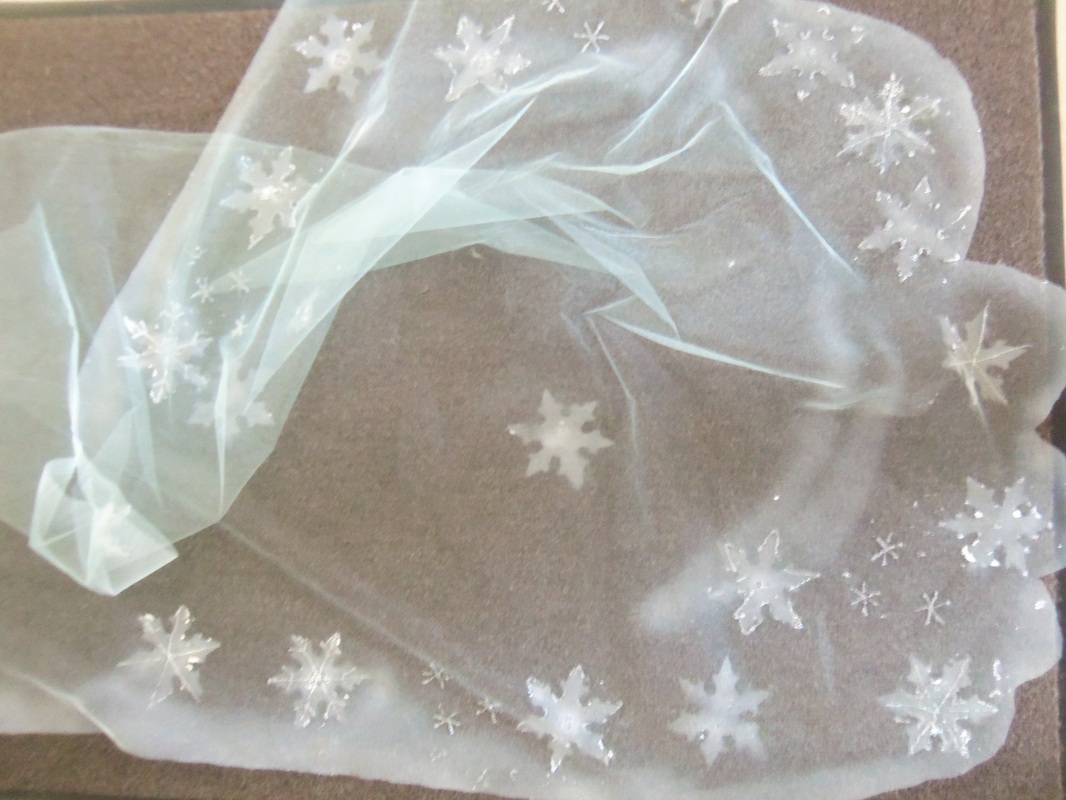
Here's a simple way to make a frosty cape for an Elsa costume.  My daughter and I are delighted with how it turned out:  so dainty and elegant!  You'll need one full-size sheet of paper, a can of white spray paint, and fabric.  For my 6-year-old's costume, I bought 1 1/3 yards of 60" wide nylon tulle, pale turquoise color.  Sheer nylon tricot or sheer chiffon would also work, and be less prone to ripping.  (No, ours has not ripped yet.)

Lay out the fabric and fold in half lengthwise, so it's 60" long and half the width you bought.  Cut 4-6" wide scallops along one narrow end.  

Fold the paper and cut out a simple six-pointed star.  Mine was about 4" across.  I reinforced the paper (now my stencil) and helped it lie flat by running 2" wide packing tape in a square around the snowflake.

  Spread the fabric on top of something clean that you don't care if paint gets on.  Darker colors under will make it easier to see the white paint.  In my case, I spread this on the lawn; we have a frosty decoration on it until next mowing!

Spray into your stencil, focusing on the center first, then spraying the points.  Continue until you have all you want, occasionally stopping to wipe excess paint off the stencil (the grass was good for this, too). 

Once the snowflakes are sprayed, 'frost' the edges and scallops of the cape by spraying along the edges.  

With some silver glitter glue or silver sparkle paint, draw on the snowflakes. Add some smaller ones made with only the silver.    Let dry completely.
0 Comments

Homemade Anna and Elsa dolls

5/3/2014

0 Comments

 
Picture
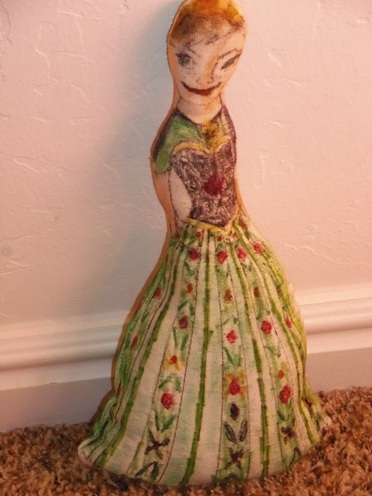
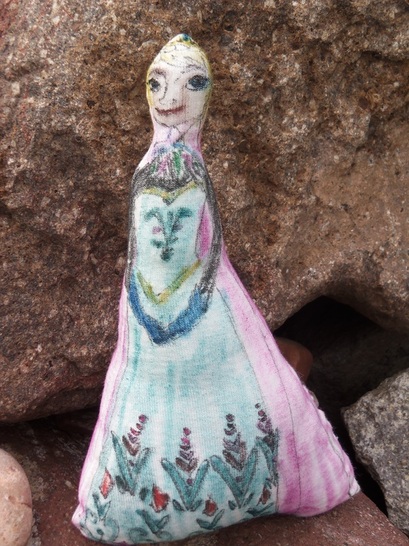
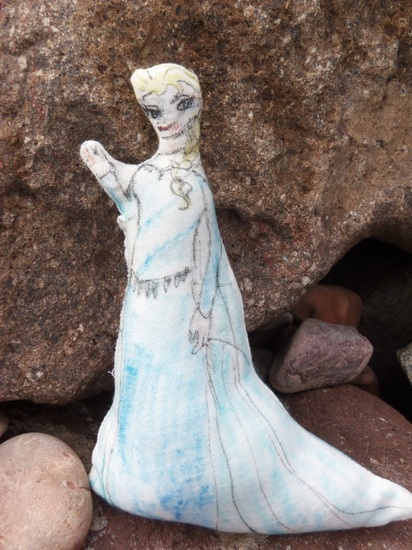
My 11-year-old daughter had decided she really, really wanted some Frozen dolls.  However, having used all her spending money previously on a couple plush My Little Pony toys, the ones we found were way out of her price range.

She flipped through a girls' sewing book, spent a couple days thinking about how to possibly make the dolls instead, and came up with this plan:  find a picture, use it for a pattern, sew two identical pieces together, color, stuff, and stitch closed.

We used plain white knit fabric from my fabric stash so the doll would be softer and a little more forgiving, stuffed it with plain old fiberfill For the Anna doll, we used this coloring page 
Elsa:  in her coronation dress, or with one hand out.  (The one hand out was pretty tricky to turn right-side out, but it worked.)

You'll need a picture, 1/3 yd of fabric (for 11" high dolls, but you'll have enough width for 4 dolls!), needle and thread, sewing machine (optional), a handful or two of fiberfill, and some non-water-soluble markers  (we used a combination of Sharpies and fabric markers).

1- Resize the picture to make the size doll you'd like. 
2- Add 3/8" all the way around the picture*, for a seam allowance, and cut this paper pattern.
3- Pin onto a double layer of fabric, and cut this out.
4- Unpin the pattern from the fabric, take ONE of the fabric pieces, put the pattern piece behind it, hold it up on a window, and, using a Sharpie or fabric marker, trace all the lines you'll need to color later.  Draw in the facial features, neck, dress design, etc. Invent what the back should look like, for the second fabric piece. :)
5- Put the right sides (drawn-on sides) together, and sew 3/8" from the edge, almost all the way around.  Be sure to backstitch when you start and stop!  Leave 2" open.
6- Turn the fabric right-side out, stuff with a handful of fiberfill.
7- Turn the raw edges of the opening inward, and stitch closed, knotting well at both ends.  
8- Color your doll with the markers, front, back, and sides.

*On the coloring pages, the necks are too narrow to pull the rest of the body through when turning the fabric right-side-out after sewing, so shoot for a finished measurement of 1" wide, and just draw the neck the width it should be.

She had a lot of fun marking these- so much that she also made Kristof and Olaf the same way.  

The only question she has left is how much of the ink will survive their first trip through the washer and dryer!

Picture
Picture
0 Comments

Free Perpetual Christmas Calendar

12/5/2013

0 Comments

 
Picture
photo credit: Alex Grichenko
This December, would you like a daily thought, song, scripture, story, and/or activity to help you feel more of the calm spirit of Christmas?  My friend Amy over at LDS Holistic Living has a Christmas Advent Calendar you can use or download for free.  It's designed specifically with members of the LDS faith in mind, but anyone can find great things in it.  If you're interested, you can get the calendar here.

Meanwhile, here's a sample:

The Real Story Behind the 12 Days of Christmas


Catholics in England were prohibited by law from practicing their faith, both in private and in public from 1558 to 1829. Being a Catholic was treated as a crime. There was no restored gospel at the time, however there were good Christians who knew without doubt the true church was not one that was mainly created merely for the convenience of King Henry the Eighth who wanted to sin and have a church justify his actions. So in secret they continued to teach their children their  religion. 

"The Twelve Days of Christmas" was written in England during this time frame. It was written to help children learn about their religion. The entire song is writing in symbolism and hidden meanings because it was illegal to have anything in writing that would indicate adherence to the Catholic faith. To be caught could mean imprisonment, hanging, or drawn and quartered.
Christmas referred to a twelve day period that starts with Christmas day. "The Twelve Days of Christmas" referred to a twelve day period that began Christmas day. While the world may have celebrated Christmas for about twelve hours, these Christians celebrated it for twelve days as a reminder that the gifts of God are with us for twelve months of the year. It also represented the idea that we should be thankful for the gifts of God and follow His teachings for all twelve months of the year and not just one day a year. 

The song begins, "On the first day of Christmas my true love gave to me..." The "true love" represents God, as our greatest love should be for Him. The word worship means that which we love the most. The "me" who receives these presents is the Christian man or woman.

1. The "partridge in a pear tree" was Jesus Christ who died on a structure made from the wood of a tree. In ancient times a partridge was often used as mythological symbol of a divine, sacred king.

2. The "two turtle doves" were the Old and New Testaments - another gift from God. Doves symbolize peace and the Gospel contained in these scriptures, when practiced, brings peace.

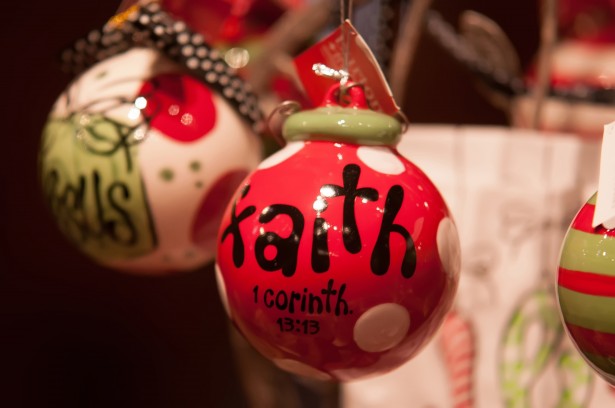
3. The "three French hens" were faith, hope and love - the three gifts of the Spirit that abide (I
Corinthians 13). The French hens can also represent God the Father, His Son Jesus Christ and the Holy Ghost.

4. The "four calling birds" were the four Gospels which sing the song of salvation through Jesus Christ.

5. The "five golden rings" were the first five books of the Bible also called the "Books of Moses."

6. The "six geese a-laying" were the six days of creation.

7. The "seven swans a swimming" were "seven gifts of the Holy Spirit." (I Corinthians 12:8-11, Romans 12, Ephesians 4, 1 Peter 4:10-11)

8. The "eight maids a milking" were the eight beatitudes.

9. The "nine ladies dancing" were nine fruits of the Holy Spirit.
But the fruit of the Spirit is love, joy, peace, longsuffering, gentleness, goodness, faith, meekness, temperance: against such there is no law." (Galatians 5:22)

10. The "ten lords a-leaping" were the Ten Commandments.

11. The "eleven pipers piping" were the eleven faithful disciples.

12. The "twelve drummers drumming" were the twelve points of the Apostles' Creed.
0 Comments

Turkey Clucker (Cuica)

11/27/2013

0 Comments

 
Picture
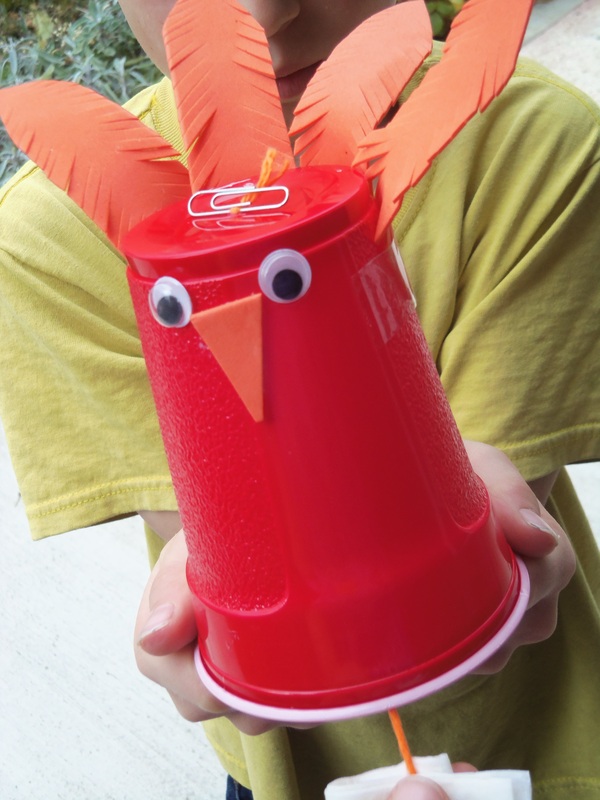
This is actually an instrument.  Or a noise maker, depending on your perspective and the personality of the child holding it.  It's a variation of the Brazilian & African cuica, used in Samba music.  (See a video of an actual musician using a higher quality cuica on the YouTube video below. 

At any rate, this one can be made to make a clucking or 'gobble'y sound.  These are entertaining by themselves, or add it in to an impromptu marching-around-the-yard band!  You could have a whole flock of chickens or turkeys.

To make one, you'll need
A disposable plastic cup, googly eyes, paper/real feathers/paper or foam beak, an 18-20” length of cotton (not nylon) yarn, something to poke a hole with, a paperclip, dollar-bill sized piece of a paper towel, water.

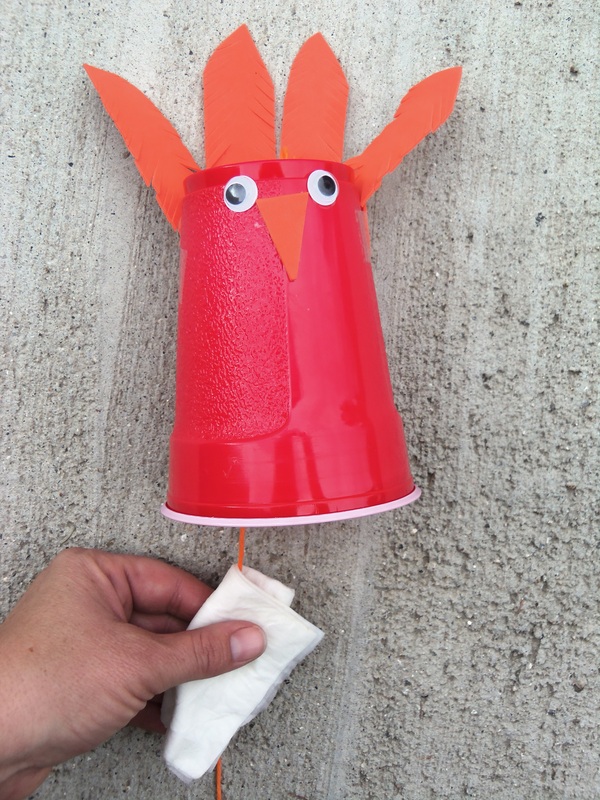
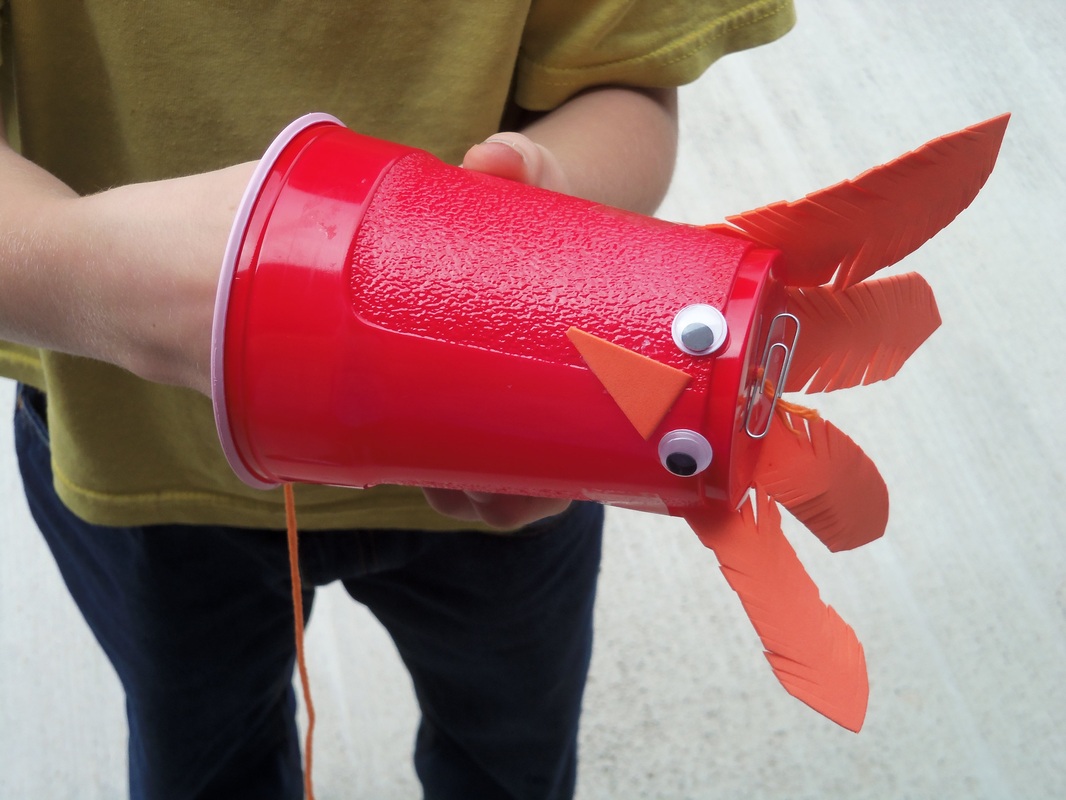
Using a nail or whatever works, poke a hole in the top.  Thread the string through the hole, and tie the top end of the string onto a paperclip or washer, to keep it securely on the right side of the hole!    Decorate.

If you want to see someone make one and use it, see here.  

Have fun!
Picture
To make the sound, while holding the clucker still with one hand, get a square of folded-over wet paper towel and grab the string, making quick yanks down the string.
Picture


tin can version http://www.youtube.com/watch?v=OcT1vGsx38c 

0 Comments

The Four Seasons Trees kids' craft

11/12/2013

0 Comments

 
Picture
Last week we had a lesson on the four seasons in the group of 5-and-unders that I teach in a homeschool co-op.

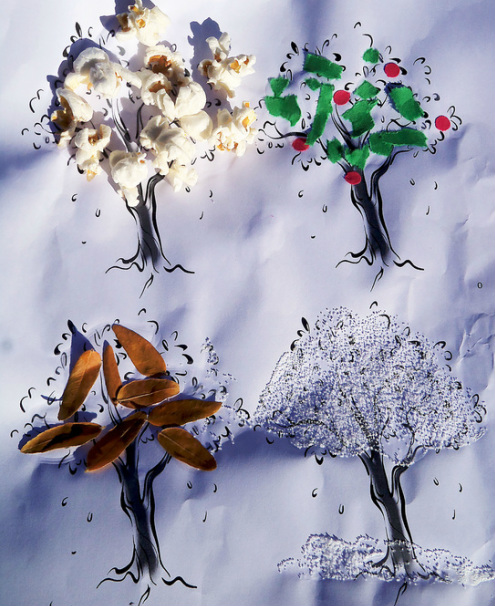
We started with four trees on a page; each tree gets something glued to it:

spring- popcorn
summer- tear bits of green construction paper, hole punch red paper for apples
fall- tiny brown leaves (I used honey locust) or torn brown paper bag
winter- drizzle school glue all over tree and across the base, the child uses a finger to spread it smooth; sprinkle with table salt.  

Their favorite was the winter tree! 

You  can even listen to Vivaldi's The Four Seasons while making these...

The full lesson is below, with activities and songs.  
Picture
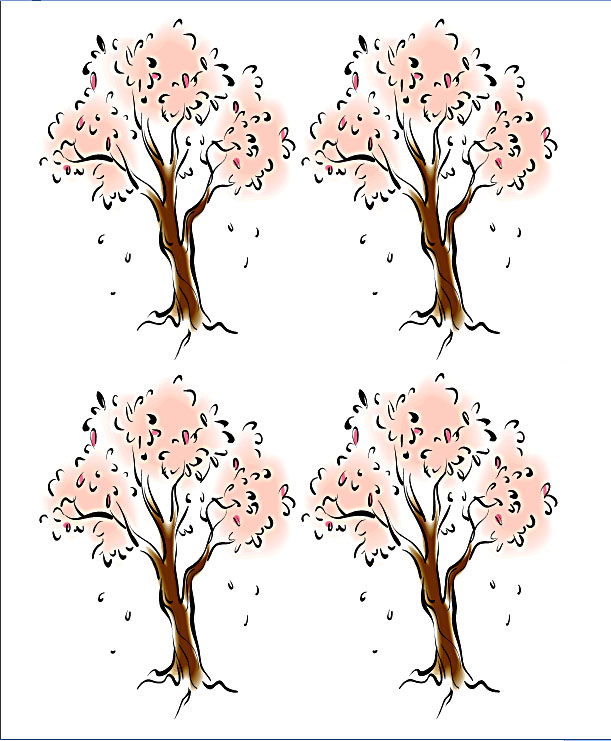
Print this full-page size. I printed them black and white because that's all my printer does...
Four Seasons lesson/activities
Materials needed:
music: Rain is Falling All Around, Popcorn Popping, Once There Was a Snowman, In the Leafy Treetops 
Vivaldi’s Four Seasons CD, CD player
Four Season discovery bottles
Autumn sensory box
4-tree papers (1 per child)
Popcorn kernels, popcorn popper, bowl with lid, spray bottle with water
Green construction paper
Red construction paper and a hole punchSmall colored leaves or yellow/orange paper
School glue
Salt
Wipes to clean hands
Crayons

Seasons song: Rain is Falling All Around (leaves are falling, snow is falling, sun is shining, wind is blowing)

Listen to The Four Seasons with eyes closed; what season does it sound like?  What do you see?  Dance to the music, pretending to be a something in that season: an unfurling leaf, a bird, wind blowing, snow falling...

Four Seasons bottles to pass around

Four seasons artwork: divide a page into 4 sections each has a tree outline?  Older ones can write seasons

Get the popcorn popper and kernels ready, sing "Popcorn Popping". Pop the popcorn.

While working on the summer trees, sing In the Leafy Treetops.

Winter:  use fingers to spread glue on the branches and below the tree; sprinkle on salt (or could paint with salt water on tree with a black construction paper background) Sing Once there Was a Snowman

Autumn sensory box for when done: a box full of things like a “Can You See?” book- things of different textures and warmth, things to find, things to count, crocheted apples,

Mist the leftover popcorn with the spray bottle, add salt.  Put the lid on and shake to coat.  


_________

Is including this lesson useful to anyone? Or should I stick with closer-to-homemaking posts?  
0 Comments

Introducing the Constitution to preschoolers

9/17/2013

0 Comments

 
Picture
Photo of the construction paper flag we made with this template to come... as soon as I can figure out what in the world my camera did with my photos!
Yes, I'll get some great recipes on this blog again soon... the reason it's been a bit is the same problem as above.  My camera is taking the pictures and burying them somewhere deep inside its circuitry. Sigh.

I'm teaching Joyschool to a group of children ages 1-5.  That's a huge spread in capability and ability to focus.  The group meets for two hours once a week, and has a focus on incorporating the scriptures into lessons. Since today is Constitution Day, I decided to teach them about the reason and purpose of the Constitution, plus the symbols of our flag and what the Pledge of Allegiance means.  I've learned to overplan and then be flexible- so there's a lot below.  :)

Materials needed

‘The Gift to Choose’ cube in a pretty box
Scriptures (Book of Mormon, D&C)
Constitution paper puppets (page 4 of the link, or see photo below)
Constitution puppet story (same as above)
Pictures of a school, church, plus an envelope
Map of the original 13 colonies
Map of the United States (I have a placemat map)
Marker or crayon
American flag- any size
flag pieces (red and blue construction paper) and silver star stickers (see picture below)
Music for “My Flag, My Flag” 
glue sticks or school glue


Section 1: God gave us the gift of Agency and the U.S. Constitution to protect it

Show the present, let someone open it to find the rolling cube inside.  Tell them that God gave us an amazing gift- the freedom to choose.  Let a few children take turns rolling the cube, read what it says.

Sing Do As I’m Doing (CS, - then ask, did I make you do this, or did you get to choose?

Read, then have them recite this scripture  3x: Wherefore, men are free … to choose liberty and eternal life, through the great Mediator of all men (2 Nephi 2:27).

Tell the paper-puppet story of the Constitution (Constitution FHE manual, pg. 4).  God told us that gave us the Constitution to protect our right to choose (D&C 101:77).  We sometimes call this “liberty”.  (Have them repeat the word.)

Time for playing inside: US map puzzle for older ones?  Also let them use the cube and the finger puppets.   Also play outside for 10 minutes if weather is good: look for things that are red, white, and blue.

Section 2: The Flag and the Pledge of Allegiance

Today is a special day- show the colonies map and have the kids point out corresponding ones on the placemat map.   Count them with me while I circle them.

Show the flag, tell them it is a symbol of liberty and freedom.  Tell about the meaning of the 13 stripes (colonies and rays of light), and the stars (heaven and trying to reach it by following God, 50 stars/50states), and the colors (white: being pure and righteous, red: bravery and courage, blue: paying attention and sticking with what is true and right) = a symbol of liberty and freedom. (symbolism explained better in Supplemental Materials, at the end.)

Sing a song: My Flag, My Flag- have them wave their flags whenever you sing the word “wave”, or make up motions or dance.  Bring the music and use the piano, or the CD and a player.  

Tell about the Pledge of Allegiance

Recite it, say why we put our hand where we do, then talk about some of the words:

Pledge: a promise
Allegiance : to be faithful and helpful to it

So when you pledge allegiance to the flag, it means you promise to be faithful and helpful to liberty and freedom.

The United States: our country
Republic: the kind of government the Founding Fathers gave us, where we have power to choose our leaders.
Under God:  God is the most important, and helps the country when we’re righteous.
Liberty: we get to use our agency
Justice for all: the law is the same for everyone, no matter how old, young, rich, poor, or how they live.

End by reciting the Pledge of Allegiance together, then my testimony of God’s wisdom and love in giving the Constitution to us.
Picture
Print this to fit a regular-sized piece of paper. Cut out blue construction paper to fit the proper place (mine- 4 3/8" x 3 3/8"). Cut red stripes- each one will need 4 short ones and 3 long ones- red is the first stripe at the top and the last at the bottom. (My red stripes were 1/2" wide, long ones 10 1/2", short ones 6 1/2")
Picture
Picture
Supplemental materials:

http://www.usflag.org/colors.html "The colors [of the Great Seal] of the pales (the vertical stripes) are those used in the flag of the United States of America; White signifies purity and innocence, Red, hardiness [bravery] & valour, and Blue, the color of the Chief (the broad band above the stripes) signifies vigilance, perseverance & justice."

Also this from a book about the flag published in 1977 by the House of Representatives:
"The star is a symbol of the heavens and the divine goal to which man has aspired from time immemorial; the stripe is symbolic of the rays of light emanating from the sun."

50 stars- states; 13 stripes- original 13 colonies  (bring in US placemat, color/circle the 13 in front of the kids)

Explaining the Pledge of Allegiance: http://www.ehow.com/info_10043483_explaining-pledge-flag-kids.html

Mormon Messages:  The Freedom to… http://www.lds.org/media-library/video/2009-06-27-the-freedom-to?category=mormon-messages/mormon-messages-2009&&lang=eng

Read a  story  "Do As I'm Doing" at   

Scriptures  D&C 101:77, 80   the Lord caused Constitution to be established for protection and liberty,  D&C 134:1–5 (Governments are instituted of God for the benefit of mankind)

For an explanation of the need and purpose of the Constitution, see the FHE lessons for the Bicentennial, page 4 

My Flag, My Flag  http://www.lds.org/music/library/childrens-songbook/my-flag-my-flag?lang=eng, also on Youtube (at the :54 mark) at https://www.youtube.com/watch?v=g88bnDkoHbc

My Country  http://www.lds.org/music/library/childrens-songbook/my-country?lang=eng

Schoolhouse Rock “The Preamble”

http://www.usflag.org/colors.html "The colors [of the Great Seal] of the pales (the vertical stripes) are those used in the flag of the United States of America; White signifies purity and innocence, Red, hardiness [bravery] & valour, and Blue, the color of the Chief (the broad band above the stripes) signifies vigilance, perseverance & justice."

Also this from a book about the flag published in 1977 by the House of Representatives...

"The star is a symbol of the heavens and the divine goal to which man has aspired from time immemorial; the stripe is symbolic of the rays of light emanating from the sun."

50 stars- states; 13 stripes- original 13 colonies  (bring in US placemat, color the 13 in front of the kids)

Explaining the Pledge of Allegiance: http://www.ehow.com/info_10043483_explaining-pledge-flag-kids.html
0 Comments

Glitter Galaxies

9/10/2013

0 Comments

 
Picture
Glue Stick Galaxy
The Milky Way galaxy, which we live in, is said to contain between 100 and 400 BILLION stars, of which our sun is one of the smaller ones.  The galaxy also has nebulae, asteroids, planets, comets, and more.  
This project was simply to help my children visualize a bit of how massive one galaxy is, as we were learning about the universe and its scale.

Start by looking at photos of galaxies.  Give each child a regular-sized piece of plain paper.  Have them draw a spiral using either school glue or a glue stick.  Very quickly sprinkle it with glitter and tip back and forth to cover.  The photo below shows what happens when there's a bunch of glue in the center.... it runs.  (Hey, a little more running on the upper side and it'd be a great barred galaxy!) 

Each tiny piece of glitter represents one star.  Look at your 'galaxy' closely for a while, then watch this video.

I used some gorgeous ultra-small glitter left from another project- so we did this outside.  On the patio, 20 feet from the house.  It wasn't far away enough.  Next time we'll do this over grass, so the glitter is less likely to get tracked back indoors!

After they've dried completely, put them in a plastic page protector to keep the glitter contained.  And marvel at what we're a part of.
Picture
White School Glue Galaxy
0 Comments

Solar-power Woodburning Art

6/8/2013

0 Comments

 
Picture
Picture
There's nothing that stimulates creativity like boredom does.
My 15-year-old was bored yesterday and came up with this idea:

Draw on wood using the power of the sun.

Normally I'm not a fan of solar power:  a couple years ago, a solar panel manufacturing company was considering building in my city.   Our city council starting reading the research and crunching numbers, and eventually declined the move.  Why?  The council members discovered that when you add up everything it really takes to build and run a solar plant, it takes MORE energy to produce each panel that it will generate in its lifetime.  

Anyway, back to this solar-powered art:

A magnifying glass, when held close to something with bright sunlight behind it, creates a concentrated beam of light, as most any inherently pyromaniac 12-year-old boy might tell you.  

So he used that as his woodburning technique, holding the magnifying glass steady in one spot until a little wisp of smoke appeared, then moving it over a fraction of an inch.  (See the light beam below?)  He freehand drew it as he went, though you could sketch in pencil first (which is erasable!) and then burn over those lines.

Note: there are some safety considerations here, obviously.  One of them is keeping an eye on your child if they try this.  And I recommend doing this in a nice green grassy area that is not prone to catching fire.  Another is protecting yourself from the sun.  He wore a jacket with a hood, since he sat with his back to the sun for about 2 hours to make this.  Too bad he didn't think to put on pants instead of shorts.

Voila!  Wood burning with no specialty tools necessary except a cheap dollar-store plastic magnifying glass!

Picture
0 Comments

Broken puzzle boxes

4/13/2013

0 Comments

 
Picture
What happens when a favorite puzzle goes through six children and fifteen years?

I suppose it's impressive that the box even exists anymore, and that the puzzle pieces are still flat and whole.

But it was time for a new way of storing it.

The puzzle pieces fit nicely in a gallon-sized ziptop bag.  I cut out the top of the box so we'd still have the picture of what the puzzle looks like, then inserted it in the bag, too.   
As a bonus, it now takes up less space in the puzzle drawer!
Picture
Picture
0 Comments

Fluffy Easter Lamb craft

4/3/2013

0 Comments

 
Picture
OK, OK, I know it's a whole three days after Easter, but this is still fun.  We don't have to totally forget about a holiday after we've passed it, right?  (The real reason this is delayed is that I spent the last week in a beautiful, very green place with no phone connection, no cell phone signal, and no Internet connection.  This was ready to publish, I just couldn't get to the button.)  

How about something fluffy and NOT sugary?  This is a fun craft for kids anytime and has some deeper Easter meaning. It's simple but will keep them occupied for a little while.  How about making a whole flock of sheep?  He shall feed his flock like a  shepherd: he shall gather the lambs with his arm, and carry them in his bosom, and shall gently lead those that are with young. (Isaiah 41:11)

You'll need only 
  • 1 sheet of newspaper
  • Tape
  • Cotton balls
  • 4 straws
  • Glue
  • White paper
  • Black marker

You can find the instructions at http://www.lds.org/friend/2013/03/easter-activities?lang=eng

What about some other animals?
Picture
0 Comments

Children's Church Gift- clean and pure, FHE idea

1/12/2013

0 Comments

 
Picture
This year the theme for Primary-- the children's organization-- is "I Am A Child of God".  Our ward typically gives the children and teachers a small gift each year.  We've also recently had a lesson called "Jesus Christ is the Light and the Life of the World" (Dec. 2012, week 3), and I read a talk by Sister Elaine S. Dalton called "Now is the Time to Arise and Shine".   It also fit with our first Sharing Time lesson of the year, "God is my Heavenly Father.  He Knows and Loves Me." Connecting all these things, this is what we did this year:

I bought a number of chandelier crystals, strung a ribbon through, and attached a poem, which I titled  Illumination:

Hang this crystal in your room
Where light is bright and clear.
As light reflects and shines, think of  
The temple’s chandelier.

I am a child of God
His light can shine through me.
If I am clean and pure and serve,
I can help others see.


The poem can be sung to the tune of "I Am A Child of God"; we sang just the second stanza.  

Maybe the poem should have specified to hang it in the window; my children have theirs hanging on the wall, where they are not close enough to a light source to throw rainbows.  Hmm.  Maybe "In your window this will go/ Where light is bright and clear..."

Something like this poem and chandelier crystal could be used as part of a Family Home Evening lesson, especially along with either of the Sharing Time lessons or Sister Dalton's talk.  

I know that I am not the light but I can help share it.  The closer I am to the Source of light, my Savior, Jesus Christ, and the more pure of heart and willing to serve His children I am, the more I am able to share His light with others.  They will see it in me and hopefully want to shine, too.

_______________________________________________

How about the expense?  Each one cost just over $1, I ordered some from Amazon, $8.99 for 10 crystals, plus shipping.  They didn't have enough for me (we needed about 120), so found more at D. Lawless Hardware, $1 apiece with free shipping (and my favorite crystal of the two kinds).   Thin gold ribbon was on sale at Hobby Lobby, a 30-foot roll for $ .79, it took 6 spools to have 14" per crystal.


Picture
0 Comments

Red Cabbage- food and chemistry!

7/20/2012

0 Comments

 
Picture
My 12-year-old science nut convinced me to buy a red cabbage-  why?   

While walking through the produce section together, I had told him that the vegetable could be used to make a pH indicator.  He was excited.   You can see how to do this in the one-minute video, below.
Meanwhile, you don't need the whole head of cabbage for such a project, so it got chopped up into a creamy, flavorful, no-mayonnaise coleslaw.  The recipe is below this cabbage video. 
Isn't that simple?  If you don't have a coffee filter, any other absorbent paper will work, including (white) construction paper or paper towels.  My favorite is the construction paper.  You can read more about why this works here. 

*  *  *  *  *  *  *  *  *  *  *  * 
Coleslaw with Bacon and Buttermilk (or Kefir) Dressing
adapted from America's Test Kitchen

If you are going to eat this coleslaw RIGHT AWAY, you can skip the salting step, which keeps the cabbage from releasing water and diluting the dressing as it sits.  However, if you’re not a fan of raw onion, cook it along with the bacon; salting the onion also mellows it.

½ medium head of red or green cabbage, shredded
1 large carrot or apple, grated
½ medium onion, sliced thin
Salt
6 slices bacon, chopped, cooked and drained
½ c. buttermilk or kefir
2 Tbsp. oil (I used coconut oil)
2 Tbsp. apple cider vinegar
½ Tbsp. caraway seeds
¼ tsp. mustard (dry or prepared)
2 tsp. sugar or honey
Black pepper to taste

Combine the cabbage, carrot/apple, and onion in a colander; sprinkle with 1 tsp. salt. Let stand over a bowl until the veggies wilt, 1-4 hours.  Rinse, drain, and pat dry.  Add in the bacon (and onion if you cooked them together.)  Stir together the buttermilk/kefir, oil, vinegar, caraway, mustard, and sugar.  Pour over the salad, and toss to coat.  Add salt and pepper to taste.

0 Comments

Paper Plate Butterfly

5/15/2012

0 Comments

 
Picture
Side note: if you have these flowers, too, you have an edible weed in your yard. This is "pepperweed", also called "tall whitetop" - Lepidium latifolium-, a perennial in the mustard family. The seeds are good to eat and taste like... yep, pepper. The leaves and stems are also edible and taste spicy, similar to watercress or arugula. - Just don't eat them if they've been sprayed with herbicide. See other posts on this site for more "free veggies"!
Picture
This was a fun project with my preschooler- quick and easy for me, fun for her. 

To draw the butterfly outline, first start with a 9" paper plate.  You can draw it completely freehand, or try to follow the instructions below.  :-) The double dotted line in the center is where you glue the body.  I used a twig (and folded the plate backwards along each line so the wings could flap a little), but other options include a craft stick or pipe cleaner -- cut a length double plus 2-3" longer than the body should be, fold in half, twist together, leaving the top 1- 1 1/2" free, for the antennae.

  Draw a line horizontally, 3/4" below the center of the plate.  This is the line that will separate the top wings from the bottom ones.  Make a mark about 1" in from each edge along this line, then draw a curved triangle at each side with the mark at its tip and its base at the plate edge.

Next, draw a faint line from top to bottom, through the center, perpendicular to the first line.  Make a mark 3 3/4" from the top, and another one 2 1/2" up from the bottom of the plate.  This will be where the wings touch.  Draw a curved triangle with its tip at the mark and its base at the plate edge. 

Wouldn't these make cute decorations for an outdoor party?  Picture them hung with fishing line from trees, perched on tables or shrubs...
0 Comments

Edible Playdough

5/11/2012

0 Comments

 
Picture
I hate playdough.  It gets stuck in the carpet, smells funny, dries out, and gets thrown away.  My children, however, love playdough. 

Here's a way to let them have fun with playdough, have it over and GONE in one session, and not waste anything!  Whatever the kids roll out gets baked- as crackers!

Other things you can use as playdough: yeast dough, homemade Tootsie Rolls, Peanut Butter Balls (all recipes are also in my cookbook)

Edible Playdough

1/3 c. water
1/3 c. quick oats (or one envelope instant oatmeal and an extra 1 to 1 1/2 Tbsp. water)
1/2 c. flour
pinch of salt
1 tsp. baking powder, optional
2-6 drops food color, optional

Bring the water to a boil, add oats.  Let sit a couple minutes to plump and cool slightly.  If adding color, it's easiest to do right before adding the flour.  Stir in flour, salt, and baking powder (a pinch of sugar is always popular; omit if using sweetened instant oatmeal).  Stir until you've worked in at least half of the flour, then dump everything onto the counter and knead until smooth.  Mixing in the flour while dough is warm or hot helps it become more elastic.   (So does cooking the oats.)

If you have a toaster oven, it's the perfect size to bake in.  Oil or spray a cookie sheet, and bake at 400 degrees until the crackers are crisp.  This may be anywhere from 10-25 minutes, depending on how thick they are.  (Hint- the thinner, the better they'll be!)  Anything thicker than about 1/4 " will never be crisp, just hard.  Teething biscuits.  Entertaining to chew on.

The baking powder is not necessary, but it helps lighten the crunch of the baked product.  This is nice because those little fingers rarely roll out the dough evenly.
Picture
This color is from adding about 1 1/2 tsp. dried beet powder when cooking the oats.  After this, my daughter said she wanted purple- so I added 3 drops blue food color.


I make beet powder when my garden beets become too big and a little tough to eat normally.  To make the powder, slice the beets thinly, dehydrate until completely dry, then put them in a blender or food processor.  Grind to a powder.  Store in an airtight container, like a jar with a screw-on lid.  Best nutrition within one year.

Picture
Picture
The ideal thickness is about 1/8" thick, but...  it's for fun, with a bonus snack at the end!  My kids love that they're making actual food.

0 Comments

No bored kids

12/27/2011

0 Comments

 
Picture
Well, at least they'll be bored less....

Do you need some ideas of things to do with your kids during Christmas break?

How about:

Pipe Cleaner Animals 
Pipe Cleaner & PomPom creatures

Picture
Peel a hardboiled egg the cool way (my teenagers will love this!- but I'll do my own, thanks)   I'd blown eggs before, when they were raw, but had never heard you could use a similar technique when they're cooked!

Picture
Have you ever thought about the name "Play dough"?  I hadn't, until I bought a book called Kids' Ideas With Frozen Dough.  This book, printed by Rhodes Bread, who makes frozen bake-at-home bread dough, shows how to make butterflies, turtles, alligators, bees, dinosaurs, your name... all from regular bread dough.

As a mom, I detest play dough- it gets everywhere, and is usually abandoned someplace with its lid off, where it dries out.  But this-  Hey!  this is useful.  And edible.  I give my kids a lump of bread dough to play with, and later we bake and eat their creation.  If you want to make your own, see the Making Bread page.  You can even use biscuit dough, though it becomes tougher the more it's handled.  Yeast bread dough can take a lot  of abuse.

Now one more for anyone over about age 5: The Two-Second Shirt Fold. 
See it here,
then learn how to do it, here.  You'll be amazed.  Then you'll want to go fold all the shirts in your house!
0 Comments

Tomatoes in the garden; edible playdough, and PB Fingers

11/6/2010

0 Comments

 
Picture
from photos8.com

(originally 7/08/10)

Here in the Salt Lake Valley, we still have a couple months of the growing season left; it’s not too late to plant some things.  Beans, beets, carrots, and turnips are good ones to put in right now.  You can even grow cool-season crops like peas, lettuce, spinach, chard, and cabbage, if you wait a couple more weeks for temperatures to drop a bit.

Here are a few quick tips for growing tomatoes- 

*fertilize with 1 Tbsp. nitrogen (34-0-0) at four and eight weeks after transplanting.  For me, that’s right about now. Put the fertilizer on the ground, to the side of the plant.  Gardeners call this “side dressing”.

*Give them 1-2 inches of water per week, water deeply and infrequently.  To know how often to water, dig a 4” deep hole, feel the soil at the bottom.  If it feels cool and moist, you don’t need water yet.  Wait until the top four inches dry out, then water again.  Mulch around them to keep moisture in and to reduce weeds.  *It will take about 25-35 days for a flower to become a ripe tomato.  It seems to speed up ripening if you break off a few little branches.  This tells the plant it had better hurry up and produce seeds before something happens to it.


for more info on tomatoes, including what causes blossom end rot: http://extension.usu.edu/files/publications/factsheet/HG_2004-05.pdf

info on planting beans:

http://extension.usu.edu/files/publications/factsheet/pub__7948214.htm

and information on growing about any fruit, vegetable, or herb: 

https://extension.usu.edu/yardandgarden/htm/vegetables-fruits-herbs    

Here are a couple great quotes I ran across recently:

"Self-reliance is a product of our work and under-girds all other welfare practices. It is an essential element in our spiritual as well as our temporal well-being. Regarding this principle, President Marion G. Romney has said: “Let us work for what we need. Let us be self-reliant and independent. Salvation can be obtained on no other principle. Salvation is an individual matter, and we must work out our own salvation in temporal as well as in spiritual things.” - (In Welfare Services Meeting Report, 2 Oct. 1976, p. 13.), quoted in “In the Lord’s Own Way” Elder Russell M. Nelson, Ensign, May 1986

"There is more salvation and security in wheat than in all the political schemes of the world". - Orson Hyde, Journal of Discourses, 2:207  Or in whatever food you end up storing.

Now for the recipes:

The two below are almost the same thing:  the first is stiff because of the large amount of milk powder and powdered sugar, the second starts with the same ratio of PB and honey, but thickens it up with cereal/oats and just a little milk powder.  Just goes to show you can do your own variations if you like.  On those days that we’re out of bread and don’t know what to do for lunch, we’ll whip up a batch of these Peanut Butter Fingers (though we usually shape them in balls) and eat those.  It’s our peanut-butter-sandwich, fun-sized.  If you go by what the PB jar says is a serving (2 Tbsp.), the PB Fingers recipes only feeds 3 people. 


 Edible Playdough  - makes about 2 cups’ worth, 1 ¼ lbs.

1   cup   peanut butter   
1   cup   dry milk powder   
1   cup   powdered sugar   
1/2   cup   honey   

Mix peanut butter and honey together until smooth.  Stir in milk powder, then add powdered sugar.  Stir as much as you can, then dump out on counter and knead with your hands until it all sticks together.

 
           Peanut Butter Fingers  (small batch)

Yield: about 20  (2”) "fingers"

1/3   cup   peanut butter   
3   Tbsp.   honey   
1/2   cup   corn flakes   
1/2   cup   quick-cooking rolled oats   
1/4   cup   dry milk powder   
1/4   cup   raisins or dried fruit bits    
Sesame seed, if you like   

In a medium mixing bowl stir together the peanut butter and honey until smooth.  Put corn flakes in a plastic sandwich bag.  Close the open end.  With your fist, crush the corn flakes into small pieces.  Add corn flakes, oats, milk powder, and raisins to the peanut butter mixture in the bowl.  With your hands, mix well.  If mixture is too dry to hold together, mix in a few drops of water. 

       Using a well-rounded teaspoonful for each, shape into logs 2 inches long and 1/2 inch wide, or about the size of your finger.     Spread the sesame seed (if you're using it) in a pie plate.  Roll peanut butter fingers in the sesame seed.      Store in the refrigerator in an airtight container.  If they don’t disappear first.

 
0 Comments

Family Home Storage: a new message; Homemade Paints for Crafts

11/3/2010

0 Comments

 
(originally from 7/29/10)
At the beginning of the year we had the ‘three month challenge’.  Where are you now in your home storage program?  Which step are you ready for?  I know some of you are done with all of them, congratulations!  The more self-reliant you are, the more of service you can be.  Here’s the four-step program the Church has published.


1. Gradually build a small supply of food that is part of your normal, daily diet until it is sufficient for three months.

2. Store drinking water.

3. Establish a financial reserve by setting aside a little money each week, and gradually increase it to a reasonable amount.

4. Once families have achieved the first three objectives, they are counseled to expand their efforts, as circumstances allow, into a supply of long-term basic foods such as grains, legumes, and other staples.

Of the new guidelines, Presiding Bishop H. David Burton says, “Our objective was to establish a simple, inexpensive, and achievable program that would help people become self-reliant. We are confident that by introducing these few, simple steps we can, over time, have more success.”  

I know that following this will bless you and your family temporally, spiritually, and physically.  For more information, see “Family Home Storage: a new message”, March 2009 Ensign, or the “All Is Safely Gathered In: Family Home Storage” pamphlet. 

* * * * * * *
Need something to keep your kids entertained?  There’s nothing more fun than watching paint dry….   Well, maybe not actually watching it dry, just looking at the crystals after the paint HAS dried (see Crystal Paint, below.)   The following paints were found at http://bluebonnetvillage.com/recipes.htm    They have other ‘kid craft’ recipes as well, including several versions of ‘play-dough’ , edible dough, finger paints, poster paints, …..


Monet’s Water Color Paints

Ingredients:
1 tablespoon white vinegar
2 teaspoon baking soda
1 tablespoon cornstarch
1/4 teaspoon glycerine
food coloring


Do like the famous impressionist painters did and bring your watercolors outside to paint.
To make your own watercolors, first mix vinegar and baking soda.
Next slowly add cornstarch and glycerine to the mixture. Pour into small paper cups to let dry.
Add food coloring. The color is not as intense when it is dry so remember to add a lot of food coloring.
When dry peel away the paper cups.


Shiny, Glossy and Shimmery Paints

Moooo Paint 
1 cup condensed milk (or make your own with powdered milk)
Food coloring


Mix one cup condensed milk with a few drops of food coloring. This makes a very bright, glossy colored paint, great for fingerpainting.

Egg Yolk Paint
1 egg yolk
1/4 tsp. water
Food coloring


Mix egg yolk with water and lots of food coloring. Use a paint brush to paint on baked cookies. Return cookies to oven until egg has solidified.


Non-edible paints:

Artist Quality "Oil" Paint 
Tempera paint
Liquid dish washing soap


This paint has a smooth, glossy effect and holds color well. Mix together tempera paint and soap. Store in glass jars.


Crystal Paint
1/4 cup hot tap water
3 teaspoon epsom salts


Sparkle and Shine! Mix hot tap water and epsom salts. Brush the mixture onto a dark colored paper. When dry the salt will form crystals that shine in the light.  Photos are at http://unplugyourkids.com/2008/10/05/salt-crystal-paint/
0 Comments

    Need a Search bar?
    One day I may upgrade my website-- but until then, use your web browser search bar. Type in my web address and what you're looking for, like this-- 
    www.theprovidenthomemaker.com  pumpkin --  and you should get results.


    Author

    I'm a disciple of Christ, a member of the Church of Jesus Christ of Latter-day Saints, a family-defending, homemaking, and homeschooling mom of eight children, two of whom sometimes can't have milk or wheat. Growing up on a farm in a high mountain valley, my parents taught me to 'make do', work hard, smile, and help others.  I love cooking, learning, growing food and flowers, picking tomatoes, and making gingerbread houses --which CAN be made allergy-friendly-- with my children.  I hope you find something to help you on my site!

    Archives

    April 2024
    July 2023
    April 2022
    September 2021
    March 2021
    December 2020
    April 2020
    March 2020
    February 2020
    January 2020
    December 2019
    November 2019
    October 2019
    September 2019
    August 2019
    July 2019
    June 2019
    May 2019
    April 2019
    January 2016
    November 2015
    October 2015
    September 2015
    March 2015
    February 2015
    November 2014
    October 2014
    September 2014
    August 2014
    July 2014
    June 2014
    May 2014
    April 2014
    March 2014
    February 2014
    January 2014
    December 2013
    November 2013
    October 2013
    September 2013
    August 2013
    July 2013
    June 2013
    May 2013
    April 2013
    March 2013
    February 2013
    January 2013
    December 2012
    November 2012
    October 2012
    September 2012
    August 2012
    July 2012
    June 2012
    May 2012
    April 2012
    March 2012
    February 2012
    January 2012
    December 2011
    November 2011
    October 2011
    September 2011
    August 2011
    July 2011
    June 2011
    May 2011
    April 2011
    March 2011
    February 2011
    January 2011
    December 2010
    November 2010
    October 2010
    September 2010

    Categories

    All
    Alcohol
    Alternate Cooking
    Appearances
    Apple
    Apricots
    April Fools
    Aprons
    Bananas
    Beans
    Beef
    Beets
    Bench
    Beverages
    Bonnet
    Bread
    Breakfast
    Budget
    Budgeting
    Cake
    Candy
    Canning
    Carrots
    Cheese
    Chicken
    Children
    Chocolate
    Christmas
    Cleaning
    Coconut
    Comfrey
    Common Core
    Constitution
    Cookbook
    Cookies
    Cooking Oil
    Crafts
    Dairy Substitutions
    Dehydrating
    Dessert
    Dried Fruit
    Earth Oven
    Earthquake
    Easter
    Edible Weeds
    Eggs
    Emergency Prep
    Essential Oils
    Faith
    Family Home Evening
    Fertilizing
    Food Storage
    Fourth Of July
    Freezer
    Frosting
    Fudge
    Garden
    Gardening
    Gingerbread
    Gluten
    Gluten Free
    Gold
    Government
    Grains
    Gratitude
    Hat
    Herbs
    Home Remedies
    Home Repairs
    Homeschool
    Home Storage
    Honey
    Hope
    Inflation
    Leftovers
    Legumes
    Lemon
    Main Dishes
    Mixes
    Mothers
    Noah
    Non Artificial Colors
    Non-artificial Colors
    Nuts
    Oats
    Oil
    Orange
    Paint
    Peaches
    Pear
    Pie
    Pizza
    Plums
    Poem
    Popcorn
    Pork
    Potatoes
    Powdered Milk
    Prayer
    Preparedness
    Projects
    Prophecy
    Pruning
    Pumpkin
    Quick Bread
    Rhubarb
    Rice
    Salad
    Salt
    Sauces
    Self Reliance
    Self-reliance
    Sewing
    Shelf Life
    Shelves
    Sky
    Smoothie
    Snacks
    Soup
    Spices Or Seasonings
    Squash
    Strawberries
    Substitutions
    Sugar
    Summer Fun
    Three Month Supply
    Time
    Tomatoes
    Trees
    Truffles
    T-shirts
    Tuna
    Ultra Gel
    Valentine\'s Day
    Vegetables
    Water
    Watermelon
    Wheat
    Work
    Year Supply
    Zucchini

    RSS Feed

Web Hosting by iPage