The Provident Homemaker
  • Recipes and Info
    • Making Bread
  • My Blog
  • Favorite Resources
  • Documents and Files
  • 52 Weeks of Building Storage

No-bake Apricot Cheesecake

7/30/2023

0 Comments

 
Picture
This is a recipe I remember as being in a neighborhood cookbook my mom got in the 1970s. It's a recipe that comes with fond childhood memories-- a cool, creamy dessert on a cookie crumb crust that hit the spot on a hot summer day.  

You'll see in the recipe that the 'cheese' in this can be either cottage cheese or cream cheese.  My mom almost always made it with cottage cheese. There's not a lot of difference in the finished product, so use either one.  I like that cottage cheese increases the protein content of this. It's also usually a little less expensive than cream cheese.

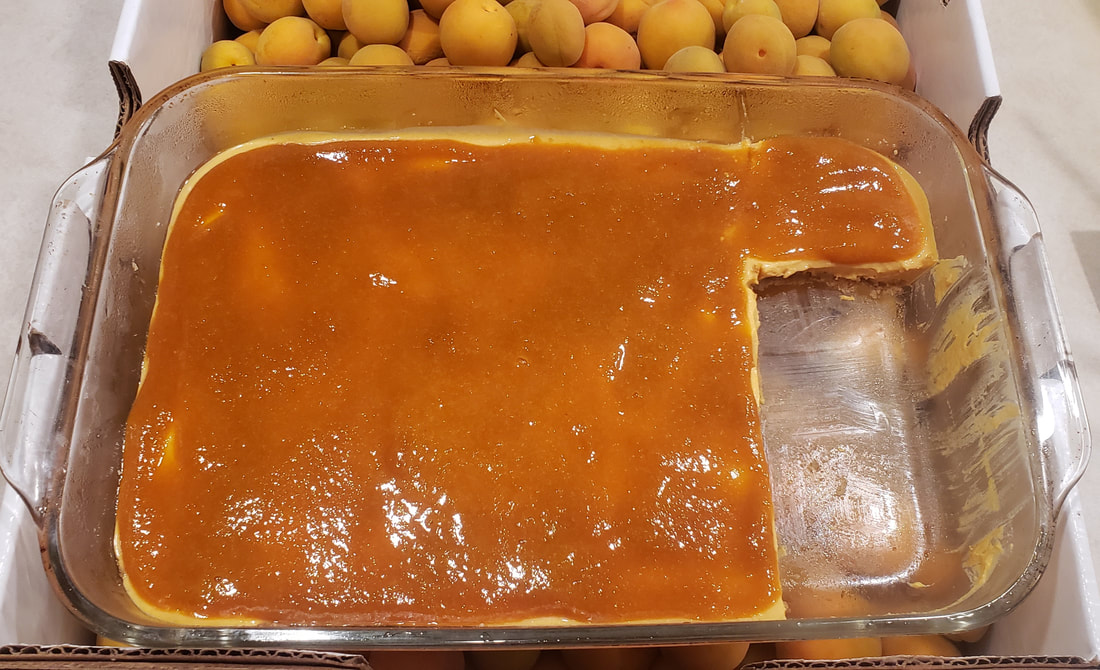
We've always made this in a 9x13 pan. The filling is only about 1/2-3/4" thick, but it's good for a crowd that way. You could pour it into a pie pan instead.

You can use a graham cracker crust if you prefer, but I'm partial to the homemade crumb base. It uses simple ingredients and comes together in just a couple of minutes. It's flexible, too; this week I made it gluten free by using a combination of almond flour, GF oatflour (the last few tablespoons in the bag), and coconut flour (also a couple of tablespoons). 

NO-BAKE APRICOT CHEESECAKE
1 prepared cookie crumb crust (recipe below)
2 1/4 cups fresh apricots or 16 oz can of apricots
3 oz package lemon or orange gelatin
16 oz. cream cheese OR cottage cheese
1/2 tsp. vanilla
1 cup whipping cream, whipped, OPTIONAL (8 oz whipped topping is fine too)

If you're using fresh apricots, wash and pit them.  If using canned, drain them and set the juice aside for later. 

Puree the apricots.  If you're using fresh, reserve 1/2 cup for later. (Don't reserve any if you're using canned.)

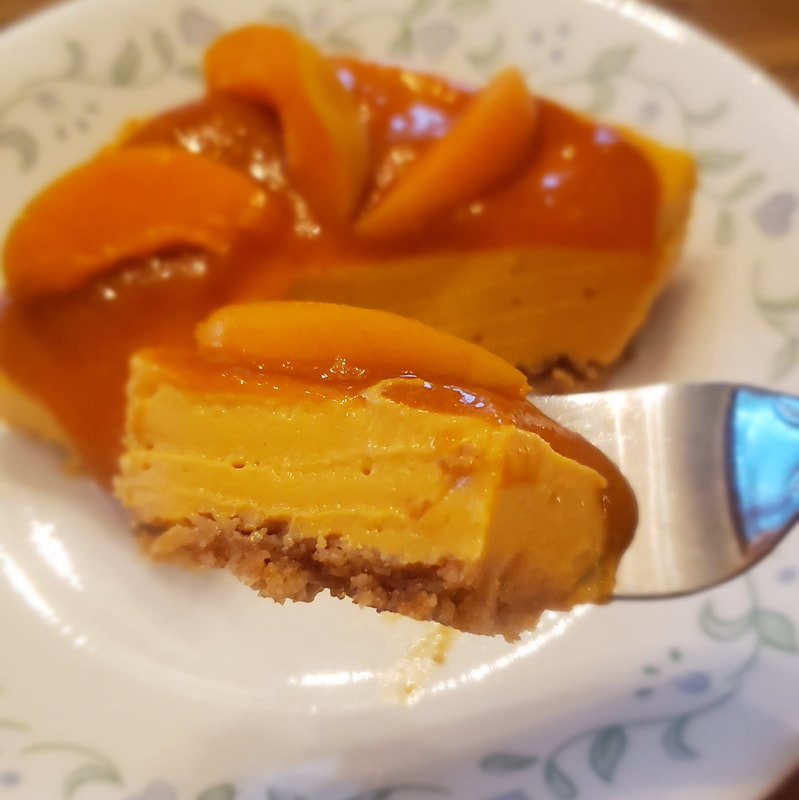
Put the rest of the puree in a microwave-safe bowl and heat just to the boiling point.  Stir in gelatin and mix until mostly dissolved.  Pour this back into the blender and add the cream cheese or cottage cheese, and vanilla.  Blend until very smooth.  If you're adding the whipped cream, let the mixture cool to near body temperature, then fold in the cream or whipped topping. If you're not adding the whipped cream, pour the mixture into the prepared crust.  (The first photo in this blog post shows the cheesecake made without the whipped cream. Using it will make a slightly taller cheesecake with more airiness.)

Cover and refrigerate at least 3 hours or until set.  

While it's chilling, make the Apricot Glaze- 

Fresh apricot version- 
Get your 1/2 cup reserved puree. Stir in 1 tsp. sugar; mix well. Store covered in the fridge until serving time.

Canned apricot version-
Boil together 1/2 c. reserved syrup and 1 tsp. cornstarch. Stir until smooth.  Store covered in the fridge until serving time.

When the cheesecake has set, spread with Apricot Glaze. 

For another version of this, spread with pineapple glaze-- mix 1 tsp. cornstarch with 1/2 c. crushed pineapple with juice.  Boil; stir until smooth. This is the topping my mom used!

Cookie Crumb Crust
1 1/4 c. flour
1/3 c. brown sugar
6 Tbsp. softened butter

Preheat oven to 375 F.
Mix ingredients together until crumbly.  Press on the bottom of a 9x13 baking dish. Bake for about 10-15 minutes, until it starts to lightly brown, and smell delicious.  Let cool while you make the filling. 

This is also delicious with chopped nuts in it; add 1/4-1/2 finely chopped nuts (almonds, walnuts, or pecans) and reduce flour to 1 cup.


Picture
0 Comments

Meal Ideas for Menu Planning

3/28/2020

0 Comments

 
Picture
 Easy everyday main dishes or meals—ideas for your 3 month supply menus

Here is a menu plan for my family
​
Taco Soup  (Homemade Taco Seasoning here)                                         
Spaghetti
"Leftovers" Soup 

Baked Potato with Broccoli and Cheese 
Hawaiian Haystacks  
Pigs in a Blanket (hotdogs baked inside of bread dough or biscuit dough)                                    
Chicken Nuggets (or fish sticks) and French Fries
Orange Chicken (or cauliflower) and rice                               
BBQ Chicken and rice pilaf or biscuits
Pot Pies- made with canned biscuit dough   
Chicken Noodle Soup
Pizza Pockets (Homemade version here)
Taco Salad   
Tacos- beef, fish, chicken, shredded pork, or shrimp
Tamale Pies (mini)   
Mango-Berry Salad, with a sandwich if needed
​Swiss Steak and Tomato Gravy over rice
Hamburgers
Tuna Burgers
Bean Burgers
Red Beans and Rice   
Crockpot (or Instant Pot) Rosemary Pork Roast and Vegetables                
Grilled Cheese sandwiches with Tomato Soup
Spanish Rice with chopped meat stirred in   
Chef Salad with homemade croutons
Chicken Caesar Salad
Sweet Potato Curry with Turkey/Chicken
Ramen       
Ramen-Chicken/Turkey Salad         
​Weeknight BBQ Beef                                          
Individual pizzas- on tortillas or English muffins
​Pizza on Zucchini Crust 
Quesadillas- beans inside or to the side       
French bread pizzas- split lengthwise, add toppings
Chicken Strips and rice or tator tots              
Canned soup with bread and butter
Macaroni and cheese 
Fend for Yourself Night    
Beans, warm homemade bread, cottage cheese, and tomatoes or salsa (sounds weird, but it was my mom's staple on bread baking day)    
Black Beans and Southwestern Zucchini Cakes                           
Breakfast for dinner:
   French Toast                                            
   Pancakes or Waffles with fruit puree or jam
   V8 and nuts and toast                                                
   Hardboiled or scrambled eggs with muffins
   Eggs with fried potatoes or hashbrowns                                                   Muffins and yogurt, cut fruit
   Omelet
   Frittata
   Sausage and Gravy (or sausage gravy!) over Biscuits
   Fruit and Yogurt Parfaits
   German Pancake (try this microwaved version)
Curry over rice
theprovidenthomemaker.com/my-blog/two-minute-egg-and-cheese-breakfast-sandwichBurritos
Enchiladas
Chicken and Ramen salad 
Cheesy drop biscuits and soup                                 
Navajo Tacos    
Spanish Rice – add diced meat or cheese               
Clean out the Fridge night                             
Ham or Spam Fried Rice                               
Sour Cream Chicken Enchiladas
Vegetable Fried Rice                                     
Potato Bar (clean out the fridge for toppings)
Goldenrod Eggs                                             
Meatloaf and baked potatoes
Chicken Gravy over Rice     
​Egg Toast                         
Bread in Milk (basically Egg Toast without the eggs)
Beef stroganoff over noodles                         
Lentil Soup
13-Bean Soup                                                
White Chicken Chili
Chili                                                                
Two-Minute Egg and Cheese Sandwich  
Tuna sandwiches
Chicken salad sandwiches                            
Egg salad sandwiches
Potato salad with eggs, cheese, ham           
Crab salad on bread or lettuce leaves
Teriyaki stir-fried vegetables over rice          
Porcupine Meatballs (made from rice and hamburger, not porcupine!)
 
What else should I add? 
0 Comments

Week 42—Cottage Cheese or Queso Fresco, and WWII rationing

2/2/2020

0 Comments

 
To help with building your year's supply (this is Week 16 of 26), see this chart. 
 
Last week I found myself browsing through World War II recipes.  It was a good reminder of which foods become more difficult to come by during hard times. Several foods were rationed during WWII, including meat, cheese, coffee, sugar, and some canned foods.  How well prepared would you be for similar shortages? 


“Loaf foods” were common, and things like Walnut Roast were suddenly eaten more often. Eggless cakes with less sugar became a thing. I even have a recipe for “New Deal Fudge”, which, though it was from a decade earlier in the Depression, fit the bill nicely.

During that time, apparently cottage cheese also became more popular.  It was easy to make (I remember my grandma making it on the counter overnight), and since it’s high in protein, it was often used as a meat substitute in meals. People got creative with it, too.  (cottage cheese salad, anyone?)

You can make your own cottage cheese using powdered milk  Or use sour milk, ¼ c. vinegar per quart of sour milk.

Homemade Cottage Cheese


2 cups water
¾ cup non-instant dry milk powder
3 Tbsp. white vinegar
¼- ½ tsp. salt
 
Blend water and dry milk together and heat in a saucepan until it starts to steam, stirring constantly. Remove from heat.  (Heating this in a microwave is an option, too- heat until it foams and rises to the top of the bowl.)
 
DRIP vinegar around the edge of the pan (or bowl) and gently stir; milk will immediately start to curdle, separating into curds and whey.  Let rest 1 minute.
 
Pour into a colander. (the whey can be set aside as liquid for making bread.)  Rinse the curds with HOT water.  Rinse again with cold water to firm the curds; break apart into as small of curds as you want. This rinse should take about a minute under cold running water. The goal is to be sure all of the sour whey is rinsed away.  Sprinkle the curds with salt.

Makes about 1 ½ cups of curds. To make it creamy, like storebought, stir 1-4 Tbsp of sour cream or yogurt.
 
To make Queso Fresco, use four times the amount of powdered milk, triple the amount of vinegar and double the amount of water. (4 cups water, a little over ½ cup vinegar, 3 cups dry milk powder). Make it the same way, except drain it for a couple hours, then press the cheese firmly into a container to shape it. Use fresh within about a week, or freeze it.  
 
0 Comments

Week 18- Make Your Own Cream of Tomato Soup

8/10/2019

0 Comments

 
Your weekly assignment- you have two this time!  B4-3, and do a quick inventory of nonfoods. These include toilet paper, shampoo, soap, dish soap, laundry soap, hygiene supplies. Record what nonfoods are open; note how much is in each. At the end of four weeks, go through them again.  Note how much of each you used; multiply by three to know what you need for 3 months’ supply, or by 12 to know for a year supply. (Purchasing these begins in one month.)

Tomatoes are in full production mode in my garden right n
ow.  I made a couple dozen jars of salsa this week, and picked tomatoes again this morning.  About half of them went into a giant, double-size lasagne for my son's birthday dinner, but there are a couple quarts of cherry tomatoes left over.  I'm debating whether to make a cherry tomato salad tomorrow (yes, it's the right link; scroll down), or this cream of tomato soup. 
It's simple and delicious. Using cherry tomatoes increases the natural sweetness; did you know that commercial versions almost always add sugar to their tomato soup?  

Another advantage to making it yourself is you can substitute out any ingredient you have food sensitivities to.  Can't have dairy?  Use a nondairy milk instead, or coconut cream for a richer version.  Can't have wheat or gluten?  Use cornstarch to thicken it instead of the flour. (You'll only need half as much, and don't add it to the hot vegetables; add it to the blender along with the broth and tomatoes.)


The biscuit recipe is a fast drop biscuit version- the butter is melted before mixing in, rather than cut in. In the photo below, the biscuits were made with cheddar cheese and crumbled bacon in the dough. ​Mmm.

BTW, the link to the cherry tomato salad has two tomato recipes- a surprisingly hearty tomato salad, and the most delicious vegetable gratin I've ever tried.  (Bonus- it uses tomatoes AND the extra zucchini or summer squash that seems to always hide under the leaves until it's big! 
Picture
0 Comments

Week 12- Homemade Pizza Pockets

6/29/2019

0 Comments

 
Picture

Week 12 assignment-- Going off your  Inventory Shopping List and this week’s sales, buy the 3 months’ worth of as many different items as you can (= Buy For 3) as your new budget allows.    You'll do this through Week 21.

Have you ever made pizza from scratch?  It's delicious. To get directions on making pizza, go to the basic bread recipe, and scroll down until you see “Pizza”.  Directions are there, including for making enough of a super-simple red sauce for your pizza.  You'll want the sauce for pizza pockets, too.

Pizza pockets are fun, portable, completely customizable, AND they freeze well.  You can make them to suit food allergies; nondairy cheese can be used in these if you like. This recipe can be doubled, tripled, quadrupled  make whatever quantity you want to make for dinner plus extras for packable lunches. 

To make 8 regular pizza pockets or 6 large ones, you'll need:

-One loaf’s worth of bread dough

-8 oz. shredded cheese

-One 8-oz. can of tomato sauce (you'll only use half)

-Dried or fresh herbs- oregano, basil, thyme, garlic powder, onion powder, ground black pepper, rosemary, fennel (use whatever you have and like.  I often use only oregano, garlic and onion powder)

-Toppings-- crumbled bacon, pepperoni, cooked sausage, leftover chopped cooked chicken or hamburger, mushrooms, zucchini (shredded and squeezed dry), chopped bell peppers, spinach leaves, diced tomato, olives… Plan on ¼- ½ c. of each topping, for each 8 pockets you make.
 
Roll dough out as you would for pizza crust, a rectangle about 8x15”.  While the dough relaxes after rolling, pull out your sauce, cheese, and other toppings.  Oil a 12x18" baking sheet, sprinkle with cornmeal for extra crunch, OR line with parchment. After your toppings are ready, roll the dough larger, to make it measure about 13x19". 

With a pizza cutter or knife, cut the rolled dough down the center the long way, then in fourths the other direction. (See photo, below.) This will give you eight rectangles, each about 4x6”.

Picture
Picture
Spread pizza sauce on one long side of each rectangle, leaving a 1” clean border around those edges. Sprinkle with any toppings and about 2 Tbsp. of cheese. Brush the edges of the bare half with water; this will help the pockets seal better around the edges after crimping.

Fold each pocket in half the long way, lining up edges.  Crimp (pinch) the edges with your fingers or by flattening with the tines of a fork.  Set on the oiled baking sheet. Cover with a kitchen towel and let rise for 15 minutes. While they rise, preheat the oven to 400° F.  Remove the kitchen towel. 

For shiny rolls, brush with beaten egg (whites, yolks, or both) before baking, or brush with milk or butter for better browning. Bake about 20 minutes, or until browned on the bottom. Remove to a cooling rack.  Let cool at least 10 minutes before eating; they continue baking internally in those first several minutes. 


Refrigerate or freeze any that you didn't eat right away.

If you’re going to freeze them, first cool them completely.  Freeze them on a baking sheet, and then transfer to a ziptop freezer bag, labeled and dated.

Picture
Picture
Picture
Picture
Picture
0 Comments

Reducing Food Waste-- What to do with Sour Milk -- Make Cheese and More!

5/18/2019

0 Comments

 
Week 6 assignment-- Going off your  Inventory Shopping List and this week’s sales, buy the 3 months’ worth of as many different items as you can (= Buy For 3) as your new budget allows.    You'll do this through Week 21.
_______________

A big part of food management at home is reducing waste.  There are many ways to do this. 

Serve only what you’ll eat.  Refrigerate, freeze, or re-purpose leftovers. Or share with a neighbor.  A friend of mine regularly fixes a plate of leftovers immediately after dinner, and takes it across the street to an elderly widow.

You can use a lot of your food prep trim - lemon peels can be used to flavor things, clean kitchen disposals, make homemade lemon extract and lemon sugar. Shriveled lemons, orange, grapefruit, or limes are good for making marmalade. Tops and bottoms of celery can be frozen and saved to make broth or to add flavor when you cook dry beans. Broccoli stems can be trimmed and cooked along with florets, or chopped and added to salad for a nutritious crunch.  Things you can't re-purpose or eat can be fed to chickens, and many can be added to the compost pile.

If you wonder how much improvement you could make-- and how much money you could save on food!-- remember this:
“What’s measured gets managed.”

For one week, notice, measure, and take notes on what gets thrown out. 
 Aramark, a food service contractor, began doing this, and has reduced their food waste by nearly half (44%). For them, that was 479 tons of food saved from being sent to landfills. 

This is an interesting article on what some restaurants have done to reduce waste. Most of what they've tried works in homes, also.

You may have heard that in the US we waste 40% of our food-- 63 million tons of it per WEEK. But do you know where that waste is happening?

The largest share of it (43%) is happening in our homes-- 27.1 million tons of it per year. That's about 51 ounces per person, per week, or 3.17 pounds. If my family was average, that would mean the 8 of us currently at home would be throwing out 25 pounds of food every week. Shocking!
​
That would count food trimmings when I'm cooking, vegetables and fruits that went bad before getting used, whatever is wasted on a plate, leftovers that didn't get eaten in time, and anything that got burned too badly to eat. :)

We waste much less than average, though, and truthfully throw out very little. We belong to the "Clean Your Plate Club" that my grandma and mom talked about; all but the tiniest kids have learned to only serve up what they are willing to eat. We serve the 2- and 4-year-olds their food, and only in small amounts. If they want more, they get it after the other food on their plate is gone. Usable trimmings get saved for soup or broth. Unusable ones go to the chickens. Produce that went bad gets washed and trimmed; any good parts are used, bad parts go to the chickens. (We call these, "chicken treats"!) Bananas and apples that are getting mushy get put in smoothies or in baked goods. We understand what "expiration" dates mean on food, and so use our senses of smell, sight, and taste to know if they're still fine. (And they ARE, for much, much past those dates.)   When I miss a container of leftovers in the back of the fridge and find it after a week, that goes to the chickens too. Somehow we had THREE gallons of milk go sour this week, so they were turned into quick cheese; the whey went in muffins and bread. 

Let’s look at how to reduce waste with one item- MILK.

What can you do when milk goes sour?  This applies whether it happens before the ‘sell by’ date or after. Why does milk go sour? Does that mean it will make you sick?


Milk is high in lactose, which is the natural sugar found in milk.  When bacteria are introduced to the milk, they eat the sugars and convert them into lactic acid (=fermentation).   This means the milk has less sweetness, and more sourness.   This is the process used and controlled when making yogurt, cultured buttermilk, cottage cheese, and more.  

Some bacteria can make you sick, others are perfectly safe.  Because you don’t know which bacteria made your milk go sour, using uncooked sour milk has a possibility of making you sick.  Cooking with it, however, kills the bacteria, and is therefore safe.

Ways to use sour milk
 

-use it in place of buttermilk in pancakes, biscuits, chocolate cake, cornbread, wheat   bread, or any other recipe. 
-freeze it for using in recipes next time.

-pour a cup around your garden plants- it’s good fertilizer!  Milk is used to help grow     giant pumpkins, and helps prevent blossom end rot in tomatoes.  
- feed to chickens, pigs, or dogs (boil it first if you’re concerned for your dogs)
- make CHEESE! 


That’s right, you can take sour milk and turn it into cheese.  The fastest, easiest ones to make are cottage cheese and Queso Fresco, a mild fresh cheese. The method for both is the same until after the cheese curds are drained.

One gallon of milk will make about one pound of cheese.
 

Cheese from Sour Milk
You will need:

Sour milk
Salt
Vinegar or lemon juice—maybe.
 
Spray the inside bottom of a heavy saucepan with nonstick cooking spray.  Heat over low for about a minute to form a coating-- this helps the milk proteins NOT stick to the bottom of your pan.(You can skip the spray and still be fine.  Just stir more.)  Add your sour milk, and heat over medium-high until the milk starts to steam, stirring often.  If your milk is sour enough, it will start to curdle-- separating into curds and whey.  (Remember "Little Miss Muffet"?  Curds are the white clumps, whey is the yellowish liquid left behind.)  If your milk isn’t separating on its own, add up to ¼ c. of vinegar or lemon juice, a few DRIPS at a time, stirring after each addition.  The milk will immediately start to curdle.  Remove from heat and let it rest for one minute. 

Put a fine-mesh sieve over a large bowl and pour the curds and whey into the sieve.  Move the sieve to the sink, and rinse with hot water to get the acid out.  Rinse with cold water for about a minute, until no more whey is in it.  Add salt, ½ tsp. per cup of curds.

Cottage Cheese-
For each cup of curds, stir in 2-4 Tbsp. of yogurt or sour cream.  Cover and refrigerate.  This works great in recipes like lasagna.  I can make a batch of cottage cheese (using dry milk powder) faster than I can drive to the store and purchase it. (That’s saying something; the store is about a mile away.)
 
Queso Fresco-
After draining, rinsing, and salting the curds, put them in a couple layers of cheesecloth or on a flat (non-terrycloth!) dish towel.  Twist the top of the fabric closed, and tightly squeeze the cheese over the sink.  More liquid will come out.  Attach the twisted part of the towel (your ‘bag’) to a cupboard handle, and set a bowl under it to catch any more drips.  Let hang overnight.

If you want a nice flat, round shape, instead of hanging the bag, set it inside something round—a clean, empty 29 oz peach can, a food storage container, or whatever you have.  Set something on top of the cheese, and put something heavy on top of it to press it down.  Let that sit overnight. 
In the morning, wrap and refrigerate the cheese.  Use within a week or two; this one doesn’t have a long shelf life.  Here are ways to use it. https://www.thekitchn.com/queso-fresco-the-cheesemonger-91408
 
 ---------------------------------------
Now you have leftover whey - a yellowish, clear liquid that contains protein, carbs, calcium, phosphorus, and several B vitamins.
 
The resulting whey in this recipe is ‘acid whey’ (versus ‘sweet whey’) because it is a little acidic.  How to use it?  Very much as you would sour milk or buttermilk.  Use in most recipes that call for water or milk.  Use it as a tenderizing marinade for meat; add flavors and spices as you like.  Use it to make whey lemonade, feed it to animals (chickens love it!), or as a last resort, pour in your compost bin.  It’s also reportedly used as a great hair rinse, but I haven’t tried it yet.

What else have you done with sour milk, or with whey?
0 Comments

    Need a Search bar?
    One day I may upgrade my website-- but until then, use your web browser search bar. Type in my web address and what you're looking for, like this-- 
    www.theprovidenthomemaker.com  pumpkin --  and you should get results.


    Author

    I'm a disciple of Christ, a member of the Church of Jesus Christ of Latter-day Saints, a family-defending, homemaking, and homeschooling mom of eight children, two of whom sometimes can't have milk or wheat. Growing up on a farm in a high mountain valley, my parents taught me to 'make do', work hard, smile, and help others.  I love cooking, learning, growing food and flowers, picking tomatoes, and making gingerbread houses --which CAN be made allergy-friendly-- with my children.  I hope you find something to help you on my site!

    Archives

    April 2024
    July 2023
    April 2022
    September 2021
    March 2021
    December 2020
    April 2020
    March 2020
    February 2020
    January 2020
    December 2019
    November 2019
    October 2019
    September 2019
    August 2019
    July 2019
    June 2019
    May 2019
    April 2019
    January 2016
    November 2015
    October 2015
    September 2015
    March 2015
    February 2015
    November 2014
    October 2014
    September 2014
    August 2014
    July 2014
    June 2014
    May 2014
    April 2014
    March 2014
    February 2014
    January 2014
    December 2013
    November 2013
    October 2013
    September 2013
    August 2013
    July 2013
    June 2013
    May 2013
    April 2013
    March 2013
    February 2013
    January 2013
    December 2012
    November 2012
    October 2012
    September 2012
    August 2012
    July 2012
    June 2012
    May 2012
    April 2012
    March 2012
    February 2012
    January 2012
    December 2011
    November 2011
    October 2011
    September 2011
    August 2011
    July 2011
    June 2011
    May 2011
    April 2011
    March 2011
    February 2011
    January 2011
    December 2010
    November 2010
    October 2010
    September 2010

    Categories

    All
    Alcohol
    Alternate Cooking
    Appearances
    Apple
    Apricots
    April Fools
    Aprons
    Bananas
    Beans
    Beef
    Beets
    Bench
    Beverages
    Bonnet
    Bread
    Breakfast
    Budget
    Budgeting
    Cake
    Candy
    Canning
    Carrots
    Cheese
    Chicken
    Children
    Chocolate
    Christmas
    Cleaning
    Coconut
    Comfrey
    Common Core
    Constitution
    Cookbook
    Cookies
    Cooking Oil
    Crafts
    Dairy Substitutions
    Dehydrating
    Dessert
    Dried Fruit
    Earth Oven
    Earthquake
    Easter
    Edible Weeds
    Eggs
    Emergency Prep
    Essential Oils
    Faith
    Family Home Evening
    Fertilizing
    Food Storage
    Fourth Of July
    Freezer
    Frosting
    Fudge
    Garden
    Gardening
    Gingerbread
    Gluten
    Gluten Free
    Gold
    Government
    Grains
    Gratitude
    Hat
    Herbs
    Home Remedies
    Home Repairs
    Homeschool
    Home Storage
    Honey
    Hope
    Inflation
    Leftovers
    Legumes
    Lemon
    Main Dishes
    Mixes
    Mothers
    Noah
    Non Artificial Colors
    Non-artificial Colors
    Nuts
    Oats
    Oil
    Orange
    Paint
    Peaches
    Pear
    Pie
    Pizza
    Plums
    Poem
    Popcorn
    Pork
    Potatoes
    Powdered Milk
    Prayer
    Preparedness
    Projects
    Prophecy
    Pruning
    Pumpkin
    Quick Bread
    Rhubarb
    Rice
    Salad
    Salt
    Sauces
    Self Reliance
    Self-reliance
    Sewing
    Shelf Life
    Shelves
    Sky
    Smoothie
    Snacks
    Soup
    Spices Or Seasonings
    Squash
    Strawberries
    Substitutions
    Sugar
    Summer Fun
    Three Month Supply
    Time
    Tomatoes
    Trees
    Truffles
    T-shirts
    Tuna
    Ultra Gel
    Valentine\'s Day
    Vegetables
    Water
    Watermelon
    Wheat
    Work
    Year Supply
    Zucchini

    RSS Feed

Web Hosting by iPage