To help with building your year's supply (this is Week 11 of 26), see this chart.
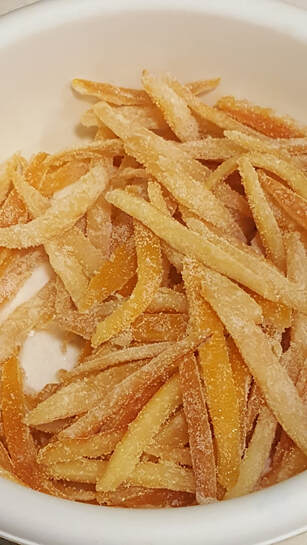
Candied orange peel takes some time, but it's really easy and requires very little hands-on time. It's done mostly while you’re working on other projects. Basically, you cut orange peel into strips, boil it in two changes of water to get the bitterness out, simmer for an hour in a basic sugar syrup, cool, then toss with sugar to coat. It’s delicious by itself, dipped in chocolate (my favorite!), or chopped up and used in recipes. It’s especially good in muffins, cookies, breakfast oatmeal,yeast breads, cakes, zucchini bread, etc. You get the picture. Any citrus peel may be candied- grapefruit, lemon (yum!), lime. Clementines are even an option, but their peel s are so thin you’ll be candying uneven pieces, rather than neat strips.
I saw chopped candied orange peel at the store today. The ingredients included high fructose corn syrup, sodium benzoate, sulfur dioxide. When you make this yourself, it has two ingredients. Two. (Water doesn't count.)
I made three batches this year with the peel from eight oranges each batch. This made about six pounds of candied orange peel total, which took between 3 and 4 pounds of chocolate to coat. (I tend to work in biggish quantities.) Everybody who tried it loved it. Everybody, that is, except my husband. He’d rather eat the orange jelly sticks from the store. I’m OK with that; I’d rather have these.
You can make any size batch—even down to the peels from a single orange—but other than the time to cut up the peels, it takes almost no more time to candy a lot than a little.
What can you do with the now-peeled oranges? In a family my size, we have no problem eating them within a day or two. My kids especially like them sliced in wheels to eat with breakfast. But we often make my mom’s orange salad- separate the oranges into segments, cut them into bite-sized pieces, then combine in a bowl with canned pineapple and shredded coconut. Quantities are super flexible, but a good amount is 4 -6 oranges to one 20-ounce can of pineapple (chunks or tidbits), along with ½ to 1 cup coconut. Toss together and serve.
See the slide show below for pictures on making this.
Candied Orange Peel
8 oranges
Water
3 cups sugar, for candying
½ cup sugar, for coating
Chocolate for dipping- about 1 ½ pounds, optional
Peel the oranges as neatly as possible. My favorite peeler by far is the one from Tupperware –maybe that’s just because I grew up with it-- but this one will work, too.
If you peel them like this (video) you’ll end up with four quarter-peels per orange. Grab a pair of scissors and snip them lengthwise, with each one ¼- 3/8” wide. Toss them in a large pan.
Cover with water and bring to a boil. Turn down the heat and let the peels simmer for 10 minutes. Turn off the heat and let the peels sit anywhere from another ten minutes to overnight. Drain the water.
Cover the peels with new water. Repeat the boiling process, letting them sit afterwards for 10-30 minutes. Drain as much of the water as you can.
To the peels in the pan, add 3 cups granulated sugar and 1 ½ cups water. Bring to a boil, then reduce to keep a stead boil. Stir the peels occasionally. Meanwhile, put a cooling rack on top of a cookie sheet to catch the drips later.
The goal here is to get as much of the syrup to absorb into the peels as possible. This usually takes about 60-70 minutes of cooking. As you get closer to the end, the bubbles will change their look, becoming smaller and more white-looking. Stir more often towards the end, so the peels don’t scorch. Once the syrup has been absorbed, use a slotted spoon to transfer the peels onto the waiting cooling rack. Spread them out more or less evenly. Let them cool for 30 minutes to 2 hours. (Nothing bad will happen if it’s longer; the worst is that less sugar will stick to them.) Get the ½ cup of sugar. In a large bowl with a lid, dump half of it onto the bottom of the bowl. Put all the orange peels in next, then add the other half of the sugar. Put the lid securely on the bowl, and shake to coat. Stir if needed. Leave the pan on the stove; we’ll get back to it.
Spread the orange peel out flat and one layer deep on two cooling racks or cookie sheets. Once it’s dry to the touch—a few hours or overnight—it’s ready to dip in chocolate.
What do you do with the last of the syrup in the pan and what dripped off onto the cookie sheet when the hot peels drained?
Scrape off whatever’s on the cookie sheet and add it to the pan. Add ¼ cup water to the pan, bring it to a boil, scraping the sides of the pan. This syrup can be used on pancakes or oatmeal, or to flavor water, smoothies, or other drinks. Refrigerate any leftover syrup.
Store not-dipped orange peel in a tightly-covered container at room temperature if it's only for a few days, or in the refrigerator for longer. I've had it that way for months. As long as it hasn't grown mold, it's still good. It's likely to dry out a bit over time, but that's fine. Store
chocolate-dipped orange peel in a tightly-covered container for a few weeks. I really don't know the shelf life because it's always eaten within a week or two.


 RSS Feed