The Provident Homemaker
  • Recipes and Info
    • Making Bread
  • My Blog
  • Favorite Resources
  • Documents and Files
  • 52 Weeks of Building Storage

Your year's supply; Tootsie Rolls

11/26/2010

0 Comments

 
Picture
Picture
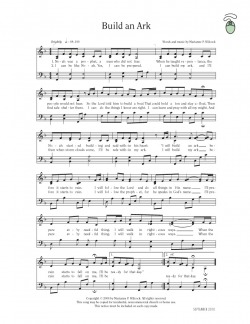
Right-click to save, it should come up full-sized once you do.  You can also find this in pdf format.  The song is on page 25.

(originally from 4/15/10

Now that the Three Month Challenge is over, the next step is finishing your year’s supply.  In agrarian cultures, it was very common to have a year’s supply, in case the next year’s harvest was insufficient- hailstorms, drought, fire, flood, damage from animals or bugs.  Since we don’t grow all our own food anymore, we sometimes become oblivious to the need to have backup.  In reality, our food situation is more precarious- it involves a large web of people, machinery, and transportation, as well as Nature, all doing their part.  If any one of these is messed with, the stores could be empty within a few days.  Food storage is great insurance and brings peace of mind.    I can’t afford to invest in gold, but I can afford wheat.  You can’t eat gold, anyway.  I’ll send a quote next week from Brigham Young about gold and wheat. 

A great article on what and how to store your long-term food is “Home Storage: Build on the Basics” from the Ensign magazine, June 1989.  Some highlights from it are:

“We continue to encourage members to store sufficient food, clothing, and where possible fuel for at least one year. We have not laid down an exact formula for what should be stored. However, we suggest that members concentrate on essential foods that sustain life, such as grains, legumes, cooking oil, powdered milk, salt, sugar or honey, and water. Most families can achieve and maintain this basic level of preparedness. The decision to do more than this rests with the individual.

“We encourage you to follow this counsel with the assurance that a people prepared through obedience to the commandments of God need not fear.” (First Presidency letter to priesthood leaders, 24 June 1988.)

If families would think in terms of storing only foods basic to survival, or if they would supplement the food storage they already have with the basics to build it up to a year’s supply, the task would be simpler than they might think. They would then be prepared for food emergencies.

A year’s supply of food storage is beneficial in several ways:

1. It provides peace of mind as we obey the counsel to store.

2. It helps ensure survival in case of personal (including financial setbacks, health issues) or natural disaster.

3. It strengthens skills in preparing and using basic foods.

No single food storage plan will work for everyone. Each family’s needs differ, as does their financial ability to accumulate the storage items. But by working under the direction of the First Presidency “to concentrate on essential foods,” it can be done. President Ezra Taft Benson has said on at least three different occasions, “The revelation to produce and store food may be as essential to our temporal welfare today as boarding the ark was to the people in the days of Noah.” (Ensign, Nov. 1980, p. 33.)”


Noah didn’t build it in a week, and he didn’t take out a loan for it… but he worked at it until it was done.


Are you building your ark?

 
* * * * * * *
The
recipe this time around is for something fun to make and eat:

 Tootsie Rolls
2 Tbsp. butter
½ c. corn syrup
¼ c. unsweetened cocoa powder
1 tsp. vanilla
3 c. powdered sugar
¾ c. dry milk powder

 Combine in a bowl, mix as much as you can with a spoon, then knead by hand.  At first it will look like a big bunch of powdered sugar that won’t ever stick together….. but keep with it, and it will.  Once it all turns brown and holds together, roll into long ‘snakes’ and cut into bite-size pieces.

These are even better the next day, and if you want them chewier, let them sit out a few days.  (Remember how old the store’s Tootsie Rolls must be…)

Vanilla Tootsie Rolls
Instead of corn syrup, use sweetened condensed milk and omit the milk powder.  Increase vanilla to 1 Tbsp.  

 
0 Comments

Top 10 Food Storage myths; Chicken Vegetable Soup

11/26/2010

0 Comments

 
 (originally from 4/25/10)
This great list was sent to me by one of my sisters-  enjoy!  It is written specifically for members of the Church of Jesus Christ of Latter-Day Saints; the information is good for everyone.

-Rhonda

Top 10 Food Storage Myths BustedBy Danielle Ellis, Desert Saints Magazine

A quick glance through any grocery store reveals that the average American food supply has come from far and wide. Produce from around the globe, grains from hundreds or thousands of miles away, canned goods from who-knows-where. A single calamity, whether man-made or an act of God, would leave those shelves empty, without much hope of a new supply.  For this reason, and many more, Latter-day Saints have long been counseled to have a year’s supply of food and basic supplies in their homes. Yet research has shown that never more than a small percentage of saints have complied with this vital instruction. We’ll bust some of the myths surrounding food storage that may be holding you back. Then make your plan and complete your year’s supply!

10  I Don’t Need Food Storage“There aren’t enough of us; my parents have mine; I don’t think I’ll ever need it.”  These are all ways of saying that you, for some reason, are exempt from prophetic counsel. You’re not. We have been told that our food storage will be as vital to us as boarding the ark was to Noah’s family. You need food storage!

9 There’s Food In The Bishop’s Storehouse“If something happens, I’ll go to the bishop’s storehouse.” Estimates are the bishop’s storehouse would be cleaned out in a matter of minutes. As President Monson advised over twenty years ago, “The best storehouse system that the Church could devise would be for every family to store a year’s supply of needed food, clothing, and, where possible, the other necessities of life.” Be your own storehouse.

8 I Don’t Have A Place To Store FoodIf you knew the lives of your family members depended on the food in your home, would you find a way to store it? Clear out some of your baggage (clutter) to provide for the future. You can find many places for storage. Make it a priority.

7 I Don’t Know What To Store Visit providentliving.org. If that’s too daunting, consider this: the Church advises storing 300 pounds of grains and 60 pounds of beans per adult per year. Break that up into breakfasts, lunches and dinners, and find some recipes. You know what you eat: store it.

6  I Don’t Know How To Store It If you’re confused by oxygen absorbers and gamma seals, don’t be. Get basic foods in your home and begin using them. Once you know how to use them, figure out how to store them for longer periods. You should be using and rotating your foods in an orderly plan, not keeping them for generations.

5  I Have Food Allergies You’re eating something now to stay alive. Figure out how to get a supply of that. If you want to store grains, try millet and oats. Millet is the least allergenic of all grains and oats contain no gluten. Quinoa is a totally different type of grain than wheat and is a nutritional powerhouse. Those with special dietary needs especially need food storage.

4  I Don’t Know How To Prepare It Brigham Young once said, “we need not ask God to feed us, nor follow us round with a loaf of bread begging of us to eat it. He will not do it….” It is our job, and nobody else’s, to figure out how to feed ourselves. There are many cookbooks created to use food storage ingredients. Find some and start using them.

3 The Food Will Go Bad The food will only go bad if you buy short-life products, then stick them under the bed and wait for “d-day.” Buy whole-food products, store them properly, use and rotate them and you’ll be in great shape.

2  I Hate Wheat Then find grains you like, or new recipes, or find different ways to use wheat. Sprouting wheat provides a new dimension of possibilities, as well as additional nutritional benefits- enzymes, extra vitamins and minerals. Try barley, buckwheat, bulgur, couscous, millet, oats, quinoa, rye. Or durum wheat for pasta. Whole grains have the longest storage life and great nutrition.

1It’s Too Expensive If you buy food you never use, you will never find “extra” money to purchase food storage or ways to use and enjoy it. I recently made a large purchase of grains. Including the cost of shipping them to my door, the grains ended up costing LESS THAN 35 CENTS/LB! Look at anything you buy from the grocery store- you are paying much more. Incorporating simpler, whole foods into your diet will improve your health and ease your pocketbook. Priceless.

* * * * * * *         

Menu suggestion- serve this soup with crunchy apple slices and 'Best Drop Biscuits'.  Turn on the oven first; it will be hot enough by the time you get the soup in the pot and the dough mixed.

Chicken Vegetable Noodle Soup 

2  ½   c.  water    (or use broth and omit the bouillon)
1 (8-oz). can  tomato sauce   
10-16 oz bag frozen mixed vegetables (or 2-3 cups fresh)   
A handful of noodles  or other pasta 
2   tsp. or 2 cubes  chicken bouillon   
2   c. cooked chicken (or turkey),  cut up

Combine water, noodles, sauce and veggies.  Bring to a boil, then simmer, stirring occasionally, 10 minutes.  Stir in chicken.  Bring to a boil, then simmer 5 minutes or until vegetables are tender. Makes about 6 cups. 
I frequently make this my clean-out-the-freezer soup; instead of adding a bag of mixed vegetables, I add all my frozen odds and ends


0 Comments

Bishop McMullin clip, more on 3-month supply; Spreadable Butter, Snow Ice Cream

11/26/2010

0 Comments

 
(originally from 3/4/10)

Today the information is from two Internet sources:

Here’s a link to Bishop Keith B. McMullin (Bishop for the whole church) speaking on Family Home Storage:http://providentliving.org/channel/0,11677,1706-1,00.html   click on TV icon in upper right corner of page. It’s about a one-minute clip, and very good, simple advice to listen to.

At http://www.utahpreppers.com/2009/10/food-storage-short-life-supply/ there is a good post on a three-month supply- starting it, using it, maximizing shelf time, replacing it, advantages of having it. 

And just a note: remember the email about storing vegetables without a ‘real’ root cellar?  Yesterday (March 3) we ate butternut squash from last year’s garden, it was delicious!  I kept it, along with a couple pumpkins and a giant zucchini, in a dark basement room.  They’ve been just been sitting on top of a couple food storage buckets; I learned a couple years ago that they spoil quickly with moisture, so they can’t sit on a cement floor. They’ve stayed about 65 degrees there, so it requires nothing unusual.  One pumpkin got dropped a month ago, bruising it, so one side has started to go soft.  Maybe we’ll have pumpkin pie tomorrow, to use it before it spoils.  The other pumpkin is still perfect, and the zucchini, well, now there’s an interesting experiment.  It really is big, about 18” long, and bigger around than my hands can reach.  It sat on my counter for about a month, until I decided it might as well go downstairs to see what would happen.  It has blanched.  It slowly lost its green color, now hardly any is left, but it’s still firm.  I’ll let you know how it cooks up.

How’s your food storage coming?  Are you finding the joys in shopping from your own pantry?  Is it saving you trips to the store?  Mine is a great blessing to me and my family.  I love feeling that we could weather whatever economic storm comes our way.   This is also the third month on the three-month challenge.  If you’re not 2/3 of the way there, don’t panic or give up, just start.  If you are that far or more, go look at your shelves/freezer of food and admire your work, and thank the Lord for it.

-Rhonda

Spreadable Butter
2 cubes butter, softened
1 c. oil, use olive oil if you like
¼  tsp. salt

Beat butter until smooth; while beating slowly add in olive oil, then salt.  Pour in whatever size container you want it in; store in refrigerator.   Make any quantity you like- you’ll always use equal amounts of butter and oil, and some salt for flavor.

Snow Ice Cream

1 cup milk, evaporated milk, or cream
1/2 cup sugar
1/2 tsp. vanilla or other flavor
6-8 cups fresh clean snow (6 c. if heavy, wet; 8 if powdery)

 Mix together milk, sugar, and vanilla.  Pour over snow.  Mix well and eat right away.
You may substitute a can of sweetened condensed milk for the milk and sugar- tastes good, but costs more.

 
0 Comments

Turkey or Chicken Broth, Homemade Chicken Noodle Soup, ETB quote

11/24/2010

0 Comments

 
Picture
Eggs, flour, and water make delicious homemade noodles.

Picture
Do you have most of a turkey left over? Or do you have a rotisserie or roasted chicken?  Or even some fried chicken that's nothing but bones now?   It's perfect for making soup.  Really good soup.  It's simple and easy.  There are a lot of herbs and vegetables listed in the broth recipe, which may seem intimidating, but keep in mind the old story of Stone Soup..... each ingredient makes it a little better, but if you don't have something, the soup will still be good.  You make the broth a few hours ahead of time, then add the noodles right before serving- fresh pasta takes only about 3 minutes to cook.  This makes a lot of broth- it freezes well.  Save some for another day. 

Turkey Broth- for chicken, use half as much of everything

The bones from your turkey (with a little meat on still) -   
Water to cover
1 big handful of parsley
1 tsp. thyme
1 bay leaf
2 carrots, cut in 1" chunks
2 stalks of celery with leaves, chopped
2 onions, quartered
5-10 peppercorns
5 whole cloves
1 Tbsp. salt to start with

I like to add a little cayenne pepper to the soup if someone is feeling  under the weather.
Picture
The perfect ratio of bone-to-meat is 50/50, but anything will give you broth.  Combine everything in a stock pot, large Dutch oven, or crockpot.  Let simmer or bake, mostly covered, for at least one hour but preferably 4+ hours, until the broth is brown and any remaining meat is fall-off-the-bone tender.  Less time will still give you soup, just not as flavorful.  If you leave the lid off, it will steam up your kitchen windows but will reduce and concentrate the flavor.  A happy medium is to have the lid mostly-on.

Picture
Once you decide the broth is done, pour into a colander over a large bowl.  Pour the broth back into your stock pot, and start sorting through to get the bits of meat.  Try to get every little bit and you may be surprised how much meat was left on a bird you thought was picked clean.
Plan on this taking about 30 minutes; less for a chicken but often more for a large turkey.

Picture
I now have two bowls from the contents of the colander- meat on the left, parts I'm discarding on the right.  If you don't have any tiny bones mixed in with the well-cooked vegetables (I call them 'dead vegetables' at this point!), you can put the veggies in a blender and use it as a base for gravy or soup.

Picture
Beautiful, rich brown broth.  A sign of a good broth, or stock, is that it will gel when cooled.  That's because the bones, with long cooking, release natural gelatin; it adds body and nutrition.

Picture
Skim off fat.  You can save it for cooking with later.  
If you have time, it's easiest to remove when you've chilled the broth overnight to let the fat solidify on top. To make the chicken noodle soup, put it in a big pot and bring to a boil while you're making the noodles.  I usually add in a couple diced carrots and a rib of chopped celery, too.  Taste to see if it needs more salt.

Picture
Freeze and label any leftover broth. I like to use 1-quart-sized freezer ziptop bags; the broth on the right was frozen in muffin cups, for the times I just need a little broth. It will be good at least 3-6 months in the freezer.  I've kept it longer, it hasn't ever gone bad, but may pick up a little funny flavor from whatever else is in the freezer after too long.

Homemade Noodles  -double or triple for a bigger family- my family will eat a 3-cup batch of noodles in soup in one sitting)

1  c. flour
1 egg
2-3 Tbsp. water

Put flour and salt in a bowl or on the counter, stir, and make a deep well in the middle of it.  Put the egg in the well, beat the egg lightly with a fork, add water, and stir to make a stiff dough.  Turn out onto floured counter and knead until smooth, about 3-4 minutes.   Let rest 10 minutes.  (You don't have to do this, but it rolls out more easily if you do.)  Roll out into a rectangle, very thin, about 1/8" thick or less, on a floured counter.  Using a pizza cutter or knife, cut into long strips 1/4-1/2 inch wide.  Cut crosswise so each noodle is only 2-3 inches long.  Lift off the counter using a pancake turner, dump into the boiling broth.   They'll be done in only three minutes, when they float.


Here's a quote for today:


Ezra Taft Benson

"I would respectfully urge you to live by the fundamental principles of work, thrift, and self-reliance, and to teach your children by your example.  It was never intended in God's divine plan that man should live off the labor of someone else.  Live within your own earnings.  Put a portion of those earnings regularly into savings.  Avoid unnecessary debt.  Be wise by not trying to expand too rapidly.  Learn to manage well what you have before you think of expanding further.  This is the kind of advice I would give my own, and is, in my opinion, the key to sound home, business, and government management.

"I would further counsel you to pay your honest tithes and contribute generously to the support of the poor and needy through the fast offerings.  Then store at least a year's supply of basic food, clothing, and fuel.  Then you will find these blessings will accrue: You will not be confronted with the danger of losing all you have because of inflation or depression.  You will have security that no government can provide---savings and supplies for emergencies" (The Teachings of Ezra Taft Benson, p. 262-263).

0 Comments

Cleaning Out and Stocking Up; Chocolate Popcorn

11/18/2010

0 Comments

 
Picture
 

Here is a great idea I heard this week:  go through all your extra stuff (house, garage, back of the cupboards, storage unit if you have it, basement) and tag everything you don't really need.  Even if you like it, if  you don't need it, let it go.  Sell it on Craigslist or ksl, or we could have a giant yard sale...   Then use the money to pay off debt.  Or get food storage.  Or to help someone else. 

Remember the church's website, http://www.providentliving.org?   Being provident means making the most of what you have.  What you have isn't useful if it's sitting.  Have fun!  You’ll be amazed at how thankful you feel for what you could clean out.  It’ll even help you spend less on Christmas!  

“‘Self-reliance means using all of our blessings from Heavenly Father to care for ourselves and our families and to find solutions for our own problems.’ Each of us has a responsibility to try to avoid problems before they happen and to learn to overcome challenges when they occur. …

“How do we become self-reliant? We become self-reliant through obtaining sufficient knowledge, education, and literacy; by managing money and resources wisely, being spiritually strong, preparing for emergencies and eventualities; and by having physical health and social and emotional well-being.”- Sister Julie Beck

 Chocolate Popcorn

One 10-12 oz. bag chocolate chips
8-9 quarts popped corn

 Melt chips, pour over popcorn and mix.  Put in a 225 degree F oven for about 30 minutes, stirring about every 10 minutes.  Cool and store. 

You can also skip the baking step, but baking makes it a little less messy to eat; less melting on your fingers.  That might not be important to you, though…

 Use any kind of chips: dark, milk chocolate, white chocolate, peanut butter, butterscotch, mint, or a combination.  Try chocolate  drizzled with a little bit of melted peanut butter chips.  Or use different colors for a baby shower.  Or stir in some toasted chopped nuts (butter toffee peanuts, anyone?)  Reese's Pieces, cut-up pieces of caramels or candy bars, or anything else that sounds good.
0 Comments

What is Provident Living? and "Warm Delights" copycat recipe

11/16/2010

0 Comments

 
Picture
You, too, can be just two minutes away from a personal-sized warm cake.   One minute to find a cake-mix box and mix 1/2 cup of it with 1/4 c. water, one minute to microwave.  This one is yellow-cake 'warm delights' with chocolate frosting.  My favorite is chocolate cake with a couple mini chocolate-almond bars broken into it.

Great for those smaller households or college students! 

Picture
OK, I think this looks like a bowl of Cream of Wheat. It's really yellow cake with 1 1/2 tsp. cinnamon sugar swirled on top before cooking.  Yum. 
I know the cake mix calls for eggs, but I made this mini version both without eggs and with the right (tiny) amount- they were nearly identical.  The batch with egg in it rose a little bit higher, but that was about it.  Not worth dividing an egg for.

Scroll to the bottom of this post for the complete recipe.

 (originally 5/21/10)

The LDS Church has a wonderful, helpful website, providentliving.org.  The name got me thinking, what does ‘provident’ really mean?  I know the general idea, but what are the details of it?  So here’s what I found.  Some synonyms for it are: careful, conserving, frugal, prepared, prudent, scrimping , thrifty, vigilant, wise.


Antonyms include careless, extravagant, shortsighted, wasteful.

So basically it means being wise with your resources and planning ahead. Right along with ‘self-reliance’, it means planning so that you “rely on yourself” in emergencies or difficulties, not on the city, or the government, or the church, or your neighbor’s food storage.  We’ll share, and you know it, but if you’re prepared, then you have the blessing of helping others instead  of using resources up faster.  We have the safety nets of family, church, and community in place, and sometimes we have to use them, but we are to plan so we have to rely on those backups as little as possible.  Don’t make your Plan A “have someone rescue me”.  That’s Plan B or Plan C.  Or D.  The Visiting Teaching message from January 2010 included this from Sister Julie B. Beck:

“‘Self-reliance means using all of our blessings from Heavenly Father to care for ourselves and our families and to find solutions for our own problems.’ Each of us has a responsibility to try to avoid problems before they happen and to learn to overcome challenges when they occur. …

“How do we become self-reliant? We become self-reliant through obtaining sufficient knowledge, education, and literacy; by managing money and resources wisely, being spiritually strong, preparing for emergencies and eventualities; and by having physical health and social and emotional well-being.”1


So there’s a lot to it, but think about this one:  are you preparing for emergencies and whatever else may/will eventually happen?  Earthquakes, job loss, sickness, car repairs…prayerfully put plans in place to avoid and overcome these challenges.  “Organize yourselves, prepare every needful thing”- D&C 88:119.  If you need any help on your journey to provident living, your visiting teachers will be glad to help; I will too. Pat yourself on the back for what you’ve already done, and figure out what’s next.   I know that the Lord will bless you as your exercise faith in this principle.

* * * * * * *  

“Warm Delights” copycat  (10 cents per serving when cake mixes are on sale….)

½ cup any flavor cake mix       
1/4 cup water

Microwave in a bowl for 1 minute, let stand a couple minutes to cool. 

If you like, add before cooking: 1 Tbsp. chocolate chips/chunks or a few Hershey’s kisses for Molten Chocolate, a few unwrapped, quartered caramels, or a generous sprinkle of cinnamon sugar lightly swirled in;   use your imagination!  After cooking, add a drizzle of caramel topping, lemon sauce, fudge sauce, whatever sounds good.  For upside-down German Chocolate, mix together 1-2 Tbsp. cream cheese, 1 tsp. sugar, and 1-2 tsp. coconut.  Dollop on top before cooking the cake. 

One cake mix will yield about 9 of these.     Or use Bisquick: 1/3 c. mix, 1 ½ Tbsp. sugar, 1 Tbsp. unsweetened cocoa with 1/4 cup water.
0 Comments

EP Moment; Mom's barbecue sauce

11/16/2010

0 Comments

 
Picture
Click here to download a PDF of
the Putting Down Roots pamphlet
(16MB).

Picture
Barbecue Sauce on beef


(originally from 5/27/10)
Here’s a great idea from Meridian Magazine: 

 the “Emergency Preparedness Moment: 

What emergency preparedness activity would you like to do this week for your family? Make this a matter of prayer and you will be surprised at the promptings you can receive. These few minutes every seven days during Family Home Evening can help your children be ready for a variety of emergencies. Problem solving skills, first aid skills, putting together backpack 72-hour kits, or any other kind of creative endeavor shows your family you love them and teaches them how to take care of themselves in tough scenarios. What will you choose this week?” 

You could also find a minute or two while you're driving kids to school or activities. A little bit of time each week can help you cover a LOT of ground. If you need resources, some great ones online are
http://www.fema.gov/areyouready/   http://ussc.utah.gov/publications/roots_earthquake_low.pdf    If you prefer a booklet you can HOLD, both of these are available, free of charge, at the city office building, from the city emergency planner.  Here in South Jordan that’s Dustin Lewis.  He’s happy to pass them out!

Maybe expand the “Emergency Preparedness Moment” into a “Self-Reliant Living Moment”?    See where the Spirit leads you in your quest… 

-Rhonda

 * * * * * * *
Mom's Barbeque Sauce       Makes about 3 cups

2   8-oz cans  tomato sauce (or 2/3 c. tomato powder and 1 1/3 c. water)   1   can/cup water (fill up one of the now-empty tomato sauce cans)   1 chopped onion (size is totally up to you)  or use a handful of dried
A couple sprinkles  of garlic   
pepper to taste   
3-4   shakes   of Worcestershire sauce   
1 Tbsp. vinegar, optional
Sugar, honey, or molasses to taste, anywhere from none to ½ cup

Simmer everything together until flavors combine, at least 10 minutes, or an hour if you have it, to let it thicken and become rich.  This will be even better the next day or later in the week.  Leftovers freeze well.  If using this with hamburger, you can cook the hamburger with the onion and then add the rest and simmer.

If you want to change the flavor a bit, add a spice or two. Some good ones for this are cloves (try 1/8-1/4 tsp.), oregano (about 1 tsp.), chili powder (1-3 tsp.), or Liquid Smoke (1/2-1 tsp.), mustard (1 tsp. dry, or up to ¼ c. of the stuff in a squeeze bottle), a dash of cayenne, a little Tabasco sauce. Basically any spice that you like!  Another idea is to use pineapple juice in place of the water.  With that one, try just a tablespoon or two of brown sugar.  Or use orange juice and honey with ½ tsp. ginger.

 
Picture
To make BBQ Beef, brown a roast in a couple tablespoons of hot oil.  Pork or chicken are also good.

Picture
Add all the Barbecue Sauce ingredients.  If you have a tight-fitting lid, or are using a crockpot, don't add the cup of water.   A little vinegar in the sauce will help tenderize the meat.  In this batch, I used 2 Tbsp. apple cider vinegar, and 1/4 c. honey. 

Picture
When the meat is cooked and tender, remove the lid and boil until the sauce thickens enough to coat. 

Picture
Shred or slice the meat, then stir together with the sauce.  Delicious!  Just the right amount of sweetness for me.  Store-bought sauce is always too sweet, in my opinion.  I still buy it when it's cheap, but mix it with some plain tomato sauce.

0 Comments

Cost of a year's worth of food; Eggless "old bottled fruit" Cake

11/11/2010

0 Comments

 
Picture
Ah, a lonely jar from 'way back when'; 1999, in this case.  It's still sealed, but not so appetizing-looking anymore. 

Picture
Turn it into cake!  Since I was using pineapple as the fruit, I omitted the cloves and nutmeg from the recipe, left in the cinnamon, and added shredded coconut, which makes for a nice toasty topping.

Yesterday I pulled a 5-pound jug of honey out of my storage room.  It had mostly crystallized, so it sat in a pan of hot water all night, on low heat, to melt.  As it sat there, I noticed a price sticker on the lid; one from Storehouse Markets, from when we lived in Orem fifteen years ago.  (Yes, honey will last forever!)  It said $4.99.  That means the shelf price of honey has TRIPLED in fifteen years. 
Prices for food always rise year-to-year; especially now with the Fed’s “quantitative easing” (QE2) going on.  If you want to see what experts are predicting now, with QE2, take a look at
http://inflation.us/foodpriceprojections.html .   This group, the National Inflation Association, is a very credible source.  To see how they reached their conclusions, click on their pdf link, in the document.The long and short of it is that your money will go much further right now than it will in a few months, especially with the harvest shortages we’ve had worldwide this year.   


How much will your year’s supply cost you right now?  Adding up all the essentials, a month’s worth of food for one person is $16.23.  No kidding.

A year’s worth for one person is  $194.76

Figure in that you’re getting your year’s supply after building your three-month supply; that knocks it down to getting nine months’worth;

$146.07 per adult.

It’s even less for children: quantities for age 3 and under= 50%, ages 4-6= 70%, ages 7-10= 90%, ages 11 and up= 100%.

Here’s the counsel we’ve been given:     "We encourage members world-wide to prepare for adversity in life by having a basic supply of food and water and some money in savings.” “For longer-term needs….gradually build a supply of food that will last a long time  and that you can use to stay alive” (from All is Safely Gathered In, LDS First Presidency pamphlet)

Here are quantities and current costs:

Grains, 300 lbs- if you get just wheat and oats, at the Home Storage Center they cost between $5.80 and $8.15 for 25 lbs. depending on if you get white or red wheat, quick or regular oats.  If you average this out, it will cost you $6.98 per person, per month.  $83.70 per year’s worth.


Milk, 16 lbs is $1.40/lb at the HSC, which is $1.87 per month, $22.40 per year.

Sugar, 60 lbs is $ .56/lb there, $2.80 per month, $33.60 per year.

Oil, 10 qts –this isn’t sold at the HSC, but the price at Macey’s last week was $2.50 for 1 ½ quarts (48 oz.) At that price, after tax, it’s $1.43 per month, $17.17 per year.  It’s only $14.38 if you buy it at Sam’s Club ($6.98 + tax for 5 qts.)

Salt, 8 lbs- 4# box at Costco or Sam’s Club is a dollar; $ .16 per month, $2 per year.

Legumes, 60 lbs– the Home Storage Center sells black beans, pinto, and white, from $14.10 to $16.30 for 25 lbs.  Averaging the prices, it’s $2.99 a month, $35.92 per year.

Water, 14/gal/person-   You can store this for free by using 2- and 3- liter pop bottles, or juice containers (not milk jugs- they break down).  Or use the 5-gallons square jugs or big blue barrels; they’ll run you about $1 per gallon of storage. If you already have the minimum water, and your long-term foods stored as well, you might consider storing even more water.  One source is http://familywatertanks.com ; they’re the cheapest big-size tanks I’ve seen.  They’re local for us, too.

When you’re done storing the basics, you will probably decide to add a few ‘gourmet’ items, they’re nice to have—I’m a big proponent of storing spices and chocolate!- but the basics are what is essential.  Cheapest, too.

Notice that the costs were just for food, not containers to store them in. Most of my storage containers cost nothing.   You CAN get buckets for free, with a little effort- most bakeries give them away; all their frostings and fillings come in those buckets.  Plan on washing them at home.  There are two main sizes; 5 gallon and 2 ½  gallon.  I keep packages of dried fruit in the smaller buckets, also cornmeal or other things that I don’t use as much.  They are a great size for a pantry, too.  Some of the buckets have gaskets, some don’t.  The ones that don’t seal well are still good for storing sugar.

If you want all your wheat, powdered milk, sugar, and legumes in #10 cans from the cannery, it will cost you $85.83 more to get a full year’s worth, $65 to do 9 months.

I don’t can my wheat, sugar, or beans because we go through large quantities; one batch of bread would use a whole can.  Pretty silly storage for me.  Besides, it’s easier for me to find space for 10 buckets than 60 #10 cans; they hold about  the same amount of food.

* * * * * * *
Do you have an odd bottle of old fruit lying around?  Do you have peaches than look more ‘tan’ than ‘peach’?  Don’t throw them out (unless they’ve come unsealed, or are foamy, or the juice has turned opaque!)- make something with them!  Smoothies are a good use, as well as the following recipe.  Eggless cakes were fairly popular in the 30’s and 40’s, when eggs were often hard to come by. 

 
EGGLESS “OLD BOTTLED FRUIT” CAKE

1 qt. fruit, undrained and blended
2 c. sugar
1/2- 3/4  c. oil
4 c. flour

1 t. salt
1 Tbsp. baking soda (originally this was 4 tsp, see note below)
1 t. nutmeg
4 t. cinnamon

1 t. cloves
1/4- 1 c. nuts, raisins, dates, coconut (opt.)

 Use fruit that has been sitting at room temperature. Sift dry ingredients and add to wet mixture. Bake in a greased and floured 9x13 glass pan at 350 F for 30-40 minutes.

At 3500 ft elevation, 4 tsp. baking soda was too much leavening, causing the center of the cake to fall.  One tablespoon is better, though if you're at a lower elevation you might need the full amount.  Try it and see!
0 Comments

Storing Water: Benjamin Franklin quotes; Basic Bread

11/10/2010

0 Comments

 
Picture
from photos8.com

(originally from 6/03/10)
Have you stored water yet?  Benjamin Franklin wrote, “When the well is dry, they know the worth of water.”   Even a little bit helps.  Keep a few water-filled 2-liter bottles, or 2-quart juice containers, under the sink in the kitchen and bathrooms.  I screw the lids on REALLY tight because of my curious little ones….

These are great for when the city water suddenly goes out, or a pipe breaks in your house.  (Last winter we were out of water TWO times in two weeks because of broken pipes!)   Then figure a way to keep a lot more water stored someplace; President Hinckley told us to store at least a gallon per person per day, for two weeks.  The blue barrels are good for this, and can be kept in your garage. If you’re buying storage containers, figure a dollar for each gallon of storage capacity- $50 or under for 50 gallon barrel, $5 or so for a 5-gallon jug, etc. You can live a lot longer without food than you can without water.  If you want to have even MORE than the minimum, check out the super-size containers at
http://familywatertanks.com/    Our water already has chlorine in it, so it will stay clean and safe as long as the container is closed securely.   If/when we have a large-scale disaster (remember Sister Beck told us to prepare for ‘eventualities’….) the city can get to repairing much faster if they don’t have to spend all their time hauling water around to all of us.


Here are some more applicable quotes from Franklin, enjoy!


“Energy and persistence conquer all things.
                           *
“Well done is better than well said.
                           *
“God helps those who help themselves.
                           *
“It is hard for an empty sack to stand upright.”

* * * * * * * 
 Here’s the bread recipe I’ve eaten for the last 30+ years; it’s my mom’s recipe.  The beauty of bread is that is so adaptable.  Use this recipe to make anything from white sandwich loaves, to whole wheat bread, pizza, fluffy dinner rolls or mouthwatering cinnamon rolls.   See Making Bread for these variations and more.  The bread freezes well, so I always make an oven full; it’s no more work to make six than to make two.  I keep enough in the pantry for 3 days because it is fresh-tasting for only that long; I put the rest in the freezer as soon as it's cooled and sliced.  

 -Rhonda

          Basic Bread

Six loaves:                                        Two loaves:
2 Tbsp. salt                                          2 tsp. salt
2 Tbsp. yeast                                       2 tsp. yeast     
½ cup -1 cup sugar                             1/4 -1/3 cup sugar
½ cup oil                                             3 Tbsp. oil
6 cups hot water (hottest from           2 cups hot water
  faucet, not over 130 degrees)                   

8 cups flour to start- you will             3 cups flour to start, will be 5-6
  use around 16 c. total                          total


      Mix salt, yeast, sugar, oil, water, and first amount of flour in a bowl.  Beat about two minutes with a wooden spoon.  Stir in half of what’s left, then mix in more until too stiff to stir.  Dump out onto a floured counter and knead for 8-10 minutes, adding only enough flour to keep the dough from sticking to the counter.   The dough should be smooth and elastic after kneading.  (Yes, you could use a stand mixer for this, too….)

     Cover with a kitchen towel or plastic grocery bag and let rise 1 to 1 ½ hours, or until doubled.  Punch down and shape into loaves.  Place in greased 8x4 loaf pans and let rise about 45 minutes or until nearly doubled.  Bake at 350 degrees F for about 30 minutes (or at 375 for 25 minutes) or until the sides of the bread are brown.  (Tip a loaf out of the pan to check.)  Remove from pans and cool on a rack.

100% WHOLE WHEAT BREAD-
Follow above 6 loaf recipe, using all whole wheat flour, and also add one of the following:

1/4 c. lecithin, 1/4 c. gluten, 1/4 c. dough enhancer, or 1000 mg Vitamin C, crushed or dissolved in water.  These improve texture and reduce coarseness.  Any of the variations can be made with whole wheat.
0 Comments

FHE lessons on the Constitution; Chicken Nachos

11/10/2010

0 Comments

 
Picture

(originally from 6/11/10)
This last week I moved my bookcases around (thanks to a great organizing suggestion from a neighbor) and found a treasure:

In 1987, to celebrate the Bicentennial of the signing of the Constitution, the Church published a 14-page booklet with Family Home Evening lessons on the Constitution and the Founding Fathers.  I had a copy hiding amongst our books.  It's also available online.  The lessons are great for teaching simply and powerfully what is at the heart of our country's existence.  At the following website, halfway down the page you can click to download this in pdf format. http://www.latterdayconservative.com/articles/family-home-evening-lessons-for-the-bicentennial-of-the-constitution    

Use it, teach it, spread it around!  We've been told often (especially the last couple LDS General Conferences)  to teach our children truth; this is a great way to see that they are being taught the truth about our nation's birth.

Here’s what lds.org had to say about the booklet (Ensign, Nov. 1987, 102–3)

Booklet Published

The Church has published for its members in the United States a special booklet explaining the divine significance of the U. S. Constitution and its principles.

The First Presidency has asked that the booklet be used as the subject of family home evening lessons by all member families in the United States.

The delegates to the Constitutional Convention in 1787 were inspired men the First Presidency said—men who produced a document that the Prophet Joseph Smith called “a glorious standard” and “a heavenly banner.”

In a preface to the new booklet, the First Presidency stated the purpose of the publication:

“In commemoration of this important event, we are providing this booklet, which contains three family home evening lessons, activity ideas, and a copy of the Constitution. We encourage you to prepare and teach each lesson prayerfully so that family members may feel the divine significance of the Constitution in their minds and hearts.”

Some 1.3 million copies of the booklet have been printed and are available to congregations throughout the United States. Local leaders may order copies through the Salt Lake Distribution Center.

TV Special

“America, the Dream Goes On,” was the title of a one-hour variety special spotlighting the U. S. Constitution. The show was produced by Church-owned Bonneville Media Communications.

The television special featured singing by the Tabernacle Choir and Marie Osmond. LDS actor Gordon Jump portrayed Benjamin Franklin. Another prominent actor, Harry Morgan, was host and narrator. The show was televised nationally in September (1987)."

* * * * * * *
Chicken Nachos     6 servings

1 can cheddar cheese soup (or make 1 cup of white sauce and stir in ½ c. cheese)   
1/2  c. salsa   
1   c. cooked chicken,  diced  (I use my frozen or canned chicken)
1   10 oz bag   tortilla chips    
        chopped tomato, optional    
        sliced olives   
On low, heat together soup, salsa, and chicken.   Serve over chips; top with tomato and olives.
0 Comments

Ezra Taft Benson garden quote; Using Wheat Without a Mill

11/9/2010

0 Comments

 
Picture
(originally from 6/17/10)
QUOTE OF THE DAY:
Ezra Taft Benson

"There are blessings in being close to the soil, in raising your own food, even if it is only a garden in your yard and a fruit tree or two.  Those families will be fortunate who, in the last days, have an adequate supply of food because of their foresight and ability to produce their own" (The Teachings of Ezra Taft Benson, p. 266).

In Google Docs there
 is a file with the recipes  I made for the basic-foods class today; Using Wheat Without A Mill.  It covers different ways to use your wheat (all without a mill- a grinder-), including sprouting it, cooking it whole or cracked, how to crack it in the first place, blender-wheat recipes (including a chart to help you convert your own recipes to use whole wheat with the blender), making malt, and soaking wheat before using it.  The last page also has links to some great recipes and resources for using your wheat.   These links are also listed below.
 
Please buy wheat!  You cannot beat it for price.  You can buy it by the bag at the Family Home Storage Center, you don’t have to get it in the cans. White wheat there is $5.80 for a 25 lb bag, which is about 23 cents per POUND, which is enough to make one whole loaf of bread.  You pay that much, or more, for each OUNCE of breakfast cereal.  If you don't have a grain mill (grinder), or don't know yet how to use wheat if it's not already flour, now is a great time to jump in and get some wheat anyway.  If you're worried that you won't be able to rotate/use it before it goes bad, don't let that stop you from following the commandment to build your food storage.  It lasts for a long, long time.  Decades or more, if stored right.  Get it, then learn how to use it.  It's healthy stuff to have on hand anyway! It’s also inexpensive insurance.  You'll be glad you have it, and I know you’ll be blessed for following the prophet's counsel.

-Rhonda

Notes from what we tasted and learned at the class- these and more are in the handout, link is above:

We sampled Blender Wheat Pancakes, Wheat Puree Bread, Wheat Salad with Chicken and Corn, Strawberry Nut Jello Salad (the 'nuts' are wheat), Gourmet Banana Nut Cookies, cooked wheat, cracked wheat, sprouted wheat, malt powder .  Also covered was the difference between COOKED and SPROUTED wheat, and how to make malt. 

Why  eat it:  it's CHEAP, stores a LONG time, high in fiber, high in some proteins, vitamins, minerals.

 (summary of the class):   How to eat it:  Grind in blender (2 cups for 1 ½ minutes) or food processor (the dry grains or soaked/cooked), crack in blender, cook whole or cracked, sprout and eat as kernels (as breakfast cereal, or ground beef extender, or rice/pasta/nut substitute), make malt, or sprout and eat as wheat grass or wheat grass juice.

Ways to cook wheat:  in a Thermos, rice cooker, crock pot, regular pan, use in breads (quick/yeast), cakes, salads, (including Jello).  You may cook them then freeze for later. 

Why soak grains before eating them- phytates (phytic acid, the form the phosphorus is in) are anti-nutrients, they bind with and so block absorption of minerals, especially zinc, that you need for proper growth and immune system strength. You inactivate phytates by making the grain think it’s sprouting- warm, moist. Also, soaking freshly ground grain in warm liquid also destroys the phytic acid by activating the enzyme phytase.  A diet rich in Vitamins D, C, A, and calcium help mitigate the effect of phytic acid on the body.  Sprouted wheat is a vegetable, does not lose gluten, but the amino acid profile and vitamins change and it becomes more easily digestible.

 Wheat Berries

2 cups hard red winter-wheat berries
7 cups cold water
1 teaspoon salt


Place wheat berries in a large heavy saucepan. Add water and salt.
 Bring to a boil over high heat, then reduce heat, cover, and simmer gently for 1 hour, stirring occasionally. Drain and rinse. To serve hot, use immediately. Otherwise, follow the make-ahead instructions. Makes about 4 1/2 cups.                    
MAKE AHEAD TIP: Cover and refrigerate  or freeze. 
For Cracked Wheat,  put ¼ to ½ cup of uncooked wheat in a blender, run for 30 seconds or til cracked. 

NUTRITION INFORMATION: Per 1/2 cup: 151 calories; 1 g fat (0 g sat, 0 g mono); 0 mg cholesterol; 29 g carbohydrate; 6 g protein; 4 g fiber; 263 mg sodium; 0 mg potassium.
2 Carbohydrate Servings
Exchanges: 2 Starch

Ready-made toppings for your cooked wheat:
Applesauce
Pure fruit spreads
Fruit butters, such as apple, apricot, prune, pear
Marmalades, jams, preserves, conserves
Frozen berries and fruits, with or without syrup
Nut butters- peanut, almond, cashew
Lemon and lime curds
Maple syrup
Pure honey, whipped, unfiltered or in unusual flavors such as sage, lavender, or chestnut
Chocolate-hazelnut and chocolate peanut butter spreads
Sundae toppings

Making malt: http://www.dryit.com/diastaticmalt.html 

Put 1 cup of wheat kernels in a quart jar, cover with water, and let soak for about 12 hours.  Drain the water (which has vitamins and minerals- save for broth, watering plants, or making bread), rinse, and drain completely.  Rinse and drain 1-3 times a day for 2 days, until the sprouted part is about the same length as the grain. Spread on cookie sheets to go in the sunshine or warm oven or in a dehydrator; dry thoroughly but don’t heat over 130 degrees, so you don’t kill the enzymes.  Grind in a mill or in your blender.  Makes about one cup.  Store tightly covered.  This will keep indefinitely in the fridge or freezer.  Use about 1-1 ½   teaspoon (1/10 of 1% flour) per loaf of bread.  More than this will give you sticky dough and is not beneficial. 

The enzyme in malt (diastase) converts starch in the dough to sugars (maltose) that the yeast can use; longer fermentation (rising) times are needed to be most effective.   Malt replaces sugar/honey and feeds the yeast, browns the crust.  It also has lots of enzymes and vitamins, and so makes your bread more digestible and more nutritious.  The enzymes also improve the flavor, make a finer texture, and increase shelf life.  If you wanted to make malt syrup, you would slowly cook the sprouted grain to get a dark syrup.

Also see:  http://makinghomemadewineandbeer.blogspot.com/2008/05/making-malt-extract.html 

Links:


http://everydayfoodstorage.net/training-cooking/grains, http://everydayfoodstorage.net/2008/10/12/pumpkin-blender-wheat-waffles-with-caramel-sauce/food-storage-recipes Pumpkin Blender Wheat Waffles with Caramel Sauce, http://everydayfoodstorage.net/category/long-term-food-storage/grains/wheat/blender-wheat  Red, White and Blue Blender Pancakes (blender pancakes with red and blue berries, whipped cream), http://everydayfoodstorage.net/2008/04/01/food-storage-gourmet-blender-wheat-cookie/food-storage-recipes Gourmet Blender Banana Wheat Cookie, http://everydayfoodstorage.net/2008/06/24/bring-one-of-these-one-of-a-kind-salads-to-your-next-gathering/food-storage-recipes Feta Wheat Berry Salad, Wheat Berry Salad with Apples and Cashews

http://selfreliantsisters.blogspot.com/search/label/Wheat%20Berries Black Bean, Edamame, and Wheat Berry Salad, Crockpot Wheat Berries, Stovetop Wheat Berries, Pressure Cooker Wheat Berries, Carroll Shelby’s Chili, Wheat Berry Pineapple Chicken Salad, Wheat Berry Salad, Wheat Nuts (like Corn Nuts); http://selfreliantsisters.blogspot.com/2010/02/4-blender-pancake-recipes.html 4 different blender pancake recipes to try

http://www.foodnetwork.com/search/delegate.do?fnSearchString=wheat+berry&fnSearchType=site  Wheat Berry Tapenade, Mushroom Wheat Berry Pilaf, Cumin-Scented Wheat Berry-Lentil Soup, Zesty Wheat Berry-Black Bean Chili, Rice, Red Lentil, and Wheat Berry Salad, Wheat Berries and Greens (Farro e Verdure)

http://www.foodnetwork.com/search/delegate.do?fnSearchString=wheat+berry&fnSearchType=site Easter Wheat Pie (Pastiera di Grano); the same type recipe baked in a springform pan to be a cake is as http://www.celtnet.org.uk/recipes/miscellaneous/fetch-recipe.php?rid=misc-la-pastiera-di-grano

http://www.ldspreparedness.com/Files/cookbook.pdf   The “New Ideas For Cooking with Food Storage” cookbook (20 pages).  Meat substitutes and extenders, Bulgur Wheat, another Blender Wheat Pancake recipe with variation for Waffles, Chinese Fried Wheat (instead of rice), Italian Fried Wheat, Spanish Fried Wheat, Cracked Wheat Casserole (includes burger too), Popped Wheat (similar to Corn Nuts), how to cook it: stovetop, Thermos, gas range’s pilot light, crockpot, as cracked wheat.

http://www.suegregg.com/  for whole foods, including lots of blender wheat recipes

0 Comments

Banana Pops and Snacks e-cookbook

11/9/2010

1 Comment

 
(originally from 6/24/10)

First I need to make a clarification from last week- for those of you wondering what “wheat berries” are, that’s just the chef’s term for what we simply call WHEAT.   Uncooked, whole, wheat; what we buy in those 25- or 50-pound bags. 


Here’s a great link, and while I disagree slightly with what the author calls “healthy”, there are some good recipes in it.  Here it is:

Free e-book of healthy snacks http://www.favediets.com/Snacks/The-Ultimate-List-of-Healthy-Snacks-40-Healthy-Snack-Recipes-Free-eCookbook#

This is one of the recipes in it- something sweet, cold, and delicious for these hot days we’re now getting into….

 
Banana Pops

Slice bananas into disks.

Roll banana discs into PLAIN yogurt (you can use vanilla yogurt or other flavored yogurt; it's just sweeter)

Add any kind of topping you wish. We rolled our disks in chopped pecans. I know that's expensive, but we love pecans so much. After freezing these we ate them and you wouldn't believe the taste! It was like eating a frozen candy bar. Okay, maybe not that good, but they were sweet and refreshing, and I didn't have to put a limit on how many the kids could eat.

Other toppings that work well: chopped raisins, granola, any kind of nut (cashew, peanuts, almonds), peanut butter (this would be without the yogurt), and of course, melted chocolate or chocolate chips.

My son is not a fan of bananas, but he really liked this treat. You can even eat them plain. Oh, yeah, another topping we did was a cinnamon/sugar mixture. Believe it or not, it was good too!

I will warn you that it's messy because of the yogurt. And super messy if the kids help! But you don't have the guilt of giving them something unhealthy, and it's a cheap "popsicle."
1 Comment

Making Tres Leches Cake

11/8/2010

1 Comment

 
Picture
If you've never had a Tres Leches cake, you're in for a treat!  It's very moist, with a Dulce de Leche flavor throughout.  It's soaked with a mixture of 'three milks'- whole milk, evaporated milk, and cream, normally.  I tend to use whatever's on hand, though.  If you don't have cream, replace with an equal amount of evaporated milk.  You can even whip evaporated milk, if it's very cold.  30 minutes in the freezer usually does the trick.

Picture
This is how you get the Dulce de Leche flavor- caramelize a can of sweetened condensed milk.  It takes two hours if you let the unopened can boil, ALWAYS completely covered by water (or it could explode). Or if you open up the can and pour it in a bowl,  it takes 7-15 minutes in the microwave.  It really boils up, though, so use the biggest microwave-safe bowl you own!  And cover it with plastic wrap.  The condensed milk on the left is caramelized; the condensed milk on the right is what it looks like beforehand.

Picture
The baked cake, a sturdy hot-milk sponge cake.  Let it cool for ten minutes, then poke holes all over, using a skewer or similar.  (My 'skewer' is the bottom of an instant-read thermometer.)

Picture
While the cake is still hot, but the 'milks' mixture is cool-ish, pour all over the cake.  It will start soaking in.  Refrigerate for at least 3 hours, to let the liquid totally soak in and start to set up a bit.

Picture
You know how food blogs make it look like everything is always perfect?


Well... 
 a doubled recipe + the same size bowl = scrubbing!

For an easy-to print version, click on one of these, below.
Tres Leches Cake recipe
, or Gluten-free, Dairy-free, Egg-free version here.

To get the milk mixture to soak in properly, the cake should be hot and the milks room temperature: make the milk  mixture first so it can cool during cake baking time. This was modified from the Cook’s Country recipe.  I live at 3500 ft. elevation, and their version kept falling in the center.  If you live around sea level, you might need to increase the sugar back up to 2 cups, and the baking powder to 2 tsp.  

Tres Leches cake

Milk Mixture:
1 (14 oz) can sweetened condensed milk (or use the powdered-milk version)
1 (12 oz) can evaporated milk
1 c. heavy cream (sometimes I just add 1 c. more evap. milk instead)
1 tsp. vanilla
           Caramelize the sweetened condensed milk by either boiling the can (covered at ALL TIMES by water) for two hours OR in the microwave:  pour into a large microwave-safe bowl, cover with plastic wrap, and microwave for 7-15 minutes, until slightly darkened and thickened.  Stir every couple minutes, especially at the end.  This takes 7 ½ minutes in my microwave.  If it looks a little burned, it’s still OK.  Stir in about half of  the evaporated milk, then set aside 3 Tbsp. for the top of the cake. Whisk in the remaining evaporated milk, cream, and  vanilla.  Set aside.

Cake:
½ c. unsalted butter (if using regular butter, reduce salt by ¼ tsp.)
1 c. milk
4 large eggs, room temperature
1 ¾ c. sugar
2 tsp. vanilla
2 c. flour
1 ½ tsp. baking powder
1 tsp. salt
1/2 tsp. cinnamon, optional (I prefer the cake without)
           Preheat oven to 350 degrees. Heat together the butter and milk until the butter melts; set aside.  Beat the eggs for about 30 seconds, then slowly add the sugar while beating.  Beat on med-high for 5-7 minutes, until they become very thick and glossy.  Mix in vanilla and hot milk/butter.  Add flour, baking powder, and salt  (I dump them on in that order, then mix them with my fingers a bit before beating them into the batter.)  Pour into a greased and floured 9x13 pan.  Bake for about 30 minutes, until cake tests done with a toothpick.  Let sit on a cooling rack for 10 minutes.  Poke holes every half inch all over the cake with a skewer; pour milk mixture over top.  Let sit for 15 minutes, then refrigerate for at least 3 hours and up to 24.  Frost right before serving.

Frosting:
1 c. whipping cream
3 Tbsp. reserved cooked sweetened condensed milk
1 Tbsp. sugar
1 tsp. vanilla
           Beat all together until whipped and thick enough to spread.
1 Comment

Cheap solar cooker; Oven Fried Potatoes

11/6/2010

0 Comments

 
Picture
The BYU Solar Cooker- designed to work well with whatever materials you have on hand to build with.  This one uses cardboard, foil, and a box to support it, though a bucket or some rocks would work too.

(Originally from 7/01/10)

I'm excited right now because this idea works!  Last week I cooked some carrot cake in a really
cheap and simple solar cooker. I got a windowshade at D.I. for $1.50, used a canning jar spray-painted black for a cooking pot, and fastened the edges of the shade with  metal brads (like you use in kids’ projects).  I set it outside, angled it so my shade fell right into from in front, and left it for an hour.  Yummy!   Not only that, but my 'carrot cake' was just my simple muffin recipe with cinnamon, raisins, and a handful of dried (not reconstituted, either) carrots from the Family Home Storage Center. 


So how did I make it?  Mine looked like these two solar cookers- the first uses that car windowshade, and the second just uses cardboard and aluminum foil.  Both designs are VERY similar, they just use different materials.  Use what you have; if you didn’t have aluminum foil but had one of those Mylar emergency blankets, you could use that.  Solar cooking works best from March through October, though you can still use your solar cooker in the cooler months.  It helps to put the cooker against a south-facing wall, to get more reflected energy, during the ‘off’ months.  Here’s the first link:  http://www.solarcooking.org/plans/windshield-cooker.htm .  The other version (from Dr. Steven Jones @ BYU) is made with cardboard and aluminum foil; the website has great info on why, how, and what to cook, including cooking times.  You can even make ICE with a solar cooker.  No kidding. It's at  http://solarcooking.org/plans/funnel.htm  This link also has cooking times for different types of food.


To cook a meal for a family, one way to cook a bigger amount is just use a bigger container.   Maybe layer multiple containers? Or layer food in one container. Usually not every part of a meal needs cooked, anyway.  I have pans that stack together, to cook things simultaneously.  You could also use a gallon-sized glass jar painted black; I got a couple from a store that makes chocolates.  They got the jars when full of maraschino cherries, and sold them to me (empty) for $1.  But any container that is dark (black or dark blue) can be cooked in.  Maybe use a Dutch Oven or enameled cooking pot.

And if you wonder why the instructions for the foil/cardboard solar cooker say to put a wooden block under the jar/pan before cooking, I found out why-  it's to keep heat from escaping out from underneath.  The first time I cooked with this, my carrot cake was a little underdone on the bottom.  Apparently that's why.  

 
I have also baked cookies in my van window.  I was told that it has to be at least 95 degrees outside for that to work, it gets to about 250 degrees in the window that way.  I tried it on  a slightly cooler day (93?) and it worked, barely.  Now if you put the food next to the glass, and put a sunshade BEHIND the food, on the dashboard, that might give you a much warmer (and bigger) cooking spot. Hopefully it doesn't bake your dashboard!  The glass IS tempered, though, so that part should be OK. 


You can also use a vehicle for dehydrating food because it gets so hot. Just be sure to open windows a bit for airflow. ( I haven't tried that one yet, though.)  You can use clean window screens or an old screen door for a drying tray.  Cookie sheets work, too, but drying will take a little longer because the bottom can’t get air.

 * * * * * * *
Those of you who planted potatoes this year probably now have those delicious, creamy ‘new potatoes’ ready.  (Or just use whatever kind from the store….)  Maybe try cooking these in your solar oven!
 
Oven-Fried Potatoes 

2-10  potatoes- however many you want   
1-2   Tbsp.   vegetable oil   
Seasoned salt, dry ranch dressing mix, or Parmesan cheese   

Heat oven to 450 degrees.  Wash potatoes well, then cut into strips or wedges about 1/4-1/2-inch thick , unless they're 'new potatoes'; leave those whole or cut into bite-sized pieces.  Put them all in a bowl, drizzle the oil over them, and then sprinkle a good amount of seasoned salt, dressing mix, or Parmesan cheese over the top.  Stir well and add more salt or cheese if it looks like they need it.  Spread potatoes out on an ungreased cookie sheet.  Bake for about 15-30 minutes or until lightly browned and tender when you poke the thickest one with a fork.  

 
0 Comments

Tomatoes in the garden; edible playdough, and PB Fingers

11/6/2010

0 Comments

 
Picture
from photos8.com

(originally 7/08/10)

Here in the Salt Lake Valley, we still have a couple months of the growing season left; it’s not too late to plant some things.  Beans, beets, carrots, and turnips are good ones to put in right now.  You can even grow cool-season crops like peas, lettuce, spinach, chard, and cabbage, if you wait a couple more weeks for temperatures to drop a bit.

Here are a few quick tips for growing tomatoes- 

*fertilize with 1 Tbsp. nitrogen (34-0-0) at four and eight weeks after transplanting.  For me, that’s right about now. Put the fertilizer on the ground, to the side of the plant.  Gardeners call this “side dressing”.

*Give them 1-2 inches of water per week, water deeply and infrequently.  To know how often to water, dig a 4” deep hole, feel the soil at the bottom.  If it feels cool and moist, you don’t need water yet.  Wait until the top four inches dry out, then water again.  Mulch around them to keep moisture in and to reduce weeds.  *It will take about 25-35 days for a flower to become a ripe tomato.  It seems to speed up ripening if you break off a few little branches.  This tells the plant it had better hurry up and produce seeds before something happens to it.


for more info on tomatoes, including what causes blossom end rot: http://extension.usu.edu/files/publications/factsheet/HG_2004-05.pdf

info on planting beans:

http://extension.usu.edu/files/publications/factsheet/pub__7948214.htm

and information on growing about any fruit, vegetable, or herb: 

https://extension.usu.edu/yardandgarden/htm/vegetables-fruits-herbs    

Here are a couple great quotes I ran across recently:

"Self-reliance is a product of our work and under-girds all other welfare practices. It is an essential element in our spiritual as well as our temporal well-being. Regarding this principle, President Marion G. Romney has said: “Let us work for what we need. Let us be self-reliant and independent. Salvation can be obtained on no other principle. Salvation is an individual matter, and we must work out our own salvation in temporal as well as in spiritual things.” - (In Welfare Services Meeting Report, 2 Oct. 1976, p. 13.), quoted in “In the Lord’s Own Way” Elder Russell M. Nelson, Ensign, May 1986

"There is more salvation and security in wheat than in all the political schemes of the world". - Orson Hyde, Journal of Discourses, 2:207  Or in whatever food you end up storing.

Now for the recipes:

The two below are almost the same thing:  the first is stiff because of the large amount of milk powder and powdered sugar, the second starts with the same ratio of PB and honey, but thickens it up with cereal/oats and just a little milk powder.  Just goes to show you can do your own variations if you like.  On those days that we’re out of bread and don’t know what to do for lunch, we’ll whip up a batch of these Peanut Butter Fingers (though we usually shape them in balls) and eat those.  It’s our peanut-butter-sandwich, fun-sized.  If you go by what the PB jar says is a serving (2 Tbsp.), the PB Fingers recipes only feeds 3 people. 


 Edible Playdough  - makes about 2 cups’ worth, 1 ¼ lbs.

1   cup   peanut butter   
1   cup   dry milk powder   
1   cup   powdered sugar   
1/2   cup   honey   

Mix peanut butter and honey together until smooth.  Stir in milk powder, then add powdered sugar.  Stir as much as you can, then dump out on counter and knead with your hands until it all sticks together.

 
           Peanut Butter Fingers  (small batch)

Yield: about 20  (2”) "fingers"

1/3   cup   peanut butter   
3   Tbsp.   honey   
1/2   cup   corn flakes   
1/2   cup   quick-cooking rolled oats   
1/4   cup   dry milk powder   
1/4   cup   raisins or dried fruit bits    
Sesame seed, if you like   

In a medium mixing bowl stir together the peanut butter and honey until smooth.  Put corn flakes in a plastic sandwich bag.  Close the open end.  With your fist, crush the corn flakes into small pieces.  Add corn flakes, oats, milk powder, and raisins to the peanut butter mixture in the bowl.  With your hands, mix well.  If mixture is too dry to hold together, mix in a few drops of water. 

       Using a well-rounded teaspoonful for each, shape into logs 2 inches long and 1/2 inch wide, or about the size of your finger.     Spread the sesame seed (if you're using it) in a pie plate.  Roll peanut butter fingers in the sesame seed.      Store in the refrigerator in an airtight container.  If they don’t disappear first.

 
0 Comments

What to do now in the garden; fruit leather

11/5/2010

0 Comments

 
Picture
from photos8.com

(Originally 7/15/10)

JULY in the garden:
• Plant beets and turnips for fall harvest.
• Thin out plants and fertilize.
• Fertilize potatoes with nitrogen.
• Watch watering on tomatoes! Even deep watering is better than frequent shallow watering to avoid blossom end rot.
• Irrigate at ground level rather than over head spray to avoid diseases.
• Keep looking for any signs of pests. Use insecticides only as necessary.
• Stake tomatoes if you haven’t already.
• Remove suckers and pinch back tomatoes as necessary.

This was from Glover Nursery’s website; see it for a month-by-month checklist. 

Remember that you can also plant shorter-season crops; the seed envelope will tell you how many days until harvest for that variety.  The official information for our area (data from Riverton) is that the earliest-ever fall freeze was Sept. 13, average date is Sept. 24, and latest was Oct. 4.  So worst-case scenario is 58 frost-free days remaining, best-case is 80 days, plus whatever length you can extend your growing season by covering your garden with a sheet or blanket for those first frosts.  

 
Now, for that fruit that some of you have coming out your ears-  our favorite way to eat it is ‘Fruit Leather’. 

Here are two samples of how much to use:

Apricot leather:
1 c. apricot puree (1 ½ c. pitted apricots)
1 Tbsp. lemon juice
Around 3 Tbsp.* sugar or honey

*2023 update- over the last several years I've reduced the sugar and lemon in this.  1 Tbsp. sugar/honey for every 1 Tbsp. lemon juice is plenty. I've even dropped it to 1 Tbsp. each per quart of puree, and it tastes delicious. It does sometimes brown more though.


Cherry leather:
1 c. cherry puree (1 ½ c. pitted cherries- or use the food mill for this one)
1 Tbsp. lemon juice

Dry until there are no more sticky spots, roll up and store in an airtight jar.  We’re still eating leather made two summers ago, it’s holding up fine.

 The best leather is made with overripe fruit, too, which is helpful!  Basically, you puree or mash fruit, or send it through a food mill, sweeten it to taste, then dry it.  You can sweeten it with concentrated fruit juice, or with sugar, or honey.  We like it best with sugar because that way the fruit leather crystallizes over time, rather than getting tougher.  You can also add a little lemon juice to keep the leather from turning brown as much.

Whatever you’re going to dry it on/in needs sprayed with Pam or oiled first.  Trust me, you don’t want to forget that step.   Leather is no fun to chip off of trays!  Pour about a ¼” layer, and put it someplace to dry.  It’ll be done in about 24 hours in a dehydrator.  You can also dry it on cookie sheets in your oven (lowest setting, door slightly ajar for air circulation), or in a car parked outside on a hot day. 

A good article on drying is at http://www.backwoodshome.com/articles/shaffer58.html


0 Comments

Fall Gardening checklist; Creamy Blender Frosting- Chocolate and more!

11/4/2010

0 Comments

 
Picture
Chocolate Blender Frosting on pumpkin cake.

Picture
Dump these in the blender, mix on high...

Picture
...until it looks like this.  Yum!

Hi everyone,  

Most of the garden is done right now, since the frost a couple weeks ago.  Here’s a section from one ‘Fall Gardening checklist’ online:  
“After you harvest, it's time to clean up your garden. Cut back perennials to a few inches above the ground -- they'll grow back next year -- and pull out annual and vegetable plants. Put healthy plants on the compost pile, said Toby Day, associate horticulture specialist at Montana State University Extension. "But if the plant material is diseased, throw it away instead of composting it. Most compost piles don't get hot enough to kill disease or insects." Also, throw away weeds so they don't go to seed in your compost.

Day recommended a few related cleanup jobs before the temperature drops: Remove soil from pots and bring them indoors so they won't freeze and crack. Bring in liquid fertilizers and other substances that shouldn't freeze. Blow out your irrigation lines. And clean, sharpen and oil garden implements so they don't rust.   Enrich your soil before you head indoors for the winter. Larry Sagers recommended shredding everything from corn stalks to woody branches and tilling the material into the ground. If you don't have a shredder, he suggested renting one for the day. "Compost costs around $30 to $50 per yard to buy," he said. "My take is I'll shred my own."

Read more:
http://www.ehow.com/feature_7293587_fall-gardening-checklist.html  
    

* * * * * *
    
This is a fabulously smooth frosting.  The consistency is closer to store-bought frosting than any other homemade I've found, but the flavor is WORLDS above the stuff from a can.  For a wonderful, rich hot fudge sauce, see below, There are pictures on my blog of how to make this, and lots of variations- milk chocolate, butterscotch, caramel, peanut-butter chocolate, 'Nutella' flavor- click on this link:   Creamy Blender Frosting
 

Creamy Chocolate Blender Frosting
(original, very dark version)

 6 blocks (6 oz.) unsweetened chocolate                   
1 ½ c. granulated sugar

1 c. evaporated milk, cream, or coconut cream         
6 Tbsp. butter (not margarine)

1 tsp. vanilla                                                                         
Pinch of salt, optional

Chop chocolate, then put everything into a blender.  Blend on low until better chopped, then scrape down sides with a spatula. Blend on high until it becomes dark and smooth.  This may take about ten minutes, or only two minutes in a Vitamix or similar.   Makes 3 cups.

  For different flavors, try using a different extract than vanilla- maple, orange, rum, mint.  You could also add a teaspoon of frozen concentrated orange juice, a couple Tbsp. of maraschino cherry juice in place of the same amount evaporated milk (along with maybe a 1/2 tsp. almond extract).  Or 1/2 tsp. cinnamon for a nice winter flavor.  You can reduce chocolate to 5 blocks, for slightly less intensity, and have it still work.

  If you have any extra frosting, use it as a base for hot chocolate: 2-3 Tbsp. per cup of milk, use a blender to mix.  (Personally, I use up my extra by putting it on a spoon...)    

Hot Fudge Sauce: Use the same ingredients, except reduce butter to 2 Tbsp.  Instead of mixing in a blender, bring to a boil in a small saucepan; let cook for 2 minutes, until sugar is dissolved.
0 Comments

12 Ways to Sabotage Your Family's Preparedness; Crustless Quiche

11/3/2010

0 Comments

 
(originally from 7/23/10) Here’s a timely article (condensed) that came from Carolyn Nicolaysen at Meridian Magazine this week- all of us can find some room to improve here..

In a real emergency, no one is going to ride in and rescue us if the calamity involves the whole community. Government, church leaders, prophets, and emergency response organizations all tell us to prepare – and to expect that in the aftermath of a disaster we will be on our own for 72 hours at least, and possibly for days or weeks after that.

Coping with natural disasters is one thing – coping with a
slow drain on our back-up reserves is another. Food storage and emergency preparations require planning, continuing education, and awareness of our changing needs. In this time of downsizing and economic disappointment, it is more urgent than ever before in our lifetime that we commit to self-reliance and stay on top of our family emergency plan. Don't be left wondering when that crisis comes, "what have I done?" Here are twelve ways we could sabotage our own best efforts:


Here’s the quick list, for what she means by them, see the link afterwards:

1-    Move too fast

2-    Look for the easy fix

3-    Ignore nutritional needs

4-    Fail to include non-food essentials

5-    Ignore a sensible storage strategy

6-    Overlook comfort items

7-    Overdo it!

8-    Underestimate the value of water

9-    Put your storage in the basement and forget it!

10-Who needs dates and labels, anyway?

11- Lose track of what you have.

12-Put it all under the bed.

  http://ldsmag.com/emergency/100720plan.html

 
* * * * * * *
Crustless Broccoli Cheese Quiche

 If you don’t like broccoli, you can either leave it out, or use 5-10 ounces of a different vegetable instead.  Try cooked sliced zucchini, onions, Swiss chard, spinach, or whatever sounds good.  These are simple to make because there's no crust.

1 package (10 ounces) frozen broccoli florets
6 large eggs
1/2 cup half-and-half  or evaporated milk
Ground pepper
1/8 teaspoon ground nutmeg
3/4 cup shredded cheddar cheese (3 ounces) – or other cheese 
Crusty bread and mixed salad (optional)

Preheat oven to 350 degrees. Butter four 8-ounce ramekins (or a 9-inch pie pan); set aside. Bring a medium pot of salted water to a boil. Add broccoli; cook 1 minute. Drain well; transfer to a cutting board, and blot dry with paper towels. Chop coarsely. Or microwave the broccoli for a couple minutes instead, then chop.

Beat together eggs, half-and-half, 1/2 teaspoon salt, 1/4 teaspoon pepper, and nutmeg. Stir in broccoli and cheese.

Put ramekins on a rimmed baking sheet. Divide mixture evenly among the four ramekins, or fill a 9” pie pan.  Bake until golden brown, 35 to 40 minutes. Serve with crusty bread and a salad, if you like.

 
0 Comments

Family Home Storage: a new message; Homemade Paints for Crafts

11/3/2010

0 Comments

 
(originally from 7/29/10)
At the beginning of the year we had the ‘three month challenge’.  Where are you now in your home storage program?  Which step are you ready for?  I know some of you are done with all of them, congratulations!  The more self-reliant you are, the more of service you can be.  Here’s the four-step program the Church has published.


1. Gradually build a small supply of food that is part of your normal, daily diet until it is sufficient for three months.

2. Store drinking water.

3. Establish a financial reserve by setting aside a little money each week, and gradually increase it to a reasonable amount.

4. Once families have achieved the first three objectives, they are counseled to expand their efforts, as circumstances allow, into a supply of long-term basic foods such as grains, legumes, and other staples.

Of the new guidelines, Presiding Bishop H. David Burton says, “Our objective was to establish a simple, inexpensive, and achievable program that would help people become self-reliant. We are confident that by introducing these few, simple steps we can, over time, have more success.”  

I know that following this will bless you and your family temporally, spiritually, and physically.  For more information, see “Family Home Storage: a new message”, March 2009 Ensign, or the “All Is Safely Gathered In: Family Home Storage” pamphlet. 

* * * * * * *
Need something to keep your kids entertained?  There’s nothing more fun than watching paint dry….   Well, maybe not actually watching it dry, just looking at the crystals after the paint HAS dried (see Crystal Paint, below.)   The following paints were found at http://bluebonnetvillage.com/recipes.htm    They have other ‘kid craft’ recipes as well, including several versions of ‘play-dough’ , edible dough, finger paints, poster paints, …..


Monet’s Water Color Paints

Ingredients:
1 tablespoon white vinegar
2 teaspoon baking soda
1 tablespoon cornstarch
1/4 teaspoon glycerine
food coloring


Do like the famous impressionist painters did and bring your watercolors outside to paint.
To make your own watercolors, first mix vinegar and baking soda.
Next slowly add cornstarch and glycerine to the mixture. Pour into small paper cups to let dry.
Add food coloring. The color is not as intense when it is dry so remember to add a lot of food coloring.
When dry peel away the paper cups.


Shiny, Glossy and Shimmery Paints

Moooo Paint 
1 cup condensed milk (or make your own with powdered milk)
Food coloring


Mix one cup condensed milk with a few drops of food coloring. This makes a very bright, glossy colored paint, great for fingerpainting.

Egg Yolk Paint
1 egg yolk
1/4 tsp. water
Food coloring


Mix egg yolk with water and lots of food coloring. Use a paint brush to paint on baked cookies. Return cookies to oven until egg has solidified.


Non-edible paints:

Artist Quality "Oil" Paint 
Tempera paint
Liquid dish washing soap


This paint has a smooth, glossy effect and holds color well. Mix together tempera paint and soap. Store in glass jars.


Crystal Paint
1/4 cup hot tap water
3 teaspoon epsom salts


Sparkle and Shine! Mix hot tap water and epsom salts. Brush the mixture onto a dark colored paper. When dry the salt will form crystals that shine in the light.  Photos are at http://unplugyourkids.com/2008/10/05/salt-crystal-paint/
0 Comments

    Need a Search bar?
    One day I may upgrade my website-- but until then, use your web browser search bar. Type in my web address and what you're looking for, like this-- 
    www.theprovidenthomemaker.com  pumpkin --  and you should get results.


    Author

    I'm a disciple of Christ, a member of the Church of Jesus Christ of Latter-day Saints, a family-defending, homemaking, and homeschooling mom of eight children, two of whom sometimes can't have milk or wheat. Growing up on a farm in a high mountain valley, my parents taught me to 'make do', work hard, smile, and help others.  I love cooking, learning, growing food and flowers, picking tomatoes, and making gingerbread houses --which CAN be made allergy-friendly-- with my children.  I hope you find something to help you on my site!

    Archives

    April 2024
    July 2023
    April 2022
    September 2021
    March 2021
    December 2020
    April 2020
    March 2020
    February 2020
    January 2020
    December 2019
    November 2019
    October 2019
    September 2019
    August 2019
    July 2019
    June 2019
    May 2019
    April 2019
    January 2016
    November 2015
    October 2015
    September 2015
    March 2015
    February 2015
    November 2014
    October 2014
    September 2014
    August 2014
    July 2014
    June 2014
    May 2014
    April 2014
    March 2014
    February 2014
    January 2014
    December 2013
    November 2013
    October 2013
    September 2013
    August 2013
    July 2013
    June 2013
    May 2013
    April 2013
    March 2013
    February 2013
    January 2013
    December 2012
    November 2012
    October 2012
    September 2012
    August 2012
    July 2012
    June 2012
    May 2012
    April 2012
    March 2012
    February 2012
    January 2012
    December 2011
    November 2011
    October 2011
    September 2011
    August 2011
    July 2011
    June 2011
    May 2011
    April 2011
    March 2011
    February 2011
    January 2011
    December 2010
    November 2010
    October 2010
    September 2010

    Categories

    All
    Alcohol
    Alternate Cooking
    Appearances
    Apple
    Apricots
    April Fools
    Aprons
    Bananas
    Beans
    Beef
    Beets
    Bench
    Beverages
    Bonnet
    Bread
    Breakfast
    Budget
    Budgeting
    Cake
    Candy
    Canning
    Carrots
    Cheese
    Chicken
    Children
    Chocolate
    Christmas
    Cleaning
    Coconut
    Comfrey
    Common Core
    Constitution
    Cookbook
    Cookies
    Cooking Oil
    Crafts
    Dairy Substitutions
    Dehydrating
    Dessert
    Dried Fruit
    Earth Oven
    Earthquake
    Easter
    Edible Weeds
    Eggs
    Emergency Prep
    Essential Oils
    Faith
    Family Home Evening
    Fertilizing
    Food Storage
    Fourth Of July
    Freezer
    Frosting
    Fudge
    Garden
    Gardening
    Gingerbread
    Gluten
    Gluten Free
    Gold
    Government
    Grains
    Gratitude
    Hat
    Herbs
    Home Remedies
    Home Repairs
    Homeschool
    Home Storage
    Honey
    Hope
    Inflation
    Leftovers
    Legumes
    Lemon
    Main Dishes
    Mixes
    Mothers
    Noah
    Non Artificial Colors
    Non-artificial Colors
    Nuts
    Oats
    Oil
    Orange
    Paint
    Peaches
    Pear
    Pie
    Pizza
    Plums
    Poem
    Popcorn
    Pork
    Potatoes
    Powdered Milk
    Prayer
    Preparedness
    Projects
    Prophecy
    Pruning
    Pumpkin
    Quick Bread
    Rhubarb
    Rice
    Salad
    Salt
    Sauces
    Self Reliance
    Self-reliance
    Sewing
    Shelf Life
    Shelves
    Sky
    Smoothie
    Snacks
    Soup
    Spices Or Seasonings
    Squash
    Strawberries
    Substitutions
    Sugar
    Summer Fun
    Three Month Supply
    Time
    Tomatoes
    Trees
    Truffles
    T-shirts
    Tuna
    Ultra Gel
    Valentine\'s Day
    Vegetables
    Water
    Watermelon
    Wheat
    Work
    Year Supply
    Zucchini

    RSS Feed

Web Hosting by iPage