The Provident Homemaker
  • Recipes and Info
    • Making Bread
  • My Blog
  • Favorite Resources
  • Documents and Files
  • 52 Weeks of Building Storage

Week 30-   Pumpkin Recipes!  and assignment

10/31/2019

0 Comments

 
Picture
To help with building your year's supply (this is Week 3), see this chart. 

Harvest, Halloween, and Thanksgiving-- all of these bring pumpkin to mind. So here’s a collection of what’s on my blog so far on the topic.  Don't throw out your Halloween pumpkins! 

While the 'sugar pie pumpkins' are small, dense, and sweeter, the big ones are still good for cooking with. Multiple years, I've been able to glean pumpkins from farmers' fields for free after Halloween. Check with your local farmer, roadside stand, or grocery store. 

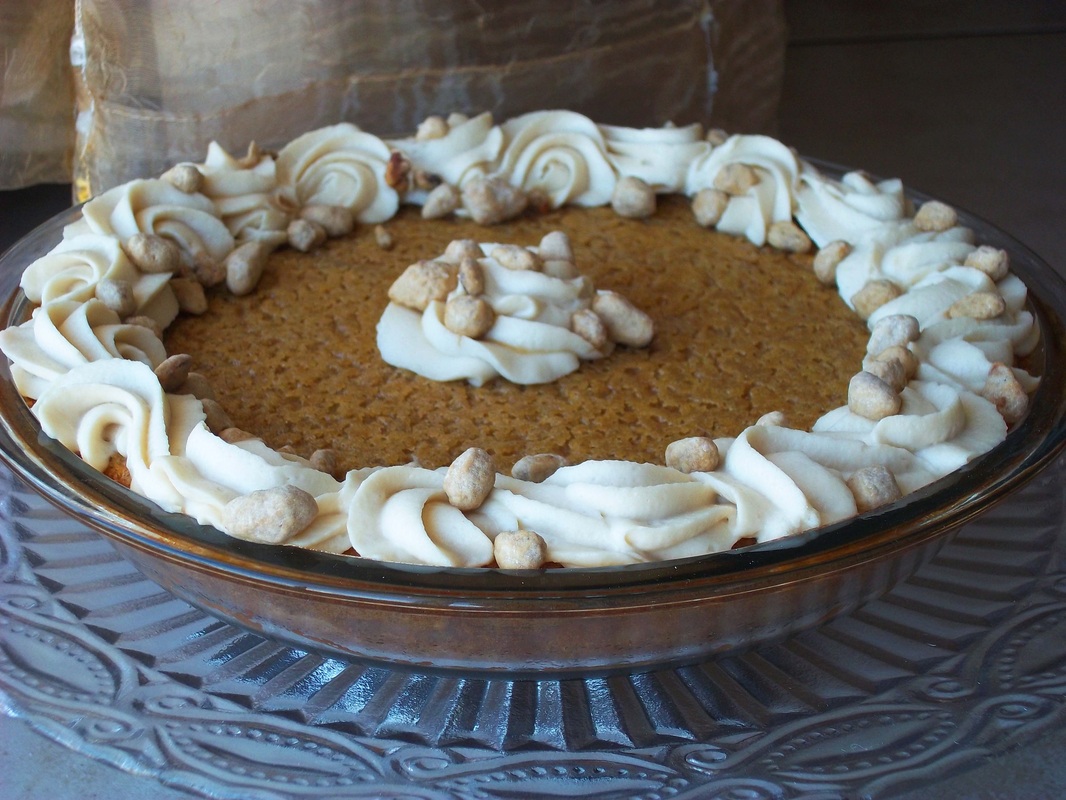
See how to make your own recipe-ready pumpkin puree. It makes better pumpkin pies.  Better everything. 😊  There’s more about cooking with pumpkins, here.

Here's a collection of recipes to use them. 

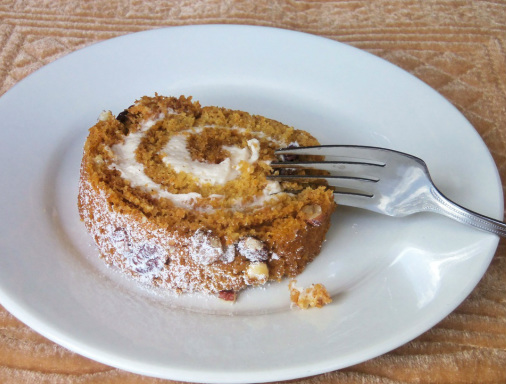
The Great Pumpkin Cookbook, including these recipes that have their own posts: Impossible Pumpkin Pie, Pumpkin Cake Roll (homemade is WAY better than the store’s!), and Pumpkin Shake.
 
This link has just a few pumpkin recipes, from a class I taught.

Have you ever used pumpkin powder? It's like storing pumpkin puree, but in a fraction of the space, and with no freezer or pressure canner needed. There’s also a recipe on that post for Pumpkin Pancake Mix.

See how to make it-- and use it-- at the link above.  There’s more about pumpkin and other vegetable powders, here.   

There's even a gluten-free and dairy-free pumpkin cheesecake you can make using the pumpkin powder.

Or make this dairy-based Creamy and Light Pumpkin Cheesecake using pumpkin puree.
 
Caramel Pumpkin Bread Pudding.  Lovely caramel sauce IN and ON it.
 
Autumn Harvest Bread- a lightly sweet pumpkin-pecan yeast bread.  It’s delicious alone, with honeybutter, and makes amazing smoked salmon sandwiches.
 
Pumpkin Spice Cupcakes with Cream Cheese Cloud Frosting.  Yes.

​Store your whole pumpkins through the winter; learn more at http://theprovidenthomemaker.com/my-blog/storing-food-through-the-winter and here. 


0 Comments

Week 19- Weekly assignment, and making vegetable powders

8/18/2019

0 Comments

 
Picture
Your weekly assignment is B4-3. Did you do your nonfood inventory last week? If not, now is a great time.  

My dehydrator has been running nearly nonstop for a couple weeks now, with a couple of batches of canning interspersed.  I much prefer dehydrating whenever it's an option.  (But I will bottle a whole number of other things-- meat for quick meals, jam/jelly, juices, syrups, ghee, peaches, ...)  Peaches are better canned, but apricots?  They must be an acquired taste-- I acquired it years ago, but my kids haven't.  So we bottle peaches, and dry apricots.  Mostly we turn the apricots into fruit leather.  With the bumper crop we've had this year on our THREE mature apricot trees, that's a whole lot of leather, despite our best efforts to give away as many apricots as possible.  

But that's not all the dehydrator has been used for these last weeks. Dried cherry tomatoes are practically candy... but we've kept up on eating them fresh, with some sharing, so I haven't dried any yet this year.  What I have done is the full 12+ trays loaded with sliced yellow summer squash. It doesn't matter which one.  This year it's a combination of yellow zucchini, yellow straightneck squash, and pattypan squash that got just a little too big.

What do I do with summer squash powder?  Everything I do with the shredded or pureed fresh ones, plus some extras.  Zucchini bread. Zucchini brownies.  Smoothies. Chili, where it's great to help thicken it-- especially if I'm also using tomato powder and onion powder! Soups, where using a little becomes invisible and without any telltale flavor.  Added to regular wheat bread dough. Or muffins. Or pancakes.  

Tomato powder is even better.  I use it in place of tomato sauce, tomato paste, tomato juice, diced tomatoes. Here is a chart that tells you how much tomato powder to use in place of each of those. Tonight I added a bunch to a batch of too-runny salsa. It makes a wonderful base for marinara sauce or pizza sauce, and is used in making my own taco seasoning.  And when added to bread dough along with spices, it makes the bread taste like pizza. 

Pumpkin powder is also great.  It makes pumpkin pie, pumpkin shake, pumpkin roll... anything that you'd use pureed pumpkin in.  And again, I throw it in soup and chili to thicken them and add nutrition, and add to bread to help it stay moist longer.

I once made banana powder out of commercially-dried bananas; a neighbor had bought a 5-lb bag, found that nobody at home would eat them, and brought them to me to see if I could find a use for them.  (The powder was good in banana muffins, banana bread, and smoothies.)

​I've also made mushroom powder, carrot powder, beet powder, and dried crumbled greens. (The greens were a freebie in my yard, an edible weed known as 'redroot pigweed'. A very nutritious member of the amaranth family.) Mushroom powder adds a savory, almost meaty flavor to soups and sauces.  (I made the mushroom powder by starting with a big bag of dried mushrooms found at a Asian market.  If you're local, the place is Ocean Mart in Sandy.) The beet powder is the perfect thing to make from beets that got too big and tough for good eating.  And my favorite use for it is as a natural food color-- though it is also good in smoothies and recovery drinks. (Read what I have on beet powder, near the end of this post.)

All of these powders are made pretty much the same way.  You clean the vegetable,  (Pumpkin is steamed first. The others are handled raw.) slice it an even thickness (1/4- 3/8" is ideal), and dry until crispy.  Add them to a blender or food processor, and run until powdery.  Store airtight; even better if you can remove oxygen and seal the jar or other container.

Are you intrigued?  You can read more about each other these here, along with some recipes and tips:

Zucchini

Summer squash (Ok, zucchini is also a summer squash)

Tomato

Pumpkin

​What will you try?  

0 Comments

Storing Food through the Winter

11/27/2015

0 Comments

 
There are lots of fresh foods you can store without needing a freezer, canner, or fridge.  I haven't built a root cellar, but discovered that different places in my yard, garage, and house have the right conditions for several of these foods.
Potatoes are happy on my bare garage floor until late January. After January they have to be moved up 1-2 feet, onto the cement stairs, to avoid freezing. Same with onions. Apples are better in the garage on the workbench, which is a couple feet off the ground and a few degrees warmer (but still cold). Pumpkins are happy in the basement or in a dark closet, off the floor so they avoid moisture. Carrots and parsnips are fine to leave in the ground, covered with a pile of dead leaves or a thick layer of straw if I want any hope of digging them during the winter. Otherwise they can be dug in spring, after the winter cold has made them sweeter.The link below is a 5-page handout from the University of Wisconsin which lists types of foods, their ideal storing temperature and any necessary humidity, expected length of storage, and plans for creating your own root cellar.

http://nchfp.uga.edu/how/store/wisc_vegetables.pdf

What will you store this year?


Picture
0 Comments

Impossible Pumpkin Pie

11/24/2014

0 Comments

 
Picture
Do you feel completely inept when it comes to making pie crust? Here's a recipe you'll love! You can even make it in the microwave instead of the oven.

Impossible Pumpkin Pie
(This pie makes its own crust)

2 c. pumpkin puree
3/4 c. sugar
1 can (12 oz.) evaporated milk 
½ c. Bisquick (or ½ c. flour plus ½ tsp. baking powder)
2 Tbsp. butter or margarine, softened 
2 eggs 
2 tsp. vanilla 
2 ½ tsp. pumpkin pie spice (or 1 tsp. cinnamon, and ½ tsp. each ground cloves,
ginger, and nutmeg)


Beat all ingredients 1 minute in a blend on high or 2 minutes with hand beater. Pour into greased pie plate. Bake at 375 about 45-50 minutes or till knife inserted in center comes out clean. Cool on a flat, heatproof surface (not on a wire rack).

Microwave instructions: place on an inverted (microwavable) dinner plate on medium high (70% power), rotating pie plate 1/4 turn every 5 minutes (unless you have an automatic turntable- then use that). Cook until knife inserted in center comes out clean, 22 to 32 minutes.

0 Comments

Pumpkin Cake Roll

11/17/2014

0 Comments

 
Picture
Pumpkin Roll
Makes 18, 1" slices.  

4 eggs                                                                          
1 1/3 c. sugar
1 c. pumpkin                                                             
1 c. flour                                                                    
1 tsp. baking powder
1 Tbsp. cinnamon                                                            
1 1/2 tsp. ginger
3/4 tsp. nutmeg                                                              
½ tsp. salt
1 c. chopped nuts, optional

Beat eggs until well mixed.  Gradually add sugar; this should take about two minutes.  Beat on high for another two minutes, until sugar is mostly dissolved and the mixture is thick and pale lemon-colored..  Stir in pumpkin.  Fold in flour, baking powder, spices, and nuts.  Grease and flour a 12x18" cookie sheet with 1" high sides, OR line it with parchment and grease the pan sides..  Spread batter in pan and sprinkle with nuts.  Bake at 375 for about 15 minutes, or til the cake springs back when pressed gently in the center.  Remove from oven.  While cake is hot, flip cake over onto a kitchen towel sprinkled liberally with powdered sugar.  Holding one of the wide sides of the cake, very carefully roll it up with the towel, cinnamon roll style. When cool, 2 to 4 hours later, unroll slowly and spread with cream cheese frosting.  Roll the cake again, without the towel!  Slice and serve. 

You can make this ahead of time and freeze it for later use.
If you don't have a 12x18" pan, but have a 10x15 pan, cut the recipe in half.  The batter will not be as deep in the pan, so bake a few minutes less.  (Mine took 12 minutes.)  Roll as above, but hold a narrow side as you roll it up.  This will give you one 10" wide roll.

Fluffy Cream Cheese Frosting
(the 1-1-1-1-1 recipe)

1 stick butter (1/2 c.), softened
1 c. powdered sugar                                                     
1 Tbsp. lemon juice OR water or milk (lemon accents the zing of the cream cheese)
1 tsp. vanilla
1 (8 oz.) pkg. cream cheese, chilled and cut into 8 cubes                                          

Combine butter with powdered sugar, lemon juice, and vanilla.  Beat until smooth.  Add cream cheese, one cube at a time, beating until smooth after each.  Once they're all incorporated, beat another minute or until frosting is fluffy.
0 Comments

Thanks-giving

11/26/2013

0 Comments

 
Picture
"The First Thanksgiving at Plymouth", 1914, Jennie A. Brownscombe, public domain
First, a bit of trivia:  
Did you know? While pumpkins were certainly a part of the first feast of thanks-giving,  they were usually roasted or stewed.  And eaten very, very often!

For pottage and puddings and custards and pies
Our pumpkins and parsnips are common supplies,
We have pumpkins at morning and pumpkins at noon,
If it were not for pumpkins we should be undoon."


Pilgrim verse, circa 1633
______________________
Please take some time this week to gather your children, grandchildren, neighbors, or whomever you care about, and teach them of our nation's heritage of gratitude.  Some great resources are below, including what George Washington said in his Proclamation for a Day of Thanksgiving.  Each generation must learn this, or it dies out, leaving a gaping hole that entitlement and selfishness rush in to fill.

Gratitude is not only the greatest of virtues, but the parent of all the others.
— Marcus Tullius Cicero (106 BC-43 BC), Pro Plancio (54 BC)


The following is from the Providence Foundation's Nov. 2013 newsletter.  (Thank you to them!)

Celebrating Thanksgiving

Thanksgiving is an uniquely American holiday. We have been giving thanks to God in private and public from the foundation of the nation. In fact, governments regularly issued official days of Prayer and Thanksgiving from the planting of the first colonies up until the present. Over 1400 Days of Prayer, Thanksgiving, and Fasting were proclaimed by colonial, state, and national governments from 1620-1815, and hundreds more have been issued since then.  

A few items to help you remember and pass on our heritage of thanking God include:

Why We Celebrate Thanksgiving

You can use this article to share with your family the origins of Thanksgiving Day.

Some Early Government Thanksgiving Proclamations

1.       President George Washington, Proclamation for a Day of Thanksgiving, Thursday, November 26, 1789

2.       Governor Thomas Jefferson of Virginia, Thanksgiving Proclamation, December 9, 1779

3.       Proclamation for a Public Thanksgiving, New Hampshire, December 10, 1778

4.       Proclamation for Thanksgiving Day, Continental Congress, December 18, 1777
Issued during the American Revolutionary War by the Continental Congress, this was the first national Thanksgiving Day in America. The explanation of the proclamation is from W. DeLoss Love, The Fast and Thanksgiving Days of New England (1895). Love lists over 1400 days of prayer and fasting and prayer and thanksgiving observed by civil governments (colonial, state, and national) from 1620-1815.

5.       Proclamation for a Day of Thanksgiving and Prayer, Massachusetts, June 29, 1676
On June 20, 1676, the Council of Massachusetts appointed June 29 as a Day of Thanksgiving and Prayer, in response to the colonists’ victory in King Philip’s War. The broadside of this proclamation is the earliest printed thanksgiving broadside known. At the top is the seal of Massachusetts, which shows an Indian speaking the words, “Come Over and Help Us.”

0 Comments

Caramelized Butternut Squash with Rosemary

11/23/2013

0 Comments

 
Picture
How about this for a new side dish?  I love rosemary and olive oil. Or butter.  Or both.  :)

This recipe showed up at my house this week in a save-the-farmlands newsletter, of all things.  (I'm all for saving farmlands, but how about nixing the property tax instead of government paying them subsidies?!)  And since my live rosemary died over last winter and there's a bottle of rosemary essential oil in my cupboard, I adapted it to use that.

You can substitute about any squash you have on hand that is a similar size.  Or use something large, like half a banana squash or pumpkin, or kabocha squash, etc, but if you do, then double the amount of other ingredients except rosemary oil.

Caramelized Butternut Squash with Rosemary 

1 butternut squash
1 tablespoon olive oil
1/4 teaspoon salt
3 tablespoons unsalted butter
2 sprigs rosemary or one drop of rosemary essential oil (better if you have a 1 ml bottle, then use  two of those tiny drops) on top of the butter

Preheat oven to 375 degrees F.
Cut the squash in half lengthwise; scoop out seeds.   (You can wash, roast, and salt these, just like pumpkin seeds.)  Put the squash cut-side up on a baking tray.
Drizzle with olive oil, sprinkle with salt.  In each natural 'bowl' where the seeds used to be, add 1 Tbsp. butter and a rosemary sprig.  EXCEPT:  if using rosemary oil, melt 2 Tbsp. butter and add the drop to it.  Pour half into the cavity of each squash half.  Cover tightly with foil and bake for 45 minutes, or until tender when poked with a fork.

Remove from oven and pull off the foil; let cool until you can handle it.  Scoop out the flesh.  

Heat the last 1 Tbsp. butter in a large skillet over med-hi heat.  Once melted and hot, add the cooked squash.  Gently toss until some parts become caramel-y brown.  Serve hot.

NOTE:  the photo shows the squash as it comes out of the oven, not after being scooped out and browned.  If you want it browned from the oven, do this instead:
When tender, pull off foil and brush the last tablespoon of butter over the cut edges.  Return to the oven and turn on the broiling element.   Broil, checking every minute.  (I am not kidding.  Seriously check every minute!)  If your baking tray is on the middle rack in the oven, this will probably take about 3-4 minutes.  If the tray is up high, close to the element, it might only take 1 minute, maybe 2.

0 Comments

Gluten free, dairy free pumpkin cheesecake

11/9/2013

3 Comments

 
Picture
See the bottom of this post for photos on making the heart-swirl pattern.

A friend of mine has to avoid dairy, wheat, and oats- and we were going to be together at a potluck lunch on Thursday.  The pumpkin cheesecake last week (for a different group) was such a hit I decided to adapt it so she could enjoy it too.  But with a bit of chocolate.  Like pumpkin-chocolate chip cookies.

I wanted it to be relatively inexpensive- no quart of coconut yogurt! -that stuff's pricey. Coconut milk and coconut cream, sure.  I have that on hand.  
No recipes using those appeared to be online anywhere, though I found the chocolate-version crust here.  There were some cashew-puree based ones- but not only did I not have time to soak nuts, but wanted this to be a recipe even the nut-allergic could use. So I started with my tried-and-true 'normal' recipe, and adapted. And I was willing to buy one 6-oz cup of coconut yogurt to put in the (optional) topping. 
You won't taste the apple cider vinegar, but it adds both the tartness and savoriness you'd get from cream cheese. If you have 2 (14-oz) cans coconut milk and a 19-oz can of coconut cream, that will be exactly enough for the filling, the topping, and the ganache.

If you want to use honey in the filling instead of sugar, use just 1 cup honey plus 1 Tbsp.  Since this also adds about 1/4 cup of water, add about a tablespoon additional pumpkin powder OR a tablespoon oat or coconut flour so the cheesecake won't be too soft.

Gluten free, dairy free Pumpkin Cheesecake
Crust:
1 c. fine-shred coconut, toasted
1 Tbsp. coconut oil, melted
1 ½ Tbsp. honey
1 tsp. vanilla
1 ½ Tbsp. cocoa powder 

Stir together and press firmly onto the bottom of a 9” springform pan.  Set aside.  
For a fall-spice crust instead of chocolate, omit cocoa powder, and instead use                 ½ tsp. cinnamon + ¼ tsp. cloves + ½ tsp. ginger

Filling:
1 1/3 c. sugar
1 tsp. cinnamon
3/4  tsp. ginger
¼ tsp. nutmeg
¼ tsp. cloves
½ tsp. salt
6 Tbsp. (slightly heaped 1/3 c.) pumpkin powder
2 (14-oz) cans coconut milk
3 Tbsp. apple cider vinegar
1 Tbsp. vanilla
5 large eggs, room temperature
1 c. coconut cream

Mix all together, in order.  Don’t overmix or whip air into it, or it may crack while baking.  Bake at 350 F for  75-90 minutes in a water bath, until center jiggles like Jello and internal temperature is 145-150 F.  Cool in oven or on counter, then chill, covered, in fridge 4 hours or more.

Rum-flavor Topping:
1 cup coconut cream, well chilled
½ cup coconut yogurt
½ cup brown sugar
1/8 tsp. salt
1 ½ tsp. rum extract

Whip cream until just beginning to thicken; add all else and whip.  Spread over chilled cheesecake.

Chocolate Ganache drizzle:
¼ c. (1 ½ oz) dairy-free chocolate chips
3 Tbsp. coconut cream or coconut milk

Heat gently to melt chocolate chips; whisk until smooth.  Drizzle on cheesecake.
3 Comments

Creamy and Light Pumpkin Cheesecake

11/2/2013

0 Comments

 
Picture
This seasonal New York-style cheesecake is not exactly "lite", just light.  Not leaden.  But it is a little lower fat because I substituted one cup of cottage cheese in place of the original one cup of heavy cream.  :)  This gives it a higher protein content and reduces the fat.
This is an amazing pumpkin cheesecake, with just the right amount of tartness, sweetness, and spice.  I adapted it from an America's Test Kitchen recipe.  The whipped cream topping is optional but perfect.

The recipe- which is below- calls for a 9-inch springform pan.  I don't own one, but I do have a 9-inch round cake pan.  I use it instead by cutting out a circle of parchment paper and lining the bottom with it, spraying the inside edges with cooking spray, and going ahead with the baking.  When it's done, run a knife around the inside edge to help it pull away, cool and chill completely, and invert the pan over a plate.  Tap hard.  If it's being really stubborn, run hot water over the bottom of the pan (held at an angle so the plate doesn't fill with water) and try again.  
Picture
Pumpkin Cheesecake
Crust
1 sleeve (about 5 ounces) graham crackers- whack it a few times to break into chunks
6 tablespoons butter
3 tablespoons sugar
1/2 teaspoon ground ginger
1/2 teaspoon ground cinnamon
1/4 teaspoon ground cloves

Preheat oven to 325 degrees F. Put the cracker pieces in a blender or food processor; run until finely ground.  Put the butter in a 2-cup microwave-safe container and melt it, about 30 seconds in the microwave.  Dump in the crumbs, sugar, ginger, cinnamon, and cloves. Mix well, then sprinkle over the bottom of a 9" springform pan.  Press down evenly using the bottom of a glass or something else flat.  Bake for about 15 minutes, until it starts smelling delicious.  Remove and let cool while you make the filling.

Filling
2 cups pumpkin puree (canned or your own- or, better yet, use pumpkin powder)*
1 1/3 cups sugar
1 teaspoon ground cinnamon (or use 2 tsp. pumpkin pie spice in place of these four spices)
1/2 teaspoon ground ginger
1/4 teaspoon ground nutmeg
1/4 teaspoon ground cloves
1/2 teaspoon salt
3 (8-ounce) packages cream cheese, room temperature
1 tablespoon vanilla extract
1 tablespoon lemon juice
1 cup cottage cheese
5 large eggs room temperature

Pour the pumpkin puree on a triple layer of paper towels, spread evenly, then top with another triple layer. Press firmly to absorb the extra moisture.  The Test Kitchen said that when they didn't do this, the cheesecake was always wet.   OR- best idea ever!- use your pumpkin powder, using only half the water you normally would.  That means you'd use 6 Tbsp. pumpkin powder-- barely over 1/3 cup-- plus enough warm water to equal one cup.  (Ta-da!  aren't you extra-glad now that you made some?!)

Bring 4 quarts of water to a boil for a water bath later.  Put the pumpkin in a blender or food processor, and add the sugar, cinnamon, ginger, nutmeg, cloves, salt, cream cheese, vanilla, lemon juice, cottage cheese, and eggs.  Blend until smooth. Pour over crust. Put this pan in a roasting pan or on a jelly roll pan if that's all you have.  Put it in the oven, then pour water in that larger pan, enough to come about halfway up the sides of the cheesecake pan.  Bake for about 1 1/2 hours, until the center wobbles like Jello instead of like water; a thermometer poked into the center should register 145-150 degrees F.  Run a knife around the inside edge of the cheesecake, then put the cheesecake pan on a wire rack to cool.  When cool, chill for at least 4 hours to let it firm up.  (I didn't have that much time; mine cooled on the counter for 30 minutes, then went in the fridge for 3 hours.  It was a little soft in the center, but sliced OK.  The leftovers sliced much more nicely the next day.)

Brown Sugar and Rum (flavor) Cream Topping
1 cup whipping cream, very cold
1/2 cup sour cream or 4 oz. cream cheese, softened
1/2 cup packed light brown sugar
1/8 teaspoon salt
1/2 tsp. rum flavor*

Whip the cream until it barely starts to thicken.  Add sour cream or cream cheese (I used cream cheese since I was out of sour cream), brown sugar, salt, and rum flavor. Beat about a minute, until thick; spread on top of cooled cheesecake.

*I have a whole bunch of Stephen's Gourmet Rum Sauce mix packets; each packet makes 2 cups of sauce; I used half of one dry mix in place of part of my sugar.  But I don't know if the company still makes the mix; I got them for ten cents apiece on a clearance deal. So you can use rum flavor.  Or use 2 tsp. rum if you happen to like it.  Or, if you live nearby, call me and you can have a packet.  :)
I also cooked a bit of the sauce and used that to drizzle a design on the top of the cheesecake.  Mini chocolate chips sprinkled on top would be great instead, as would some sugared pecans or hazelnuts.  Mmm.
0 Comments

Caramel Pumpkin Bread Pudding

11/9/2012

0 Comments

 
Picture
About six years ago I discovered my boys had a vocabulary problem.  They were using one word to describe everything that tasted good: 'heavenly'.
This bothered me for two reasons-  one, I'm sure heaven is much better than the best food, and two, they weren't expanding their vocabulary.  This was a perfect time.  So we pulled out a thesaurus and looked up 'delicious' to come up with a new word to use.  'Toothsome' had them rolling on the floor laughing, so that became the new favorite.  
I've discouraged them using 'heavenly' very often- but I'll tell you, that was the first word that popped into my head (I didn't say it!) when the first spoonful of moist, custardy, caramel-y, pumpkin dessert hit my tastebuds.  

My apologies to Heaven.
  

This is a modified version of Caramel Bread Pudding.  (The link has other ways of using up stale bread, too.)  The spices in this play a supporting role to the pumpkin flavor: just enough there to help you notice the pumpkin, not the spice.  If you want to taste the cinnamon, double or triple the amount here.

Caramel Pumpkin Bread Pudding- fills a 9x13 pan

15 slices good-quality white bread, cut into 1” pieces (about 16 cups or 20-24 ounces)- baked until crisp (about 10 minutes at 450 degrees)
1 ½ sticks butter
2 cups light brown sugar
1 cup heavy cream or evaporated milk
¼ c. honey or corn syrup  
5 tsp. vanilla, divided
2 1/2 c. half-and-half, or use the last ½ cup evaporated milk from your can (above); use whole milk for the remaining 2 cups here.   
5 large eggs
1 c. pumpkin puree
1/2 tsp. cinnamon  OR 2 tiny drops cinnamon essential oil
1/4 tsp. ground cloves OR 1 tiny drop clove essential oil
1/2 c. toasted nuts, optional

Melt butter and sugar together in a saucepan on medium-high heat.  Stir about 4 minutes, or until bubbly and golden.  Remove from heat and stir in cream or evaporated milk, corn syrup, and 2 tsp. vanilla.  Pour one cup of this caramel into a greased 9x13 pan.  

Set aside one more cup of caramel, to use as topping later.  

To the remaining caramel, add the half-and-half (or mixture of evaporated milk and whole milk).  Beat the eggs together, then whisk in pumpkin, cinnamon, and cloves.  Whisk in the half-and-half mixture.  Add remaining vanilla.  Fold in the bread, and let sit until soaked through, about 20 minutes. Meanwhile, heat oven to 350 degrees. Put bread mixture into the 9x13 pan, bake about 40-45 minutes, until the top is crisp and the custard is barely set.  Sprinkle with toasted nuts.  Serve warm, with the reserved cup of caramel drizzled on top.
0 Comments

Preparing a pumpkin for recipes

11/2/2012

0 Comments

 
Picture
Do you have carved - or not- pumpkins sitting around now?   Or do your neighbors?  Will they share?
If you have a pumpkin farmer nearby, even better.  Their selling season is over.  If you act fast, they're often happy to let you glean for free.  If you wait, the pumpkins will likely get tilled into the ground.

 If the pumpkins are not cut, you can store them for a couple months if you like- dry (NOT sitting on cement!!), cool (under 75 F), and dark is best.  Most often my whole pumpkins stay firm and fresh until about January or February- this is at about 65 degrees F, stored off the floor and on a layer of cardboard or newspapers to absorb moisture- but I've had a Hubbard that stored until the next July, and a spaghetti squash from a year ago!

But let's say you have a pumpkin that you'd like to cook with. 

Fresh has so much more flavor than the stuff in a can from the store.  

Smaller pumpkins tend to be sweeter, bigger ones more watery.  But you can always drain off extra liquid if you need to.  Below is a slide show on how to make your own fresh puree.  You can see here for another, more detailed post on making the puree, or see previous posts on finding,choosing, buying,storing, or dehydrating them.


Click on the "Pumpkin" category on the right for recipes.
0 Comments

Pumpkin Shake

10/29/2012

0 Comments

 
Picture
Pumpkins are one of the most inexpensive, nutritious vegetables around... right now they're under 20 cents per pound where I live.  One cup (8 oz.) of pumpkin has more than 700% of your daily Vitamin A needs, 7g fiber, 3g protein, 19% RDA for iron, 17% RDA for Vitamin C, and 6% RDA for calcium.  All this for 83 calories and about 10 cents.

We grew a few, but the garden was pretty sad in general and we ended up buying a couple for our annual pumpkin-carving party at Grandma's house.  (To tell you how bad the garden was... the only pumpkins that survived were in the SANDBOX, where one son had spilled some pumpkin guts in late spring.  Yeah.  Go figure.  They even survived our free-roaming chickens.)

So now we have several carved jack-o-lanterns to set on the front porch for Trick-or-Treating.  The day after Halloween they'll get cleaned, sliced, and either cooked or dehydrated and turned to powder. My kids are excited at the possibilities.  Their favorite is pumpkin pie, but this shake tastes just like it, in a fraction of the time!

Pumpkin Shake
1 pint vanilla ice cream (about 4 heaping ice cream scoopsful)
1 1/2  c. milk
1 1/2 Tbsp. pumpkin powder*
1/4 tsp. pumpkin pie spice OR 1/8 tsp. cinnamon plus a dash (to taste) each ground cloves,     ginger, and/or nutmeg
2 Tbsp. brown sugar, OR molasses, OR honey

Put all ingredients in a blender and mix on high until smooth.  Makes about 3 1/2 cups.

*If you don't have pumpkin powder, use 1/2 cup plain pumpkin puree, and reduce the milk to 1 cup instead of 1 1/2 cups.

Optional mix-ins:
2 Tbsp. raisins (add before pureeing so they get finely chopped)
2-3 oz. cream cheese
2-4 Tbsp. chocolate chips

Get this recipe and many more ways to use pumpkin, free, from The Great Pumpkin Cookbook.


0 Comments

Autumn Harvest Smoked Salmon Sandwiches

9/13/2012

0 Comments

 
Picture
Yeah, I know that smoked salmon is a little expensive for a website with a name like this one has...  

Would it help you feel better to tell you I buy it during the after-Christmas "food gift" clearance sales?   It's at least 50% off then.  

OK, it's still not real frugal.  But it does have an incredible shelf life-- and is one of my absolute-favorite foods!- which is why I had a couple tins of it on hand when the idea for this sandwich struck.  I decided, the day of the contest, to enter the "Fleishman’s Yeast Sandwich Bread Contest 2012" at the Utah State Fair.  Which bread I wanted to make was no problem, the Autumn Harvest Bread came right to mind.  The contest this year, though, specified for 10% of your overall judging score to be from the filling (or "description of a filling").  This is what I came up with to complement the breads' flavors.    It will make your tastebuds "dance and sing"!  The judges agreed, this took first place in the contest.

Autumn Harvest Smoked Salmon sandwiches

Start with one loaf of Autumn Harvest Bread, sliced about 1/2" thick.

* * * * * * * * * * * *

Cream Cheese Filling:
4 ounces cream cheese, softened 
2 Tbsp. very finely chopped (or pureed) red onion
2 Tbsp. minced crystallized ginger
2 Tbsp. finely chopped toasted pecans
¼ c. finely chopped celery
2 tsp. fresh lemon juice
1 ½ tsp. finely grated lemon zest
1/16 tsp. freshly ground black pepper

Stir together, chill at least 30 minutes to blend flavors. 

To assemble  sandwiches, spread about 2 Tbsp Filling on each of four slices of bread. Top with 2 ounces smoked salmon, and any of the following you like (I used all of them): thinly sliced red onion, sliced tomato, roasted red pepper, alfalfa sprouts, and arugula.  Drizzle with red wine vinegar and sprinkle with salt and pepper.  Makes 4 sandwiches.


0 Comments

Autumn Harvest Bread

9/11/2012

2 Comments

 
Picture

 This bread has a thin, chewy crust with an exceptionally tender and moist interior, flavored with pumpkin and honey, scented with cinnamon, ginger, cloves,  with a toasty crunch from pecans.  (See a photo of the inside here.) It is one of my all-time favorite recipes.  It all started with an artisan bread cookbook, Amy's Bread.

My brother had just finished a two-year mission to Spain, and came back with a whole new perspective on bread.  He described how fresh, hearty, deeply flavored, and moist those European breads were, with their beautiful, flavorful crusts.  

That's it, I thought, I MUST learn to make bread like that.  

So I bought a book.  (I still have, it, use it, and love it.  Her Country Sourdough loaf is perfect, and the thin, crunchy, seeded breadsticks are addicting!)

The recipe below began as one from her cookbook.  I've tweaked it over the years, until it can be claimed as my own.  We usually just slice and butter it, or toast and spread with cream cheese.  It would make incredible French Toast, especially if you stuff it with lightly sweetened cream cheese and top with fruit syrup or homemade maple-flavored syrup.   For a sandwich filling that goes spectacularly well with it, see my next post!

See here for a post on making pumpkin puree, or see this one on making pumpkin powder.  I actually used the pumpkin powder & added water in my batch for the fair.

Autumn Harvest Bread
(Pumpkin-Pecan Yeast Bread)

1 Tbsp. Instant or RapidRise yeast               4 ½ c. bread flour
1/2 c. warm water                                           ½ c. butter, melted
½ c. (6 oz.) honey                                            1 tsp. cinnamon
1 c. pumpkin puree                                          ½ tsp. ginger
1/4 c. cornmeal                                                ½ tsp. ground cloves
2 large egg yolks                                             1 ½ tsp. salt
2 Tbsp. dry milk powder                                 1 c. pecan pieces, toasted                                                                                

Combine yeast and warm water, stir to dissolve.  Let stand 3 minutes.  Mix in honey, pumpkin, cornmeal, egg yolks, milk powder, and 2 cups of the flour. Add butter, then the remaining 2 cups flour, the cinnamon, ginger, cloves, and salt.  Knead until smooth and elastic, about 5-10 minutes.  Let rest 20 minutes.  Knead in pecans.   Cover and let rise until doubled, about 1 ½ -2 hours.  

While it’s rising, make a wash with 1/4  c. cold water and 1/2  tsp. cornstarch:

Combine the two, bring to a boil, and stir until thickened.  Cover it so it doesn’t form a skin, and let it cool.

Divide dough into two pieces. Shape into 16-20” long logs, and tie each into a knot.  (Or shape into a ball, seam-side down, or shape into two 8x4 loaves.)  Cover and let rise until nearly doubled, 1-1 ½ hours.  Using a pastry brush, gently coat each loaf with the glaze.  Bake at 375 degrees for 25-35 minutes, until golden brown and the surface is firm.  Brush again with the glaze.  This helps it have a nice shine and a thin, soft crust.  Cool before cutting into 1/2" slices. 
2 Comments

Lemon Chess and other custard pies

11/11/2011

2 Comments

 
Picture

This is a smooth, lemony, egg-based baked pie.  Use a fresh lemon for the best flavor, one is all you'll need.  If you only have bottled lemon juice, be sure to use the lemon zest, or about 1 tsp. lemon extract, or 4-6 drops lemon oil.  The zest gives more flavor than the juice does.

Lemon Chess Pie

5 eggs
1 3/4 c. sugar
3 Tbsp. fresh lemon juice
1 Tbsp. lemon zest
2 Tbsp. cornmeal
1/4 tsp. salt
1/2 c. (1 stick) melted butter

Preheat oven to 450 degrees.  Beat the eggs in a medium bowl, then add sugar, juice, zest, cornmeal, salt, and butter.  Pour into a parbaked crust, put on the lowest rack so the heat will set the crust.  Immediately reduce temperature to 325 or 350 degrees.  Bake for 50-60 minutes, until all but about 1” of the center is set. Jiggle the pie to check that- it will jiggle like Jello instead of like water.  (If 1" of the center still seems like liquid, that's OK;  the center will continue to cook as it cools.)  Cool on a rack.  Store covered in the fridge.


Pat-in-Pan Crust
Looks and tastes just like a rolled-out crust, but is much easier, and does not get tough from handling it.

1 stick butter (1/2 c.) softened but cool
2 oz. cream cheese, softened but cool
1 ¼ c. flour
2 Tbsp. sugar
¼ tsp. salt

Coat a 9” pie pan with cooking spray.  Beat together butter and cream cheese until very smooth.  Add all else, beat 20-40 seconds more until it looks like coarse cornmeal.  Scrape sides of bowl, beat until large clumps form.  Set aside 3 Tbsp of dough for top edge.  Evenly press remaining dough onto bottom and up sides of the pie pan.  On a floured surface, roll each Tbsp reserved dough into a 9” rope, put around top edge of pan; flute edge.  Wrap and chill 1 hour, preheat oven to 325 degrees.  Roll out and prick with a fork; bake until golden, 35-40 minutes.  Cool on rack.

To "parbake" this crust, you're going to "par"tly "bake" it: cook 20-25 minutes, until the crust looks dry but not browned.  Pour the filling in while crust is still warm.

If you’re making multiples of this, it’s easiest to use an upright mixer and wire beaters.  You’ll use about two cups of the dough, loosely packed, for each crust.
 

This recipe is from  this week's Custard Pies and Pie Crust class- the two-page handout is on the link. It includes recipes for several custard pies: Pumpkin Pie, Pecan Pie, Poor Man's Pecan Pie (Pecan Pie recipe, but using toasted rolled oats INSTEAD of pecans), Rhubarb Custard Pie, and Cranberry Pie. 
2 Comments

Cooking with Pumpkins

11/2/2011

1 Comment

 
Picture
There are a few previous posts on finding, choosing, buying,storing, or dehydrating pumpkin-

This one is on just preparing it.  If you want pumpkin recipes, see The Great Pumpkin e-book, available for free.

The simple version is: cook until soft, mash or puree, use or store it.  If you need details, this is the post for you!

I prefer to steam my pumpkin, that way I can keep the skin on and get the extra fiber and minerals from it, and waste less.  You can bake it if you prefer; cut in half, clean out the insides, and bake, cut-side down on a cookie sheet.  Plan on about an hour at 350 degrees. Baking is a better option if you're using a thick-skinned squash like Hubbard or Acorn (which work fine in pumpkin recipes, by the way).

If you're steaming it, start by scrubbing off any dirt.  If there are little blemishes, cut them out or scrape them off with a paring knife.  Some are only skin-deep.  Cut off the steam and blossom end.  Those little brownish-grey bits never will soften up.  They won't hurt you, but they're not pleasant to eat.

Picture
Cut the pumpkin in half.  Scrape out the strings and seeds.  A spoon is a great tool.  Don't worry about getting all the strings out.  They puree.  Seeds don't. 

Picture
Cut the pumpkin in strips about 1 to 2" wide.  These will be C-shaped.  Turn them on their sides and cut crosswise to make roughly square-shaped pieces.

Picture
Put about 1" of water in the largest pot you have.  When it comes to a boil, fill the pan with the pumpkin pieces.  Bring back to a boil, put a lid on it, and let simmer until tender.  It takes about the same amount of time as it does to boil cubed potatoes: about 30 minutes for bigger chunks, less for smaller ones.

Picture
When the pumpkin is done, it will be translucent.  A fork or knife poked into a piece will meet no resistance.  You can still puree it without it being fully cooked, but it's harder on the machine.
Mash with a potato masher if that's all you have (but it won't get rid of strings).  I use a blender and usually have to add about 1/4 c. of the cooking water to get it to puree.   A food processor would work great. 

Picture
If you have more puree than you'll use within a week, measure the extra into containers or freezer bags.  How much will you use at once?  Store that much in each container.  I always make two pumpkins pies at a time, which takes 4 cups.  So I freeze pumpkin in 4-cup batches.  If you only want 1 cup at a time for a batch of cookies, freeze some in that amount.  Label them with the contents, amount, and the date.  Best if used within a year, but they'll be fine so long as they don't get freezer-burned.  It won't make you sick even then, but you'll need more spices to hide that nasty flavor.  I sometimes find 3- or 4-year-old bags hiding in the back of the freezer; they cook up just fine.
So that the bags lie flat for storing, you can freeze them on a cookie sheet.  This has another benefit- if your bag happens to pop open while freezing, spills are caught on the tray.  Yep, I learned this one the hard way.  Actually, they'll stack in a less space if you freeze them already stacked up.  Just make sure those bags are going to stay closed!

This reminds me of a quote seen today: "Always learn from others' mistakes.  You can't possibly live long enough to make them all yourself."

Picture
What about the seeds you scraped out?  Well, you can toss the whole lot out into a flowerbed or pot outside, and see what grows next year.  We prefer to eat them.  With your fingers, sort out the seeds.  It's a slippery job, but you'll get the hang of it.  The strings go in the compost pile outside.  If you want to save seeds for next year, put some of the seeds on a paper towel and let them airdry for a couple weeks.  Store them in a paper bag or paper envelope.  They'll mold if stored in plastic.  Label them!  Be aware that unless you have a non-hybrid pumpkin, what grows next year will not be exactly the same size, shape, or variety.  But it will be pumpkin.  Plant in the spring after the last frost.  Plant 3-4 seeds close together, and allow them about a 2-4 foot radius for the vines to spread out.

To bake them instead, drizzle with 1-2 tablespoons of oil (this makes them MUCH easier to chew and digest!), sprinkle with salt, and bake until they've turned golden brown.  Use any temperature from 350 to 400 degrees, baking will take anywhere from 7-20 minutes, depending how wet they were and how hot the oven is.


1 Comment

Applesauce- or Pumpkin-Spice Cupcakes with Cream Cheese Cloud Frosting

10/26/2011

0 Comments

 
Picture
Hey, I know what this is starting to look like...  and no, I really don't make cupcakes ALL the time!
I had a quarterly lunchtime get-together with some friends, and we all brought food.  So that's my excuse this time around.  That said, everyone flipped over these cupcakes, and insisted that I share the recipe. 

True to form for me, there is no single-page recipe for this: I took a regular cake recipe, added applesauce and spices to it, filled it with something complimentary I had in the cupboard, and made my favorite frosting, using cream cheese in it this time.

If you have a copy of The Chameleon Cook, the plain (yellow) cake recipe is on page 74, and the frosting recipe is on pages 76 (Boiled Milk Frosting) and 78 (Cloud Frosting variation).  I made a half batch of frosting; it ran out on cupcake #19.  If you like a lot of frosting, especially when it's fluffy, creamy, and not too sweet, make the full batch.  If you like a strong cream cheese flavor, instead of using 2 sticks (8 oz.) butter and 8 oz. cream cheese, decrease the butter to 1 stick (4 oz.) and add an extra 4 oz. cream cheese (total 12 oz.) To make it even more rich, reduce milk to 1/2 cup, Ultra Gel or flour down to 2 Tbsp, and sugar down to 1/2 cup.  

For the cupcakes:
Take any white or yellow cake recipe, or a boxed mix
.
Use the same ingredients and instructions as the recipe or box says, except:

Add 1 cup applesauce or pumpkin puree to it, and reduce the liquid the recipe calls for by 1/2 cup (this means reduce the milk to 3/4 cup if you're using my recipe)
Applesauce or pumpkin puree, for cooking purposes, acts like about 50 % water.
Stir in any or all of these spices: using all of them gives a full, round flavor, but if you only have cinnamon, it'll still be good:
1 Tbsp. cinnamon
1 tsp. ground ginger
, or 1 Tbsp. grated fresh, or 1-2 Tbsp. chopped crystallized ginger :-)
3/4 tsp. cardamom
1/2 tsp. allspice
1/2 tsp. ground cloves
1/4 tsp. ground nutmeg

If you like, also add 1/2 c. chopped walnuts, pecans, or hazelnuts, and/or 1/2 c. raisins

Bake according to regular instructions. 

When cool, add filling if you like.  I used Dulce de Leche, thinned with enough water that the caramel didn't hold its shape anymore (maybe 2 Tbsp. water to 3/4 c. caramel).  But use whatever you have or can make, such as homemade or jarred caramel sauce, unwrapped caramels melted with milk or water (try 1 Tbsp. milk/water for each 10 caramels).  If you have a decorating bag with a tip, you can fill the bag with caramel, poke the tip down into the cupcake, and squeeze the bag until the cupcake swells with the filling.  I have a bag, but didn't want to mess with it this time.  The other way I fill cupcakes is by cutting out a cone-shaped section from the top of the cupcake.  Lift it up, put a spoonful of filling in the hole, and replace the top of the cupcake.  Frosting the cupcakes will hide those surgery marks.  See the photos below.
Picture
If you're making mini cupcakes, an easy, non-messy way to get batter in those little cups is with a small ice cream scoop.  Use a regular-sized scoop for regular-sized cupcakes.

Picture
To fill a cupcake, run a knife around the top, with the blade angled so the tip is in the center, about an inch down.

Picture
Lift up the top, and the cupcake is ready to fill!  How much you add is up to you.  Any less than 1/2 teaspoon just disappears into the cupcake, so use more than that.  Add too much and it will spill over the top...  so you'll figure out what you like pretty quickly.  That said, I used what fit on a regular spoon, about 1 1/2 teaspoons.  Put the top of the cupcake back on, then frost.

0 Comments

Sugar Pie Pumpkins

10/25/2011

0 Comments

 
Picture
SO... is there a difference between those big pumpkins that are cheaper, and the littler, "Sugar Pie Pumpkins" that are 3 to 10 times the price?

Yes, there is.  The smaller ones are varieties selected for smooth, dense, creamy flesh, with a higher sugar content.  The bigger ones are still good for eating, but usually have a higher water content, and often have stringy flesh.  When I make pumpkin pie using the small sweet ones, I can get away with using only 1/2 cup sugar per 2 cups puree.  If I use the bigger ones, it tastes best if I use the 3/4 cup sugar called for in the recipe.

How big of a pumpkin will you need for one pie?

A very small one.  If you're including the peel in your puree, there will be almost no waste from your pumpkin- only the stem, seeds, and stringy center will be taken out.  (Remember to rinse, salt, and roast those seeds!)  You'll get almost two cups of puree for each pound in your pumpkin, when prepared this way.  Two cups will make one 9" pumpkin pie.  That means a 5-pound pumpkin will yield enough puree for FIVE pies.   And if you use your 25-lb jack-o-lantern?......  Luckily, pumpkin puree freezes well!  My favorite way to preserve it now is by making pumpkin powder.  Less space, no freezer burn, and no electricity required once it's dry.

If you're using big pumpkins, you can still end up with dense, smooth puree if you know how to handle it.  Clean, chop, and steam, boil, or microwave the pumpkin until tender, then run it through a blender or food processor, adding water only if it won't blend without it.  You could use a potato masher, but it won't get rid of the strings.  When it's smooth, you can either use it as-is (which is thinner than usual), or let it sit in a colander lined with cheesecloth or paper towels.  Let it drain at least 1/2 hour.  The water drained off has vitamins in it; use that in pancakes, smoothies, or whatever else occurs to you.  Any winter squash can be used in pumpkin recipes.  I've eaten "pumpkin" pies made of kabocha squash, spaghetti squash, and Hubbard squash.  The spaghetti squash was a lot more watery (drain that liquid off!), and if only mashed, not pureed, the texture resembles coconut cream pie (in fact, there's a recipe for Mock Coconut Cream Pie that takes advantage of this!)  Hubbard and kobocha are both dense, creamy, and sweet, and only required the 1/2 cup of sugar that I use with sugar pie pumpkins. 
0 Comments

Pumpkin Time!

10/20/2011

2 Comments

 
Picture
 When else can you get another vegetable for under twenty cents a pound?


You may even get them for free if you ask a farmer, or grocer, right AFTER Halloween.  I was able to glean from two different farm fields last year!

I saw an interesting thing, as I was looking for pumpkins in good condition: one man was walking around with a hatchet and a bucket.  He wasn't after the pumpkins; he wanted the seeds!  It didn't matter if the pumpkin was shriveled or damaged; each pumpkin was chopped open and the seeds scooped out.

Most people look at pumpkins as merely decorations. They are great for giving your yard or home that homey, autumn feel.  But one cup of pumpkin (only 49 calories!) is also high in fiber (3 g) and beta-carotene (Vitamin A- 2650 IU), plus calcium (37mg), potassium (564mg), magnesium (22mg), along with smaller amounts of iron, zinc, selenium, Vitamin C, Niacin, folic acid, and Vitamin E. See University of Illinois Extension  or Nutritiondata .  That's just the pumpkin.  The seeds also provide exceptional nutrition. 

If you'd like to know how to turn that festive decoration into a form you can eat, it's simple.  Basically, you clean it, cook it, and mash or puree it.  I much prefer the flavor of fresh pumpkin to that from a can.  It can be frozen for later use, dried and powdered, pressure-canned in chunks, or stored whole in a cool (55-70 degrees), dark, dry location.  They can last the whole winter stored whole.  I stored a Hubbard squash last November; I finally cut into it in July this summer.  It was perfect.

For more detailed instructions for cooking it, along with a  few dozen  recipes, see The Great Pumpkin recipe book.   To get cooking instructions and just a few of my favorite recipes-
Pumpkin Chili, Pumpkin-Pecan Yeast Bread, Pumpkin Muffins, and Pumpkin Pie-

see the Pumpkin Class Handout.
2 Comments

Pumpkin Pancake Mix, making pumpkin powder

1/14/2011

11 Comments

 
Picture
These make great little gifts.  I gave these out during the holidays, when most people are short on time and have had enough 'goodie plates'.  If you want to give them something extra, also include a bottle of syrup (homemade or storebought) or a couple different mixes in a basket.

 Back on 10/27/2010  I wrote a post on making vegetable powders.  Here's one kind you can make- pumpkin powder! The recipe below uses it to make some fragrant, fresh pancakes.   You can also adapt any recipe that calls for pumpkin puree.  I've made pumpkin pie with the powder, and it turns out great.  3 tablespoons pumpkin powder plus just shy of one cup of water is all it takes to make a cup of pumpkin puree.  Most recipes won't require rehydrating the pumpkin first, either.  Just mix everything together, and the powder will rehydrate while it cooks. 

This mix is just a really large batch of "Foolproof Pancakes," made so you only need to add eggs and water.

Pumpkin Pancake Mix

½ cup coconut oil (shortening works too, but I don't use it)
1 ¼ c. brown sugar or raw cane sugar
¼ c. cinnamon
1 ¼ c. pumpkin powder
3 c. powdered milk
1/4 c. baking soda
¼ c. salt
13 c. flour ( ½  wheat, ½ white)

Mix together the coconut oil, brown sugar, and cinnamon.  Stir in everything else.  Store in a container with a tight-fitting lid.  Makes about 20 cups.

To use it,  combine  1 1/3 c. mix, 1 egg, 1 cup water.  You'll get about 15 batches this size from the whole mix.

I made up a smaller bag with 2 2/3 c. mix, which is 12 ounces if you like to weigh things.  The instructions to use the whole bag is to add 2 eggs and 2 cups of water.

My bigger bag has 4 cups mix, about 17 ounces, and mixes with 3 eggs and 3 cups water.  For a ready-made label, click here.


* * * * *
The amount of pumpkin is based on using roughly 1/2 cup of pumpkin puree for a 1-cup-of-flour batch of pancakes.  If you don't have pumpkin powder, omit that ingredient, use just under 1 1/4 cups of mix, 1 egg, 1/2 cup fresh or canned pumpkin puree, and reduce the water to 3/4 cup. 
Picture
To make pumpkin powder, first wash (but don't peel) the outside of a pumpkin.  Scoop out the seeds.

Picture
The seeds are great themselves.  I find them easiest to separate from the stringy fibers by putting them in a bowl of water.  Pinch the seeds off into the water.  Dry them for a couple weeks and save them for planting in next year's garden, or roast them with a little oil and salt.

Picture
Trim off the stem and the blossom end.  Slice the pumpkin lengthwise into pieces about 2" wide.  If you steam them now, the pumpkin will dehydrate in about half the time, and have a mellower, sweeter flavor.  Let cool enough to handle, then cut them about 1/4- 3/8" thick crosswise. 

Picture
Lay the thin pieces in a single layer on a dehydrator try, or on a windowscreen laid down in a hot car, or on a cookie sheet with the oven on lowest setting... whatever you have.  When crispy-dry, put the pieces in a blender and puree until powdered.

This 5-lb pumpkin dehydrated down to just under 7 ounces, which measured 1 1/2 cups of powder.  That's a great space saver!  It takes just 3 Tbsp of this powder to equal 1 cup of puree, after adding water.

Use it in anything that calls for pumpkin; you don't even need to rehydrate it first: just add the right amount of water and powder.  Try Pumpkin Shake!  Or how about a gluten-free, dairy-free Pumpkin Cheesecake? Pumpkin Pie?

Picture
A rainbow of dehydrated vegetables: from left to right:  tomato powder, pumpkin powder, yellow squash powder, and dried & crumbled greens.

11 Comments
<<Previous

    Need a Search bar?
    One day I may upgrade my website-- but until then, use your web browser search bar. Type in my web address and what you're looking for, like this-- 
    www.theprovidenthomemaker.com  pumpkin --  and you should get results.


    Author

    I'm a disciple of Christ, a member of the Church of Jesus Christ of Latter-day Saints, a family-defending, homemaking, and homeschooling mom of eight children, two of whom sometimes can't have milk or wheat. Growing up on a farm in a high mountain valley, my parents taught me to 'make do', work hard, smile, and help others.  I love cooking, learning, growing food and flowers, picking tomatoes, and making gingerbread houses --which CAN be made allergy-friendly-- with my children.  I hope you find something to help you on my site!

    Archives

    April 2024
    July 2023
    April 2022
    September 2021
    March 2021
    December 2020
    April 2020
    March 2020
    February 2020
    January 2020
    December 2019
    November 2019
    October 2019
    September 2019
    August 2019
    July 2019
    June 2019
    May 2019
    April 2019
    January 2016
    November 2015
    October 2015
    September 2015
    March 2015
    February 2015
    November 2014
    October 2014
    September 2014
    August 2014
    July 2014
    June 2014
    May 2014
    April 2014
    March 2014
    February 2014
    January 2014
    December 2013
    November 2013
    October 2013
    September 2013
    August 2013
    July 2013
    June 2013
    May 2013
    April 2013
    March 2013
    February 2013
    January 2013
    December 2012
    November 2012
    October 2012
    September 2012
    August 2012
    July 2012
    June 2012
    May 2012
    April 2012
    March 2012
    February 2012
    January 2012
    December 2011
    November 2011
    October 2011
    September 2011
    August 2011
    July 2011
    June 2011
    May 2011
    April 2011
    March 2011
    February 2011
    January 2011
    December 2010
    November 2010
    October 2010
    September 2010

    Categories

    All
    Alcohol
    Alternate Cooking
    Appearances
    Apple
    Apricots
    April Fools
    Aprons
    Bananas
    Beans
    Beef
    Beets
    Bench
    Beverages
    Bonnet
    Bread
    Breakfast
    Budget
    Budgeting
    Cake
    Candy
    Canning
    Carrots
    Cheese
    Chicken
    Children
    Chocolate
    Christmas
    Cleaning
    Coconut
    Comfrey
    Common Core
    Constitution
    Cookbook
    Cookies
    Cooking Oil
    Crafts
    Dairy Substitutions
    Dehydrating
    Dessert
    Dried Fruit
    Earth Oven
    Earthquake
    Easter
    Edible Weeds
    Eggs
    Emergency Prep
    Essential Oils
    Faith
    Family Home Evening
    Fertilizing
    Food Storage
    Fourth Of July
    Freezer
    Frosting
    Fudge
    Garden
    Gardening
    Gingerbread
    Gluten
    Gluten Free
    Gold
    Government
    Grains
    Gratitude
    Hat
    Herbs
    Home Remedies
    Home Repairs
    Homeschool
    Home Storage
    Honey
    Hope
    Inflation
    Leftovers
    Legumes
    Lemon
    Main Dishes
    Mixes
    Mothers
    Noah
    Non Artificial Colors
    Non-artificial Colors
    Nuts
    Oats
    Oil
    Orange
    Paint
    Peaches
    Pear
    Pie
    Pizza
    Plums
    Poem
    Popcorn
    Pork
    Potatoes
    Powdered Milk
    Prayer
    Preparedness
    Projects
    Prophecy
    Pruning
    Pumpkin
    Quick Bread
    Rhubarb
    Rice
    Salad
    Salt
    Sauces
    Self Reliance
    Self-reliance
    Sewing
    Shelf Life
    Shelves
    Sky
    Smoothie
    Snacks
    Soup
    Spices Or Seasonings
    Squash
    Strawberries
    Substitutions
    Sugar
    Summer Fun
    Three Month Supply
    Time
    Tomatoes
    Trees
    Truffles
    T-shirts
    Tuna
    Ultra Gel
    Valentine\'s Day
    Vegetables
    Water
    Watermelon
    Wheat
    Work
    Year Supply
    Zucchini

    RSS Feed

Web Hosting by iPage