The Provident Homemaker
  • Recipes and Info
    • Making Bread
  • My Blog
  • Favorite Resources
  • Documents and Files
  • 52 Weeks of Building Storage

Week 26- storing winter vegetables, and weekly assignment

10/5/2019

0 Comments

 
Picture
This week, B for 3 of nonfood items. If you’re not sure what quantities you need, see the week 22 post.
This is the LAST week in the get-3-months'-supply program! Next week we'll begin the long-term-storage foods.

Did you know that many fresh vegetables can be stored for months at a time?  The USU Extension Office has multiple articles and helps.  This particular article addresses what to do at the end of the garden season for tomatoes, winter squash, onions, and potatoes

"With the first frost just around the corner, many people harvest and store their produce for later use. Many fruits and vegetables can be canned, pickled, dried or frozen. Another option is to store them fresh. Consider this information."  See here for the details. 
 
"...Other crops such as apples, pears, cabbage, celery, carrots and parsnips can be stored for an extended period of time. The following fact sheets can be accessed online, and both provide useful information. For a brief overview, visit http://www.ext.colostate.edu/Pubs/Garden/07601.html. For a more complete look at home food storage, see the USU bulletin at http://extension.usu.edu/files/publications/publication/FN_502.pdf"
0 Comments

Week 21- Making Your Own Taco Seasoning, Weekly Assignment

9/1/2019

0 Comments

 
Picture
Weekly Assignment:   B4-3- This is the last week of doing this for your 3-month food supply items! Next week you’ll start ‘B4-3’ with your nonfood items like hand soap, laundry soap, and toilet paper.

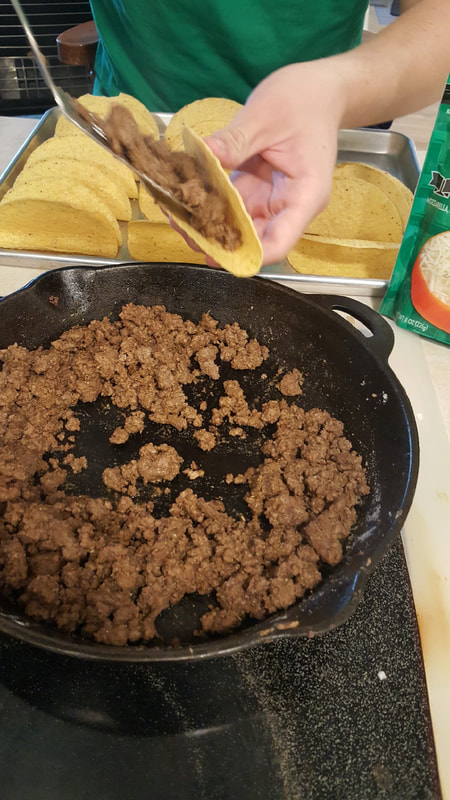
Why spend extra on pre-made seasoning packets when you likely already have all the ingredients? Save some money by making your own seasoning packets, or adding the spices directly to your meat.

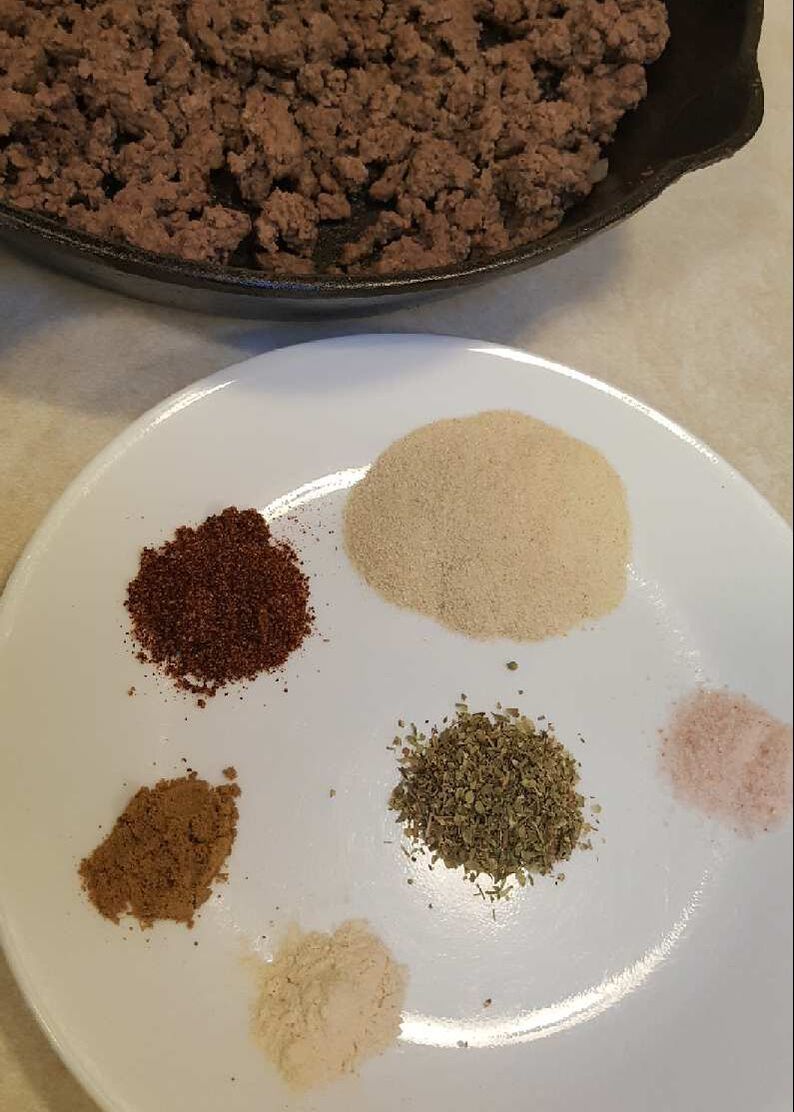
Taco Seasoning
2 Tbsp. dried onion
1 tsp. oregano
1½ tsp. chili powder
½ tsp. garlic powder
½ tsp. cumin
½ tsp. salt

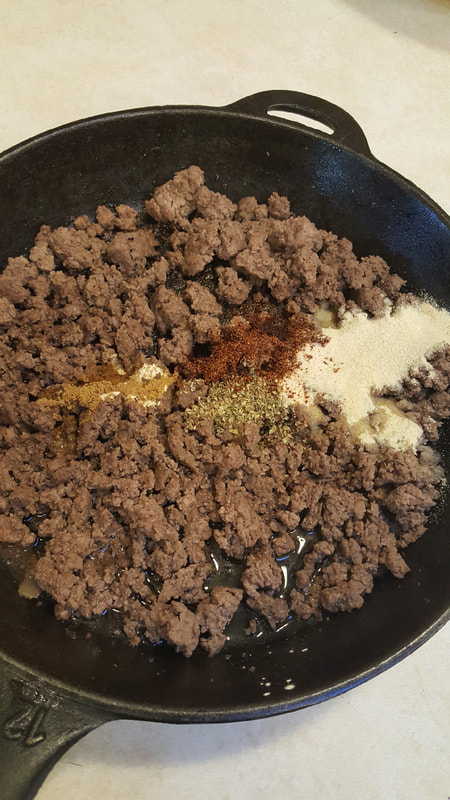
This is enough seasoning for 1 pound of ground beef or turkey, or a pound of freshly cooked pinto or black beans.  Cook the meat until browned, add the seasonings and ½ c. water or 8 oz tomato sauce; simmer for a few minutes until it’s the consistency you like. Want to make your meat go further?  Add any of these: 1 cup of cooked rice, a handful of quick-cooking oats and a bit of extra water (or 1/4 c to 1 c. leftover cooked plain oatmeal), a can of beans (drained), 1/2- 1 c. shredded vegetable like carrot or zucchini, 1-2 c. cooked cracked wheat.

The seasoning can be adjusted to your own tastes; if you like cumin, up to 1½ tsp. can be good.  I’ve also seen people add crushed red pepper or cayenne pepper, black pepper, smoked paprika, and a couple tablespoons of brown sugar.  What if you overdo the spices?  See how to fix that, here.  

Something to know about chili powder is that there are two general kinds-- the first is nothing but powdered chili peppers, with a huge range of heat, depending on the type of pepper used. (If it's a spicy one, 1 1/2 tsp. of this in your recipe will likely be too much!)   The second kind of chili powder is a mixture of spices-- including powdered chili peppers- but also including things like cumin, oregano, garlic, salt, and more.  Check the label of your spice bottle to see what yours is made of; if it has salt, you may need to reduce the separate amount of salt. If it doesn't have salt, you may want to add 3/4 tsp instead of 1/2 tsp.

Multi-batch Taco Seasoning (some for now, some for later)
½ c. dried onion
1 Tbsp + 1 tsp oregano
2 Tbsp. chili powder
2 tsp. garlic powder
2 tsp. cumin
2 tsp. salt (use 1 Tbsp if your chili powder doesn’t contain salt)
 
Stir together in a small bowl.  You can keep the whole batch in a glass spice jar and use 3 Tbsp each time you cook 1 lb of burger for tacos, or store single-use quantities in snack-size ziptop bags.  For single use size, divide into four roughly equal portions.  Put each one in a small ziptop bag or other airtight container.  Label, date, and store in the cupboard or freezer.
 
Store in a dark cupboard or in your freezer.

You can even add tomato powder (see here how to make it and how to use it in your recipes)


Use this mix in taco salad, soups (1 batch of seasoning for 1-2 quarts of liquid), salad dressings, dips, Mexican dishes, as a rub for meat, on kebabs, and of course for tacos. (Add 1 tsp seasoning mix to one drained can of beans.)

Want to make more home-seasoned basics?  


Marinara sauce
​

BBQ sauce

Or maybe you're needing ways to use all the tomatoes your garden is producing:

https://theprovidenthomemaker.com/my-blog/category/tomatoes
Picture
Picture
0 Comments

Week 8- Canning meat, beans, and vegetables

5/30/2019

0 Comments

 
Your ​Week 8 assignment-- Going off your  Inventory Shopping List and this week’s sales, buy the 3 months’ worth of as many different food items as you can (= Buy For 3) as your new budget allows.  Only 10 more weeks of this step!

This week's skill:
Did you know that you can bottle meat, beans, stew, and chili at home?  When you find a great sale price on meat, you can buy a bunch and save yourself a lot of money in future months!  For instance, a couple months ago I found boneless skinless chicken for $1/lb. I bought a case (40 lbs), froze about 10 lbs in meal-sized quantities, and bottled the rest.  The bottled chicken makes for quick meals, and I know exactly what was added to it.  In this case, that meant chicken and salt.  Other times I’ve put sliced carrots, celery, onions, and herbs in the jars with the meat, to have a great base for a quick, wholesome chicken noodle soup or pot pie. My food storage includes home-bottled chicken, beef, salmon, pork broth, chicken broth, black beans, pinto beans…

Did you watch the video at the top, on making bottled stew?  Do you have some of the dehydrated diced carrots from the Home Storage Center?  They're great for adding to canned foods.  It helps to soak them in hot water for at least 10-20 minutes first, so they don't soak up all the water in your jar while it cooks.

Meat, beans, and vegetables (except tomatoes) are in the category called ‘low acid’, compared to things like tomatoes and fruits, which are ‘high acid’, or contain higher acidity.  Higher acid foods may be processed using a big pot with boiling water to heat the jars and food, but low acid foods have to be heated to a higher temperature.  This means the only way to safely bottle them is with a pressure canner—a pressure cooker made to hold 7 or more jars at a time.  They start around $65 and go up from there, but you may have a friend who is willing to let you try it out at her house, or borrow it if you’re the confident type.  (I have one. It's very similar to the one in the video above. Come on over!)

Where can you find instructions on pressure canning?  Most pressure canners come with an instruction book and charts, and there are great resources online.
 
The first place to know is your local Extension Office.  In Utah, that’s the Utah State University Extension office, and somebody there knows the answer to just about any question you come up with on the topics of food, kitchens, preserving, budgeting, gardening, yard care, house and garden pests, and more. They’ll even test your pressure cooker gauge every year for $2.

https://nchfp.uga.edu/ has lots of canning information; one of its pages is this one.  It has instructions on canning
Chicken, Rabbit, Chicken or Turkey Broth, Chili, Meat (ground or chopped), Meat (strips, cubes, or chunks), Meat Stock, Meat and Vegetable Soup, Mincemeat Pie Filling, Clams, Crab, Fish (fresh or smoked), Oysters, and Tuna!

This page has info on how canning preserves food, how to make sure your food is safe, what jars, lids, and canners to use, how to know if the jars sealed correctly, canning food for special diets (including baby foods), and more.
 
Other good resources are The Ball Blue Book  and its online counterpart, https://www.freshpreserving.com/home

The Ball Complete Book of Home Preserving

So Easy to Preserve    (388 pages of instructions and recipes from the Extension Office in Georgia)

There are lots more.  Look for USDA-tested recipes.
​_____________ 

Are you ready to try this?? It's great!
0 Comments

Turkey Ramen Cabbage Salad

11/30/2013

0 Comments

 
Picture
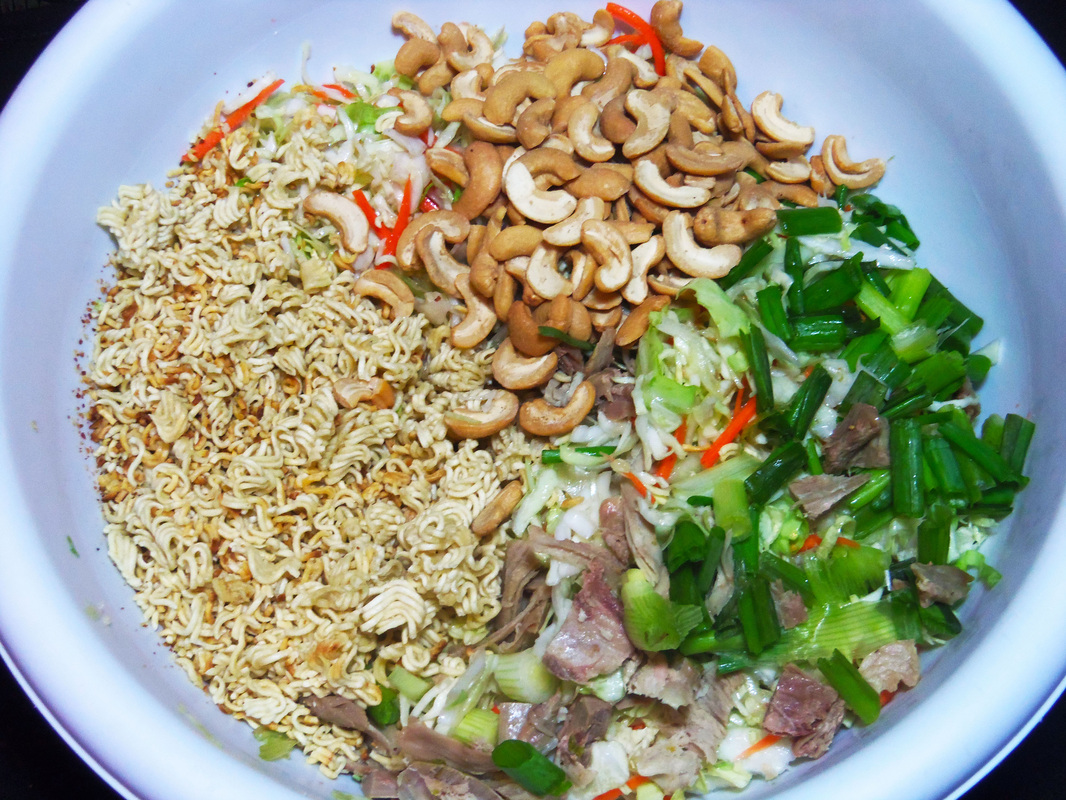
Most salads like this use so much dressing that there's a pool of it at the bottom of the bowl.  And the dressing is about all you taste.  
Not this one.  There's enough oil in the salad to help you unlock those fat-soluble vitamins; both cabbage and cashews are very high in Vitamin K.  And you can actually taste the cabbage, in a way that accents only its best features.  

If you have any left over, even though the noodles will not stay crunchy by the next day, the cabbage does.

Cabbage Ramen Salad        Serves 4-6.  Or two who really, really like it.

1 tsp. olive oil
1 package Ramen noodles
2 Tbsp. olive oil
1 Tbsp. rice wine vinegar or apple cider vinegar
1 Tbsp. honey or sugar
1/2 tsp. salt
1/4 - 1/2 tsp. black pepper
1/2 tsp. ginger OR 1 1/2 tsp. chopped crystallized ginger OR 1 drop ginger essential oil
1 small cabbage, shredded, OR a 14-16 oz package coleslaw mix (cabbage and carrots)
2 green onions, chopped
1 c. cooked turkey or chicken, diced
1/2 c. cashews, optional

Heat 1 tsp. olive oil in a large skillet on high heat.  Break the Ramen noodles into small pieces and add to the hot oil.  (You won't need the flavor packet for this recipe.)  Stir dry noodles constantly for about 2 minutes, until some of the noodles start turning a toasty brown.  Remove from heat and set aside. 

In a medium bowl, combine remaining 2 tbsp. olive oil, vinegar, honey/sugar, salt, pepper, and ginger. Stir well to combine.  Add the cabbage or coleslaw mix, green onions, turkey/chicken, and cashews.  Stir thoroughly, until no puddle of dressing remains on the bowl's bottom.  Serve right away for the crunchiest noodles.  

0 Comments

Red Cabbage- food and chemistry!

7/20/2012

0 Comments

 
Picture
My 12-year-old science nut convinced me to buy a red cabbage-  why?   

While walking through the produce section together, I had told him that the vegetable could be used to make a pH indicator.  He was excited.   You can see how to do this in the one-minute video, below.
Meanwhile, you don't need the whole head of cabbage for such a project, so it got chopped up into a creamy, flavorful, no-mayonnaise coleslaw.  The recipe is below this cabbage video. 
Isn't that simple?  If you don't have a coffee filter, any other absorbent paper will work, including (white) construction paper or paper towels.  My favorite is the construction paper.  You can read more about why this works here. 

*  *  *  *  *  *  *  *  *  *  *  * 
Coleslaw with Bacon and Buttermilk (or Kefir) Dressing
adapted from America's Test Kitchen

If you are going to eat this coleslaw RIGHT AWAY, you can skip the salting step, which keeps the cabbage from releasing water and diluting the dressing as it sits.  However, if you’re not a fan of raw onion, cook it along with the bacon; salting the onion also mellows it.

½ medium head of red or green cabbage, shredded
1 large carrot or apple, grated
½ medium onion, sliced thin
Salt
6 slices bacon, chopped, cooked and drained
½ c. buttermilk or kefir
2 Tbsp. oil (I used coconut oil)
2 Tbsp. apple cider vinegar
½ Tbsp. caraway seeds
¼ tsp. mustard (dry or prepared)
2 tsp. sugar or honey
Black pepper to taste

Combine the cabbage, carrot/apple, and onion in a colander; sprinkle with 1 tsp. salt. Let stand over a bowl until the veggies wilt, 1-4 hours.  Rinse, drain, and pat dry.  Add in the bacon (and onion if you cooked them together.)  Stir together the buttermilk/kefir, oil, vinegar, caraway, mustard, and sugar.  Pour over the salad, and toss to coat.  Add salt and pepper to taste.

0 Comments

Carrots and Carrot Tops

9/6/2011

3 Comments

 
Picture
Yesterday as I dug carrots and enjoyed the slightly spicy aroma of the roots and greens, I started wondering if carrot tops are edible.  They smell so nice… not that scent is an indication of edibility.  Still, carrots are in the same family as parsley, dill, and fennel, and we eat those leaves.  On the other hand, a couple of other plants in the Apiaceae family are poisonous; Poison Hemlockand Water Hemlock are two that come to mind, though the whole plant is deadly with both, not just the leaves or root.  So what’s the case with carrot tops?

According to what I found from several sources online, the tops are edible.  I guess we don’t eat them much because we store carrots without their leaves, which are much more perishable.  As with almost any other food, keep in mind that you may personally be allergic to them; this may show up as photodermatitis (skin becomes red or irritated when exposed to light).  If you grow them yourself, you probably don’t have any pesticides to worry about eating; wash store-bought tops thoroughly.

One carrot farmer says he thinks the flavor and bitterness of the tops nicely balance the sweetness of the roots.

They’re said to be high in Vitamin K, as well as chlorophyll (obviously, since they’re green)

Vitamin K is a fat-soluble vitamin (you need to eat fat at the same meal- or with it- to access the vitamin) and is important in blood coagulation (forming scabs and avoiding hemorrhaging, including heavy menstrual bleeding) and bone growth and maintenance, as well as other helpful actions.

Chlorophyll appears to fight the growth of tumors, as well being as a good cleanser for lymph nodes, adrenal glands, and for purifying blood.

One article I found says a tea made of carrot tops is good for getting rid of intestinal worms or parasites, and juiced tops are antiseptic, good for mouthwash.  Mashed tops, or the carrots themselves, can be mixed with honey and applied to festering wounds.

To eat carrot tops, try them:
- as a substitute for parsley in any recipe
-added to a green salad
-chopped and cooked with other vegetables or rice dishes
-added to a ‘green drink’ or smoothie- though go easy on this
-as the base for a pesto (add some honey to balance the bitterness), or sautéed with bacon and garlic

Extra tidbits about carrots (the roots):

-The Dutch grew carrots specifically to feed to their dairy cows.  The country became famous for having the richest yellow butter as a result.
-Carrots have only been well-known in the USA since about the time of WWI.
-Carrots have the second-highest natural sugars of any vegetable, at 7% sugar.  Beets score #1.
-Carrots were included in puddings and cakes in the 1600-1800’s to sweeten them.
-Carrot tops were a fashionable hat decoration in the 1600’s, used as feathers were.  I love carrot greens and carrot flowers in arrangements in a vase, too.
-Many of the carrot’s minerals and nutrients are found in or just under the skin.  In other words, they’re more nutritious if you don’t peel them.

And that bit you’ve heard about the Vitamin A in carrots improving your eyesight?  My husband munches on carrots at work every day.  Last time he went to the optometrist, he discovered his eyesight had gone from 20/30 to 20/20.   Like everything else, though, don’t overdo it. Too much of anything can cause problems.

 
So, eat those carrots.  The tops, too!

For more information, see carrotmuseum.com,
http://www.carrotmuseum.co.uk/carrotops.html, 
wikipedia,
http://www.vegparadise.com/highestperch412.html 

To read more about alkaloids and toxins in 'normal' foods:
http://en.wikipedia.org/wiki/Alkaloid
Natural Food Toxins
Natural Toxins in Raw Food and How Cooking Affects Them


Picture
3 Comments

    Need a Search bar?
    One day I may upgrade my website-- but until then, use your web browser search bar. Type in my web address and what you're looking for, like this-- 
    www.theprovidenthomemaker.com  pumpkin --  and you should get results.


    Author

    I'm a disciple of Christ, a member of the Church of Jesus Christ of Latter-day Saints, a family-defending, homemaking, and homeschooling mom of eight children, two of whom sometimes can't have milk or wheat. Growing up on a farm in a high mountain valley, my parents taught me to 'make do', work hard, smile, and help others.  I love cooking, learning, growing food and flowers, picking tomatoes, and making gingerbread houses --which CAN be made allergy-friendly-- with my children.  I hope you find something to help you on my site!

    Archives

    April 2024
    July 2023
    April 2022
    September 2021
    March 2021
    December 2020
    April 2020
    March 2020
    February 2020
    January 2020
    December 2019
    November 2019
    October 2019
    September 2019
    August 2019
    July 2019
    June 2019
    May 2019
    April 2019
    January 2016
    November 2015
    October 2015
    September 2015
    March 2015
    February 2015
    November 2014
    October 2014
    September 2014
    August 2014
    July 2014
    June 2014
    May 2014
    April 2014
    March 2014
    February 2014
    January 2014
    December 2013
    November 2013
    October 2013
    September 2013
    August 2013
    July 2013
    June 2013
    May 2013
    April 2013
    March 2013
    February 2013
    January 2013
    December 2012
    November 2012
    October 2012
    September 2012
    August 2012
    July 2012
    June 2012
    May 2012
    April 2012
    March 2012
    February 2012
    January 2012
    December 2011
    November 2011
    October 2011
    September 2011
    August 2011
    July 2011
    June 2011
    May 2011
    April 2011
    March 2011
    February 2011
    January 2011
    December 2010
    November 2010
    October 2010
    September 2010

    Categories

    All
    Alcohol
    Alternate Cooking
    Appearances
    Apple
    Apricots
    April Fools
    Aprons
    Bananas
    Beans
    Beef
    Beets
    Bench
    Beverages
    Bonnet
    Bread
    Breakfast
    Budget
    Budgeting
    Cake
    Candy
    Canning
    Carrots
    Cheese
    Chicken
    Children
    Chocolate
    Christmas
    Cleaning
    Coconut
    Comfrey
    Common Core
    Constitution
    Cookbook
    Cookies
    Cooking Oil
    Crafts
    Dairy Substitutions
    Dehydrating
    Dessert
    Dried Fruit
    Earth Oven
    Earthquake
    Easter
    Edible Weeds
    Eggs
    Emergency Prep
    Essential Oils
    Faith
    Family Home Evening
    Fertilizing
    Food Storage
    Fourth Of July
    Freezer
    Frosting
    Fudge
    Garden
    Gardening
    Gingerbread
    Gluten
    Gluten Free
    Gold
    Government
    Grains
    Gratitude
    Hat
    Herbs
    Home Remedies
    Home Repairs
    Homeschool
    Home Storage
    Honey
    Hope
    Inflation
    Leftovers
    Legumes
    Lemon
    Main Dishes
    Mixes
    Mothers
    Noah
    Non Artificial Colors
    Non-artificial Colors
    Nuts
    Oats
    Oil
    Orange
    Paint
    Peaches
    Pear
    Pie
    Pizza
    Plums
    Poem
    Popcorn
    Pork
    Potatoes
    Powdered Milk
    Prayer
    Preparedness
    Projects
    Prophecy
    Pruning
    Pumpkin
    Quick Bread
    Rhubarb
    Rice
    Salad
    Salt
    Sauces
    Self Reliance
    Self-reliance
    Sewing
    Shelf Life
    Shelves
    Sky
    Smoothie
    Snacks
    Soup
    Spices Or Seasonings
    Squash
    Strawberries
    Substitutions
    Sugar
    Summer Fun
    Three Month Supply
    Time
    Tomatoes
    Trees
    Truffles
    T-shirts
    Tuna
    Ultra Gel
    Valentine\'s Day
    Vegetables
    Water
    Watermelon
    Wheat
    Work
    Year Supply
    Zucchini

    RSS Feed

Web Hosting by iPage