The Provident Homemaker
  • Recipes and Info
    • Making Bread
  • My Blog
  • Favorite Resources
  • Documents and Files
  • 52 Weeks of Building Storage

Turtleneck SKIRT

4/28/2012

3 Comments

 
Picture
No, it doesn't have a turtleneck...

it used to BE one!

In the spirit of repurposing t-shirts, here's another option.

By the time you hit late March, most clothing stores are pretty desperate to clear out their winter clothing.  This shirt was marked down to 99 cents!  Turtlenecks often have the steepest discount- who wants to wear them when it's sunny and warm?

Hey, I'll wear one if it's now a skirt!  I decided that skirts were going to be my go-to clothing item this summer.  I love wearing them, and jeans aren't the most comfortable thing on a hot day anyway.  Plus I get a little bit of a tan.  Below the knee, anyway...

3 Comments

Taco Meat too spicy?

4/27/2012

8 Comments

 
Picture
Did you add a little too much chili?  or maybe the lid fell off the salt shaker and now it's salty enough to kill a cat? 

When we're cooking from scratch, sometimes we get carried away with spices.  Are you stuck eating the whole batch because now your children refuse to touch it?  Or are you tempted to throw it out?

My sister-in-law asked my sisters and I what we would do.  Apparently her favorite way is to rinse the meat in a colander under running water, then return the meat to the skillet and add spices more cautiously.  Someone on Facebook said that was disgusting and would result in soggy meat. 
I'd be cautious about how much grease could go down the drain that way, potentially clogging it, but that's actually a good solution.  The meat won't be soggy if you reheat it to drive off an excess water.

Another solution is to mix something else in with it to dilute the spice:
-plain cooked oatmeal or cooked cracked wheat (a really cheap meat extender!)
-plain refried beans
-a can of drained beans (black, kidney, or pinto)
-a half can of tomato sauce (cook more if this is too soupy)

The whole point is- if the food didn't turn out the way you intended, instead of chucking it, come up with a way to fix it or repurpose it.  If that doesn't work, you're no worse off than before!
8 Comments

Homemade Rice & Roni mixes

4/20/2012

0 Comments

 
For those days that you just don't have time to think what to cook for dinner, have this on hand.  (Thanks, Rebecca!)  You can make up several mixes at once.  Not only are these much less expensive than the boxed version, but you have complete control over what goes in it.  This is especially handy if you have allergies or have to eat gluten-free.

This mix is equivalent to about 2 ½ -3 boxes of Rice-A-Roni.

Homemade Rice & Roni
Serves about 8
(put half as much in the bags to make smaller mixes!)

In a quart size bag, add
2 cups of converted rice
1 cup of broken thin spaghetti  or fideo noodles

Place the following ingredients in snack-sized bags or in an envelope cut in half (cut the short way, fill, fold over, and glue or tape closed)

2 tsp bouillon granules (Optional, you can prepare the mix with stock instead of water.)
2 Tbsp dry onion
1T dry carrots or other dried or freeze-dried vegetable (optional)
1/8th tsp celery seed
1Tbsp. all-purpose seasoning
2 tsp dry parsley
1 tsp garlic powder

*Be sure to write the name of the flavoring mix on the bag along with how much liquid to add to the mix to prepare it. To prepare you will need
2 T butter or oil
5 cups water (or stock if you omit the bullion in your seasoning)
In a 2 quart pan with a tight fitting lid, brown the rice and noodles in the butter or oil until noodles are a nice deep brown, but not burned. Add the water and the contents of the seasoning mix.  Bring to a boil, then cover and reduce heat to low for 20-25 minutes, until tender.

Other flavor ideas:
Mexican:
Use onion and carrot but for seasoning, use 1T taco seasoning, Or 1 tsp each: garlic, cumin, oregano and chile powder.
Oriental: Use onion carrot and celery seed, but also 1 tsp curry and 1 tsp Chinese 5 spice, 1/2 tsp ginger and 1T garlic powder.
Curry Chicken: Use chicken bullion, all the original seasoning plus 1tsp saffron 2tsp curry powder.

For more flavor ideas, browse the boxed pasta section at the grocery store.  You'll be sure to see something that sounds good.  Then make your own!


Instruction label for the bags of mix: 
Picture
0 Comments

More cooking with essential oils

4/18/2012

0 Comments

 
Picture
A friend, cooking with essential oils for the first time, questioned if it was really OK to do.  She asked,

"I had heard that we weren't supposed to ingest essential oils.  Is is because they can burn?  How is it that it is o.k. to cook with them?  You are not the only person I know that uses them for cooking, so I am perplexed.  What have you learned as you have been experimenting?"

I've also read that you should never ingest essential oils, and yet seen recipes and concoctions using them.  Young Living oils' company hired a chef to blog and create recipes using their essential oils, and doTERRA encourages their distributors to have websites using them.

The thought process I've gone through is:

(1) essential oils are already in the foods you normally eat. 

(2) It takes a lot of one food/herb to produce the oil.  

(3) The possible danger of swallowing essential oil lies in the fact that they are so strong.  Caustic, even.  They need diluted.

SO- as long as you can figure out how much oil is equivalent to a normal amount of food, and there aren't any traces of scary chemicals in the oil, then it should be about the same as using that food or herb.  It's naturally diluted when you mix it with other ingredients.

 The thing to remember, though, is that different types of foods or herbs yield different amounts of oil because some foods are more oily than others.  So that's why I posted suggested amounts with a reminder that they might vary.  I also experimented separately with different types of oils, i.e. citrus oils (the zest is naturally high in oil) and herbs (almost all naturally low in oils).  It can't hurt, either, to find out what the oils are used for, so you know what symptoms to look for in case of 'overdose'!  There are some oils more potentially problematic than others.  (Nutmeg, for instance- but, then again, you can also get in trouble by using too much powdered nutmeg...)

The rough equivalents for citrus oils, according to my  testing, anyway, are

1 tsp. extract = 2 Tbsp. zest = 1 c. citrus juice = 16 drops oil = 1/8 tsp. oil

Note, though, that using oil instead of juice, changes the amount of acidity in batter, so you need to adjust the leavening accordingly.  For this same reason, I have not been impressed with 'lemon oil lemonade': there's no tartness to it.


For more info on using essential oils in your recipes, see Cooking With Essential Oils.
0 Comments

Black Beans and Sausage

4/14/2012

0 Comments

 
Beans and sausage have probably been around since sausage was first invented.  Take some bland beans, add flavorful ingredients, and -presto- a nearly-one-dish-meal.  We ate ours with homemade bread and a fruit smoothie.

Picture
You can use any kind of beans you like, and any kind of sausage or similar meat.  I used kielbasa because that's what was cheap this time.  Sometimes I use hotdogs.  Or link sausage.  Or I shape bulk sausage into meatballs.  Ham Spam, or bacon would also work; the point is to add something savory and meaty. 
You can leave out the kale if you prefer; I only added it because it was calling to me from the fridge (so it wouldn't die lonely in the vegetable crisper).  It also added to the nutritional content; my mom taught me the budget trick of using half as much meat and twice as many vegetables as most recipes call for.  The onions and celery are pretty important for flavor, but if you don't like them, fine, leave them out.  Add something you do like.  Carrots or peppers would be good.
I used onion powder because some of my kids think they don't like onions.  It's really the texture they revolt against; if I use onion powder or puree the onions, nobody notices them.  The tomato and chicken bouillon enhance the meaty flavor.  

This makes a big batch; you can freeze some for later!

Black Beans and Sausage

1 lb. black beans, or 3  14-oz. cans
2 medium onions, diced, or 1/3 c. onion powder or 2/3 c. dried minced onion
1 lb. sausage (or hotdogs), cut in coins
2-3 stalks celery, chopped
4 cloves garlic, minced, or 1-2 tsp. garlic powder
1 bunch kale, chopped
1 Tbsp. chicken bouillon, or 3 cubes, or one 14-oz. can chicken broth
1 Tbsp. tomato powder, or use 1 Tbsp. tomato paste or 2 Tbsp. tomato sauce
2-4 tiny drops thyme essential oil, or 1 tsp. powdered thyme, or 1-2 Tbsp. fresh leaves

Salt and pepper to taste

Serves 8-10

If starting with dry beans, sort through to find any bits of rock or dirt, rinse, then put in a large pot with 2 quarts of water and the onions.  Bring to a boil, then cover and simmer for 4 hours.  I used a pressure cooker (a Kuhn Rikon, it's quick!) and needed only 1 ½ quarts water,  cooked on high pressure for 25 minutes.  Drain and reserve water.  If using canned beans, also drain and reserve.

Picture
In a 12” skillet, cook sausage and celery over medium-high heat until partly browned.  This really deepens the meat's flavor.  In case you like science-type stuff, this is because of the Maillard Reaction- simplified, it's the combination of amino acids (proteins) reacting under heat with the sugars (carbohydrates) to form completely new flavor compounds.  Anyway, yeah, you want to brown the sausage, even if it IS precooked.

Picture
Add garlic and stir 30 seconds, then put the kale on top, cover, and reduce heat to medium.  Check after about 5 minutes to see if you need to add a little liquid.  If so, use the bean water.  Cook until kale is tender, about 10 minutes. 


Add the meat and vegetables to the bean pot.  Stir in chicken bouillon or broth, tomato powder, thyme, 1 tsp. salt, ¼ - ½ tsp. pepper.  Taste and add more salt and pepper if needed.  Heat through if it’s not warm enough.  The flavor will be better after sitting covered for 20-30 minutes.  If it's too thick, add more of the bean water. 

0 Comments

Pruning forsythia or lilac bushes

4/9/2012

0 Comments

 
Picture
If you have a forsythia bush in your yard, you’ll need to prune it each year to keep it from turning into an overgrown tangle.  The best time to do this is right after it blooms.   You can prune it any time of year, but you’ll get fewer blossoms this way.  Blossoms form on ‘old’ wood, which is what gardeners call what was there during the previous summer and fall.  

If your bush is terribly overgrown already, you can cut the entire bush nearly to the ground.  About four inches is a good amount to leave behind; it will grow new, flexible branches during the summer and fall, and by the next year, it will be looking good again.  If the bush doesn’t need that much help, just cut the oldest branches off as close to the ground as you can.   Also cut out any broken or damaged branches, as well as any that cross and rub each other.  Ideally, you’ll remove about ¼ to 1/3 of the branches each year.

Lilacs can be treated the same way; these flowers also bloom on  one-year-old wood.  Cutting an old one nearly to the ground works to rejuvenate it in a hurry.  If you don’t much mind waiting a little longer, start by cutting out any branches thicker than 2”.  The ideal is to have 8-12 branches of different ages; you’ll get the most blooms that way. This also means you don’t need to prune much during its first few years.  Almost any shrub that blooms in spring, bloom on ‘old wood’.  Other shrubs that bloom on old wood, and so do best if pruned right after blooming, include big-leaf hydrangea, English holly, flowering quince, some clematis, some roses (old varieties), and most climbing roses.

Related posts:

Will Frost Damage Wipe Out My Tree Fruit?

How to Prune and Fertilize Fruit Trees, shrubs, and landscape trees

Selecting and Using Inorganic Fertilizers

Fertilizing Fruit Trees

Understanding Fertilizer, Knowing Your Backyard Weeds, and free cooking e-books

0 Comments

He is Risen!

4/7/2012

0 Comments

 
Picture
Click on the photo to watch the 'He Is Risen' Bible video.

There's a whole Life of Christ series available, as well.

I know that Jesus Christ lived, that he atoned for our sins, that he voluntarily gave up his own life for us, and that he was resurrected and lives today.  I'm grateful for this.  I know he will return at his Second Coming, and I try to live by his example of love for God and all others.  I know this brings happiness; the better I am at following Him, the happier and more fulfilling my life is. 

May you feel His love for you as we celebrate Resurrection Sunday.
0 Comments

Why use vinegar when dyeing eggs?

4/4/2012

3 Comments

 
Picture
My kids hate the smell of vinegar.  One option is to skip the dye entirely, and just decorate eggs with ribbon (as in this photo), markers, paint, string, decoupage, or whatever...

...but there's something about dyeing eggs that takes me back to childhood memories of sitting on tall stools around the kitchen counter, dunking eggs with those flimsy metal dippers. 

So I just have to dye eggs.

(If you want to color eggs using natural dyes, there's a link at the bottom to a previous post.)

Why, though, do all instructions seem to call for using vinegar?  Some of the newer kits have the vinegar built in to the tablets, but it's still there.  What does it do? 

I ran some searches, did some experimenting, and here's what I've learned:

Several people online said it's to make the dye darker.  Someone else said you could use salt instead.  So I started looking into the science of why.

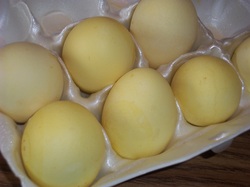
Vinegar is acidic.  Egg shells are mostly calcium carbonate, which is alkaline.  Put them together, and they react, dissolving some of the egg shell.  I put a hardboiled egg into straight vinegar and left it overnight.  In the morning, only a thin layer of shell remained, and by late afternoon, there was no more shell; only the flexible inner membrane was left.

Adding vinegar to the dye bath helps etch the shell, roughening the surface (increasing surface area) and thus allowing it to receive more dye.

Picture
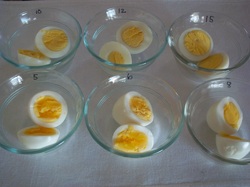
If that was the case, then, shouldn't other acidic ingredients work?  What if I don't have vinegar on hand?  And would it work as well to just add vinegar to the water the eggs are hardboiled in, and not need vinegar in the dye bath?   Here's how the experiments turned out:

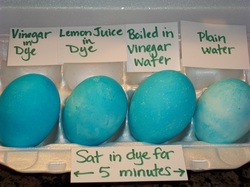
The deepest, most even color was from vinegar in the dye, followed closely by the eggs boiled in vinegar water.  Lemon juice did pretty well but yielded more color marbling.  The dye using plain water (no acid) gave me a much paler and less evenly colored egg.

Picture
The salt water dye (using 2 tsp. salt in 1 cup water, producing the egg on the left) was slightly better than plain water, but not much.  Salt is a mordant, which means it physically or chemically helps the dye bind to the surface, but it did not work well here. 

So I'll go back to vinegar when I want deeply colored eggs.  Here are the amounts I used:

1 cup water
10 drops liquid food color (you can use less)
1 Tbsp. vinegar (or lemon juice)

Or, to restrict the smell of vinegar to a one-time boil, add 1/4 c. vinegar in 1 quart of water, hardboil as usual.  I'll tell my kids they can either stay inside where the smell is, or go outside and pull weeds...

Happy coloring!

Picture
Perfect Hardboiled Eggs

Picture
Natural-dyed Easter Eggs


Picture
Homemade Marshmallow Eggs and Chicks

Picture
Homemade Marshmallows


Are you ready for some kitchen fun now?
3 Comments

April Fools' Food Fun

4/2/2012

1 Comment

 
Picture
So much fun I wanted to share it...

On a previous April Fools' Day we had a main dish that looked like dessert- this "carrot cake" is really meatloaf and mashed potatoes.....    

Picture
And a dessert that looked like a main dish.


Picture
So here was the whole meal. 

The actual cake, the spaghetti and meatballs, was made using the Sauerkraut Cake recipe.

Picture
Ta-da! 
The original idea came from someone's two-person 'cake', made using two giant hamburger patties-- each about a half pound-- as the cake layers, frosted the same as below.

To make this one, started with about 1 to 1 1/2 lbs of burger and make it into meatloaf, pat it into a 7" circle with vertical sides, and bake it in an 8x8 square baking dish.  When it is done, toast about 1/2 cup bread crumbs in the still-hot oven (I used panko because that's what was in the cupboard); about five minutes is all it will take.  After the mealoaf has rested about ten minutes to firm up, cover it using about 3 cups of mashed potatoes.  (I made them using potato flakes.)  To pipe the carrots, soften about 2 oz. of plain cream cheese; tint half orange, and half green.  Put each color in a ziptop baggie and snip a small corner off; squeeze a carrot shape first, then make 2-4 small green lines for each carrot top.  I used a pastry tip for the swirl on top (filled JUST the decorating tip with potatoes, and shoved my clean thumb into it); you can skip that part, use a bag and tip, or snip an 'M' shape in the corner of a ziptop baggie to pipe out of. 
To coat the sides, press a handful of crumbs against the side, repeat all the way around.   Serve warm, and refrigerate any leftovers, of course!

To make the 'spaghetti casserole', start by baking any cake in a square or rectangular pan.  My family's big enough we used a 9x13 pan.  After it's cool, frost with a rather thin layer of frosting.  Put a cup of frosting in a pastry bag fitted with a round tip (# 3) OR in a heavy-duty ziptop bag, one lower corner reinforced with tape, then snip off a tiny corner.   Squeeze frosting out, letting it randomly pile up a bit on itself to form the 'spaghetti'.  Unwrapped Ferrero Rocher make splendid meatballs, and strawberry jam makes for good 'spaghetti sauce'.   Grate a little white chocolate over the top for the 'parmesan' look.

1 Comment

    Need a Search bar?
    One day I may upgrade my website-- but until then, use your web browser search bar. Type in my web address and what you're looking for, like this-- 
    www.theprovidenthomemaker.com  pumpkin --  and you should get results.


    Author

    I'm a disciple of Christ, a member of the Church of Jesus Christ of Latter-day Saints, a family-defending, homemaking, and homeschooling mom of eight children, two of whom sometimes can't have milk or wheat. Growing up on a farm in a high mountain valley, my parents taught me to 'make do', work hard, smile, and help others.  I love cooking, learning, growing food and flowers, picking tomatoes, and making gingerbread houses --which CAN be made allergy-friendly-- with my children.  I hope you find something to help you on my site!

    Archives

    April 2024
    July 2023
    April 2022
    September 2021
    March 2021
    December 2020
    April 2020
    March 2020
    February 2020
    January 2020
    December 2019
    November 2019
    October 2019
    September 2019
    August 2019
    July 2019
    June 2019
    May 2019
    April 2019
    January 2016
    November 2015
    October 2015
    September 2015
    March 2015
    February 2015
    November 2014
    October 2014
    September 2014
    August 2014
    July 2014
    June 2014
    May 2014
    April 2014
    March 2014
    February 2014
    January 2014
    December 2013
    November 2013
    October 2013
    September 2013
    August 2013
    July 2013
    June 2013
    May 2013
    April 2013
    March 2013
    February 2013
    January 2013
    December 2012
    November 2012
    October 2012
    September 2012
    August 2012
    July 2012
    June 2012
    May 2012
    April 2012
    March 2012
    February 2012
    January 2012
    December 2011
    November 2011
    October 2011
    September 2011
    August 2011
    July 2011
    June 2011
    May 2011
    April 2011
    March 2011
    February 2011
    January 2011
    December 2010
    November 2010
    October 2010
    September 2010

    Categories

    All
    Alcohol
    Alternate Cooking
    Appearances
    Apple
    Apricots
    April Fools
    Aprons
    Bananas
    Beans
    Beef
    Beets
    Bench
    Beverages
    Bonnet
    Bread
    Breakfast
    Budget
    Budgeting
    Cake
    Candy
    Canning
    Carrots
    Cheese
    Chicken
    Children
    Chocolate
    Christmas
    Cleaning
    Coconut
    Comfrey
    Common Core
    Constitution
    Cookbook
    Cookies
    Cooking Oil
    Crafts
    Dairy Substitutions
    Dehydrating
    Dessert
    Dried Fruit
    Earth Oven
    Earthquake
    Easter
    Edible Weeds
    Eggs
    Emergency Prep
    Essential Oils
    Faith
    Family Home Evening
    Fertilizing
    Food Storage
    Fourth Of July
    Freezer
    Frosting
    Fudge
    Garden
    Gardening
    Gingerbread
    Gluten
    Gluten Free
    Gold
    Government
    Grains
    Gratitude
    Hat
    Herbs
    Home Remedies
    Home Repairs
    Homeschool
    Home Storage
    Honey
    Hope
    Inflation
    Leftovers
    Legumes
    Lemon
    Main Dishes
    Mixes
    Mothers
    Noah
    Non Artificial Colors
    Non-artificial Colors
    Nuts
    Oats
    Oil
    Orange
    Paint
    Peaches
    Pear
    Pie
    Pizza
    Plums
    Poem
    Popcorn
    Pork
    Potatoes
    Powdered Milk
    Prayer
    Preparedness
    Projects
    Prophecy
    Pruning
    Pumpkin
    Quick Bread
    Rhubarb
    Rice
    Salad
    Salt
    Sauces
    Self Reliance
    Self-reliance
    Sewing
    Shelf Life
    Shelves
    Sky
    Smoothie
    Snacks
    Soup
    Spices Or Seasonings
    Squash
    Strawberries
    Substitutions
    Sugar
    Summer Fun
    Three Month Supply
    Time
    Tomatoes
    Trees
    Truffles
    T-shirts
    Tuna
    Ultra Gel
    Valentine\'s Day
    Vegetables
    Water
    Watermelon
    Wheat
    Work
    Year Supply
    Zucchini

    RSS Feed

Web Hosting by iPage