The Provident Homemaker
  • Recipes and Info
    • Making Bread
  • My Blog
  • Favorite Resources
  • Documents and Files
  • 52 Weeks of Building Storage

How many dried bananas from a whole box?

4/15/2022

1 Comment

 
Picture
For details on how I dry these, see Chewy Dried Bananas. 
...and by "whole box" I mean the 40-pound boxes you see the produce guy emptying to restock the banana shelf. 

In other words, 40 pounds of fresh bananas will shrink down to what total space after dehydrating them?  The short answer is 7-9 quarts. Around the volume of two gallons, give or take a quart. 

It's hard to tell exactly because of a few factors.  The first is that a box is rarely exactly 40 pounds.  It's usually a little bit more, and sometimes a few pounds more.  
The second is that it depends on how many bananas get eaten before they're tucked away for later.  That could mean some were eaten fresh, some were made into banana bread, some were used in smoothies, and-- the easiest way to have a bunch disappear-- some (or many) were eaten after drying but before you whisked them away.  

In my case, my family started with three boxes.  

Yes, that's one hundred-twenty pounds. Or a few more. 

Why?  

Simple.  

We love them-- they're great for snacks, car trips, and packed lunches; they store well for a year (or a few); I hadn't seen any cases at a good price for a long time; and our dried banana stash was getting low. Low-ish. AND-- this is important-- my neighbor who ran across them called from the store asking if I wanted any slightly-overripe bananas. For $3 per box.  (No, that's not a typo.) Since my family was leaving town the next day, I said yes, to two boxes.  One for me-- we could get them sliced and on trays that night, and dried just in time to leave town-- and one for my sister in Idaho, which is where we were going. (She dehydrates, too.)

The next week, I was at that store again -- with my kids begging to look for more because those fresh dried bananas were SO GOOD. Sure enough, they still had lots. The now more-overripe bananas were $1 per box.  

Perfect.  Buy food when the store wants it OUT, and FAST. And use or preserve it quickly. 

From that 3 boxes, here's what our yield was:
  • 18 quart jars tucked away, plus at least a jar or two’s worth eaten by my kids as they helped,
  • 2 (12x18) trays of banana bars (one regular, with caramel icing, the other were chocolate banana bars, with chocolate icing)
  • one 11x15 pan of gluten-free banana bars  (all the bars were for a youth dance)
  • three loaves of banana bread,
  • two loaves of gluten-free banana bread
  • 1-2 pounds of bananas frozen in ziplock bags, for future smoothies

How can the bananas get dried before they get too ripe?  Well, not all of them did.  That's why there was so much banana baking going on. When we got to that last box, if something was too ripe, or bruised, it got tossed into the bake-with-it bowl, to be mashed. 

In addition, I have two large dehydrators, with 12 trays each. (They were much cheaper when I bought them!) 
A 40-pound box of bananas, sliced, fits nearly perfectly on those 24 trays.  It takes the dehydrators about a full day to dry them.

How did I get 12 trays each, when they come with only 8?  You can buy extra trays, but they’re about $12 apiece (sold in packs of 2). 

That's not how I got them. 

My first dehydrator was the same type and size. That one was purchased through the local classifieds for $25. It still works, but the new ones are a little more powerful, so the old base is in the basement, on standby just in case it’s needed. 

Also notice, in the photo at the top of this post, that when I say "quart jars," it doesn't necessarily mean canning jars.  Oh no.  These jars just need to be airtight.  I use cleaned-out mayonnaise jars and pasta sauce jars too.  If you're a canner, you've likely learned that if the rim of a jar gets chipped, that often prevents the canning lid from sealing properly.  My solution now is to write a big X on the jar with a Sharpie, and use that jar ever after only for dehydrated foods.  Waste not, want not.  
​
Or at least 'want less.'
Picture
1 Comment

Food Preservation-- Quick overview

3/20/2021

0 Comments

 
This is the "Preservation" section of a presentation given at CSW 2021, the Convention on the Status of Women, typically held each spring in New York.  Cathy Mauluulu of Big Ocean Women and I taught the "Four Ps" of greater self-reliance when it comes to food:  Principles, Production, Preservation, and Propagation. (Our portion of the video begins at 1:23:45.)
Picture
No matter who you are or where you live, there’s a way to better use the resources around you. 
​

A few years ago I read a report saying that in the United States, 40% of the food grown is wasted, rather than eaten. Some of that happens in the field, some in warehouses or stores, some in restaurants or homes.  That’s awful.  And it’s not just a problem in wealthy nations.  Not even close.  It turns out that in developing countries, 40% of the food grown is wasted rather than eaten.  More of it spoils in the field, since it’s harder to get to market, or to preserve it for extended periods.  

Picture
If you can get the food when it’s plentiful and in danger of spoiling if not handled quickly, preserving it is a way to not only save money and prepare for the future, but a way to reduce the waste in the world. And of course, reducing waste saves money.  One thing I do fairly often is buy several pounds of food when it’s marked down because of nearing its sell-by date, take it home, and right away preserve it for later.  It most often gets cooked, packaged in a useful size for my family, labeled, and frozen.  If it's meat, sometimes I’ll pressure can it instead for quick meals later. Either way, whenever we eat it, we’re eating at last month’s or last year’s prices.  And yes, in places where it’s legal to have a year’s worth of food on hand, getting that much basic food is not only doable, but saves you so much money! In times that the prices rise—whether because there’s a shortage, or because there’s high demand—if I have plenty of food on hand, I can hold off buying until the prices drop. This benefits everyone. It helps me because I’m eating on last year’s prices. And it helps my community because not buying the in-demand food then leaves more for those others who need it.

Waste less in your own home and garden, and don’t eat up everything right away.  It’s the food version of “spending less than you earn.” See what you can preserve for later. Even storing away a tablespoon of rice per day will add up. 

A cookbook from almost two hundred years ago explains, “The true economy of housekeeping is simply the art of gathering up all the fragments, so that nothing be lost.  I mean fragments of time, as well as materials, … whatever be the size of the family, every member should be employed either in earning or saving money... and should be taught to consider every day lost in which some little thing has not been done to assist others.” (America Frugal Housewife, 1838)
One important aspect of preserving is to share, especially anything you don’t have time, space, or energy for. Whatever is around should be used to benefit someone.

Picture
Some of the methods of preserving include dehydrating or drying, pickling or brining, smoking, freezing, dry-pack canning, pressure canning, boiling-water canning, or ‘root cellaring’—which doesn’t actually require a real root cellar.  Your area and circumstance will best fit with at least one or two of those.   How can you learn what will be best?  What are your area’s traditional ways of preserving? Find a mentor—the older and more experienced, the more wonderful it is on both sides. Create a ‘maternal economy,’ a sisterhood, a brotherhood, utilize the experienced home economists at your local extension office.

Some climates are warm and dry, which is perfect for drying foods.  When I lived in El Paso,Texas as a little girl, we dried apricot halves up on our hot black asphalt roof, with the fruit spread out on clean window screens and covered lightly to keep off bugs.  When we moved to a much colder climate, we dug a hole in the garden and buried a big, clean garbage can in which we stored our carrots through the winter. Eventually we bought an electric dehydrator—which is still one of my favorite tools.  In my previous house, we had very limited space to store foods, so I started drying some of the foods that I used to bottle.  Take tomatoes, for instance.  Six quarts’ worth of tomatoes could now fit into a single quart jar, once the tomatoes were dehydrated and powdered.  Tomato powder can be used in almost any recipe that calls for canned or cooked tomato products-- everything from tomato juice to pizza sauce to tomato paste. Now I make powders out of lots of vegetables- bell pepper, celery, tomato, mushrooms, pumpkin, zucchini. They thicken and flavor soups and sauces, or hide in smoothies or baked goods like bread or brownies. Powdered zucchini or pumpkin can be used in any recipe that calls for puree.
​
There’s so much that can be done to preserve and use food instead of wasting it! Links to instructions and resources for dehydrating, as well as the other preservation methods, are below, as well as on my "Favorite Resources" page. ​
►How to Waste Less food posts: 
-Reducing Food Waste, and What To Do With Sour Milk
-Cutting Food Waste

►How to eat well and still spend less 

►Canning 101 -  Free video trainings from the USU Extension Office, for lots of kinds of canning, from marmalade to meat.
​
►Canning Meat, from Backwoods Home Magazine
 
►"How To Can Anything"    You'll have to see this one to appreciate the treasure trove it is. It has step-by-step canning photos, how-to's, why-to's, why-not-to's, plus lots and lots of recipes.  Also has links for purchasing what you'll need.  

►Which foods can be safely bottled at home    
There's also a great FB canning group, called "We Might Be Crazy But We're Not Stupid"-- they are careful to stay within USDA safety guidelines. 

►Tattler reusable canning lids          

►http://www.dehydrate2store.com/  - how, what, and why to dehydrate.  Lots of videos, including one on building good-looking, shallow shelves for your storage jars.
 
►How to dry-pack foods  This link has several links within it. 

►Making and Using Vegetable powders 
 
►Storing Vegetables At Home --How to store them through the winter, even without a root cellar. 

►Storing Fruits and Vegetables at home:  see page 5 at this link for a chart of what foods prefer similar conditions.
 
►http://www.motherearthnews.com/modern-homesteading/root-cellaring-zm0z85zsie.aspx   Written by Mike and Nancy Bubel (who wrote the book on Amazon, considered the 'bible' of root cellaring!)

►http://www.nepanewsletter.com/cellar.html gives an excellent, detailed overview of what you learn in the Bubel's book

►“Return of the Root Cellars”-- great overview. 

►hows, whys, recipes, and supplies for making consistent quality pickled (lacto-fermented) foods. I haven’t tried these yet, but I have been adding more fermented foods to our diet.   Also this: https://myfermentedfoods.com/how-make-lacto-fermented-pickles/  
0 Comments

Week 40- Free Cookbooks for Using Food storage

1/19/2020

2 Comments

 
Picture
To help with building your year's supply (this is Week 14 of 26), see this chart. 
 
Do you have some food storage now, but need more recipes to use it? Check out these eleven FREE cookbooks, plus some extra resources like a book that teaches you how to can food, one on nutrition and one on REALLY frugal cooking and homemaking.
Picture
1. Bee Prepared Pantry Cookbook. 67 amazing pages.  

Picture
2. New Ideas for Cooking with Home Storage (also found here)--
​created to be used with the foods at the dry-pack canneries of the Church of Jesus Christ of Latter-day Saints.  You can no longer dry pack food there, but can still purchase products already packaged. 
 
​

Picture
3. A Guide to Food Storage for Emergencies—compiled by the USU Extension Office. 120 pages. 
 

Picture
4.The Wooden Spoon Cooking School collection- this was a pilot program by the Church of Jesus Christ of Latter-day Saints.  The same ladies who created the Bee Prepared Pantry Cookbook were commissioned to create the class materials, so this is basically an expanded version of Bee Prepared. There are individual sections on the following topics: 
Introduction (note that the ‘length of storage’ information is outdated, per BYU Food Studies)  
Intro- Commodities, Family Assessment, Family Plan, Skills & Equipment
Legumes
Oats, Honey, and Sugar
Wheat
Rice and Pasta
Powdered Milk
Seasonings
A Meal in a Bag- quick meals with everyday, three-month supply foods


Picture
5. All Is Safely Gathered In: Family Home Storage Basic Recipes—compiled by the Church of Jesus Christ of Latter-day Saints, and sent with food storage boxes/kits.  4 pages, 11 recipes. 

Picture
6. Shelf Stable Recipes-- family favorite pantry recipes submitted by readers of FoodStorageMadeEasy.net   
​58 pages.  Uses long-term storage foods as well as some shorter-term ones. 
​

Picture
7. Use it or Lose It— another “food storage cooking school,” compiled by the Utah State University Extension Office. 17 pages. About half of the pages have recipes, with a focus on wheat and dry milk powder; the rest is good information on how to obtain, store, and rotate your food.

Picture
8. Cooking with Dry Beans—compiled by the USU Extension Office. 13 pages.

Picture
9. Whole Kernel and Bulgur Wheat: Preparation and Usage—compiled by the USU Extension Office.  57 pages, so you know there’s a lot of variety. It doesn’t mention hard white wheat vs hard red wheat partly because white wheat had not quite hit the public scene in 1992. ​

Picture
Short term food storage rotation
​
10. 3x5 card/photo album cookbook—3x5-sized cards to cut out and fit inside a small photo album that holds 72 photos. ​

Picture
11. Crockpot Freezer Meals with Five Ingredients of Less, from TheFamilyFreezer.com.   25 main dish recipes to use your short-term (“regular food”) storage. Go to the main webpage, https://thefamilyfreezer.com/ for many more recipes. 


Other great resources:

Nutrition and Diet—includes charts on vitamins and their role in the body. Church of Jesus Christ of Latter-day Saints, 26 pages.

USDA Guide to Home Canning – a self-taught course in how to can. 
 
Frugal pioneer recipes- ten recipes, printed in the July 1972 Ensign magazine.

American Frugal Housewife, 1838. The twenty-second edition.(!)

“Dedicated to those who are not ashamed of economy” and “Economy is a poor man’s revenue; extravagance, a rich man’s ruin.”  The introduction begins, “The true economy of housekeeping is simply the art of gathering up all the fragments, so that nothing be lost.  I mean fragments of time, as well as materials…and whatever the size of a family, every member should be employed either in earning or saving money… The sooner children are taught to turn their faculties to some account, the better for them and for their parents.  In this country, we are apt to let children romp away their existence, till they get to be thirteen or fourteen.  This is not well. It is not well for the purses and patience of parents; and it has a still worse effect on the morals and habits of the children. Begin early is the great maxim for everything in education. A child of six years old can be made useful; and should be taught to consider every day lost in which some little thing has not been done to assist others.”
__________________________

If you like old cookbooks, this website has more than 75 of them, all waiting for you in digital format. 
 
Thanks to prepperssurvive.com for alerting me to the old cookbook digital collection!

2 Comments

Week 32-  Storing grains and more – dry pack and vacuum method

11/16/2019

0 Comments

 
Picture
To help with building your year's supply (this is Week 6 of 26), see this chart. 

How do you keep your dry foods safe?  That depends on a number of factors, including the local climate, humidity levels, if your storage area is cool and dark or not, and how long you need to store it. 
  
One good option is the ‘dry pack’ method. 
You pack (or pour) dry food into an airtight food grade container.
 
There are better and worse ways to do this. (See here for ALL about it!)
 
Several years ago I attended a class at a local grocery store where the teacher showed us how to extend the shelf life of dry foods.  Some of those foods were wheat and rice, but she included chocolate and nuts.  You can store peanut M&Ms?!  She said this was an experiment, but they’d stored beautifully for a year and she didn’t know how much more to expect.
 
She used glass canning jars, lids, and a seal-a-meal (vacuum packaging)  attachment for canning lids. 

I don’t have the attachment, but discovered something else that works-- oxygen packets!  A 300cc oxygen pack will remove oxygen from filled containers up to a gallon in size. The cheapest way I’ve found to buy these is through the Church’s website, in quantities of 100.  If you’re buying them elsewhere, know that a 100cc oxygen pack is powerful enough for any container of one quart or less.

Oxygen packets are little squares—about 2” across and mostly flat—that contain iron powder.  Oxygen crosses through the packaging material, where it causes the iron inside to rust.  This permanently locks up the oxygen. 

Oxygen packets are recommended for dry-pack canning for two reasons-
  1. their use quickly removes oxygen that could keep insects alive in what you’re storing, and
  2. removing oxygen extends the shelf life of a food.
 
Three things, more than any others,  shorten shelf life of foods once moisture has been reduced--oxygen, light, and heat.  If you can remove the oxygen, the food will last longer. This is especially true if you store it someplace dark or cool, and preferably both. 
 
But removing oxygen also creates a vacuum, which can seal the jars for you.  No seal-a-meal vacuum attachment needed. 
I’ve been dry-packing food in glass canning jars, as well as PET and PETE plastic bottles, for about ten years.   
PETE plastic bottles include those you buy juice in.  Check the bottom of the bottle, and if it says PET or PETE, you can use it.  You can also use food storage foil pouches, which can be cut to whatever size you like, and sealed all the way around.

Make sure your containers are clean and dry, then fill most the way with whatever food you’re placing in it.  Add an oxygen packet, screw on the lid, label, and store somewhere cool and as dark as you can find.  (I like to run a band of masking tape around the lid edge, so I can tell at a glance later if someone opened it—a real possibility in a houseful of children!) 

Simple, right?

But dry-canning in glass jars—vacuum canning-- has been a game-changer for me. You can use any size of canning jar, from the little 4-oz ones to the big 2-quart size.
 
Here’s how I do it:
Get jars, lids, and rings ready- they need to be totally clean and dry. 
Get your food ready- totally clean, with moisture levels below 10%

Get your oxygen packets ready- keep them in their sealed package or airproof jar until the last minute. 

Fill the jars up to the neck only, or a little below the neck.  You’ll need a little bit of extra space in there, and overfilled jars don’t seal well.  Set a new lid and ring (band) to the side of each one. Wipe off the top of each jar, to be sure you have a clean surface for the lid to seal to. Open up the oxygen packets, and, working quickly, drop a packet into each.  Quickly top each jar with a lid and screw the band on.  Label each jar with the contents (if not obvious) and the date (always).

Oxygen packets will start to absorb oxygen immediately, and you don’t want them using up all their power before they’re in the jar!  You can tell the packets are working because they warm up.      
Store the leftover packets in a glass jar with a lid and band firmly screwed on.  They’ll be ready the next time you need them.

The oxygen packets will do their job in the food jars over the next 48 hours, dropping the oxygen content down to .1%.  As this happens, suction is created inside the jar, making the lid seal.  It’s not as secure of a seal as you get with regular canning (steam, water bath, or pressure), but it almost always holds.  Avoid bumping the tops of the jars, since this can knock lids loose.  Leave the bands on for at least the full 48 hours.  You can leave them on the whole storage time if you like. 


I’ve have learned a few things along the way. 

Removing oxygen makes a huge difference, and I can even store foods with a high fat content (peanut M&Ms!) for a few years without them going rancid. 

When storing my homemade tomato powder the first year, I used oxygen packets with some jars, and not with others.  Dried foods are listed as ‘best within a year,’ though that depends a lot on storage conditions.  Two years later, there was a visible difference between the oxygen-free tomato powder and the untreated powder.  The ones with oxygen removed were still as brightly colored—and nicely flavored—as at the beginning, while the others had lost both color and flavor. 
 
How long does sealing and removing air extend shelf life? 

That depends.
 
When stored in my cool, dark basement, nuts have remained great for about 5-6 years.  I recently opened two jars of walnuts canned in 2010! One jar had remained sealed, but the other hadn’t. While the sealed-jar nuts were definitely better three years ago, they were still in the realm of ‘OK’.  Barely.  But the ones that had lost their seal?  Awful.   Really, truly awful.  The smell of rancid oil assaulted my nostrils as soon as the lid was lifted, and those nuts—stored side-by-side with the other jar—were several shades darker.  (I gave those to the chickens.  Not sure whether they got eaten or not.)   So the moral of the story is to ROTATE your food.  Use it.  I try to store the right amount of food to be able to go through it in the next two years, and that would have been great.  Try to use any high-oil-content food within at least five years.

But low-oil foods like rice and wheat?  They’ll store nearly indefinitely.  20, 25, 30 years or more are the estimates from BYU’s food studies. But still rotate using it.

Things I’ve successfully home dry-packed (stored in airtight containers with oxygen packets)

→Rice
→Vegetable powders- tomato, zucchini, pumpkin, beet
→Citrus sugar (dried zest from orange, lemon, or lime, added to sugar and run through the blender to form a powder.  I use it in place of orange or lemon extract.) https://www.theprovidenthomemaker.com/1/post/2010/10/garden-seeds-homemade-orange-flavoring-and-easy-marmalade.html
→Dried candied orange peel (also used to flavor recipes- see the same link as citrus sugar)
→Thoroughly cooked and dried crumbled sausage (all dry packed foods MUST be below 10% water content, or you risk botulism)
→Raw almonds, walnuts, pecans, macadamia nuts, pecan meal, pumpkin seeds, pine nuts, pistachios, smoked almonds, honey-roasted peanuts …
→Sesame seeds, flax seed,
→Spices
→Bridge mix
→Trail mix
And probably more that we’ve long since eaten and forgotten about.
 
I don’t dry-can dried fruit, because it lasts a few years anyway, we’re pretty good at rotating through it, AND I haven’t wanted to do the measuring and weighing to determine if the moisture content is low enough to dry-can it safely.
 
The things people usually dry can at home are wheat, rolled oats, beans, lentils, rice, etc.

So why did I put these other things in jars with oxygen packets?

There are 3 typical reasons- (1) something was at a really good price and I wanted to have it last, (2) I naturally had a lot of that thing, or (3) I was curious to see if it would work! 
 
In the case of all those nuts and seeds, there used to be a local nut packaging company that only allowed its wholesale customers to keep any particular product on the shelf for six months.  Whatever didn’t sell in that time was returned to the company, who would resell this ‘expired’ product for $1 per one-pound bag… no matter if the bag contained gummy bears or macadamias.  Most of the time the nuts were still very good—depending on how and where the store displayed them—in a hot window or on a cool, darker shelf.  As you can see from the photo and list of things I’ve vacuum-canned, my friends and I took full advantage of this!  
0 Comments

Caramel Pear Butter, plus Week 25 assignment

9/28/2019

0 Comments

 
Picture
How is your B for 3 going?  At this point, you may be done with your 3-month supply of food, and using your weekly budget for nonfood items. If you’re not sure what quantities you need, see the week 22 post.
There is only one week left in the get-3-months'-supply program!

Do you ever have a whole bunch of fruit that is, shall we say, (far) less than perfect? Do you resign yourself to throwing it away or turning it into garden mulch?  Most often, there is something good and useful to do with it still, after the bad parts are cut away.  A couple weeks ago, at my house, the project was the pears we’d picked off our tree.  (This week we’re working on peaches and apples.) We’d only managed to get the pears sprayed once as blossoms, and the worms were really happy about that.  Most of the pears were wormy through the cores. The pears were damaged enough that canning beautiful pear halves was out of the questions.  So I found a recipe where the shape of the fruit didn’t matter--Caramelized Spice Pear Butter.  The original recipe didn’t quite work for what I had, so I combined the idea from that recipe with the quantities for apple butter, one page earlier in the cookbook.  

I made one batch (6 pints) of the spiced pear butter, then two batches where the spices were left out, for just Caramel Pear Butter.  A touch of salt brought out the caramel notes. It’s delicious on bread, toast, muffins, and pancakes, of course, but also as both fruit and sweetener for cooked oatmeal. 

If you don’t have pears, but do have apples, go right ahead and substitute them in, for 
Caramel Apple Butter. (Doesn’t that sound delicious?)  And if you don't have apples, but live anywhere near me, come get free apples!


Caramel Pear Butter
7 to 8 pounds of pears, depending on how much needs cut away
3 c. sugar
¼ tsp. salt*
2 Tbsp. lemon juice

*For Caramelized Spice Pear Butter, omit salt; add 1½ tsp. ground cinnamon, 1 tsp. ground cloves, ½ tsp. ground ginger.
Wash, halve, and core pears, cutting away any bad parts. Leave the skin on.  Stick the pears in a blender or food processor, and run until nearly smooth.
​

You’ll need a total of 12-13 cups pureed pears.  In a heavy-bottomed, very large pan or a stock pot, put 2 cups of sugar.  Turn the heat to high and watch it closely. (Do not walk away!  Not without reducing heat to low while you’re away.) When the sugar begins to melt, stir the melted spot to keep it from burning, and to stir more of the still-granulated sugar into it.  Reduce heat to medium-high, and keep stirring more of the sugar into the molten part.  If some of it starts to smoke and turn black, the heat is too high or you’re not stirring enough. (Be careful; this stuff is near 300 degrees F.)  Once it’s all golden brown, stir in the remaining 1 cup sugar.  Stir for a minute to help it melt, then reduce heat to low.  Add the pear puree and salt (or spices, if you’re going with that option). It will splutter, and the molten sugar will harden up at the bottom of the pan.  Turn the heat up to medium-low and put the lid on, propped so steam can escape. 

Let it simmer or boil for about 45-60 minutes, stirring every five or ten minutes. The longer it cooks, the more often you’ll need to stir, to keep it from scorching.  Eventually, almost all of that sugar at the bottom will dissolve into the pear puree.  Around 45 minutes, the mixture will start to thicken because of the water that has escaped through steam.  Simmer until it’s nearly as thick as you want; it will thicken a little more after it cools. 

Stir in the 2 Tbsp. lemon juice.  Pour into sterilized canning jars leaving ½” headspace, wipe tops of the jars clean, add a sealing lid and firmly screw on a canning band.  Process half-pints in a boiling water canner for 5 minutes (15 minutes at my elevation of 4400 ft above sea level), or in pints for 15 minutes (25 minutes at my elevation). 
Makes 5 ½ to 6 pints, or about 12 half-pints. 
0 Comments

Week 14- Preserving fruits and vegetables

7/13/2019

0 Comments

 
Picture
Your weekly assignment:  B for 3   Only 7 weeks to go! (How's your shelf looking?)

If you have a garden or fruit trees, or like to visit farmers’ markets, you’re likely starting to wonder about how to handle the food that so proliferous right now.  The Utah State University (USU) Extension has resources for you! It covers freezing, canning, dehydrating, and best varieties to use, from Apples to Zucchini.   After going to this link,  click on “Preserving the Harvest Fact Sheets”.

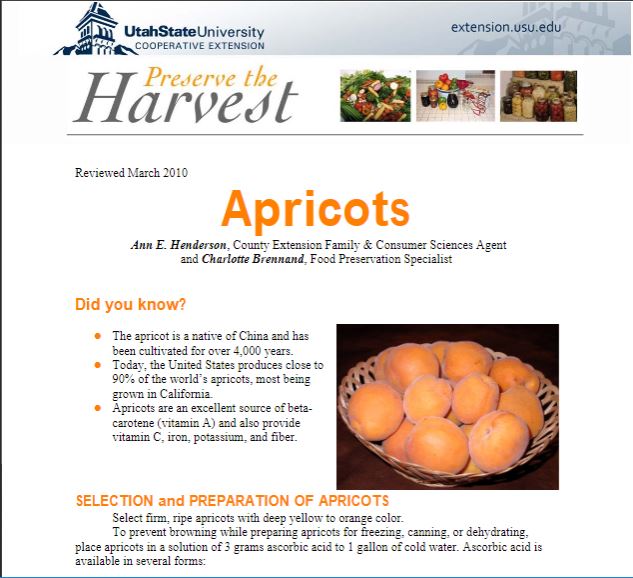
For example, in the Apricot “fact sheet”
the 'sheet' is 9 pages of information--

-How to select and prepare apricots

-Freezing to preserve them, in syrup, sweetened without syrup, plain, or as puree

-Canning them- how many pounds or bushels will fill how many jars, how to get them ready (in halves or as nectar), how to process them, for how long, for your altitude

-Making apricot jam, jelly preserves- with pectin, or without pectin

-Drying apricots- including preparing them, and drying them using a dehydrator, the sun, or an oven

-Nutrition information for apricots
​
-Storing them- fresh, canned, dried, or frozen

And all this, for so many other fruits and vegetables!
0 Comments

Week 8- Canning meat, beans, and vegetables

5/30/2019

0 Comments

 
Your ​Week 8 assignment-- Going off your  Inventory Shopping List and this week’s sales, buy the 3 months’ worth of as many different food items as you can (= Buy For 3) as your new budget allows.  Only 10 more weeks of this step!

This week's skill:
Did you know that you can bottle meat, beans, stew, and chili at home?  When you find a great sale price on meat, you can buy a bunch and save yourself a lot of money in future months!  For instance, a couple months ago I found boneless skinless chicken for $1/lb. I bought a case (40 lbs), froze about 10 lbs in meal-sized quantities, and bottled the rest.  The bottled chicken makes for quick meals, and I know exactly what was added to it.  In this case, that meant chicken and salt.  Other times I’ve put sliced carrots, celery, onions, and herbs in the jars with the meat, to have a great base for a quick, wholesome chicken noodle soup or pot pie. My food storage includes home-bottled chicken, beef, salmon, pork broth, chicken broth, black beans, pinto beans…

Did you watch the video at the top, on making bottled stew?  Do you have some of the dehydrated diced carrots from the Home Storage Center?  They're great for adding to canned foods.  It helps to soak them in hot water for at least 10-20 minutes first, so they don't soak up all the water in your jar while it cooks.

Meat, beans, and vegetables (except tomatoes) are in the category called ‘low acid’, compared to things like tomatoes and fruits, which are ‘high acid’, or contain higher acidity.  Higher acid foods may be processed using a big pot with boiling water to heat the jars and food, but low acid foods have to be heated to a higher temperature.  This means the only way to safely bottle them is with a pressure canner—a pressure cooker made to hold 7 or more jars at a time.  They start around $65 and go up from there, but you may have a friend who is willing to let you try it out at her house, or borrow it if you’re the confident type.  (I have one. It's very similar to the one in the video above. Come on over!)

Where can you find instructions on pressure canning?  Most pressure canners come with an instruction book and charts, and there are great resources online.
 
The first place to know is your local Extension Office.  In Utah, that’s the Utah State University Extension office, and somebody there knows the answer to just about any question you come up with on the topics of food, kitchens, preserving, budgeting, gardening, yard care, house and garden pests, and more. They’ll even test your pressure cooker gauge every year for $2.

https://nchfp.uga.edu/ has lots of canning information; one of its pages is this one.  It has instructions on canning
Chicken, Rabbit, Chicken or Turkey Broth, Chili, Meat (ground or chopped), Meat (strips, cubes, or chunks), Meat Stock, Meat and Vegetable Soup, Mincemeat Pie Filling, Clams, Crab, Fish (fresh or smoked), Oysters, and Tuna!

This page has info on how canning preserves food, how to make sure your food is safe, what jars, lids, and canners to use, how to know if the jars sealed correctly, canning food for special diets (including baby foods), and more.
 
Other good resources are The Ball Blue Book  and its online counterpart, https://www.freshpreserving.com/home

The Ball Complete Book of Home Preserving

So Easy to Preserve    (388 pages of instructions and recipes from the Extension Office in Georgia)

There are lots more.  Look for USDA-tested recipes.
​_____________ 

Are you ready to try this?? It's great!
0 Comments

No-pectin, No-refined sugar Strawberry Jam

2/26/2014

0 Comments

 
Picture
This is a great fresh jam to eat fresh. It also freezes well, so is a good freezer jam.  Since the berries are not cooked and there's not enough sugar to help preserve it, its fridge life is fairly short.  If you're keeping it in the fridge, try to use it within about a week.  If left too long, it will get moldy (you'll know if it does!)   But it's SO GOOD fresh!  My eight-year-old made a batch two nights ago; we ran out yesterday.  I made another batch this morning, and between spreading it on our pancakes at breakfast, and using it on warm bread this afternoon, it's gone again!

Pectin-free Strawberry Freezer Jam
1 pound strawberries, washed and hulled (green parts pulled off)
2 Tbsp. honey (or to taste; use any sweetener you prefer)
2 Tbsp. chia seeds, OR 1 Tbsp. ground flax seeds

Mash the berries with a fork, or chop in a blender until they're the consistency you want.  Stir in the honey (or other sweetener) and the chia.
 After this sits for about half an hour, the chia (or flax) will gel as they absorb the extra liquid.  Keep refrigerated or frozen.

Makes about 2 1/4 cups.

Come to think of it, a drop or two of orange essential oil would be really, really goo
0 Comments

Elderberry Syrup

11/15/2013

0 Comments

 
Picture
Elderberry syrup is known as a wonderful immunity booster and antiviral- which means it'll help knock down the flu or any other virus-caused illness.  It's also really, really delicious on pancakes.  Or a splash added to desserts or fruit salads.  Or brushed on a spice cake.  Or mixed with chilled sparkling water.  Or... you get the idea.
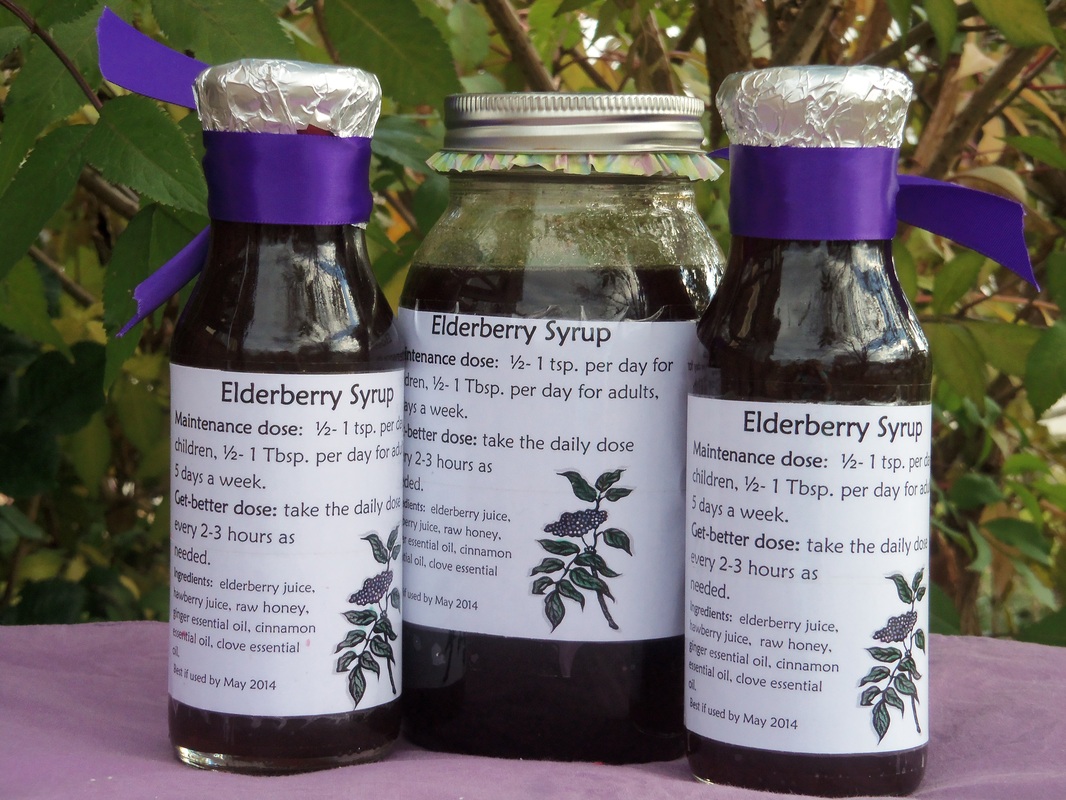
 Now that there's a jar in my fridge, I may have to watch to be sure my children don't sneak in and use up all my 'medicine'.   Just for that reason, I wax-sealed the lids on the jars I plan to share with others.  

I've already used it.  My family has had a nasty cold or flu this week; we've had missed school days and work days from it.  Yesterday it hit me hard, and felt like it was on the verge of turning into bronchitis or pneumonia.  I've been taking either elderberry infusion (tea) or the syrup at least three times a day since feeling it come on a couple days ago, and today I feel much better.  I suppose that may or may not have anything to do with the elderberries... but I'm keeping the routine up until I'm better!  Yum.

I started with 2 pounds of berries, used a steam juicer, and the first 2-3 cups of juice were nice and dark; strong enough to use without boiling to condense it.  The longer the berries steamed, though, the lighter the juice got, so I boiled down the last three cups to yield about 1 1/2 cups.

You'll notice in the photos below that some of those berries don't look exactly the same as the others... I have a young hawthorn tree.  It produces berries, but not yet enough to make a batch of anything yet.  The haw berries are said to be good for reducing inflammation (as well as normalizing blood pressure and helping strengthen and regulate the heart)- so I threw them in with my elderberries.  Honey is used in this instead of sugar because of its soothing, anti-inflammatory, and healing properties.

If you want to make a wax seal, paraffin works great.  I had a small ball of red cheese wax I'd saved, and used that.

Elderberry Syrup
Start with 2-3 cups elderberry juice (depending on strength)- if not strong, boil to reduce to 2 cups.  To the warm, NOT hot juice (if you want to preserve the enzymes if using raw honey), stir in these ingredients:
2 cups honey
5 drops ginger essential oil
3 drops cinnamon essential oil
2 drops clove essential oil


Store in the refrigerator.  Probably best used within a couple months- though I've had syrups stay nice for a year, refrigerated.  You could store them longer if you seal them in sterilized jars. 

To use medicinally, take a tablespoon straight or mixed in 6-8 oz warm water, every 3 hours if you're sick and an adult, or take once a day as a general immunity booster.  See the label below for more details.  

If you want to start with berries but don't have a steam juicer, and want to use the spices themselves instead of essential oils, combine 4 oz (2/3 c.) berries in 3 ½ c. water, a thumb-sized piece of fresh ginger, 1 tsp. cinnamon, and ½ tsp. cloves; Simmer until water is reduced by almost half; strain, pressing on the berries.  Cool until just warm, stir in honey.

On a related note, you can use jelly to make gourmet pancake syrup:  see here.
0 Comments

Canning Butter?

2/25/2013

0 Comments

 
Have you heard that you can bottle butter at home to store for later, without refrigeration?  

The first time I heard about it was from my aunt a few years ago.  Then I kept hearing about it, here and there and everywhere!

It sounded kind of strange.  And scary-- what about botulism?  So I did some research.

The FDA discourages canning butter, as do the USU Extension offices around the country, because of the risk of botulism growth in canned butter.  HOWEVER, it looks to me that this is a case of erring on the safe side.  They, as government entities, are very averse to any kind of risk.  Botulism has about a 10-17% death rate in those who get it, though with the low incidence of this kind of food poisoning, it translates to 2-4 deaths in the US per year. Lightening kills way more people (about 55-75/yr).

Botulism does not grow if the water "activity level" is below .94; salted butter has a water activity rate of .91-.93.  The added salt helps 'tie up' the water, making it unavailable.  That should be in the perfectly safe range, but is apparently too close to comfort for the FDA, who require a water activity rate of .85 in commercially-sold foods. I would not can unsalted butter; its water activity rate is .99 or higher. Another option is to make the butter into ghee before canning, well-made ghee has no water remaining in it. I wasn't able to find what the water activity rate of ghee is, but logic leads me to believe it is under even the FDA comfort range.  I've canned both salted butter and ghee.  I'm more comfortable with the ghee.


If you'd like to read more about it to decide if canning butter or ghee is okay with you, here are some of the sources I learned from:

http://www.ecolab.com/our-story/our-company/our-vision/safe-food/microbial-risks/c-botulinum    

http://books.google.com/books?id=ylWey_KBv7UC&pg=PA337&lpg=PA337&dq=%22water+activity%22+of+%22salted+butter%22&source=bl&ots=18uZLS840j&sig=W8RCozWeTS_FcDIa-MkuRJPJu6I&hl=en&sa=X&ei=jeYFUcTWEc6tygHixICQDA&ved=0CEQQ6AEwAQ#v=onepage&q=%22water%20activity%22%20of%20%22salted%20butter%22&f=false     

http://www.ncbi.nlm.nih.gov/books/NBK50952/ )


0 Comments

Neighbor Gifts, Gingerbread Syrup and Cherry-Almond Fudge

12/21/2012

0 Comments

 
Picture
Do you want something simple to give to friends and neighbors?  Here are some quickies; if you have more time you might like Candy Cane Bread, shaped and decorated like a candy cane.  
Recipes for the fudge and the gingerbread syrup are below.

For the jars to pour syrup in, I save jars through the year: spaghetti sauce jars, pickle jars, jelly jars,baby food jars, peanut butter containers (don't use those for anyone with peanut allergies!)...
After Christmas, anything that didn't get used gets put in the recycle bin, and I have cupboard space once again!
Cherry-Almond Fudge

2 c. sugar
1/2 c. milk
7 oz. marshmallow creme (may use 7 oz. marshmallows instead)
12 oz. semisweet chocolate chips
1 tsp. almond extract
1 tsp. cherry flavor  (I used wild cherry, and it was amazing!)
1/4 c. dried cherries or cranberries, finely chopped
1/2 c. almonds, chopped

Line an 8x8 pan with parchment or foil; butter well if using foil.  Set aside.  Combine the sugar and milk in a medium saucepan.  Bring to a boil, stirring often, then boil for 3 minutes.  Pull off the heat, then add marshmallow creme, chocolate chips, almond and cherry extracts, and dried cherries.  Stir until smooth.  Pour into prepared pan, and sprinkle with chopped nuts.  
Refrigerate 1 hour or until firm, then cut into squares.  Store airtight at room temperature.

Makes just over 2 pounds.


Gingerbread Syrup 
(notice this recipe is basically the same as above, only without the marshmallow, and with extra milk to make it pourable)  If you don't have cinnamon chips, use white chocolate chips or butterscotch chips, then add 1-2 Tbsp. ground cinnamon, to taste.


2 c. sugar (can use brown sugar for deeper flavor, or add 1 Tbsp. molasses)
1 c. plus 2 Tbsp. milk
12 oz. cinnamon chips (I used Hershey's brand)
1 tsp. ground ginger OR 1 drop ginger essential oil
1/2 tsp. ground cloves OR 1 toothpick of clove oil
1/8 tsp. salt
1/2 c. pecans, toasted and finely chopped

In a medium saucepan, bring the sugar and milk to a boil, stirring occasionally.  Boil for 1 minute, then remove from heat.  Stir in cinnamon chips, ginger, cloves, salt, and stir until smooth.  Stir in pecans, then pour syrup into jars.  Store in the refrigerator.  Warm before serving.  (If too thick, microwave briefly.)

Makes about 3 1/2 cups.


0 Comments

Oregon Grape Jelly

7/7/2012

4 Comments

 
Picture
There are some shade-loving, spiny-leather-leaved shrubs known as "Oregon Grape" (Mahonia).  At least one variety is native to the Rocky Mountain area, but nurseries sell different, -bigger- ones for use in landscaping. 

The berries ("grapes") are very tart but make delicious jelly.  They're free, too!

Picture
Pick the berries when they're completely blue.  They'll have a greyish-blue coating on them that will rub off, this is normal.  You don't have to rub it off.  For this size batch of jelly, I had about four cups of berries.

Rinse them, then put them in a pan.  Mash them, then add water, 1" deeper than the berries.  Bring to a boil, then reduce heat and simmer, covered, for about 20-30 minutes, until they're very soft.  Strain through a fine-mesh sieve, a few layers of cheesecloth, or a single layer of cotton fabric.  Let it drip for ten minutes or so.  You can press down on it with a spoon to get more juice, but this will squeeze more solids into the juice, yielding cloudy jelly.

Follow the directions for grape jelly from your brand of pectin, or use these quantities:

Combine 5 cups juice with 7 cups sugar, bring to a full boil for two minutes.  Stir in one box of pectin (THIS WILL FOAM UP!- use a bigger pan than you think you'll need.) and return to a full boil. Let it boil 2 minutes more, then pour into your sterilized jars.  Top with new lids (warmed in water), screw on the bands.  Process for 10 minutes.  This makes 7 tp 8 half-pints of jelly.   If you used a big enough pan, you can scrub it out, put 1" of water in the bottom, bring it to a boil, put the jars full of hot jelly into this pan, cover with a lid, and let it steam (simmer) for the ten minutes of processing time.  Lift out carefully and put them on a dry dishtowel on the counter.  Cool completely.

When the jelly is completely cool (usually the next day), wash the jars and remove the rings.  Dry the tops, label with the year and what's in the jar.

For more detailed instructions, see a post at one of my favorite websites, http://www.pickyourown.org/grapejelly.htm 
4 Comments

Easy fruit syrup for pancakes

6/14/2012

0 Comments

 
Picture
Have you ever looked at the gourmet syrups on the store shelf?  Have they sounded delicious, but cost more than you're willing- or able- to spend?


Start with one jar-- any size-- of jam, jelly, or preserves.  Scoop into a bowl, then fill the now-empty jar about halfway full with water; use a little less if the jam was runny, a little more if it's very thick.  Add about 1 Tbsp. lemon or lime juice for each 1-2 cups you now have, to perk up the flavor (optional but good).  Whisk together until evenly mixed.  Serve warm.

18 ounces of jam will yield 26-28 ounces of syrup.

You can use any kind, homemade or storebought, including the ones made with no added sugar.  It's a handy way to use up jam or jelly when you've made/bought way more than y

We've tried blackberry, rhubarb, apricot, elderberry, black currant, blueberry, cherry... 
next maybe I'll pull out a jar of lemon-honey marmalade.  That should be fantastic with blueberry pancakes!

0 Comments

Cutting up Fresh Pineapple

6/9/2012

0 Comments

 
My vivacious 86-year-old grandmother bottles pineapple on a regular basis- has since before I was born- since she lives near a plentiful source.   She is one of those people who knows how to make anything  out of anything  and waste precious little to none of it.    As she ate some of my fresh pineapple salad earlier this week, she related how she'd been teaching my cousin to bottle fruit.  I was intrigued with what she told me about using the peel and cores.  Growing up, we kids used to always chew up the cores, which are admittedly tough and less flavorful, but we could only handle a few before the acids started hurting our mouths.  See the slideshow above to learn what she does with them.

Once you've cut the pineapple  into wedges, free of cores and peels, it's ready to cut into whatever size you want.  You can then bottle it, freeze it, or use it right away.  Like all cut fruit, it has a relatively short refrigerator life.
0 Comments

Easy Canning

8/20/2011

0 Comments

 
Picture
Does the thought of canning make you cringe?  Do you think it is an all-day project?

Well, sometimes it does take all day. If you're canning 100 jars of apricots, you know it's going to take a while.

If you have just  a little bit of fruit, though, it can be a little project.

Part of the simplicity of this is that this fruit already contains enough pectin to gel; it just needs sugar and cooking.  Other fruits high in pectin are apples (and things in the apple family, including rose hips), citrus (see Easy Orange Marmalade), and berries.

Picture
I have two black currant bushes in my front yard.  The berries have been ripening at different times, so my kids and I have picked them each week, for three weeks.  Each time we've only ended up with 3-6 pounds of berries, not enough that I felt like breaking out my water- bath canning pot.  So I didn't.  This small amount of jars fit pretty well in one of my cooking pots. 
I started with 6 pounds of washed currants, then pureed them in the blender.

Picture
Then I added sugar; one cup sugar for each cup of puree.

Picture
Stirred it over medium-high heat...

Picture
and kept stirring every now and then, until the mixture coated my spoon; a good sign that it would set up as a gel.  Another test is to drip a little on a cold plate (or granite countertop!), wait about ten seconds, and see how it set up.  It doesn't need to be very thick.

Picture
I poured it into sterilized jars.

The easiest way to sterilize them, if you remember ahead of time, is to run them through the dishwasher on the "sanitize" cycle.  Since I didn't think of that in time, I used bleach- about a teaspoon of bleach in one jar, with 1/4 c. water.  I put a lid on the jar, shook it well, then poured the bleach water into the next jar and repeated until they were all done. I let them sit for five minutes, then drained and rinsed them.

So do you HAVE TO sterilize?  No, but there may be microorganisms in your jars that cause mold to grow in your jelly.  I haven't found that to be an issue when I'm sealing jars, but it shortens the fridge life of unsealed jars.  If the jars are sterilized, I can get a good year out of unsealed marmalade (sometimes longer), but usually closer to 4-6 months if the jars were not sterilized first.

Picture
The pot on the left is deep enough to hold these half-pint jars- they have to be covered by at least 1/2" over the top.  I filled it about halfway with water, and brought it nearly to a boil.

Meanwhile, I prepped the sealing lids by putting them in almost-boiling water, then letting them sit 5 minutes to soften the sealing compound.

Picture
I brought it to a full rolling boil, adjusted the heat so it would maintain that, and set the timer for ten minutes.


Picture
When the timer rang, I turned off the heat and let them sit a minute.  Normally I use a jar-lifting tool to retrieve them, but it's kept with my water-bath canner...

So I dumped half the water out of the pot to expose the jar tops, then lifted them out using a pot holder.

Picture
I put them on a dry dish cloth to cool, with a little space around to help the air circulate. 

Then I cleaned up while occasionally hearing that musical "pop" that announces a jar has sealed.

The whole process took less than one hour.


After they cooled, I took the rings off, washed them, and labeled them with contents and date.

Some of them got an extra label, since I found one for nutritional content of black currants:


Picture
OK, so this is the nutrition for the actual fruit, not fruit with sugar.  It gives me something to work from, though. 

Those currants have some good stuff in them!

Part of the carbohydrates listed is pectin- a soluble, nondigestible fiber.  It helps you feel full longer, and not only helps scrub out your insides, but helps make it hospitable to friendly bacteria (probiotics).  This last feature makes it a "prebiotic". 

Cool stuff.

0 Comments

    Need a Search bar?
    One day I may upgrade my website-- but until then, use your web browser search bar. Type in my web address and what you're looking for, like this-- 
    www.theprovidenthomemaker.com  pumpkin --  and you should get results.


    Author

    I'm a disciple of Christ, a member of the Church of Jesus Christ of Latter-day Saints, a family-defending, homemaking, and homeschooling mom of eight children, two of whom sometimes can't have milk or wheat. Growing up on a farm in a high mountain valley, my parents taught me to 'make do', work hard, smile, and help others.  I love cooking, learning, growing food and flowers, picking tomatoes, and making gingerbread houses --which CAN be made allergy-friendly-- with my children.  I hope you find something to help you on my site!

    Archives

    April 2024
    July 2023
    April 2022
    September 2021
    March 2021
    December 2020
    April 2020
    March 2020
    February 2020
    January 2020
    December 2019
    November 2019
    October 2019
    September 2019
    August 2019
    July 2019
    June 2019
    May 2019
    April 2019
    January 2016
    November 2015
    October 2015
    September 2015
    March 2015
    February 2015
    November 2014
    October 2014
    September 2014
    August 2014
    July 2014
    June 2014
    May 2014
    April 2014
    March 2014
    February 2014
    January 2014
    December 2013
    November 2013
    October 2013
    September 2013
    August 2013
    July 2013
    June 2013
    May 2013
    April 2013
    March 2013
    February 2013
    January 2013
    December 2012
    November 2012
    October 2012
    September 2012
    August 2012
    July 2012
    June 2012
    May 2012
    April 2012
    March 2012
    February 2012
    January 2012
    December 2011
    November 2011
    October 2011
    September 2011
    August 2011
    July 2011
    June 2011
    May 2011
    April 2011
    March 2011
    February 2011
    January 2011
    December 2010
    November 2010
    October 2010
    September 2010

    Categories

    All
    Alcohol
    Alternate Cooking
    Appearances
    Apple
    Apricots
    April Fools
    Aprons
    Bananas
    Beans
    Beef
    Beets
    Bench
    Beverages
    Bonnet
    Bread
    Breakfast
    Budget
    Budgeting
    Cake
    Candy
    Canning
    Carrots
    Cheese
    Chicken
    Children
    Chocolate
    Christmas
    Cleaning
    Coconut
    Comfrey
    Common Core
    Constitution
    Cookbook
    Cookies
    Cooking Oil
    Crafts
    Dairy Substitutions
    Dehydrating
    Dessert
    Dried Fruit
    Earth Oven
    Earthquake
    Easter
    Edible Weeds
    Eggs
    Emergency Prep
    Essential Oils
    Faith
    Family Home Evening
    Fertilizing
    Food Storage
    Fourth Of July
    Freezer
    Frosting
    Fudge
    Garden
    Gardening
    Gingerbread
    Gluten
    Gluten Free
    Gold
    Government
    Grains
    Gratitude
    Hat
    Herbs
    Home Remedies
    Home Repairs
    Homeschool
    Home Storage
    Honey
    Hope
    Inflation
    Leftovers
    Legumes
    Lemon
    Main Dishes
    Mixes
    Mothers
    Noah
    Non Artificial Colors
    Non-artificial Colors
    Nuts
    Oats
    Oil
    Orange
    Paint
    Peaches
    Pear
    Pie
    Pizza
    Plums
    Poem
    Popcorn
    Pork
    Potatoes
    Powdered Milk
    Prayer
    Preparedness
    Projects
    Prophecy
    Pruning
    Pumpkin
    Quick Bread
    Rhubarb
    Rice
    Salad
    Salt
    Sauces
    Self Reliance
    Self-reliance
    Sewing
    Shelf Life
    Shelves
    Sky
    Smoothie
    Snacks
    Soup
    Spices Or Seasonings
    Squash
    Strawberries
    Substitutions
    Sugar
    Summer Fun
    Three Month Supply
    Time
    Tomatoes
    Trees
    Truffles
    T-shirts
    Tuna
    Ultra Gel
    Valentine\'s Day
    Vegetables
    Water
    Watermelon
    Wheat
    Work
    Year Supply
    Zucchini

    RSS Feed

Web Hosting by iPage