The Provident Homemaker
  • Recipes and Info
    • Making Bread
  • My Blog
  • Favorite Resources
  • Documents and Files
  • 52 Weeks of Building Storage

Inflation!  Rush to the Store?

4/15/2022

0 Comments

 
Inflation has done some crazy things to food prices.  

What's a girl to do?

Don’t rush to the store!

That tends to make the problem worse, if you panic while others are panic-buying. Instead, be calm, watchful, resourceful, and grateful.

A couple of weeks ago, while chatting on the couch with a dear friend, she asked me, "With prices rising so quickly, are you beefing up your food storage?  

An online definition says "beefing up" means “To make markedly greater in measure or degree.”

Am I doing that?

No, not really. The way I store food is centered on stocking up on what we use when it is inexpensive. Buying or gleaning what most don’t want right then.

For example, look at what has happened with wheat. The retail price of a 50-pound bag jumped from $24.99 two years ago to $39.99 two weeks ago. (Oat groats -- the whole grain--- jumped even more, to $100 for a 50-pound bag.) Even so, every store in my area appeared to be completely sold out of wheat by the first weekend in April.  Now is NOT the time for me to replenish a wheat supply. What I have is just fine. And if it wasn’t, I’d use more of some other grain in my rotation.

I did buy one bag of all-purpose flour at Sam’s Club two or three months ago—but that was before war broke out between two of the world’s biggest suppliers of wheat.  I just knew that my flour quantity was a little lower than optimal, and the flour was a good price.
 
Good food storage habits not only allow you to buy at low prices, but to help moderate supply and demand. You HELP the supply chain! -by absorbing excess when there is too much of something—by purchasing then—and help the limited quantities go to more people when there’s more demand than supply.

In other words, good food storage purchases help even out the supply-and-demand cycle.

-They help reduce excess --by preserving it for later when supply is low-
-And reduce demand – by using reserves rather than purchasing.

Not only that, but doing this allows you eat at or near the lowest prices available within the food’s shelf life.
_____________
Now, if that friend had asked “have you added anything to your family storehouse lately?” the answer would be yes.  I’ve been doing what I always do.  Shopping for my family, keeping an eye out for anything that a store has too much of, that would be helpful to my family.

Want some examples?  My two biggest food storage additions since inflation and war have combined forces are dried bananas (click for details on that) and flour. Not the single bag of flour I mentioned before.  This was after prices went nuts. But remember that in 2020-21 it was hard to find flour?  Apparently the flour had been produced, but had been sitting in warehouses waiting for trucks, or people who could drive those trucks. The overstock grocery store I frequent had just received multiple pallets of 25-pound bags of flour that had barely hit the “best by” date (see here for why that's not bad). They wanted the flour out, quickly.  It was $2.99 for one bag, or $5.49 for two of them. 

Our family goes through about 25 pounds of wheat and/or flour per month. (That's six loaves of bread every 7 days; there are currently 8 of us here, with more on Sundays). In my dark, cool basement, flour can stay fresh for about 3-4 years.  I bought 8 bags, put the flour in buckets, labelled them, and rearranged the storage room a bit to get the oldest buckets in front, newest ones behind.  It's not 'markedly greater' than what I usually have.  The buckets they went in were already sitting empty, waiting for refill. Food storage is meant to be a cushion. There's plenty of flexibility in it.

And I'm feeling pretty grateful and amazed.  Blessings are all around. 

What have you found in your area?
Picture
0 Comments

Save the Squash!

9/20/2021

0 Comments

 
On the Studio5 morning show on September 7, I taught a short segment on things to do with your summer squash, including a better way to freeze it.  Here's a link to the Studio 5 video and the recipe that was shared-- 

Glazed Lemon Poppyseed Surprise Muffins
Makes 12-15

Muffins:
1 pound yellow summer squash (to make 2 cups puree)
Zest of one lemon*
¾ c. sugar
1 egg
¼ c. vegetable oil or melted butter
1 tsp. vanilla extract
1 tsp. almond extract
2 c. flour
½ tsp. salt
1 Tbsp. baking powder
1 Tbsp. poppy seeds

Glaze:
Juice of 1 lemon
Sugar

Preheat the oven to 375°. Lightly coat the inside of 12-15 muffin cups with cooking spray. Wash and trim the summer squash; cut into 1” chunks. Place in blender or food processor along with lemon zest, sugar, egg, oil or butter, and extracts. Puree until smooth. In a medium-sized bowl, combine flour, salt, baking powder, and poppy seeds. Stir until seeds are evenly distributed. Pour lemon-squash mixture over top; stir until just combined and there are no flour pockets left. Divide between muffin cups, and bake for about 20 minutes, until lightly browned and top springs back when lightly pressed.

While muffins are baking, make the glaze: measure your lemon juice, put it in a microwave-safe cup, mug, or small bowl, and add double that amount of sugar. For instance, if you have 3 Tbsp. juice, add 6 Tbsp. sugar. Stir. Heat in the microwave until it just comes to a boil, and stir again. Set aside to cool until the muffins are done.

When the muffins are baked and still hot, pour or brush the lemon glaze over top. Use it all up!

*If you don’t have a fresh lemon, instead of the fresh zest, use any of these instead: ½ tsp. lemon extract, 2 tsp. dried zest, or 12 drops food-grade lemon essential oil.
0 Comments

Week 49- Using Wheat: Making Bread (and rescuing it)

3/21/2020

0 Comments

 
Picture
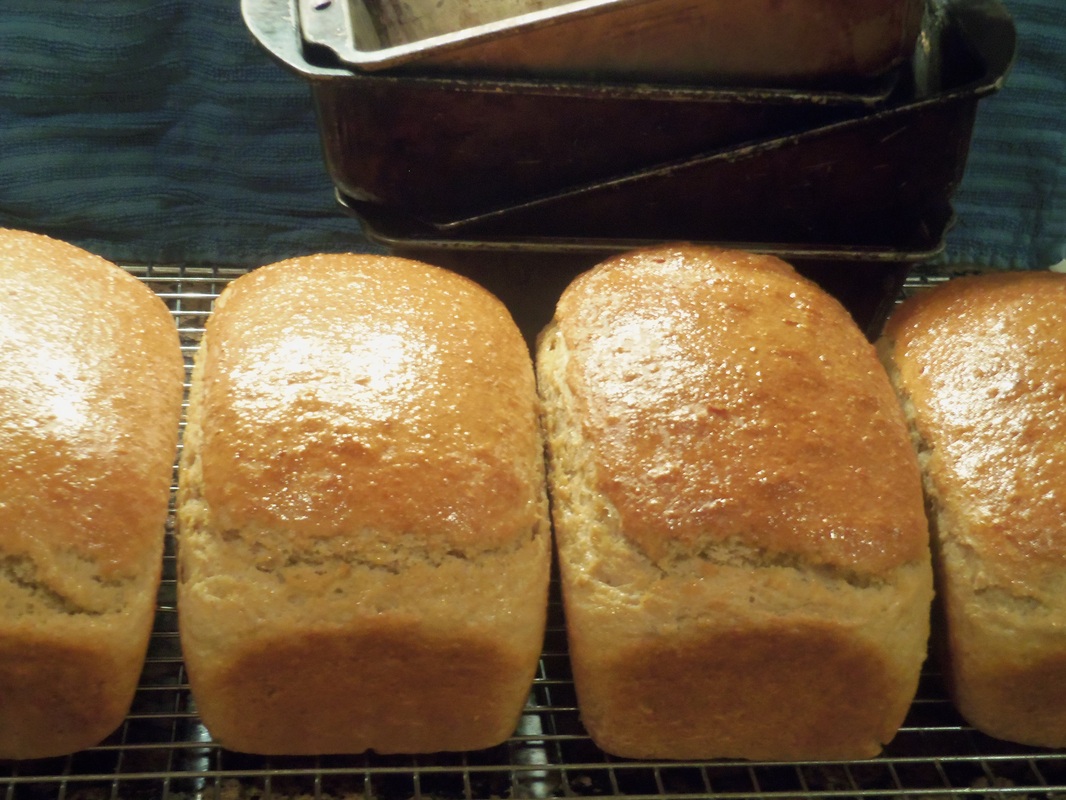
​If you’re storing up all the wheat, flour, and other grains recommended, you’ll need to have the ability to use it.  (You know-- "store what you eat, and eat what you store!") The most common way to do this is to grind the wheat into flour to make bread and other baked goods.

My mom taught all of us kids how to make bread when we were young. I still use her recipe today; it has good flavor, is immensely adaptable, and works well with quite a bit less yeast per loaf needed than many other recipes call for.  That recipe is found on my website under “Making Bread”. There are two amounts of ingredients- one for a two-loaf batch, and another for a six-loaf batch (the size that fills my oven-- because it's the same amount of dishes and time to make 6 as it is to make 1).

Wait until the bread is cool before slicing and bagging it. The exception is the loaf you eat while it's still hot!  But be patient for 10-20 minutes after it's out of the oven; it continues to cook during that time. It will mash if you slice before then.  Bread freezes exceptionally well, so I always put in the pantry only the bread we'll eat in the next three days, when fresh bread is at its best. The rest goes into the freezer; it will taste fresh-baked when you thaw it later. (The best way to thaw is in its bag at room temperature for a few hours. The next best way-- which we do more often-- is to put it in the microwave for 60 seconds. Be sure to remove any metal twist tie on the bag!)


This recipe works whether you’re making it in a big bowl with a strong wooden spoon, or if you have a stand mixer.  (Mom made me learn initially with the bowl and spoon, because, she said, “You won’t always have a mixer.”  That turned out to be true. I made my bread all through college with nothing but a bowl and wooden spoon.)  If you’re new to making bread, make your first few batches with all white flour.  It’s easier to make good white bread with than it is to make good whole wheat bread.

A new electric grain mill generally costs somewhere around $200. There are hand mills sold for much less money – around $80—but it’s a whole lot of work and time to get enough flour for a batch of bread with one of those. I like having one as emergency backup, but not for normal use. The electric mill can give you finer flour anyway. 

If you want to start using your wheat for bread and don’t have a mill, try this recipe: Really Good Whole Wheat Bread Without a Grain Mill. It's the bread version of Blender Pancakes; this kind of pancake recipe can also be found in the Wooden Spoon: Wheat section, and in the Bee Prepared Pantry Cookbook.
​
What if you don’t have yeast?  Use a sourdough start or “everlasting yeast” to leaven it.  (Maybe that should be the topic for next week’s post—What do you think?)

What if I ruin the batch of bread?

First of all, everyone makes a ‘bad’ batch every now and then.  See if you can figure what went wrong, and learn from it.  Meanwhile, here are some common problems and how to use the bread anyway.  Ruined doesn’t need to mean wasted.

BURNT BREAD- Scrape off the darkest parts, or cut it away in the thinnest slices you can manage. 

BREAD WON’T RISE- Make fried scones. If you’re unfamiliar with the term, they’re a kind of yeast-raised Indian fry bread or sopapillas. Here in Utah, we just call them ‘scones’. Heat a 1-2” deep layer of cooking oil to 350 degrees, pinch off golfball-sized pieces of dough and stretch or roll them about ¼” thick. Fry 3 or 4 at a time, turning them over after about a minute. Drain on paper towels and serve as the base for Navajo Tacos, or with butter and honey or jam.

BREAD IS UNDERCOOKED- if the bread is still hot, put it back in the oven for another five minutes.  Check again. Cook longer if needed.  If the bread was no longer hot when you discovered the problem, slice it a little thinner than you normally would, and toast it. Now it’s cooked. 

BREAD IS CRUMBLY. (Or stale)- This is a problem you see only after it has cooled; warm bread is almost always amazing and not crumbly. The solution next time is to get the gluten to develop better. (Unless the problem is the bread is several days old and dried out. These solutions still apply.)

• Make it into French toast, egg toast, or bread pudding. (Try Caramel Pumpkin Bread Pudding or Pineapple Coconut Bread Pudding!) 

• Use it for sandwiches with a creamy filling, like egg salad or chicken salad.

• Use it up sooner than usual and freeze everything that you won’t use within a day, rather than the regular 3-day window I usually keep it out for. 

• Cut it into ½” cubes, toss with a little oil and whatever seasonings you like, and toast them in a skillet or in the oven to make croutons.

• Make bread soup. This is an Italian specialty, and you can find lots of recipes.

• Make cream of tomato soup using bread in a surprising way to make it thick and creamy.

• Make a batch of bread crumbs- either toast them to dry them out, or if you want the fresh, soft bread crumbs, store any extras in an airtight container in the freezer. 
​___________________________


What other bread problems would you like a solution for?  Comment below, and I’ll do my best to answer.  If there's a way to mess up a batch, I've likely done it.  :) Experience is a good teacher.
0 Comments

Week 41- Walnut Meat(less)Loaf

1/25/2020

1 Comment

 
Picture
To help with building your year's supply (this is Week 15 of 26), see this chart. 

This month’s focus has been powdered milk, but I tried an unusual and economical recipe I’d like to share this week.  Next week I’ll show you how to make either cottage cheese or Queso Fresco. The process is the same until the final steps.

Last week I pulled out a small recipe collection from 1931. It was a supplement to the Millennial Star, and was titled, “Word of Wisdom Menus and Recipes”. (You can find in on pages 17-38  of this pdf, or here if you want to view on a phone without downloading.) 

There were some familiar-sounding recipes— Egg Toast. Lentil Soup. Cheese Toast. Macaroni and Cheese. Eggs Goldenrod.  There were others I’d never heard of, let alone tried-- Rice Renown. Tomato Surprise. Haricot Beans and Parsley Sauce. Scotch Stew. Ruby Salad (beet-onion-banana-parlsey, topped with lemon vinaigrette).  Walnut Roast.

It turns out that ‘haricot beans’ is an old name for regular white beans.
The walnut roast was something baked in a “buttered basin”. What was this food?  So I made it for dinner, to find out. I made the Scotch stew as well, since there were several vegetables in my fridge needing used.

The stew was a fairly straightforward vegetable soup. And the walnut loaf?  It was surprisingly good. My children all thought it was meatloaf and ate every last bit of it. I even told them what it really was, right off the bat. I didn’t think to take a photo of the finished loaf, but maybe I’ll remember to do it next time.

Here’s the modernized recipe, with measurements and pan sizes you’ll recognize.
Picture
Walnut Meat(less)Loaf
Makes about a 1-pound loaf.

1 Tbsp. butter
1 tsp. flour
1/3 c. dry bread crumbs or dry oatmeal
1 cup milk
½ c. walnuts
Half an onion, or one small onion
2 eggs
½ tsp. salt
 
Heat the oven to 350
°F. Melt the butter; add flour, crumbs, and milk.  Bring to a boil. (I microwaved it for about 1 ½ minutes.) It should be about the consistency of pudding. Set aside to cool.  Butter or spray a small loaf pan.* Meanwhile, mince the onion and chop the walnuts fairly small.  Beat the eggs well in the measuring cup you used for milk (why dirty an extra dish?), then mix in the walnuts, onion, salt, and any extra seasoning you like. (I added ½ tsp. oregano.) Pour the milk-crumbs mixture over the top, and stir well.  Scoop this into the buttered pan, and bake until set, about 40 minutes. 

*Mine was baked in an 8x4” loaf pan, but was only about 2” thick when done.  If you want more of a thicker loaf shape, bake this in a 6x3” loaf pan or any other 2-cup ovenproof baking dish. You could also bake this in 4-6 greased muffin cups, for individual servings of a meatless main dish.  
 
This meaty-tasting loaf was delicious plain, and will be making it again! It would be good with a little ketchup, barbecue sauce, or with a baked-on ketchup-brown sugar glaze, or with chili sauce. Next time I want to try it with a little bit of Liquid Smoke added. 


Another version of walnut roast, from 1915, uses more crumbs, less onion, one egg, and says the egg may be left out.  I haven't tried it that way yet.
Picture
This chili sauce recipe is from the same little 1931 recipe brochure. 
1 Comment

Week 40- Free Cookbooks for Using Food storage

1/19/2020

2 Comments

 
Picture
To help with building your year's supply (this is Week 14 of 26), see this chart. 
 
Do you have some food storage now, but need more recipes to use it? Check out these eleven FREE cookbooks, plus some extra resources like a book that teaches you how to can food, one on nutrition and one on REALLY frugal cooking and homemaking.
Picture
1. Bee Prepared Pantry Cookbook. 67 amazing pages.  

Picture
2. New Ideas for Cooking with Home Storage (also found here)--
​created to be used with the foods at the dry-pack canneries of the Church of Jesus Christ of Latter-day Saints.  You can no longer dry pack food there, but can still purchase products already packaged. 
 
​

Picture
3. A Guide to Food Storage for Emergencies—compiled by the USU Extension Office. 120 pages. 
 

Picture
4.The Wooden Spoon Cooking School collection- this was a pilot program by the Church of Jesus Christ of Latter-day Saints.  The same ladies who created the Bee Prepared Pantry Cookbook were commissioned to create the class materials, so this is basically an expanded version of Bee Prepared. There are individual sections on the following topics: 
Introduction (note that the ‘length of storage’ information is outdated, per BYU Food Studies)  
Intro- Commodities, Family Assessment, Family Plan, Skills & Equipment
Legumes
Oats, Honey, and Sugar
Wheat
Rice and Pasta
Powdered Milk
Seasonings
A Meal in a Bag- quick meals with everyday, three-month supply foods


Picture
5. All Is Safely Gathered In: Family Home Storage Basic Recipes—compiled by the Church of Jesus Christ of Latter-day Saints, and sent with food storage boxes/kits.  4 pages, 11 recipes. 

Picture
6. Shelf Stable Recipes-- family favorite pantry recipes submitted by readers of FoodStorageMadeEasy.net   
​58 pages.  Uses long-term storage foods as well as some shorter-term ones. 
​

Picture
7. Use it or Lose It— another “food storage cooking school,” compiled by the Utah State University Extension Office. 17 pages. About half of the pages have recipes, with a focus on wheat and dry milk powder; the rest is good information on how to obtain, store, and rotate your food.

Picture
8. Cooking with Dry Beans—compiled by the USU Extension Office. 13 pages.

Picture
9. Whole Kernel and Bulgur Wheat: Preparation and Usage—compiled by the USU Extension Office.  57 pages, so you know there’s a lot of variety. It doesn’t mention hard white wheat vs hard red wheat partly because white wheat had not quite hit the public scene in 1992. ​

Picture
Short term food storage rotation
​
10. 3x5 card/photo album cookbook—3x5-sized cards to cut out and fit inside a small photo album that holds 72 photos. ​

Picture
11. Crockpot Freezer Meals with Five Ingredients of Less, from TheFamilyFreezer.com.   25 main dish recipes to use your short-term (“regular food”) storage. Go to the main webpage, https://thefamilyfreezer.com/ for many more recipes. 


Other great resources:

Nutrition and Diet—includes charts on vitamins and their role in the body. Church of Jesus Christ of Latter-day Saints, 26 pages.

USDA Guide to Home Canning – a self-taught course in how to can. 
 
Frugal pioneer recipes- ten recipes, printed in the July 1972 Ensign magazine.

American Frugal Housewife, 1838. The twenty-second edition.(!)

“Dedicated to those who are not ashamed of economy” and “Economy is a poor man’s revenue; extravagance, a rich man’s ruin.”  The introduction begins, “The true economy of housekeeping is simply the art of gathering up all the fragments, so that nothing be lost.  I mean fragments of time, as well as materials…and whatever the size of a family, every member should be employed either in earning or saving money… The sooner children are taught to turn their faculties to some account, the better for them and for their parents.  In this country, we are apt to let children romp away their existence, till they get to be thirteen or fourteen.  This is not well. It is not well for the purses and patience of parents; and it has a still worse effect on the morals and habits of the children. Begin early is the great maxim for everything in education. A child of six years old can be made useful; and should be taught to consider every day lost in which some little thing has not been done to assist others.”
__________________________

If you like old cookbooks, this website has more than 75 of them, all waiting for you in digital format. 
 
Thanks to prepperssurvive.com for alerting me to the old cookbook digital collection!

2 Comments

Week 27- Beginning a Year's Supply, Recipe for Old-Fashioned Egg Toast

10/12/2019

0 Comments

 
We're on to the next phase of the 52 weeks of building your food storage!  The next 26 weeks we'll focus on getting and storing basic foods that last a long time.  These include wheat and other grains, beans and other legumes, powdered milk (if you're not allergic), cooking oils and other fats, salt, and sugar.  Click here for a list of how much of each you will be aiming for per person, and what foods work in each category. Did you know that you can store less when children at home are small?  It makes sense, right?  Quantities for them are listed on the link, too.
​
Your assignment this week-- Buy all the salt you'll need, according to that list.

​See how easy that was?
Picture
This is an inexpensive, filling, easy, pioneer-era recipe.  It makes a great breakfast, or a lighter late supper.   And it's much cheaper than eating cold cereal for breakfast-- especially if you make your own bread-- so you'll have some budget money left over for your other foods.

Poach an egg in a little milk. (See below for instructions.) Meanwhile, toast two or three slices of bread.  Put the egg into a cereal bowl (save the milk), and chop up the egg.  Tear one or two slices of the toast into 1/2 - 1" pieces and put on top of the egg.  Pour the hot milk over all.  Add a nice big dab of butter on top, sprinkle with salt and pepper.  Stir a little bit, serve with the last slice of toast.

Poaching is essentially hardboiling an egg, but doing this after taking it out of the shell.  Eggs can be poached in water, milk, broth, or soup. In this recipe, we use milk because it's part of the finished dish.

Poaching option one:  Microwave.  
Fill a mug 1/2 to 3/4 full with milk.  Crack an egg into it, poke the yolk so it breaks (so it won't explode during cooking).  Microwave just until the egg is firm.  Let it rest a couple minutes while you make the toast. 
When I used 1/2 c. milk and 1 large egg, it was done enough in 1 minute 20 seconds.  The times I tried cooking longer than that, the milk bubbled out of the mug and went all over.  The white was a little bit jelly-ish on the outside, but after sitting for a couple of minutes in the hot milk, everything firmed up, and the yolk was perfectly cooked.

Poaching option two: Stovetop.  
Pour 3/4-1 c. milk in a small saucepan and heat to a simmer over medium-high heat.  Once simmering, crack an egg and gently slide it into the milk by tipping the shell right next to the milk.  Cook until as firm as you like, about 2-4 minutes.
Picture
Picture
Picture
0 Comments

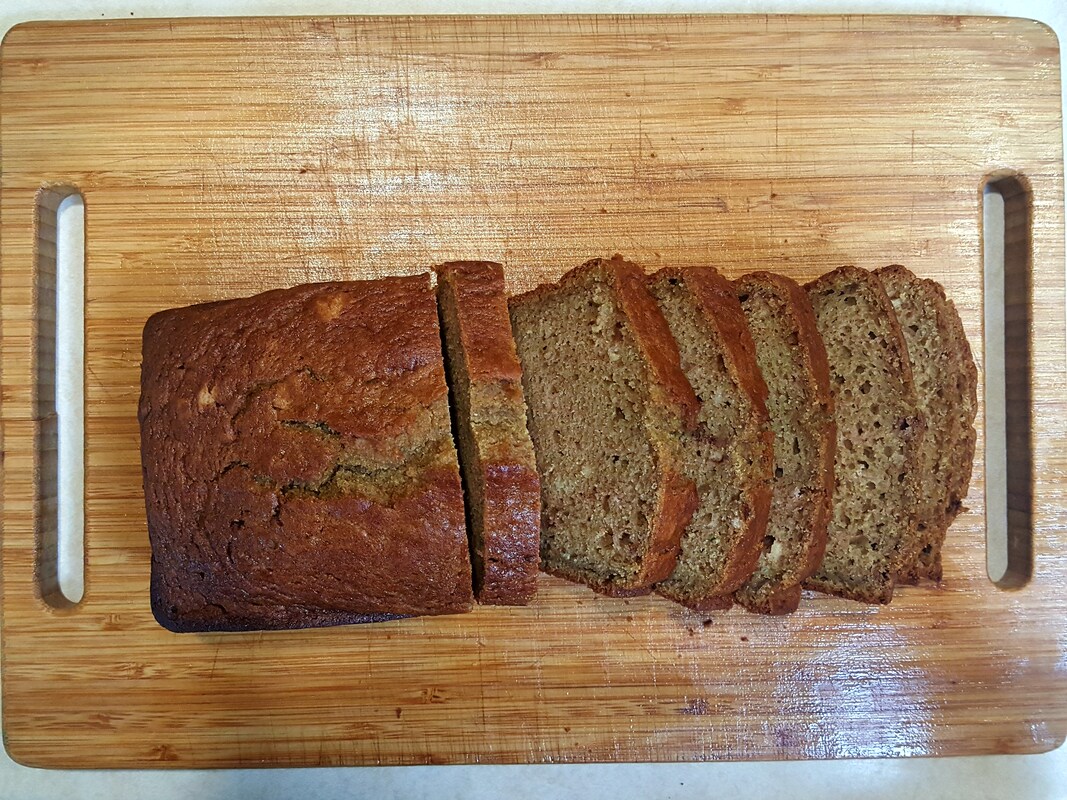
Week 17, 3-Way Zucchini Bread

8/3/2019

0 Comments

 
Picture
Your weekly assignment:  Buy for Three.

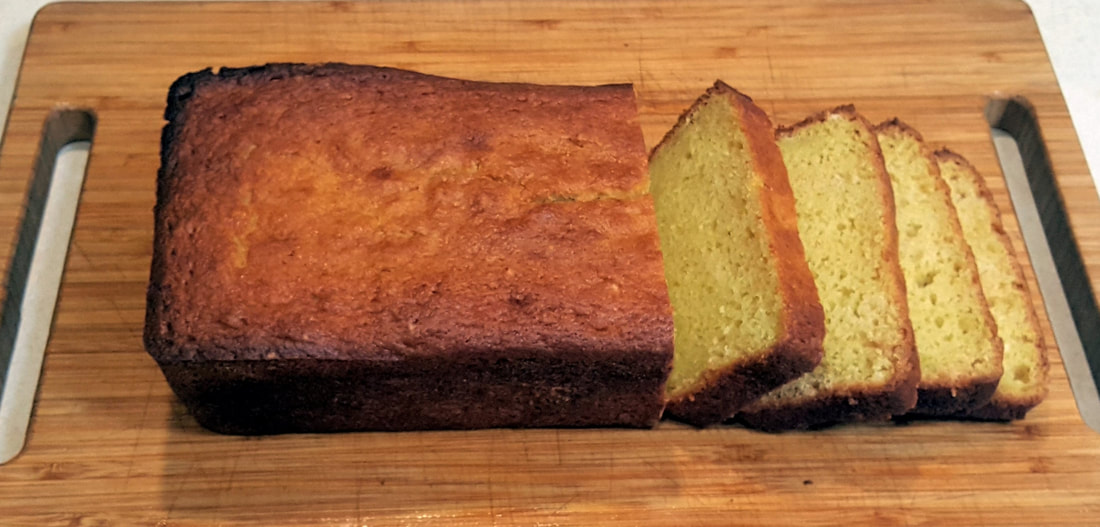
What are these three ways to make this bread?  The base recipe is a simple zucchini bread with nice cinnamon undertones.  The next variation is for chocolate zucchini bread, and the third is my family's favorite, lemon zucchini bread.  
You can make several more variations with this recipe, or even bake them as muffins. This recipe will make about 2 dozen regular-size muffins.

If you'd like a few more ways to use zucchini, check out this link for a shredded zucchini pizza crust, two ways to use zucchini in pie, and a delicious bisque--- a creamy soup-- with a touch of curry. My sister brought that last recipe home with her after living in Ukraine.

There's also a recipe for Zucchini Cakes (think crab cakes or potato pancakes, not chocolate), with an amazing Lime Chipotle sauce to make alongside.

Three-Way Zucchini Bread
3 eggs
¾ c. oil (or applesauce)
1 ½ c. sugar
4 c. packed shredded zucchini, or 3 cups pureed*
3 c. flour
1/2 tsp. baking soda
4 tsp. baking powder
1 Tbsp. cinnamon
1 Tbsp. vanilla
½-1 c. nuts, optional

½-1 c. chocolate chips or butterscotch chips, optional

Heat oven to 375 degrees.  Beat eggs until light and foamy; add oil, sugar, zucchini, and vanilla.  Add dry ingredients, including nuts if using them.  Mix well.  Pour into two greased 8x4 loaf pans.  Bake for about 50-60 minutes, or until a loaf tests done- a toothpick inserted near the center will come out with just a few crumbs, not all wet.  The bread’s top will spring back when lightly pressed with a finger, too.

 
*You'll need slightly over 1 1/2 pounds of zucchini.  Or substitute any other summer squash. I often use yellow crookneck squash. It's especially good in the lemon version, where it gives a beautiful lemony color.

Chocolate Zucchini Bread: Omit cinnamon, or reduce it to 1 tsp.  Add ½ c. unsweetened cocoa powder; reduce flour by ¼ c. Stir in ½ c. semisweet chocolate chips if you want.  Almonds are tasty in this bread.   Try it with peanut butter chips, or white chocolate chunks either mixed in or sprinkled on top before baking.
Picture
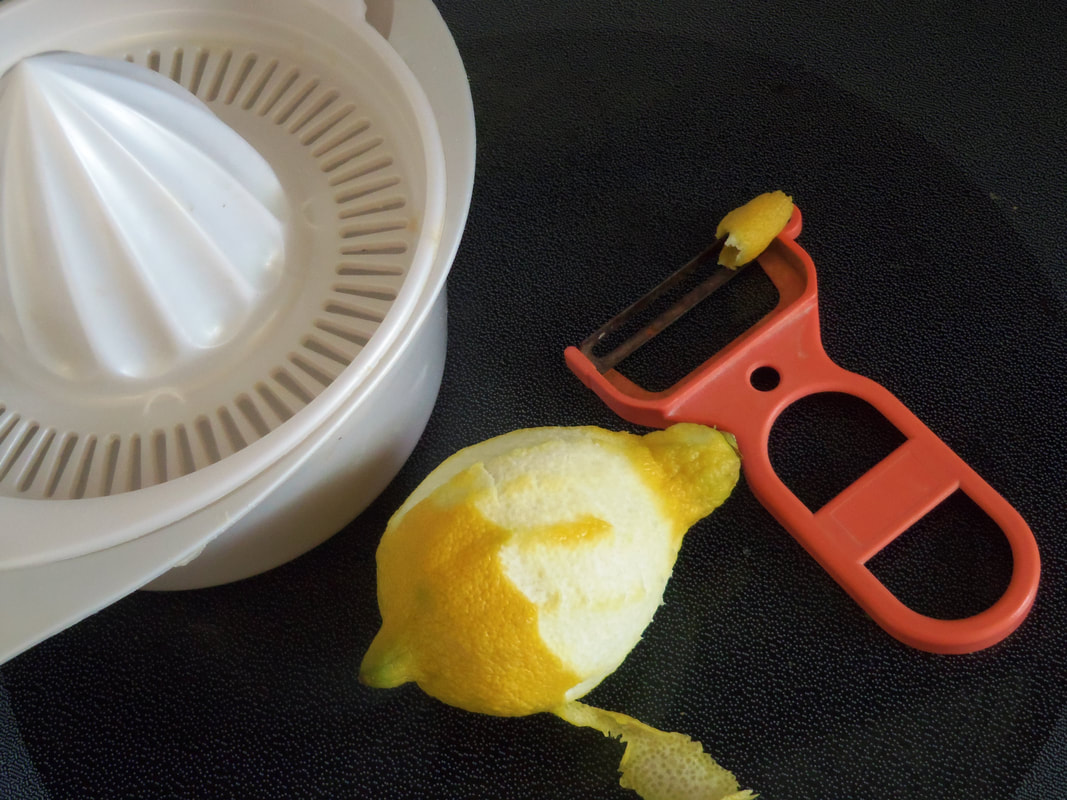
Lemon Zucchini Bread: Omit cinnamon.  Increase sugar to 2 cups.  Add ¼ c. lemon juice and the zest of one lemon, about 2 Tbsp. (If you don’t have a fresh lemon, instead of zest you can use any one of these: ½ tsp. lemon extract, 2 tsp. dried zest, or 12 drops food-grade lemon essential oil.)  This is really good with walnuts.  Orange juice and zest are a nice version, too. I prefer to remove the zest with a vegetable peeler.  Since I’m pureeing the zucchini anyway, I toss the lemon peel strips into the blender along with the zucchini, and the zest gets chopped up nice and fine.
Picture
0 Comments

Week 16, Anything-Goes Muffin recipe

7/27/2019

0 Comments

 
Picture
Your week 16 assignment:  Buy for Three.

Two houses, four wards, and almost ten years ago, a friend and I were on a quest to find two things--
the perfect pancake recipe,
and a perfectly adaptable muffin recipe. 

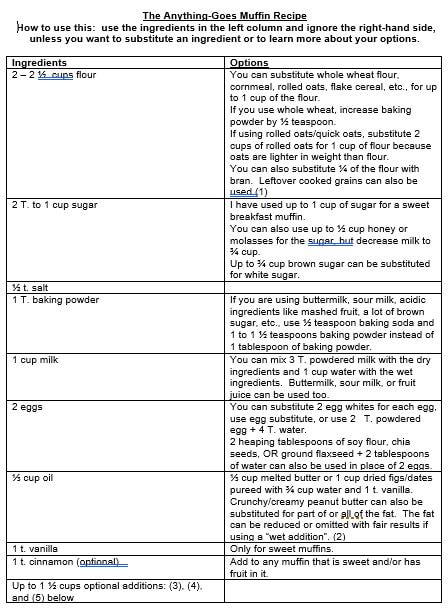
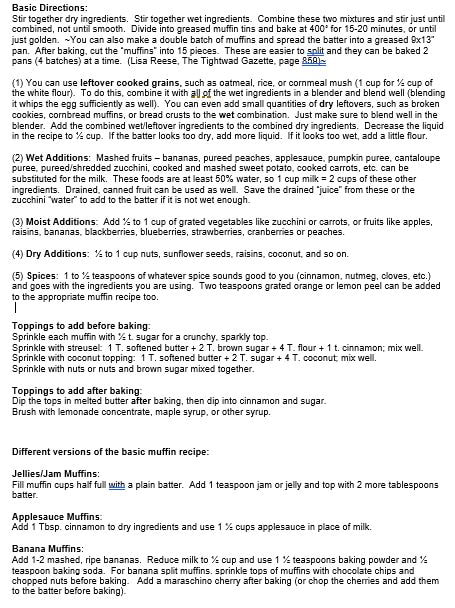
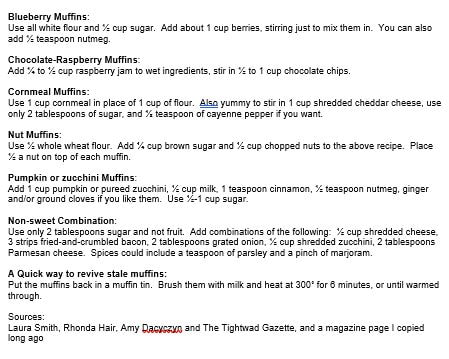
We measured, stirred, cooked, talked, shared and compared.  (I still think the ‘Foolproof Pancake’ recipe is tops.)  And after all that, Laura compiled what I learned about muffins with what she learned about muffins, and the “Anything Goes” Muffin recipe is the result. 

It’s a basic recipe that you can customize- whether sweet or savory, it will make good muffins.  Lemon-blueberry, bacon-cheese mufins, spiced applesauce muffins, oatmeal cinnamon muffins, chocolate raspberry or chocolate banana muffins, and much more.  Do you have a couple overripe bananas sitting on your counter?  This will help you use them up. How about a wrinkly apple that has gone mealy?  It will be delicious chopped or shredded into muffins.
After you've used this recipe-- or formula-- a few times, you'll get to where you don't even need the recipe to make any kind of muffin you can think of.

What will you make with this recipe? 

Or, what did you make?

Picture
Picture
Picture
0 Comments

Week 15- 61 Ways to Use Apricots

7/20/2019

0 Comments

 
Picture
Your weekly assignment:  B for 3   Only 6 weeks to go!

This year my area has a BUMPER CROP of apricots. All along my street I can see these trees drooping--sometimes clear to the ground—with their load of soft orange goodness.  But it can be a little overwhelming.  There are only so many you can eat plain, and it’s nice to have more ways to enjoy them during the time they’re everywhere.  Last week’s post had a link to the Utah State University Extension’s pdf that shared how to preserve them. But we need more.  😊

Don’t have apricots?  Drive around town and look for apricot trees that aren’t being picked. Chances are that the owner would be delighted to have you harvest them; it spares him from having to step on, drive over, or pick up fallen fruit.

1- Eat them fresh!  They’re at their best when picked ripe from the tree, warm and dripping with juice when bitten into.

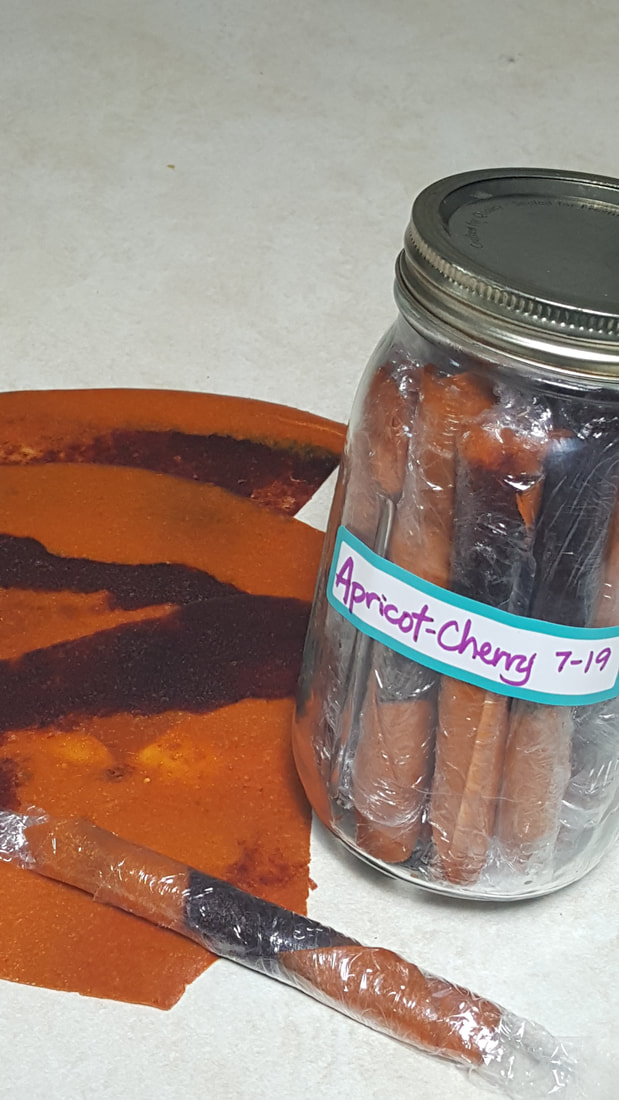
2- Fruit leather. Next to eating apricots fresh, this is my family’s favorite way to eat them. The photo above is apricot-cherry leather, using about half apricot puree, half cherry.

#3-8 Apricot nectar- puree fresh, pitted apricots with enough water to get them smooth, or puree canned apricots with their syrup.  Drink plain, over ice, with a few drops of vanilla or almond extra, with a drop of lemon oil, or a sprinkle of ginger or cinnamon.  Alternately, mix an equal portion of nectar with milk (try almond milk!), sparkling water, lemon-lime soda, or ginger ale. If you want an actual recipe so you can bottle it, see here.

9- Frozen. Halve them, remove the pit, and freeze in a single layer on a baking sheet. You can pretreat them with a little lemon juice, citric acid, or a syrup of lemon juice and honey. Once frozen, transfer them to freezer bags and return to the freezer.  

10- Grilled.  This recipe calls for brushing halved fresh apricots with honey and butter, grilling, then topping with a drizzle of honey and almond whipped cream.

Apricot jam. 

11- The recipe from Ball canning jars uses a package of liquid pectin.

12- Apricot jam using instant Clear Jel instead of pectin.  This recipe can be frozen or processed in a boiling water bath.   Don’t want to use pectin OR Clear Jel?  Use the Apricot Preserves recipe, below.

13- Apricot jam using dried apricots.  Chop 1 cup (6 ounces) of dried apricots, and combine in a saucepan with 1 c. water and 1 ½ c. sugar.  Bring to a boil; simmer a few minutes, mash, and continue simmering until it thickens.  This will thicken more as it cools.

14- Apricot-pineapple jam.  My mom made a version of this most years that we had apricots.  The pineapple lightens the flavor and adds a nice sweetness.  This recipe gives an option for adding maraschino cherries; I’ve never tried it that way but it sounds good.  It also calls for canned crushed pineapple in syrup; using pineapple canned in juice will work fine too.     If you have liquid pectin, use this version.

15- Apricot preserves. These tend to be more fruity than jam, and the apricots aren’t pureed first.  Honestly, there’s a lot of crossover between jam and preserves. This one requires no pectin- only sugar and lemon juice. (fast versions! With dried apricots, fresh ones)


Apricot butter – the thicker, more deeply flavored cousin to apricot jam.

16- This one starts with fresh apricots and apricot nectar.  See the note above on making your own apricot nectar.  

17- This apricot butter cuts the cooking time down by starting with dehydrated apricots.  If you don’t prefer the kick from crystallized ginger, feel free to leave it out for a little different version.

18- Apricot BUTTER.  Dairy butter with dropped dried apricots, lemon zest, and honey whipped into it. 

19- A smoother Apricot BUTTER, with dried apricots soaked and pureed before being beaten into soft dairy butter. 

20- Home-bottled apricots.

21- Dried apricots.  Apricots may be dried in the sun, the oven, or in a dehydrator.  Instructions for all three methods can be found here.  

22- In smoothies. Use a handful of fresh, pitted apricots. A dash of vanilla or almond extract makes it extra nice.

23- substitute fresh apricots for fresh or canned peaches in almost any recipe.

24- substitute dried snipped apricots for dried peaches in almost any recipe.

25- substitute fresh apricots for fresh or canned plums in almost any recipe.

26- substitute dried snipped apricots for pitted prunes in almost any recipe, sweet or savory.

27- Use pureed apricot (or any other fruit) as a replacement for half of the butter or oil in muffins, other quickbreads, or cookies. 

28- Purees can instead be used to replace some or all of the liquid in a recipe.  2 cups of puree will replace 1 cup of liquid.

29- Syrup for pancakes, crepes, sweetener for drinks, over ice cream, or on other desserts.  Juice the apricots using a steam juicer, (or use apricot nectar) mix with an equal part of sugar (1 c. juice to 1 c. sugar).  Bring to a boil to dissolve the sugar. Refrigerate, freeze, or place in jars and process in a boiling water bath.

30- Apricot sauce. Use over pancakes, in crepes, over ice cream, brushed over cakes, used as a filling in the center of cupcakes, and also on broiled salmon, chicken or pork, fresh or baked on to make a glaze.  At its simplest, combine equal parts apricot puree with sugar; bring to a boil to dissolve sugar.  For a thicker sauce, stir 1 Tbsp. cornstarch in to the sugar, for each cup of puree, before boiling.  For extra flavor, to each cup of sauce, add any of the following: ¼ tsp. almond extract, 1/8 tsp. cinnamon, ½ tsp. ground ginger or 1 1/2 tsp. grated fresh ginger (or puree it with the apricots to begin with), a sprinkle of ground cloves, a tablespoon of fresh lemon juice, zest of half a lemon.  Garnish with candied pecans or almonds, chopped candied ginger, a sprinkle of cinnamon, or lemon zest.

Apricot quickbread (baking powder-raised bread)

31- Apricot quickbread using pureed apricots. This recipe calls for canned ones, but you can use 1 pound of fresh apricots instead.  Pit them before pureeing. 

32- Apricot quickbread using dried apricots.  There are many variations of this online. Some add dried cranberries, others add semisweet chocolate chips, some have nuts- pecans and almonds both complement apricot.  

33- Apricot-Almond Muffins- stir ½ c. snipped dried apricots and ½ c. chopped almonds into a 12-muffin batch of muffin batter.  After baking, dunk tops in melted butter, sprinkle with cinnamon sugar and finely chopped almonds- or mix an almond glaze to spoon over the tops.  Almond glaze- stir together 1 Tbsp. milk or water, ½ tsp. almond extract, and about 1 cup of powdered sugar.  Add more water or powdered sugar as needed to make of drizzling consistency.
 
Apricot yeast bread

                34- My version, with orange, apricot, and pecans. I've got an awesome recipe somewhere for a seedy, dried fruit breakfast bread that includes apricots, and is served in wedges with cream cheese spread on top, but I'll have to look harder to find it.  Maybe it will get its own post.

                35- Bread machine version, with dried apricots, orange juice, and oats.

               36- Apricot Daisy Ring- a beautiful yeast bread in the shape of a daisy, with apricot preserves and a light almond glaze on top.  I love to bake it the day before and serve for breakfast.   The earliest version I’ve seen of this recipe came from a 1980’s Better Homes and Gardens “Breads” cookbook.
 
Cookies:

               37- Chewy apricot -almond oatmeal cookies, using dried apricots.  (includes tips on how to use dried fruit in general) 

               38- Jam-filled thumbprint cookies, using apricot jam or preserves, with or without chopped nuts.

Apricot bars.  There are different options, starting with either chopped dried apricots simmered in water, or using apricot preserves- but almost always on a shortbread-type bottom layer. 

               39- These Apricot-Oat bars from The Pioneer Woman use apricot preserves, brown sugar, and lots of nubbly oats.  

                40- This version also uses apricot preserves, but no oats,  Instead, it has coconut and walnuts.
 
Dinner

                41- Apricot-glazed moist Italian meatloaf. There are pureed apricots mixed into the meatloaf itself, too.  Again, the recipe calls for canned apricots; substitute a pound of fresh ones, pitted.  Reserve ½ c. of the puree to make the glaze.

               42- Apricot-glazed Pork Tenderloin, using apricot preserves, Dijon mustard, garlic, and thyme.

Apricot Chicken-

                43- One-pot, 5-ingredient Apricot Glazed Chicken, using bone-in chicken thighs, apricot preserves or jam, onion soup mix, and French dressing (homemade options are included). I’ve seen a variation on this where you use Russian dressing instead of French.
​
                44- Apricot chicken using boneless tenderloins, apricot jam, and dried apricots

                45- Apricot Glazed Chicken for One (or two).  Super simple, using one chicken breast, a tablespoon each of apricot preserves and French or Russian salad dressing, and a pinch of ginger.

                46- Apricot Chicken Stir Fry-- a kind of Sweet and Sour chicken—with boneless chicken breasts, apricot preserves, onion, bell peppers, pineapple chunks, garlic, ginger, and more. Cashews are an option. Serve over rice, couscous, or quinoa, or to the side of any of those, mashed potatoes, or cauliflower mash.

                47- Apricot Chicken using thighs or drumsticks, fresh apricots, ketchup, and apricot preserves.

                48- Slow Cooker Apricot Chicken- using bone-in thighs, dried apricots, lemon, onions, Dijon mustard, garlic, and thyme. 

               49- Moroccan Rice Pilaf, with Basmati rice, onion, dried apricots, dates, olive oil, chopped almonds, cumin, cinnamon, and other spices. It may sound odd, but it’s really good.  Sometimes I add a little diced smoked turkey. 


Apricots with goat cheese. This is a classic combination that can be done a few different ways. Don't have soft goat cheese?  Use cream cheese instead.

                50- Apricot-Goat Cheese Swirls- spread apricot leather with a layer of soft goat cheese.  Sprinkle with some chopped fresh basil, mint, or thyme if you have it. Roll up, wrap, chill for at least a couple hours, then slice.  Serve as a snack or hors d’oeuvres.

                51- Apricot-Goat Cheese Ball with dried apricots, rosemary and shallots


Apricot Parfaits

                52- Simple breakfast parfaits- pureed fresh halved apricots, poured over yogurt and sprinkled with granola. We’ve had these a couple times in the last two weeks.

                53- ‘Foodie’ Parfaits.  I don’t use alcohol, so would most likely use a little apple juice to replace the brandy.  And mascarpone is pricey, so softened cream cheese or Greek yogurt would stand in for it at my house.  And vanilla extract would be used instead of a scraped vanilla ban. But the fresh mint?  I’ve got a whole bunch of it growing happily on the ditchbank.

54- Apricot Cream Dessert. A fluffy, whipped-cream based concoction.

55-That last one is related to an apricot cheesecake my mom made often in the 70s; essentially, you replace the whipping cream with 16 ounces of EITHER cream cheese or cottage cheese, which gets pureed along with the apricots.  The whole thing is poured over a cookie crumb crust, graham cracker crust, or thin shortbread crust. (You bake the crust first, in a 9x13 pan.) Pour the filling over the top.  Sometimes she would spread pineapple topping (a 20-oz can crushed pineapple with juice, boiled with 2 Tbsp. cornstarch to thicken) over the whole thing once the apricot cheesecake was set.   Lower fat, lower sugar, and completely refreshing!

56- Apricot Cupcakes, using your choice of either apricot jam, or a filling you make with dried apricots, water, and sugar.

57- Apricot Cake, Aprikosenkuchen, a coffeecake. This cake fits in a 9” springform pan and uses two whole pounds of apricots.  It’s a delicious way to use apricot that are a little underripe, or mealy.  And it’s great when the fruit is fully ripe, too.    make your own apricot jam to brush as a glaze over the top: after pureeing half of the apricots, as directed in the recipe, set aside 1 Tbsp. of the puree.  While the cake is baking, mix this reserved puree with 1 Tbsp. sugar or honey, and bring to a boil in the microwave, about 45 seconds. Let it cool while the cake finishes baking, and brush it over top once the cake is out of the oven.
 
58- Apricot Nectarine Shortcake with Vanilla Whipped Cream

59- Browned Butter Almond Cake with Apricot Whipped Cream; the whipped cream uses apricot preserves. And anything with browned butter and almonds is going to be a winner.

60- Almond Apricot Tart.  It’s a beauty, with an almond shortbread crust, rich filling reminiscent of pecan pie without the pecans, topped with halved apricots.  It’s served with freshly whipped cream.

61- Apricot Salsa.  Why not? Mango salsa is one of my favorites, the Granny Smith apple salsa I tried was great...


Are there more recipes?  Yes; I didn’t even make it to my hard-copy old cookbooks (Chez Panisse Apricot Sherbet or Apricot Mousse, plus whatever is in the 1958 Betty Crocker book…) , nor the hand-written 3x5 cards in the recipe boxes. There’s still Apricot Cream Soup, Upside Down Apricot Cake, Apricot Cobbler and Apricot Crisp, Apricot-Cherry Pie… 
But this will give you a good start!
0 Comments

Week 12- Homemade Pizza Pockets

6/29/2019

0 Comments

 
Picture

Week 12 assignment-- Going off your  Inventory Shopping List and this week’s sales, buy the 3 months’ worth of as many different items as you can (= Buy For 3) as your new budget allows.    You'll do this through Week 21.

Have you ever made pizza from scratch?  It's delicious. To get directions on making pizza, go to the basic bread recipe, and scroll down until you see “Pizza”.  Directions are there, including for making enough of a super-simple red sauce for your pizza.  You'll want the sauce for pizza pockets, too.

Pizza pockets are fun, portable, completely customizable, AND they freeze well.  You can make them to suit food allergies; nondairy cheese can be used in these if you like. This recipe can be doubled, tripled, quadrupled  make whatever quantity you want to make for dinner plus extras for packable lunches. 

To make 8 regular pizza pockets or 6 large ones, you'll need:

-One loaf’s worth of bread dough

-8 oz. shredded cheese

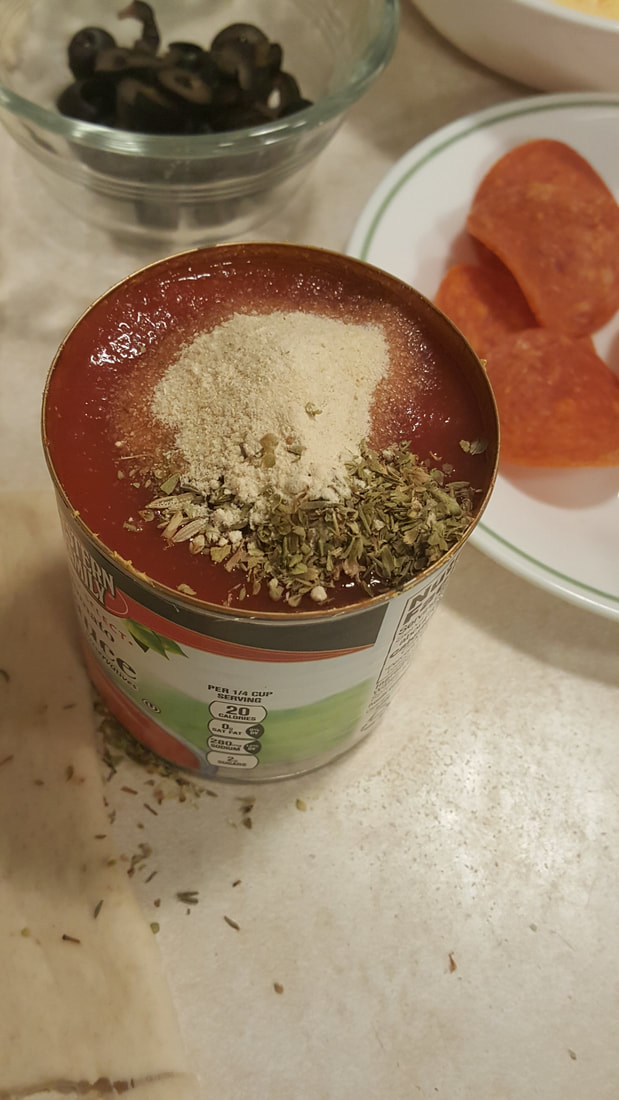
-One 8-oz. can of tomato sauce (you'll only use half)

-Dried or fresh herbs- oregano, basil, thyme, garlic powder, onion powder, ground black pepper, rosemary, fennel (use whatever you have and like.  I often use only oregano, garlic and onion powder)

-Toppings-- crumbled bacon, pepperoni, cooked sausage, leftover chopped cooked chicken or hamburger, mushrooms, zucchini (shredded and squeezed dry), chopped bell peppers, spinach leaves, diced tomato, olives… Plan on ¼- ½ c. of each topping, for each 8 pockets you make.
 
Roll dough out as you would for pizza crust, a rectangle about 8x15”.  While the dough relaxes after rolling, pull out your sauce, cheese, and other toppings.  Oil a 12x18" baking sheet, sprinkle with cornmeal for extra crunch, OR line with parchment. After your toppings are ready, roll the dough larger, to make it measure about 13x19". 

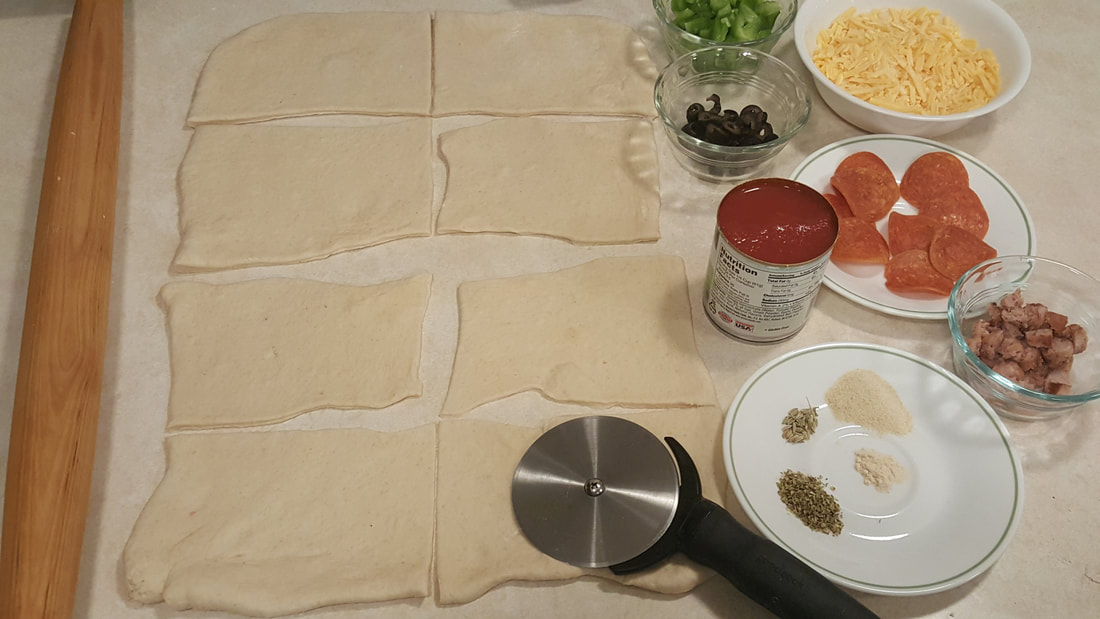
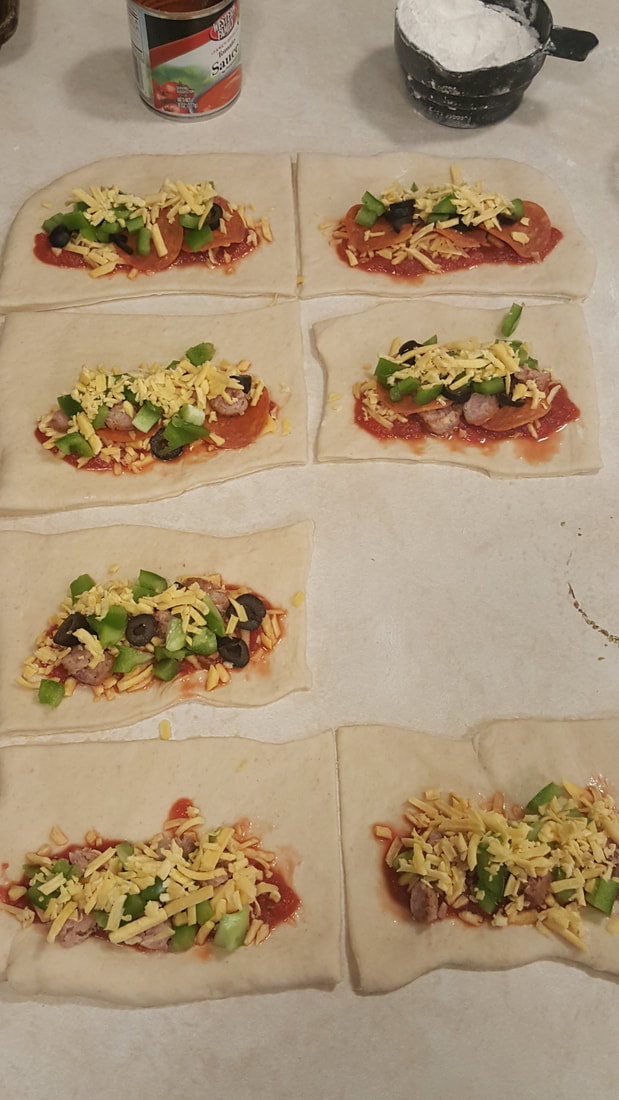
With a pizza cutter or knife, cut the rolled dough down the center the long way, then in fourths the other direction. (See photo, below.) This will give you eight rectangles, each about 4x6”.

Picture
Picture
Spread pizza sauce on one long side of each rectangle, leaving a 1” clean border around those edges. Sprinkle with any toppings and about 2 Tbsp. of cheese. Brush the edges of the bare half with water; this will help the pockets seal better around the edges after crimping.

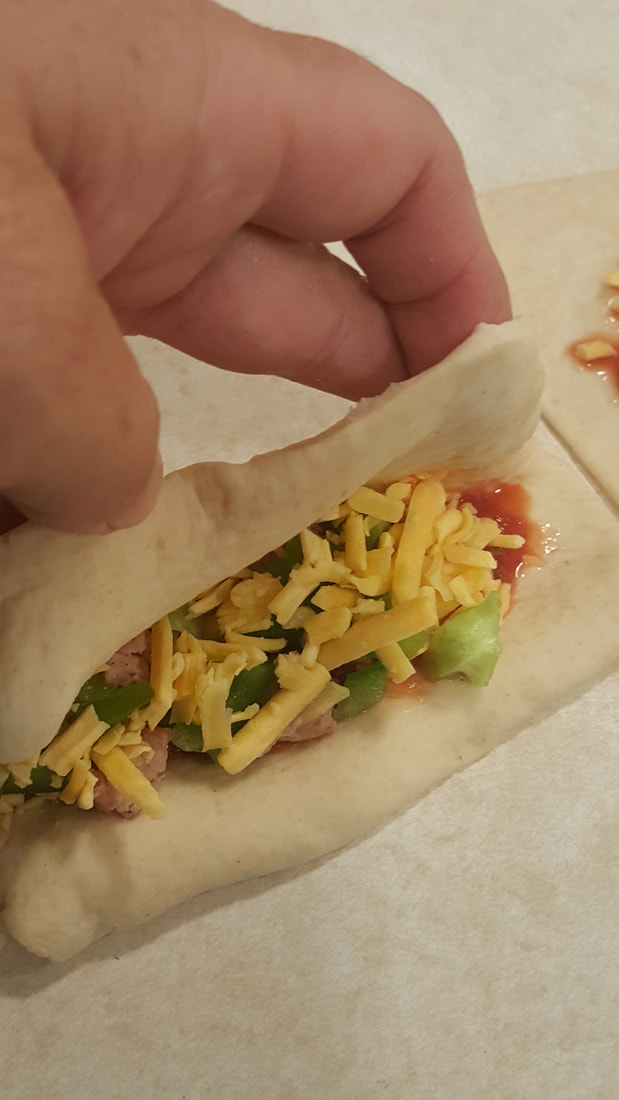
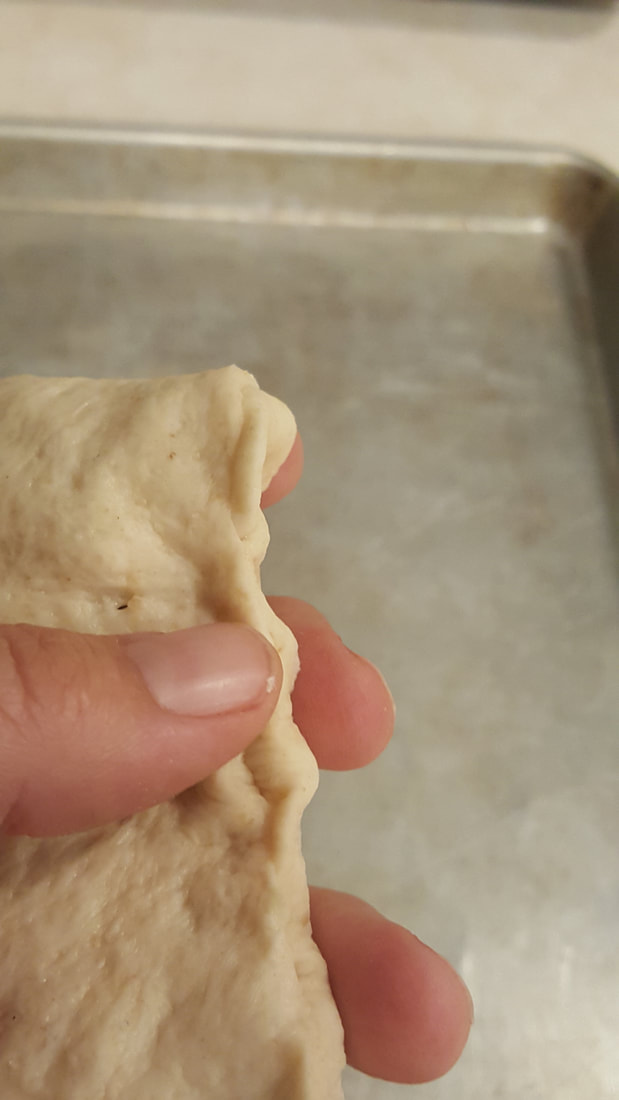
Fold each pocket in half the long way, lining up edges.  Crimp (pinch) the edges with your fingers or by flattening with the tines of a fork.  Set on the oiled baking sheet. Cover with a kitchen towel and let rise for 15 minutes. While they rise, preheat the oven to 400° F.  Remove the kitchen towel. 

For shiny rolls, brush with beaten egg (whites, yolks, or both) before baking, or brush with milk or butter for better browning. Bake about 20 minutes, or until browned on the bottom. Remove to a cooling rack.  Let cool at least 10 minutes before eating; they continue baking internally in those first several minutes. 


Refrigerate or freeze any that you didn't eat right away.

If you’re going to freeze them, first cool them completely.  Freeze them on a baking sheet, and then transfer to a ziptop freezer bag, labeled and dated.

Picture
Picture
Picture
Picture
Picture
0 Comments

Week 9 - Make Your Own Frozen Bread Dough

6/8/2019

0 Comments

 
Have you ever used frozen bread dough- whether rolls or loaves?  Did you know you can make your own? Fleishman Yeast company came up with the first make-at-home frozen dough recipe.  The earliest version I've found is from a booklet they published in 1987. In cooking terms, that's pretty new! 

It's simple; make as much as you want to have on hand.  The same batch can be shaped into loaves or rolls-- even into oven-rise pizza crusts, cinnamon rolls, caramel nut rolls, pizza pockets, breadsticks, and more.  There are lots of ways to use it; see some of them here.
​

Freezer White Bread Dough

Makes 4 loaves (8"x4"),
OR 5 dozen "Texas size" (2-ounce) rolls,
OR about 7 dozen regular (1.3 oz) dinner rolls. 
Or any combination you like.


INGREDIENTS
12 1/2 to 13 1/2 cups flour 
1/2 cup sugar
2 tablespoons salt
2/3 cup dry milk (optional)
4 packages active dry yeast*  
1/4 cup butter, softened, or olive oil
4 cups warm water (120 to 130°F)

In a large bowl thoroughly mix 4 cups flour, sugar, salt, dry milk, and active dry yeast. Add butter or oil. Add the warm water to dry ingredients and beat for two minutes at medium speed of electric mixer, scraping bowl occasionally. Add 1 1/2 cups flour. Beat at high speed two minutes, scraping bowl occasionally. The dough will start to become stretchy. Stir in enough additional flour to make a stiff dough, for a total of 12 1/2 to 13 1/2 cups of flour. (This can vary because of the humidity level in the air, how you measured your flour, and how accurately you measured the water.) Sprinkle flour onto a clean surface (countertop or table), dump the dough on top, and knead until smooth and elastic. This will take about 10-15 minutes. Cover with a towel so it doesn't dry out; let rest 15 minutes.

For loaves, divide dough into 4 equal pieces. Form each into a smooth loaf about 7-8" long.  Place on greased baking sheets. Cover with plastic wrap. Freeze until firm. Transfer to plastic bags, or wrap in plastic wrap and then in foil. Try to use within 2-3 months. The dough won't 'go bad', but will get freezer burned if not wrapped well, and the yeast may weaken, with the bread not rising as high.  My worst experience was with dough that was about a year and a half old. It simply didn't rise much at all. Dough that won't rise is still great for making into fried scones!

To bake the loaves- remove from freezer and rub oil all over the loaf. (This keeps it from drying out as it thaws and rises.)  Place in greased 8 1/2-inch by 4 1/2-inch loaf pans. Let rise in warm place, free from draft, until doubled in size, about 4-6 hours.

Bake at 350°F about 35 minutes, or until done. (Sides of loaves will have browned.) Remove from pans and let cool on wire racks. 

To freeze in dinner roll sized pieces (these will thaw much more quickly), divide the batch into 4 equal pieces.  For "Texas" rolls, divide each piece into four more equal pieces.  Divide each of these into four equal pieces.  (Each original fourth becomes 16 this way.)  Smooth each one and place on a greased baking sheet. Cover with plastic wrap and freeze. Transfer to freezer storage bags.

To make regular rolls,  divide the batch into 4 equal pieces.  Divide each into four more equal pieces.  Divide these smaller ones into 5 equal pieces, giving you 20 from each original fourth.  Smooth each one, place on a greased baking sheet, cover with plastic wrap and freeze. Transfer to freezer storage bags.

To bake, pull from freezer, place on greased baking sheet, cover, and let rise in a warm place until doubled, about 2 hours.  Bake at 350
°F about 15-20 minutes, or until lightly brown on bottoms.


For more freezer-dough baking tips, see here.

*Instead of using packets, the equivalent amount of active dry yeast is 3 Tbsp.+ 1 tsp. active dry yeast.  To use instant yeast instead, use 3 packets or 2 1/2 Tbsp. 

The photo below is the 1987 book the original recipe came from.  (I modified it some.)


Picture
0 Comments

Really good whole wheat bread without a grain mill

1/29/2014

2 Comments

 
Picture
Do you have wheat stored, but haven't been able or willing to spend $250 on a grain mill?  Have you wondered if there's a way to make bread with it anyhow?  THERE IS!   This bread is moist, tender, with a good crumb and impressive natural gluten strength.   The overnight soak is the magic trick here:  as the mash sits, enzymes break down proteins and allow gluten to begin forming  on its own, enzymes break down starches into sugars for flavor and to feed the yeast you add the next day, and the soaking lets the little hard bits of wheat soften up, leaving no trace of grittiness or graininess. You will not need to add dough enhancer, Vitamin C, vinegar, vital wheat gluten, or any thing else to get great structure!

If you use the 2 1/2 c of wheat kernels, the bread ends up about 60% whole wheat;  if you use a high-speed blender (like BlendTec or Vitamix) , you can use 3 cups and end up with bread that is about 75% whole wheat.


Blender Wheat Bread
Soaker mash:
2 1/3 cups (17 oz) wheat kernels OR 3 cups (22oz), if using a high-speed blender
2 1/2  cups water

Combine in blender; mix on high speed for two minutes.  If it seems too hard on your motor, add 2 Tbsp. water.  Let the mash soak, covered and at room temperature, 8 hours or overnight.   After soaking, add:

2- 2 ½ cups all-purpose flour (10-12 oz) OR use 1-1 ½ cups instead (5-7 oz) if you used 3            cups wheat in the puree
2 tsp. salt
2 Tbsp. oil
3 Tbsp. honey
1 ½ Tbsp. yeast (or 2 envelopes)
¼ c. hottest tap water (no more than 130°F) 


Knead for five minutes, dough should be just thick enough to clean the bowl's sides.  Add flour if needed, but the dough should be tacky and very soft.  It’s had enough kneading  when it passes the windowpane test. (See slide show.)  Cover and let rest 20 minutes.  Coat two 8x4 loaf pans with nonstick cooking spray.

Pour ½ cup water on the oven floor (avoid the heating elements!) or in a small metal pan on lowest rack.  Turn the oven on 350°F for ONLY ONE MINUTE to warm it, then turn heat off. 

Divide dough in half.  With wet hands, shape each loaf and place in a pan.  Place pans in the warmed oven.  When the top of the loaf has risen about ½” above the edge of the pan (around 30-40 minutes later), remove from oven and preheat the oven to 400°F.  When oven is hot and dough has risen to about ¾” above the rim, bake loaves for 20-25 minutes, until the sides are browned. Remove from pans; cool on a rack at least 20 minutes before slicing.

   If using a high -speed blender, use 3 cups of wheat kernels in the mash. When adding flour the next day, use 1 1/2 cups flour instead of the 2 1/2 cups. 

FAQ’s:

How long can a soaker sit?  It’s best right around 8-12 hours, up to 24 hrs.  If you need to have it go longer, refrigerate it from the beginning to slow down enzyme activity.

How high does the ideal proof go? (3/4”)  Does the poke test work? Yes if you use a wet finger or let it rise uncovered.

How smooth can I get the puree in a blender, and does it matter much? It will be a little lumpy. It doesn’t need to be super smooth with this method; soaking eliminates any hard bits.

How long does it take to rise without a warm oven? Depends on your kitchen temperature, but around 1 hour.

Is the 20 minute autolyze necessary for flavor or texture? It’s OK without it, but rises better and tastes a little nicer (sweeter) with it.

How long does it really take to bake at 400°​? This depends on whether your loaves are identical in size, where any hot spots are in your oven, and how accurate its thermometer is.    My evenly-sized loaves took 21 min.
2 Comments

Lemon-Summer-Squash Bread

8/1/2013

0 Comments

 
Picture
Everyone knows you can make bread with zucchini- but what if you have a giant yellow summer squash hiding in the garden?

Both zucchini and yellow squash-- either straightneck or crookneck-- are summer squash, with a similar flavor and texture, and CAN be interchanged in recipes.

My family's favorite quickbread is Lemon Zucchini Bread- so today we got Lemon-SummerSquash Bread.  I no longer shred zucchini -or this squash- for recipes, but puree it instead.  No more strings.  As a bonus, if I'm freezing some for later use, the texture does not change when thawed, unlike shredded squash.  

AND, if you're pureeing it, you can have the blender (or food processor) mix all the wet ingredients for you.

This bread is great for breakfast.

The recipe is found over here, though the blender method is below. 
0 Comments

When only one of you can't have wheat

3/2/2013

2 Comments

 
Picture
Surely many of you are in the same boat.

Out of the eight of us in the house, we've learned that one child can't have wheat.  She's so sensitive that eating one 1/4" piece of bread caused her arms to turn hot pink and start to weep.  But the rest of us are fine.  We're still in the process of determining if she reacts to gluten, or to just the wheat itself, so for now everything must be wheat-free AND gluten-free.  And dairy-free, while we're figuring out if that's an issue too.  For some strange reason, I prefer to cook only one meal, per meal.  And special 'gluten-free' foods are pricey.  Really pricey.  So I'll let you know how I've adapted.  Hopefully it'll help you or someone else having to adapt to whatever allergy or special needs diet strikes just one or two in your family.  


Eight Tips for feeling (more) normal when someone has special dietary needs

1- Plan on preparing most of your family's foods.  
Unless you have nothing against quadrupling your family's food budget.  Not kidding.   If you didn't cook much before, brush up on the basics.  They'll do for now.  And for a while.

2- Eat naturally wheat-free foods
Keep a list around so you can focus on what CAN be eaten rather than all the CAN'Ts.  It's empowering and encouraging.  While you're still getting used to what's okay and not, go through your kitchen and pantry, and write down everything that is GF already, including all plain spices and herbs (blends might not be; check), canned/fresh/frozen fruits and vegetables, rice, plain beans, flax, buckwheat, meat in its natural state, eggs, peanut butter, olives, potato chips, popcorn, jam, ketchup...  See a bigger list here, halfway down the page.  There's a GF year-supply list here.  You know, I've been telling myself for years that we oughta eat more rice and beans.  They're cheap, store well, and are filling. 
Those have suddenly become more popular at my house.

3- Make a list of 10-15 meals your family likes that are gluten/wheat-free and can be made using what you typically have on hand.  Include both super-quick meals and more involved ones.  Be willing to spend about an hour doing this; it'll save you much more time than that in the long run.  Get input from your kids.  Tape the list someplace handy like the inside of your cooking supplies cupboard.  No more panic or feeling helpless at a change of dinner plans!

4- When you cook some specialty gluten-free food, go ahead and make a big batch.  Then freeze the rest in individual serving sizes.  For my 10-year-old, the ziptop "snack size" baggies are the perfect size.  There's a gallon-sized ziptop bag labeled for her in the freezer. What's in it changes often.  Right now it has GF waffles and breadsticks, spaghetti (made with specialty GF pasta) and sauce, seasoned rice, dairy-free homemade ice cream (made in my blender), and GF chocolate chip cookies.  Remember treats. They've saved my daughter from feeling deprived with all these new "don't"s.  Whenever my husband pulls out the ice cream, she pulls out her freezer bag and gets something sweet too.  I also keep one loaf of GF bread in the freezer, for sandwiches and toast.  She pulls out a couple slices whenever needed.

5- Keep a small plastic bin full of GF baking supplies, like the photo above. It's handy for all kinds of things. My 'essentials' include a bag of GF flour mix (homemade or storebought), xantham gum, some white flour like rice, tapioca, or potato starch, and a whole-grain GF flour like brown rice, lentil, oat, or sorghum.  Mine also has a bag of dairy-free chocolate chips in it, good for a lot more than just cookies.  I've found flours like tapioca, potato starch, and rice flour at the Asian market for a fraction of the price.

6- Try a new GF recipe at least once a week.  And maybe only once a week, depending on how overwhelming it is to you.  Have that other family member cook with you, so she'll learn to cook for herself later.  If you love bread, stick with the quickbreads for a while.  They're much simpler.  I think the easiest way to learn, other than just trying a new GF mix each week, is to buy a copy of of Living Without magazine.  Or sign up for their free weekly newsletter, which includes a recipe.   I love the magazine format because you can learn in 5-minute increments.

7- Remember to watch out for cross-contamination
I think this is actually the hardest one.  You might want to have TWO jars of mayonnaise and jam open, one of each labeled as GF.  Otherwise it's really easy for bread crumbs from one person to end up in the jar, where they'll cause the allergic person grief.  Remember that toasters carry crumbs.  Wipe the counters really well.  Consider having a second set of measuring cups, possibly mixing bowls and cooling racks too, depending on severity of reaction.  If you have a regular wheat grinder you can grind your own GF flours, using things like rice, beans, oats, lentils, quinoa, etc, BUT only use a mill that has not been used for wheat.  Unless you want to invite problems.  Some things can be ground in a blender, like oats, if those are OK for your family member.

And,
8- Read labels.  Always.  Always.
Learn which ingredients have hidden gluten.  You'll be surprised at what you find.  Sometimes good surprises.  Sometimes lame ones.  Realize too that sometimes companies change their ingredients, and something that didn't have gluten/wheat in it before, might the next time you buy it.  Knowing exactly what you're eating is a good idea anyway.


You can do this!  :D

Love, Rhonda
2 Comments

Orange-Apricot-Pecan Yeast Bread

2/16/2013

0 Comments

 
Picture
Start with regular bread dough- and turn it into a treat!

I love the flavor combination here- the bright flavor of candied orange peel, the sweet-tartness of snipped dried apricots, and the hearty depth from pecans. This bread is at its best after a day so the orange has a chance to permeate the whole loafwhen toasted: great with butter, but heavenly with cream cheese.  Yum.  I like it for breakfast.

This batch was made using 100% whole wheat dough, but use whatever you're making anyway.

Mix up a batch of dough (like this one).  Set aside one loaf's worth of dough.  Stretch or roll it to about 8x16 inches.  Sprinkle evenly with 1/3 cup diced candied orange peel, 1/3 cup (2 oz) dried apricots, snipped, and 1/3 c. pecan pieces.  Roll up starting with the narrow end.  Place in a greased 8x4 loaf pan, seam side down.  Let rise and bake as usual, adding 1-2 extra minutes to the baking time.  Cool and slice.


0 Comments

Pizza and Pina Colada Smoothie

12/5/2012

0 Comments

 
Picture
Between helping a sick 7-year-old catch up on homework, driving the carpool today, running kids to appointments, and half of them needing to be at their church youth activities an hour later, I needed an easy and quick dinner tonight.  I had a batch of bread dough rising, so I heated the oven to 450 F, took a loaf's worth of dough, rolled it out to fit a greased cookie sheet, and baked it for ten minutes.  While it cooked, I pulled out shredded cheese, opened a can of olives and one of pineapple, and stirred together some red sauce: 1/3 c. tomato powder, 2/3 c. hot water, and 1/4 tsp. salt (or use one 8-oz can of tomato sauce), then spices to taste: a few good shakes of oregano, basil, black pepper, onion powder, a pinch of fennel... whatever you have and smells good with it. 
Spread the sauce on the hot pizza crust, sprinkle on the toppings, then put under the broiler for two minutes, until bubbling.  If you want a few more mixing/cooking details, see this other post.

Since I'd only used part of the can of pineapple and also had some coconut milk in the fridge, I made Pina Colada:   

1 (20 oz.) can of pineapple (or almost a can, in this case)
1/2 cup coconut milk (or use 2-3 Tbsp. shredded coconut and 1/3 c. water)
Half a tray of ice cubes or one handful
1 Tbsp. mild molasses
1 drop lime essential oil or 1/4 tsp. lime zest (optional but adds just the right touch)

Combine in a blender; turn on high until smooth.  Add a little sugar or honey if it's not sweet enough.

I didn't use any more sugar; the lime boosted the flavor enough that the drink didn't really need anything else.

To the pizza and drink, add a salad or other vegetable, and there's supper!

0 Comments

Caramel Pumpkin Bread Pudding

11/9/2012

0 Comments

 
Picture
About six years ago I discovered my boys had a vocabulary problem.  They were using one word to describe everything that tasted good: 'heavenly'.
This bothered me for two reasons-  one, I'm sure heaven is much better than the best food, and two, they weren't expanding their vocabulary.  This was a perfect time.  So we pulled out a thesaurus and looked up 'delicious' to come up with a new word to use.  'Toothsome' had them rolling on the floor laughing, so that became the new favorite.  
I've discouraged them using 'heavenly' very often- but I'll tell you, that was the first word that popped into my head (I didn't say it!) when the first spoonful of moist, custardy, caramel-y, pumpkin dessert hit my tastebuds.  

My apologies to Heaven.
  

This is a modified version of Caramel Bread Pudding.  (The link has other ways of using up stale bread, too.)  The spices in this play a supporting role to the pumpkin flavor: just enough there to help you notice the pumpkin, not the spice.  If you want to taste the cinnamon, double or triple the amount here.

Caramel Pumpkin Bread Pudding- fills a 9x13 pan

15 slices good-quality white bread, cut into 1” pieces (about 16 cups or 20-24 ounces)- baked until crisp (about 10 minutes at 450 degrees)
1 ½ sticks butter
2 cups light brown sugar
1 cup heavy cream or evaporated milk
¼ c. honey or corn syrup  
5 tsp. vanilla, divided
2 1/2 c. half-and-half, or use the last ½ cup evaporated milk from your can (above); use whole milk for the remaining 2 cups here.   
5 large eggs
1 c. pumpkin puree
1/2 tsp. cinnamon  OR 2 tiny drops cinnamon essential oil
1/4 tsp. ground cloves OR 1 tiny drop clove essential oil
1/2 c. toasted nuts, optional

Melt butter and sugar together in a saucepan on medium-high heat.  Stir about 4 minutes, or until bubbly and golden.  Remove from heat and stir in cream or evaporated milk, corn syrup, and 2 tsp. vanilla.  Pour one cup of this caramel into a greased 9x13 pan.  

Set aside one more cup of caramel, to use as topping later.  

To the remaining caramel, add the half-and-half (or mixture of evaporated milk and whole milk).  Beat the eggs together, then whisk in pumpkin, cinnamon, and cloves.  Whisk in the half-and-half mixture.  Add remaining vanilla.  Fold in the bread, and let sit until soaked through, about 20 minutes. Meanwhile, heat oven to 350 degrees. Put bread mixture into the 9x13 pan, bake about 40-45 minutes, until the top is crisp and the custard is barely set.  Sprinkle with toasted nuts.  Serve warm, with the reserved cup of caramel drizzled on top.
0 Comments

Bread Crumbs

10/13/2012

0 Comments

 
Picture
If you're making homemade bread, you're bound to have a few crumbs.  Most of the crumbs come from slicing the bread, but there are always a few in the bottom of the empty bread bags, too.

It's common to just shake them into the sink or the garbage, but is there anything else!

Oh, yeah.

Since they're already dry, they don't spoil if kept fairly airtight.  I scoop them into a plastic container with a lid and save up until there's enough to do something with them.

Add to hamburger to extend it a bit
Use in  Meatballs
or Zucchini Cakes
coating for Chicken Nuggets

You can even use them as a substitute for oats or flour in recipes- 
1/2 c. crumbs = 1/2 c. rolled oats, 
1/2 c. crumbs = 1/4 c. flour

Or use them in place of graham cracker crumbs for a pie crust.  See below.

Crumb Crusts
1 ½ c. graham cracker crumbs 
¼ c. sugar 
5-6 Tbsp. melted butter 

Stir together crumbs and sugar, mix in butter. Press firmly and evenly in a 9” pie pan. Chill 1 hour OR bake at 375 degrees 6-9 minutes, til edges are brown (and it smells wonderful).  
Use a blender to crush the cookies/crackers, or a cereal box liner or big zip top baggie and a rolling pin
Breadcrumb crust:use dry breadcrumbs, increase sugar to 1/3 c. You’d never know!
Chocolate Crust: use 1 ½ c. crushed chocolate cookies (take out creme filling), don’t use the sugar in the crust recipe.
Gingersnap Crust: use all gingersnap crumbs or part gingersnap, part graham. Leave out sugar.
Nut crust: add 1/3 c. finely chopped pecans, almonds, walnuts, or other to any crumb crust.
Vanilla Crust: use crushed vanilla wafers, leave out the added sugar.

 
Try it!  (Now, won't you feel thrifty?)
0 Comments

Autumn Harvest Smoked Salmon Sandwiches

9/13/2012

0 Comments

 
Picture
Yeah, I know that smoked salmon is a little expensive for a website with a name like this one has...  

Would it help you feel better to tell you I buy it during the after-Christmas "food gift" clearance sales?   It's at least 50% off then.  

OK, it's still not real frugal.  But it does have an incredible shelf life-- and is one of my absolute-favorite foods!- which is why I had a couple tins of it on hand when the idea for this sandwich struck.  I decided, the day of the contest, to enter the "Fleishman’s Yeast Sandwich Bread Contest 2012" at the Utah State Fair.  Which bread I wanted to make was no problem, the Autumn Harvest Bread came right to mind.  The contest this year, though, specified for 10% of your overall judging score to be from the filling (or "description of a filling").  This is what I came up with to complement the breads' flavors.    It will make your tastebuds "dance and sing"!  The judges agreed, this took first place in the contest.

Autumn Harvest Smoked Salmon sandwiches

Start with one loaf of Autumn Harvest Bread, sliced about 1/2" thick.

* * * * * * * * * * * *

Cream Cheese Filling:
4 ounces cream cheese, softened 
2 Tbsp. very finely chopped (or pureed) red onion
2 Tbsp. minced crystallized ginger
2 Tbsp. finely chopped toasted pecans
¼ c. finely chopped celery
2 tsp. fresh lemon juice
1 ½ tsp. finely grated lemon zest
1/16 tsp. freshly ground black pepper

Stir together, chill at least 30 minutes to blend flavors. 

To assemble  sandwiches, spread about 2 Tbsp Filling on each of four slices of bread. Top with 2 ounces smoked salmon, and any of the following you like (I used all of them): thinly sliced red onion, sliced tomato, roasted red pepper, alfalfa sprouts, and arugula.  Drizzle with red wine vinegar and sprinkle with salt and pepper.  Makes 4 sandwiches.


0 Comments

Autumn Harvest Bread

9/11/2012

2 Comments

 
Picture

 This bread has a thin, chewy crust with an exceptionally tender and moist interior, flavored with pumpkin and honey, scented with cinnamon, ginger, cloves,  with a toasty crunch from pecans.  (See a photo of the inside here.) It is one of my all-time favorite recipes.  It all started with an artisan bread cookbook, Amy's Bread.

My brother had just finished a two-year mission to Spain, and came back with a whole new perspective on bread.  He described how fresh, hearty, deeply flavored, and moist those European breads were, with their beautiful, flavorful crusts.  

That's it, I thought, I MUST learn to make bread like that.  

So I bought a book.  (I still have, it, use it, and love it.  Her Country Sourdough loaf is perfect, and the thin, crunchy, seeded breadsticks are addicting!)

The recipe below began as one from her cookbook.  I've tweaked it over the years, until it can be claimed as my own.  We usually just slice and butter it, or toast and spread with cream cheese.  It would make incredible French Toast, especially if you stuff it with lightly sweetened cream cheese and top with fruit syrup or homemade maple-flavored syrup.   For a sandwich filling that goes spectacularly well with it, see my next post!

See here for a post on making pumpkin puree, or see this one on making pumpkin powder.  I actually used the pumpkin powder & added water in my batch for the fair.

Autumn Harvest Bread
(Pumpkin-Pecan Yeast Bread)

1 Tbsp. Instant or RapidRise yeast               4 ½ c. bread flour
1/2 c. warm water                                           ½ c. butter, melted
½ c. (6 oz.) honey                                            1 tsp. cinnamon
1 c. pumpkin puree                                          ½ tsp. ginger
1/4 c. cornmeal                                                ½ tsp. ground cloves
2 large egg yolks                                             1 ½ tsp. salt
2 Tbsp. dry milk powder                                 1 c. pecan pieces, toasted                                                                                

Combine yeast and warm water, stir to dissolve.  Let stand 3 minutes.  Mix in honey, pumpkin, cornmeal, egg yolks, milk powder, and 2 cups of the flour. Add butter, then the remaining 2 cups flour, the cinnamon, ginger, cloves, and salt.  Knead until smooth and elastic, about 5-10 minutes.  Let rest 20 minutes.  Knead in pecans.   Cover and let rise until doubled, about 1 ½ -2 hours.  

While it’s rising, make a wash with 1/4  c. cold water and 1/2  tsp. cornstarch:

Combine the two, bring to a boil, and stir until thickened.  Cover it so it doesn’t form a skin, and let it cool.

Divide dough into two pieces. Shape into 16-20” long logs, and tie each into a knot.  (Or shape into a ball, seam-side down, or shape into two 8x4 loaves.)  Cover and let rise until nearly doubled, 1-1 ½ hours.  Using a pastry brush, gently coat each loaf with the glaze.  Bake at 375 degrees for 25-35 minutes, until golden brown and the surface is firm.  Brush again with the glaze.  This helps it have a nice shine and a thin, soft crust.  Cool before cutting into 1/2" slices. 
2 Comments
<<Previous

    Need a Search bar?
    One day I may upgrade my website-- but until then, use your web browser search bar. Type in my web address and what you're looking for, like this-- 
    www.theprovidenthomemaker.com  pumpkin --  and you should get results.


    Author

    I'm a disciple of Christ, a member of the Church of Jesus Christ of Latter-day Saints, a family-defending, homemaking, and homeschooling mom of eight children, two of whom sometimes can't have milk or wheat. Growing up on a farm in a high mountain valley, my parents taught me to 'make do', work hard, smile, and help others.  I love cooking, learning, growing food and flowers, picking tomatoes, and making gingerbread houses --which CAN be made allergy-friendly-- with my children.  I hope you find something to help you on my site!

    Archives

    April 2024
    July 2023
    April 2022
    September 2021
    March 2021
    December 2020
    April 2020
    March 2020
    February 2020
    January 2020
    December 2019
    November 2019
    October 2019
    September 2019
    August 2019
    July 2019
    June 2019
    May 2019
    April 2019
    January 2016
    November 2015
    October 2015
    September 2015
    March 2015
    February 2015
    November 2014
    October 2014
    September 2014
    August 2014
    July 2014
    June 2014
    May 2014
    April 2014
    March 2014
    February 2014
    January 2014
    December 2013
    November 2013
    October 2013
    September 2013
    August 2013
    July 2013
    June 2013
    May 2013
    April 2013
    March 2013
    February 2013
    January 2013
    December 2012
    November 2012
    October 2012
    September 2012
    August 2012
    July 2012
    June 2012
    May 2012
    April 2012
    March 2012
    February 2012
    January 2012
    December 2011
    November 2011
    October 2011
    September 2011
    August 2011
    July 2011
    June 2011
    May 2011
    April 2011
    March 2011
    February 2011
    January 2011
    December 2010
    November 2010
    October 2010
    September 2010

    Categories

    All
    Alcohol
    Alternate Cooking
    Appearances
    Apple
    Apricots
    April Fools
    Aprons
    Bananas
    Beans
    Beef
    Beets
    Bench
    Beverages
    Bonnet
    Bread
    Breakfast
    Budget
    Budgeting
    Cake
    Candy
    Canning
    Carrots
    Cheese
    Chicken
    Children
    Chocolate
    Christmas
    Cleaning
    Coconut
    Comfrey
    Common Core
    Constitution
    Cookbook
    Cookies
    Cooking Oil
    Crafts
    Dairy Substitutions
    Dehydrating
    Dessert
    Dried Fruit
    Earth Oven
    Earthquake
    Easter
    Edible Weeds
    Eggs
    Emergency Prep
    Essential Oils
    Faith
    Family Home Evening
    Fertilizing
    Food Storage
    Fourth Of July
    Freezer
    Frosting
    Fudge
    Garden
    Gardening
    Gingerbread
    Gluten
    Gluten Free
    Gold
    Government
    Grains
    Gratitude
    Hat
    Herbs
    Home Remedies
    Home Repairs
    Homeschool
    Home Storage
    Honey
    Hope
    Inflation
    Leftovers
    Legumes
    Lemon
    Main Dishes
    Mixes
    Mothers
    Noah
    Non Artificial Colors
    Non-artificial Colors
    Nuts
    Oats
    Oil
    Orange
    Paint
    Peaches
    Pear
    Pie
    Pizza
    Plums
    Poem
    Popcorn
    Pork
    Potatoes
    Powdered Milk
    Prayer
    Preparedness
    Projects
    Prophecy
    Pruning
    Pumpkin
    Quick Bread
    Rhubarb
    Rice
    Salad
    Salt
    Sauces
    Self Reliance
    Self-reliance
    Sewing
    Shelf Life
    Shelves
    Sky
    Smoothie
    Snacks
    Soup
    Spices Or Seasonings
    Squash
    Strawberries
    Substitutions
    Sugar
    Summer Fun
    Three Month Supply
    Time
    Tomatoes
    Trees
    Truffles
    T-shirts
    Tuna
    Ultra Gel
    Valentine\'s Day
    Vegetables
    Water
    Watermelon
    Wheat
    Work
    Year Supply
    Zucchini

    RSS Feed

Web Hosting by iPage