The Provident Homemaker
  • Recipes and Info
    • Making Bread
  • My Blog
  • Favorite Resources
  • Documents and Files
  • 52 Weeks of Building Storage

Week 2 Preparedness Challenge

9/20/2015

0 Comments

 
Week 2's challenge is to determine how much water YOU should store, and begin working towards that.

Recommended water storage quantity
:  14 gallons per person.  This is enough to meet basic needs for two weeks:  1 gallon per person per day.  Read more about that here.

Free water storage options:  use 2- or 3-liter soda bottles, 2-qt juice bottles, or any other food-grade plastic container that says PETE on the bottom and has a tight-fitting lid. Do not use milk jugs; they eventually weaken and leak.
Other options: You can often find 35- and 55-gallon blue water storage barrels for sale on the local online classified ads; in Utah they’re also at Macey’s grocery store, Industrial Container, emergency supply stores, and sometimes at Walmart. Used barrels are usually sold for one of two reasons:  someone is moving or just tired of storing the barrels, or they’re being sold by a business after having syrup or other liquid in them.  They are the containers soda companies have their syrup in when it comes to them.  Clean them out and they’re great.  There are also larger size containers you can find—100 gallons or more--, either new or used. 
When purchasing new containers, typically count on $.75-1.50 per gallon capacity, i.e. 55-gallon barrel may cost about $50-75.  You can find them cheaper if you watch sales and ads, or sometimes if you join a group buy.                

 -Rhonda

0 Comments

Homemade Electrolytes- sub for Pedialyte or Gatorade

12/11/2012

1 Comment

 
Picture
Do you ever use Pedialyte or sports drinks for sick children?  Below are some homemade, very inexpensive, and fully functional substitutes.

 We've had an impressive virus at our house lately; my 7-year-old ran a fever for an entire week (with an ear infection on top of it), and now the 4-year-old has the fever-causing virus.  Younger children get dehydrated so easily, so mine get a water bottle to keep with them at all times while sick- but it's "lemonade" water.  It really is lemonade, a little on the weak side and with salt.  I add a couple things to their water bottle, and it helps replenish the minerals and salts they lose while fevering. It tastes better to them than plain water, which helps, too.

I prefer the lemon- if you have fresh it's fantastic-, and lemon seems a little easier on upset tummies than the orange juice.  Lemon is also supposed to help alkalinize your body and cleanse the liver, both of which may help you recover faster.  The salt really is important*.  If you use unrefined coarse or sea salt, you'll also be adding critical trace minerals. (If you only have refined salt, I understand, it's OK, just not as good for our purposes here.)    For the sweetener, I use raw honey because that's what I have in my pantry.  Don't use honey if you're making this for a child under 1 year old because of possibility for botulism.  Sugar can be substituted, but doesn't have the trace minerals that honey does.  If your child likes the flavor of molasses, that's even more nutritious than honey.  My next batch will use blackstrap molasses- the amount of minerals in there are amazing!  And, after all, nutrition is the name of the game when someone's sick! This drink can also be frozen to make ice cubs or popsicles.
Note:  blackstrap molasses is not very sweet at all, and is somewhat of an acquired taste.  If I make some for myself, I tolerate the flavor, but for my children, I use no more than 1 Tbsp. blackstrap and 1 Tbsp. honey.  Using regular molasses is much more palatable to children, and even then I recommend using half molasses and half honey.

Lemon Electrolytes

16-oz  bottle of  water
3 Tbsp lemon juice or juice from 1 lemon (grapefruit juice works too)
1/8 tsp. unrefined salt
2 Tbsp. honey and/or molasses 

Pour about 1/2 cup of water out of the bottle (you're drinking it, not dumping it, right? :)  Add the lemon juice, salt, and honey or molasses. Put the lid on and shake hard.

If you want to mix up a bigger batch to keep in the fridge, use 1 quart of water, 1/2 c. lemon juice, 1/4- 12 tsp. unrefined salt, and 1-6 Tbsp. honey or molasses.  Makes a little more than a quart.

Orange Electrolytes

One 16-oz water bottle, half  full
1/8 tsp. unrefined salt
1 tsp to 1 Tbsp. honey or molasses
about 1 cup orange juice

Add salt and honey/molasses to the bottle, put the lid on and shake hard until mixed well.  Fill the bottle up the rest of the way with orange juice.

Bigger batch: 2 c. water, 2 c. orange juice, ¼- ½ tsp. unrefined salt, 1 Tbsp. honey or molasses.


*The recommended salt amount varies from 1/4 per quart to 1 tsp. per quart. Since I'm feeding this to children, I use the lower amount.  Recipe sources I looked at include the University of Connecticut Health Center, The Rehydration Project, Southern Utah University, LiveStrong.com, and http://www.cheekybumsblog.com/2012/04/living-naturally-homemade-electrolyte-drink-move-over-pedialyte/

Nutrition facts:
lemon juice: http://nutritiondata.self.com/facts/fruits-and-fruit-juices/1939/2 
orange juice: http://nutritiondata.self.com/facts/fruits-and-fruit-juices/1973/2
honey: http://nutritiondata.self.com/facts/sweets/5568/2
molasses: http://nutritiondata.self.com/facts/sweets/5573/2  
blackstrap molasses: http://www.whfoods.com/genpage.php?dbid=118&tname=foodspice


1 Comment

Free Emergency Preparedness Fair, Salt Lake Valley, Jan. 21, 2012

1/17/2012

2 Comments

 
Picture
If you live in or around Salt Lake City area, and would like to learn more about preparedness, you are welcome to attend an Emergency Preparedness Fair.  This fair is sponsored by an LDS stake in South Jordan and is this weekend (1/21).
 It's a free event and open to everyone!  This could be some great preparation for The Great Utah ShakeOut drill on April. 17 this year.

Time and location:
January 21, 2012 10am
LDS SunStone Building - 11543 Keystone Drive, South Jordan, Utah

Classes and Booths include:
First Aid
CPR - New Techniques
Emergency Planning
72 Hour Kits
Questar Gas
South Jordan City
Financial Planning
Water Storage
Water Reclamation and Rehydration
Sanitation
Grab & Run Ideas
Fire Safety
Storing basic foods, and cooking with them (see here for more)

For questions - contact Rich at 801-891-2710 or Rebecca at 801-859-6841
2 Comments

Prepare and not be afraid/ Tender and Moist Meatballs and Meatloaf

1/26/2011

0 Comments

 
Picture
Mmm...meatballs!

This quote was recently brought to my attention; it’s from some training that our General Relief Society President recently gave.  It is motivating and assuring at the same time.  I am grateful for wise and loving leaders, as well as the Spirit, to guide us.  I know they teach truth.

Below it  is a very adaptable recipe for meatballs/meatloaf.      

-Rhonda


“I have a sense and a feeling as we have watched some of these disasters in the world, that this is a time for us to learn and prepare from these experiences.   The preparation happens in our own homes. There are not enough tents in the world to furnish every person with a tent unless the members of the church have a tent in their own homes...a simple thing like that. And then the storehouse is pressed down, heaped over and running over in our own homes. Some of you have student apartments, how prepared are you? If an earthquake or an economic disaster happened, would you have enough water to drink for 24 hours? Would you be able to get by until help could come to you? Those are the kind of the things we need to be thinking about in our day and time, the Lord expects us to do our little part and then He can bring on the miracles and then we don't need to fear.  I bear you my testimony that the gospel of Jesus Christ is true, and that these principles will strengthen us individually, and as a family, and as a people, and as a church.  As we listen to prophets of God we will be okay.  We don’t need to worry about being alive in this scary time.  The world has had scary times before and the Lord has always taken care of His people who have been faithful. “

 –  Julie B. Beck  

see herefor her whole video clip, then click on Training Video: Self-Reliance


Meatballs and meatloaf are essentially the same food; only the size differs.  Burgers or patties can be the same recipe, too.  In the simplest version, you simply salt and season meat, then form and cook it.  To end up with tender, juicy results, you either use higher-fat meat, or use something to help hold the moisture in.  Many recipes call for crushed crackers or dry breadcrumbs, but the most tender results come from making a panade, which is a bread-and-milk paste.  You can also use, in the same amount as the panade,  mashed or grated potato, cooked rice, leftover cooked oatmeal (unsweetened!) or other hot cereal for this. This would make the meatballs be gluten-free.  Dry crumbs soak up more moisture, leaving you with a drier result.  Egg is usually used as a binder, to hold the meat together. And try to not squeeze the meat very much when you’re mixing it; compressed meat is tough.  Other than that, use whatever flavor additions you prefer –


Onion, garlic, ground pepper, Worchestershire sauce, soy sauce, raw pork sausage, Parmesan or other cheese, parsley, rosemary, thyme, nutmeg, Liquid Smoke, bacon pieces, diced chili peppers, shredded zucchini or carrot, chopped mushrooms, bits of sundried tomatoes, chopped spinach.  

 
 For quick, simple meals later on, make a BIG batch of meatloaf, and shape it into

* a couple meatloaves

*rolled meatloaf- pat into a rectangle on some waxed paper, spread on some filling (cheese and spinach, or whatever sounds good), roll it up with the help of the waxed paper.  (Don’t leave the paper inside it!)

*some meatballs

*mini meat loaves (portions to bake in muffin tins or custard cups)
*patties

 Freeze on cookie sheets so they won’t stick together, either before or after cooking them, then pop into freezer bags, squeeze the air out, label and freeze.

For several flavor variations, click on   Tender and Moist Meatloaf and Meatballs .

Tender and Moist Meatballs or Meatloaf


2 slices good-quality white bread, cut in ¼” cubes (1 ½ c.)
3 Tbsp. buttermilk, thinned yogurt or sour cream- milk works but is less creamy
1 egg
1 ½ lbs. lean burger (may use pork sausage as part of this)
¾ tsp. salt
¼ tsp. pepper
¼- ½ c. Parmesan cheese
¼ c. minced fresh parsley
2 cloves garlic, minced

Combine the bread, buttermilk, and egg, or use 1/2 c. other wet starch (i.e. cooked rice, oatmeal, mashed potato), with the egg, omitting buttermilk.  Mash together until it forms a paste. Add everything else and mix gently.  Form into meatballs, 1- 2” in diameter.  If you’re cooking them right away, they’ll hold together better if you first refrigerate them for an hour. To cook, pan-fry over medium heat in 1-2 Tbsp. oil, shaking the pan often to turn the meatballs.  1 ½” meatballs should be done in about 10 minutes.  Add to sauce, or cool and freeze.

Another way to cook them is:

Put meatballs on a cookie sheet.  Bake at 450 degrees F for 12-15 minutes, rotating the cookie sheet back-to-front halfway through.  Partially cool, then freeze.


Meatloaf:

Mix, form into a loaf, and bake for 1 hour @ 350 F. Before the last 15 minutes, brush with
Meatloaf glaze:

1/4 c. ketchup
1/4 c. brown sugar
1 Tbsp. Dijon mustard
1 tsp. cider vinegar
Picture
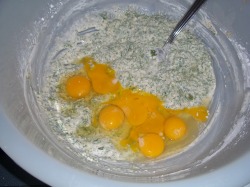
This is the panade mixed with the seasonings; eggs are mixed in before adding the meat.  There are so many eggs because this is for a ten-pound batch of meatballs/loaf.

Picture
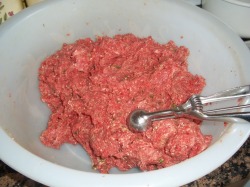
Fully mixed.  A small icecream scoop (this is a #10) makes quick work of meatballs.   Another way to make evenly-sized ones is to pat the meat in a square or rectangle, then cut them into evenly-sized small squares.  Roll each one.  One pound of meatball mixture will give you about 30 1-inch balls.

Picture
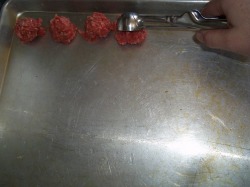
Put the meatballs on a lightly greased or sprayed cookie sheet.  For the roundest meatballs, roll them between your hands.  You can bake them now, and freeze them already cooked, or freeze them raw.  Put the whole tray in the freezer.  When they're solid, remove and put the meatballs in a freezer-safe bag or container.  Squeeze out the extra air, label, and put back in the freezer. 

Picture
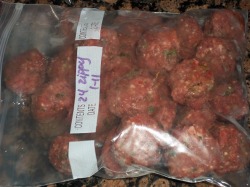
The individually-frozen meatballs packaged and ready to go in the freezer. They're best if used within a few months, but they'll be safe to eat for much longer.  (I've used 2-year-old meatballs before.)

0 Comments

Cost of a year's worth of food; Eggless "old bottled fruit" Cake

11/11/2010

0 Comments

 
Picture
Ah, a lonely jar from 'way back when'; 1999, in this case.  It's still sealed, but not so appetizing-looking anymore. 

Picture
Turn it into cake!  Since I was using pineapple as the fruit, I omitted the cloves and nutmeg from the recipe, left in the cinnamon, and added shredded coconut, which makes for a nice toasty topping.

Yesterday I pulled a 5-pound jug of honey out of my storage room.  It had mostly crystallized, so it sat in a pan of hot water all night, on low heat, to melt.  As it sat there, I noticed a price sticker on the lid; one from Storehouse Markets, from when we lived in Orem fifteen years ago.  (Yes, honey will last forever!)  It said $4.99.  That means the shelf price of honey has TRIPLED in fifteen years. 
Prices for food always rise year-to-year; especially now with the Fed’s “quantitative easing” (QE2) going on.  If you want to see what experts are predicting now, with QE2, take a look at
http://inflation.us/foodpriceprojections.html .   This group, the National Inflation Association, is a very credible source.  To see how they reached their conclusions, click on their pdf link, in the document.The long and short of it is that your money will go much further right now than it will in a few months, especially with the harvest shortages we’ve had worldwide this year.   


How much will your year’s supply cost you right now?  Adding up all the essentials, a month’s worth of food for one person is $16.23.  No kidding.

A year’s worth for one person is  $194.76

Figure in that you’re getting your year’s supply after building your three-month supply; that knocks it down to getting nine months’worth;

$146.07 per adult.

It’s even less for children: quantities for age 3 and under= 50%, ages 4-6= 70%, ages 7-10= 90%, ages 11 and up= 100%.

Here’s the counsel we’ve been given:     "We encourage members world-wide to prepare for adversity in life by having a basic supply of food and water and some money in savings.” “For longer-term needs….gradually build a supply of food that will last a long time  and that you can use to stay alive” (from All is Safely Gathered In, LDS First Presidency pamphlet)

Here are quantities and current costs:

Grains, 300 lbs- if you get just wheat and oats, at the Home Storage Center they cost between $5.80 and $8.15 for 25 lbs. depending on if you get white or red wheat, quick or regular oats.  If you average this out, it will cost you $6.98 per person, per month.  $83.70 per year’s worth.


Milk, 16 lbs is $1.40/lb at the HSC, which is $1.87 per month, $22.40 per year.

Sugar, 60 lbs is $ .56/lb there, $2.80 per month, $33.60 per year.

Oil, 10 qts –this isn’t sold at the HSC, but the price at Macey’s last week was $2.50 for 1 ½ quarts (48 oz.) At that price, after tax, it’s $1.43 per month, $17.17 per year.  It’s only $14.38 if you buy it at Sam’s Club ($6.98 + tax for 5 qts.)

Salt, 8 lbs- 4# box at Costco or Sam’s Club is a dollar; $ .16 per month, $2 per year.

Legumes, 60 lbs– the Home Storage Center sells black beans, pinto, and white, from $14.10 to $16.30 for 25 lbs.  Averaging the prices, it’s $2.99 a month, $35.92 per year.

Water, 14/gal/person-   You can store this for free by using 2- and 3- liter pop bottles, or juice containers (not milk jugs- they break down).  Or use the 5-gallons square jugs or big blue barrels; they’ll run you about $1 per gallon of storage. If you already have the minimum water, and your long-term foods stored as well, you might consider storing even more water.  One source is http://familywatertanks.com ; they’re the cheapest big-size tanks I’ve seen.  They’re local for us, too.

When you’re done storing the basics, you will probably decide to add a few ‘gourmet’ items, they’re nice to have—I’m a big proponent of storing spices and chocolate!- but the basics are what is essential.  Cheapest, too.

Notice that the costs were just for food, not containers to store them in. Most of my storage containers cost nothing.   You CAN get buckets for free, with a little effort- most bakeries give them away; all their frostings and fillings come in those buckets.  Plan on washing them at home.  There are two main sizes; 5 gallon and 2 ½  gallon.  I keep packages of dried fruit in the smaller buckets, also cornmeal or other things that I don’t use as much.  They are a great size for a pantry, too.  Some of the buckets have gaskets, some don’t.  The ones that don’t seal well are still good for storing sugar.

If you want all your wheat, powdered milk, sugar, and legumes in #10 cans from the cannery, it will cost you $85.83 more to get a full year’s worth, $65 to do 9 months.

I don’t can my wheat, sugar, or beans because we go through large quantities; one batch of bread would use a whole can.  Pretty silly storage for me.  Besides, it’s easier for me to find space for 10 buckets than 60 #10 cans; they hold about  the same amount of food.

* * * * * * *
Do you have an odd bottle of old fruit lying around?  Do you have peaches than look more ‘tan’ than ‘peach’?  Don’t throw them out (unless they’ve come unsealed, or are foamy, or the juice has turned opaque!)- make something with them!  Smoothies are a good use, as well as the following recipe.  Eggless cakes were fairly popular in the 30’s and 40’s, when eggs were often hard to come by. 

 
EGGLESS “OLD BOTTLED FRUIT” CAKE

1 qt. fruit, undrained and blended
2 c. sugar
1/2- 3/4  c. oil
4 c. flour

1 t. salt
1 Tbsp. baking soda (originally this was 4 tsp, see note below)
1 t. nutmeg
4 t. cinnamon

1 t. cloves
1/4- 1 c. nuts, raisins, dates, coconut (opt.)

 Use fruit that has been sitting at room temperature. Sift dry ingredients and add to wet mixture. Bake in a greased and floured 9x13 glass pan at 350 F for 30-40 minutes.

At 3500 ft elevation, 4 tsp. baking soda was too much leavening, causing the center of the cake to fall.  One tablespoon is better, though if you're at a lower elevation you might need the full amount.  Try it and see!
0 Comments

Storing Water: Benjamin Franklin quotes; Basic Bread

11/10/2010

0 Comments

 
Picture
from photos8.com

(originally from 6/03/10)
Have you stored water yet?  Benjamin Franklin wrote, “When the well is dry, they know the worth of water.”   Even a little bit helps.  Keep a few water-filled 2-liter bottles, or 2-quart juice containers, under the sink in the kitchen and bathrooms.  I screw the lids on REALLY tight because of my curious little ones….

These are great for when the city water suddenly goes out, or a pipe breaks in your house.  (Last winter we were out of water TWO times in two weeks because of broken pipes!)   Then figure a way to keep a lot more water stored someplace; President Hinckley told us to store at least a gallon per person per day, for two weeks.  The blue barrels are good for this, and can be kept in your garage. If you’re buying storage containers, figure a dollar for each gallon of storage capacity- $50 or under for 50 gallon barrel, $5 or so for a 5-gallon jug, etc. You can live a lot longer without food than you can without water.  If you want to have even MORE than the minimum, check out the super-size containers at
http://familywatertanks.com/    Our water already has chlorine in it, so it will stay clean and safe as long as the container is closed securely.   If/when we have a large-scale disaster (remember Sister Beck told us to prepare for ‘eventualities’….) the city can get to repairing much faster if they don’t have to spend all their time hauling water around to all of us.


Here are some more applicable quotes from Franklin, enjoy!


“Energy and persistence conquer all things.
                           *
“Well done is better than well said.
                           *
“God helps those who help themselves.
                           *
“It is hard for an empty sack to stand upright.”

* * * * * * * 
 Here’s the bread recipe I’ve eaten for the last 30+ years; it’s my mom’s recipe.  The beauty of bread is that is so adaptable.  Use this recipe to make anything from white sandwich loaves, to whole wheat bread, pizza, fluffy dinner rolls or mouthwatering cinnamon rolls.   See Making Bread for these variations and more.  The bread freezes well, so I always make an oven full; it’s no more work to make six than to make two.  I keep enough in the pantry for 3 days because it is fresh-tasting for only that long; I put the rest in the freezer as soon as it's cooled and sliced.  

 -Rhonda

          Basic Bread

Six loaves:                                        Two loaves:
2 Tbsp. salt                                          2 tsp. salt
2 Tbsp. yeast                                       2 tsp. yeast     
½ cup -1 cup sugar                             1/4 -1/3 cup sugar
½ cup oil                                             3 Tbsp. oil
6 cups hot water (hottest from           2 cups hot water
  faucet, not over 130 degrees)                   

8 cups flour to start- you will             3 cups flour to start, will be 5-6
  use around 16 c. total                          total


      Mix salt, yeast, sugar, oil, water, and first amount of flour in a bowl.  Beat about two minutes with a wooden spoon.  Stir in half of what’s left, then mix in more until too stiff to stir.  Dump out onto a floured counter and knead for 8-10 minutes, adding only enough flour to keep the dough from sticking to the counter.   The dough should be smooth and elastic after kneading.  (Yes, you could use a stand mixer for this, too….)

     Cover with a kitchen towel or plastic grocery bag and let rise 1 to 1 ½ hours, or until doubled.  Punch down and shape into loaves.  Place in greased 8x4 loaf pans and let rise about 45 minutes or until nearly doubled.  Bake at 350 degrees F for about 30 minutes (or at 375 for 25 minutes) or until the sides of the bread are brown.  (Tip a loaf out of the pan to check.)  Remove from pans and cool on a rack.

100% WHOLE WHEAT BREAD-
Follow above 6 loaf recipe, using all whole wheat flour, and also add one of the following:

1/4 c. lecithin, 1/4 c. gluten, 1/4 c. dough enhancer, or 1000 mg Vitamin C, crushed or dissolved in water.  These improve texture and reduce coarseness.  Any of the variations can be made with whole wheat.
0 Comments

How much does a year’s supply cost? and Best Drop Biscuits

10/26/2010

0 Comments

 
Picture
Once the dough is mixed, if you use a greased/sprayed 1/4 measuring cup to scoop the dough, you'll get a more traditionally-shaped biscuit.

Picture
Yum.  Tender and light on the inside, crunchy on the outside.  This batch was made with 1 cup whole wheat flour.

How much will your year’s supply cost you?  I just got an emergency supply store’s catalog in the mail; they advertised a year’s supply of food for ‘just’ $3649.95.  For one person.  Is it really that much money to get a year’s supply?

Adding up all the essentials, a month’s worth of food for one person is $16.23

                            A year’s worth for one person is  $194.76

Figure in that you’re getting your year’s supply after building your three-month supply; that knocks it down to getting nine months’worth;

                                                            $146.07 per adult.   

You CAN afford to get your home storage! 

If you really want to spend $3649.95 plus tax, you could buy a year’s supply for not just one person, but for NINETEEN people.  Yes, basic storage is different food than that ‘gourmet’ version, but here’s the counsel we’ve been given:          
"We encourage members world-wide to prepare for adversity in life by having a basic supply of food and water and some money in savings.” “For longer-term needs….gradually build a supply of food that will last a long time  and that you can use to stay alive” (fromAll is Safely Gathered In, First Presidency pamphlet)


Here is the cost breakdown:


Grains, 300 lbs- if you get just wheat and oats, at the cannery they cost between $5.80 and $8.15 for 25 lbs. depending on if you get white or red wheat, quick or regular oats.  If you average this out, it will cost you $6.98 per person, per month.  $83.70 per year’s worth.

Milk, 16 lbs is $1.40/lb at the cannery, which is $1.87 per month, $22.40 per year.

Sugar, 60 lbs is $ .56/lb there, $2.80 per month, $33.60 per year.

Oil, 10 qts –this isn’t sold at the cannery, but the price at Macey’s last week was $2.50 for 1 ½ quarts (48 oz.) At that price, after tax, it’s $1.43 per month, $17.17 per year.  It’s only $14.38 if you buy it at Sam’s Club ($6.98 + tax for 5 qts.)

Salt, 8 lbs- 4# box at Costco or Sam’s Club is a dollar; $ .16 per month, $2 per year.

Legumes, 60 lbs– the cannery sells black beans, pinto, and white, from $14.10 to $16.30 for 25 lbs.  Averaging the prices, it’s  $2.99 a month, $35.92 per year.

Water, 14/gal/person-   You can store this for free by using 2- and 3- liter pop bottles, or juice containers (not milk jugs- they break down).  Or use the 5-gallons square jugs or big blue barrels; they’ll run you about $1 per gallon of storage. 

When you’re done storing these items, you might decide to add a few ‘gourmet’ items- but that’s just extra stuff.

Notice that the costs were just for food, not containers to store them in. Most of my storage containers cost nothing.   You CAN get buckets for free, with a little effort- most bakeries give them away; all their frostings and fillings come in those buckets.  Plan on washing them at home.  There are two main sizes; 5 gallon and 2 1/2  gallon.  I keep packages of dried fruit in the smaller buckets, also cornmeal or other things that I don’t use as much.  They are a great size for a pantry, too.  Some of the buckets have gaskets, some don’t.  The ones that don’t seal well are still good for storing sugar. 

If you want all your wheat, powdered milk, sugar, and legumes in #10 cans from the cannery, it will cost you $85.83 more to get a full year’s worth, $65 to do 9 months' worth.

Here’s the year’s worth breakdown and quantities:    51 cans of wheat $137.80, 11 cans of beans $48.95, 10 cans of sugar $46.50, 4 cans of powdered milk $28.20.

 I don’t can my wheat, sugar, or beans because we go through large quantities; one batch of bread would use a whole can.  Pretty silly storage for me.  Besides, it’s easier for me to find space for 10 buckets than 60 #10 cans; they hold about  the same amount of food.


Best Drop Biscuits
 adapted from Cooks Country
Makes 12

 1 cube butter, melted and cooled a few minutes- set aside 1 Tbsp. of this.
1 cup cold buttermilk or sour milk  (1-2 Tbsp. vinegar in 1 cup regular milk)
2 c. flour
2 tsp. baking powder
½ tsp. baking soda
½  tsp. salt  (3/4 tsp. if you used unsalted butter)
1 tsp. sugar

 Heat oven to 475 degrees, no, that’s not a typo.  Mix together the butter (except reserved) and buttermilk; stir until the butter forms clumps.  (This is a faster way of getting the same results as ‘cutting in’ the butter.)  Mix all the dry ingredients together, then pour in buttermilk mixture.  Stir until just mixed in and dough pulls from side of bowl.   Drop onto  greased or parchment-lined cookie sheet.  A greased  ¼ c. measuring cup makes the perfect size scoop.    Brush with reserved butter.  Bake until tops are crisp and golden, about 12-14 minutes.    Serve warm.  These also reheat well the next day (10 minutes at 300 degrees) and freeze well, too.

You can use powdered milk in this: mix in 3 Tbsp dry milk powder when you’re stirring together the dry ingredients.  Use ice water  and 1-2 Tbsp. vinegar to make 1 cup, stir with the melted butter.

 
0 Comments

Year's Supply quantities, Roast Chicken Dinner with rice, and apple crisp

10/26/2010

0 Comments

 
Hi,

Remember  this?

"We encourage members world-wide to prepare for adversity in life by having a basic supply of food and water and some money in savings.” “For longer-term needs….gradually build a supply of food that will last a long time  and that you can use to stay alive” (from All is Safely Gathered In, First Presidency pamphlet)

Here is what a basic supply of food includes:  it will provide about 2200 calories a day, which means you’ll probably get 1800 and your husband will get 2600.  This is less than most people are used to, especially if you're suddenly living a 'more active' lifestyle, but it will keep you alive!

300 lbs grains- includes Wheat, Rice, Rolled Oats, Dried Corn, Popcorn, Flour, Pasta Products, Dried Potatoes.  Some lists say 400 lbs per person, but the current Church site says 300.  Take your pick, according to what you can handle.  Storage-wise or hunger-wise; that extra 100 lbs provides an extra 435 calories per day.

16 lbs. powdered milk- this is just enough for cooking, about ¾ cup per day.  You can store instant, regular powder, and canned milk.  It takes about 5 (12-oz) cans to equal one pound of powdered milk

60 lbs sugar- this includes white sugar, brown sugar, powdered sugar, honey, molasses, jam/jelly, corn syrup, fruit drink mix, gelatin.  If you have honey that crystallizes, set the bottle in the sun on a warm day, or put it in a pan of water on lowest heat overnight.  It will become liquid again.  You will want more sugar than 60 lbs. if you can your own fruit.

10 quarts cooking oil (2 ½ gallons)- yes, YOU NEED FAT.  Your brain is made mostly of fat.  Guess what happens if you don’t get any fat in your diet?  Plus, it’s a lot of calories for very little storage space.  The darker & cooler you keep it, the longer it lasts.  Fats include shortening, cooking oil, butter/margarine, mayonnaise, peanut butter.

8 lbs salt per person-  this is the cheapest of them all!   In addition to the round canisters, you can buy salt in 4-lb rectangular boxes; these stack together more efficiently.  At Sams’ Club, these boxes are just under $1.  Woo-hoo!  Two bucks and you have your personal salt for the year!

60 lbs. legumes, dried- includes soybeans, pinto beans, white beans, kidney beans, lima beans, anything that ends with ‘bean’ (unless it begins with ‘jelly’), black-eyed peas, split peas, and lentils.  These are a great, inexpensive source of protein.  Store the same as wheat- dry, clean, dark and cool  if possible. It takes 4 ½ (15 oz) cans to equal one pound of dry beans.

14 gallons water per person.  This is just 2 weeks’ supply, for drinking and a tiny bit for washing; the minimum our church leaders have counseled.  You may also want a way to purify water for longer-term use.  To purify, you can boil water for 2 minutes, or use chlorine bleach (plain only, not scented!)  If the water is clear, use ½ tsp. per 5 gallons of water.  If the water is cloudy, use double; 1 tsp. per 5 gallons of water.

Children do not need a full adult’s portion.  For them, figure age 3 and under= 50%, ages 4-6= 70%, ages 7-10= 90%, ages 11 and up= 100%.

Obviously, kids' ages are always changing, so when I calculate what to have on hand ( I inventory every Conference), I project out six months to a year. For instance, if someone is 6 years old, I count that child as 7 years. That way I'm not always slightly behind when it's time to replenish.

 * * * * *

Recipes today are for a whole meal….

Roast Chicken               From Living On a Dime, Jan 2010.  
Here is a very basic but yummy recipe. You can also put this in a crock pot to slow cook all day.


1 (3 lb.) whole chicken
Salt and pepper to taste
1 Tsp. onion powder
1/4 cup butter or margarine 
1 stalk celery, leaves removed

Season the whole chicken inside and out with salt, pepper and onion powder. Place breast side down in pan placing margarine and celery into cavity. Bake at 350° for 1 hour and 15 minutes or until internal temperature is 180° (82° C). You can baste with juices or melted margarine once or twice. Remove from oven and cover with foil for 30 minutes and let it rest before cutting.

You can easily adapt this recipe to your own likes and dislikes. For example, you might use garlic powder instead of the onion powder, you could slide slices of lemons or garlic cloves or even onion slices under the skin. Try other seasonings, too.

The main thing that makes this recipe great is cooking it breast side down, which makes it extra juicy.

Cheesy Peas and Rice

2 1/4 cups rice, cooked                                              
1 (10 oz.) pkg. frozen peas, thawed

1 (6 oz.) can of mushrooms, drained                          
6 oz. Velveeta, cubed*


Combine all the ingredients in a greased 1 1/2 qt. baking dish. Cover and bake at 350° for 20 minutes.

I didn't used to buy Velveeta because it was more expensive than other cheeses, but since it is the same price or less than cheddar now, I buy it more often.


Apple Butterscotch Crisp

This recipe is good served with ice cream or, for something different, try a slice of cheese or a dollop of sour cream.

 5 large (7 small) apples, sliced and peeled               
1 tsp. cinnamon

1 cup brown sugar, depending on your apples           
1/2 cup flour

1/2 cup quick cooking oatmeal                                      
1/2 cup butter or margarine, cold                                     

1 pkg. (3.5 oz.) cook and serve  
          
butterscotch pudding


Place apples in a greased 9x13 pan. Mix everything else in a bowl, cutting in* the butter until it resembles coarse crumbs. Sprinkle over apples. Bake at 350° for 40-45 minutes or until apples are tender.

You can leave out the butterscotch pudding; it won't throw off the recipe. It will still be delicious. 

*Whenever a recipe says to cut in something, that means to take a pastry cutter and mix the butter, margarine or shortening in with the dry ingredients until the mix gets crumbly looking. (I just use my fingers. It is easier for me to wash them than a pastry cutter.)

Roast Chicken Leftovers:

Chicken Spaghetti Bake-  Make your favorite spaghetti, mixing noodles and sauce. Instead of adding hamburger to it or leaving it without meat, add some cubed leftover chicken. Put it in a 9x13 greased pan sprinkle with mozzarella cheese and grated Parmesan cheese. Bake at 350° until heated through and cheese is melted.

Make Chicken Soup with leftovers- see the recipe for turkey soup.  Use ¼ the amount of water and spices for chicken because it’s so much smaller!

Leftover Leftovers- If you have any of this soup left, thicken it with a little cornstarch or flour mixed in water. Make a batch of biscuits or use any leftover biscuits you have and pour the thickened soup (now like gravy) over it.
0 Comments

Water Storage, Powdered Milk recipes & notes

10/25/2010

0 Comments

 
Picture
Powdered Milk from the Home Storage Center, $1.40/lb.  The bowl holds yogurt.  You can make plain yogurt as cheap as $ .42/quart, or $ .10/serving.

If you don’t have your water storage yet, what is a good price for water drums? Prices vary, but generally figure $1 per gallon of storage capacity.  The 55-gallon drums, then, will probably be $55 or less.  Once in a while they go on sale; I've found them at Macey's (our grocery store) for $40.  They're even cheaper if you can find them in the classifieds.  Only use food-grade drums. Empty pop bottles or juice bottles work great, but milk jugs break down fairly quickly and will leak.  If you are using  chlorinated city water,  you do NOT have to drain and refill these every year.  The First Presidency has asked us to store at least 14 gallons per person.  This is one gallon per person per day for 2 weeks. 
Attached are the recipes from yesterday's class on powdered milk.  Here's a list of what is there, and a few notes on them.  Sorry, it's a scanned-in document, so I couldn't go through and type in my notes.

Anyplace I've put cost of a recipe, it's based on the following: $1.40/lb for powdered milk, $13 for 25 lbs of sugar, $2 for a pound of butter, $8 for 25 lbs. flour.

For the recipes that give you whey (any of the cheeses, including the yogurt cream cheese), save the whey.  It has vitamins, minerals, some protein, no fat, and some milk sugar (lactose- very low on the glycemic scale).  I use it in pancakes, muffins, bread, etc.  If  your whey has vinegar in it (most of the cheeses use this), you can add 1 tsp. baking soda for every 2-3 cups of whey.  This will neutralize most of the vinegar.  Yes, it will foam up, kinda like those volcanoes you made in 3rd grade…

Go to http://everydayfoodstorage.net/training-cooking/powdered-milk  for  recipes for evaporated milk, Magic Mix, and Condensed Soups using Magic Mix. And she has a great little chart you can print out and tape to the inside of your cupboard  so you know how much milk powder to use when you're baking with it:

http://www.everydayfoodstorage.net/handouts/milk-conversion-charts.pdf

The Wooden Spoon class handout has a TON of info on powdered milk.  It is from some classes that the LDS Church's Welfare Square was teaching for a little while. The collection is not copyrighted; the two ladies who compiled it just wanted to spread the information.
   
When I get a bunch of new recipes, usually most of them get ignored unless I'm already familiar with them.  So let me familiarize you with all these possibilities....                        


 The first couple pages include:

what the difference is between regular and instant dry milk

storage times-  which are completely off!  Ignore what it says;  a BYU study shows that canned dry milk has been found to last 20+ years when kept at room temperature and below.

Mixing and drinking it- how to make it taste the best

Cooking with powdered milk

How much to store per person

How to determine if milk is past its prime shelf life

What to do with it if it's too old

Reconstituting chart

 
Now the recipes-

'whole milk' (powdered milk is powdered SKIM milk)

Buttermilk substitute

Evaporated milk- everydayfoodstorage link above gives quantities for a 12-oz can.  This costs $ .25.

Sweetened Condensed Milk – for the closest version to a 14-oz can, use

1/2 c. (non-instant) powdered milk
1/2 c. water
1 c.  sugar

0-2 Tbsp. butter

 If you like to be precise, use 1 1/2 Tbsp. less than 1/2 c. water (this also gives a slightly thicker result, like the can), but the first way is very close (yields 14 3/4 oz)    Other recipes use more -or less- of any of those ingredients.  Really, they all work. That said, the 'closest' version costs $ .39 if you use no butter, and $ .53 if you use 2 Tbsp.  What a deal! One important thing to know- these recipes call for hot or boiling water so the sugar gets completely dissolved. Otherwise you get grainy condensed milk.  I usually put my sugar with the water, then microwave and stir until the sugar dissolves.  Then blend with the milk powder and butter.


Hot Cinnamon Milk Mix- from an old 'Friend' magazine

Hot Caramel Milk Mix- like hot chocolate, only not!

Hot Chocolate Mix- one of many options out there, this one you just add water to.

Strawberry Shake- with a touch of orange to pep it up.  yummy.

Creamsicle Drink Mix- uses 3 Cannery products.  And it is really good.

Orange Julius- uses the church cannery orange drink powder.  You could use Tang if that's all you have.

Presoaked Wheat Blender Pancakes or Crepes- blender pancakes that are a little easier on your blender.  You just have to plan ahead with these.

Whole Wheat Pancake Mix

Fruit Syrup- no powdered milk here- just a really handy way to make a fruity topping for your pancakes.  The handwritten note says "Can use peaches canned in syrup and you just add cornstarch and cook"  Use 1-2 tsp. cornstarch per cup of syrup/juice.

Basic White Sauce

Cheese Sauce Mix- uses powdered cheese, pdr. milk and pdr. butter.  And onion powder.  (Remember my method of making onion powder?)

Low-Fat Cream Soup Mix -replaces 9 cans of condensed creamed soup, at $ .30 per can!

Potato Soup Mix-   very very easy.  (Well, they all are..)

Broccoli Soup- using all fresh ingredients except for the milk

Biscuit Mix- "Bisquick" where you add only water.  Use for any Bisquick recipes.  This makes as much as 2  40-oz boxes, at about $2.75/box

Honey Dinner Rolls

Whole Wheat Muffins

Weiner Schnitzel- not what you think, it's the old German dish.  Uses noodles, cheese, hotdogs.

Macaroni and Cheese- using the little 5-oz jar of cheese sauce.  This is a 'bag' recipe; everything can be put in a bag ahead of time and kept on a shelf (or given to a friend)

Microwave Caramels- mmmm

Whipped Topping- A little explanation here...  Evaporated milk will whip like cream if it is ICY-cold when you whip it.  This is glorified whipped evaporated milk, starting with the powder.  They add a few things for flavor, some oil for richness, and gelatin to keep it from going flat.  I think the gelatin gives it a strange consistency.  Next time I'll use a couple teaspoons of Instant Clear Jel.  Or cook some cornstarch with the water.  Or forget stabilizing it, and just eat it fast- maybe just whip evaporated milk and add sugar and vanilla to taste.

Fudgsicles-  don't these sound good?

Dry Milk Ice Cream- Bad name, but it uses sweetened condensed milk, which makes it really good.  The recipe claims to make a gallon, but it's really more like 2 quarts.

Peanut Butter Chews- similar to Bit-O'Honey if you use the honey instead of corn syrup.

Vanilla Pudding Mix- fat free, and has variations for chocolate and caramel pudding. When you make it, you add a tiny bit of butter and an egg, so it’s still lowfat, just not fat free.  If you cannot have wheat, substitute half as much cornstarch as the flour called for.

Plain Yogurt- really, this IS easy.  The recipe says it makes 2 quarts, but part of the water got left off the ingredients list.  Use 7 cups instead.  If you use your hottest tap water, this will be about right to start incubating.  You need the yogurt to start out between 105 and 120 degrees.  The lower end gives sweeter yogurt, the higher end makes it more tart. Wrapping the jars in a towel help keep it warm. Some warm areas to incubate it are- on top of a heating pad (cover with a  towel), an insulated cooler (I put in a jar of almost-boiling water to warm it up in there), a water-filled crockpot, a warm oven (an oven thermometer is helpful!  Hotter than 130 degrees will kill those friendly bacteria.).  Or get creative.  This costs only $ .42  per quart if you are using your own starter. 

Vanilla Yogurt- has gelatin in it, like most of the store-bought versions. This keeps it firm, even after stirring.  (Yogurt with no gelatin will become drinkable after stirring.)  If you want to use sugar instead of honey, use from 1 to 1 ½ cups.  And dissolve (boil) it in some of the water first, or it will settle to the bottom. You could use a package of flavored Jello- a 3 oz box is just under ½ c. of sugar, and  as much gelatin as one packet of unflavored.   Or use juice/syrup from canned fruit as part of your water.  Stir in fruit after the yogurt sets up.

Almond Crunch Granola- also no powdered milk, unless you count what you pour on top when eating this!

Strawberry Banana Smoothie- uses the yogurt you just made…

Yogurt-Fruit Smoothie- Banana-orange; uses yogurt as well as powdered milk

Yogurt Breakfast Waffles- yogurt makes them extra moist.  They also have a hint of orange and cinnamon in them.  I love these using the lemon yogurt.

Yogurt Dill-Veggie Dip- close to Ranch Dip

Yogurt, Berries, and Pecans on Crispbread- self-explanatory

Ranch Salad Dressing-  do you have any idea how much better fresh made is?

Fruit Yogurt Salad- uses vanilla yogurt and whatever fruit you have

Yogurt Parmesan Chicken- uses yogurt instead of mayonnaise or eggs to get the coating to stick.  Very good.

Granola, Yogurt, Berry Parfait- kinda like those little ones at McDonald’s, only you sweeten plain yogurt with honey.  You taste the fruit better this way.

Mock Mozzarella Cheese- about $1.50 per pound.  It only takes 10 minutes to make!  And it melts wonderfully.  Do use a blender to mix everything, otherwise the oil won’t mix in with the cheese curds and you’ll end up with a layer of oil on top of the whey.  (Make bread!)  NOTE- the recipe doesn’t tell you about salt.  Unsalted cheese is not very tasty.  I use 1 tsp. salt for this; I mix it in after rinsing the curds.   Even wrapping in cheesecloth, and pressing (under whatever heavy thing I can find) overnight, this hasn’t ever been cohesive enough for me to grate.  It crumbles, though. When I aged this for a couple months, it became very creamy and softer.  If you don’t have cheesecloth, you can use a piece of cotton fabric- something that will let the liquid drip out.  Cheesecloth can be found in some grocery stores in the kitchen tools section, or in fabric stores and Walmart over with the notions.

Parmesan Cheese- this is in already-crumbled form.  Best flavor after aging in fridge for 3 months, but still good used right away. 

Yogurt Cream Cheese, Yogurt Sour Cream- which one you make only depends on how long you let the yogurt drain.  16 ounces of yogurt will make just over 8 oz. of cream cheese, so it costs about $ .21  per 8 oz block.

Easy Homemade Cheese Ball- a cream cheese based cheese ball.  Use your yogurt cream cheese.

Mock Ricotta Cheese- about $ .84 for the batch, using your homemade yogurt.  ‘Real’ ricotta uses whey instead of milk, but normally you don’t have easy access to whey.  If you do (from making mozzarella?), use ¼ c. vinegar in 2 quarts whey, heat to simmering, then let sit for several hours for the curds to form.  Then strain through cheesecloth, salt,  and press.

Jalapeno Cheese- variation on the ricotta. 

Queso Blanco- this one does not melt; it holds its shape through cooking.

Homemade Cottage Cheese-  this makes the curds.  To make the creamy liquid the curds sit in, use a little yogurt, sour cream, or evaporated milk to the curds.  I like it with ¼ tsp. salt.  Add more if you like. The recipe makes about 8 oz. of curds and costs $ .36 

Cottage Cheese Scramble- a form of scrambled eggs, only mostly cottage cheese, with chives.  

Cheese-Stuffed Jumbo Shells- like Manicotti.  For those of you unfamiliar with it, this is similar in flavor to lasagna, only you use shaped pasta and stuff them, instead of doing layers.  The recipe calls for ricotta, cottage cheese, mozzarella, and Parmesan cheeses… but use what you have.  When I made it for the class, I used only cottage cheese, with mozzarella just on the top.  And only about a cup of spaghetti sauce.

Happy cooking!  

-Rhonda


0 Comments

    Need a Search bar?
    One day I may upgrade my website-- but until then, use your web browser search bar. Type in my web address and what you're looking for, like this-- 
    www.theprovidenthomemaker.com  pumpkin --  and you should get results.


    Author

    I'm a disciple of Christ, a member of the Church of Jesus Christ of Latter-day Saints, a family-defending, homemaking, and homeschooling mom of eight children, two of whom sometimes can't have milk or wheat. Growing up on a farm in a high mountain valley, my parents taught me to 'make do', work hard, smile, and help others.  I love cooking, learning, growing food and flowers, picking tomatoes, and making gingerbread houses --which CAN be made allergy-friendly-- with my children.  I hope you find something to help you on my site!

    Archives

    April 2024
    July 2023
    April 2022
    September 2021
    March 2021
    December 2020
    April 2020
    March 2020
    February 2020
    January 2020
    December 2019
    November 2019
    October 2019
    September 2019
    August 2019
    July 2019
    June 2019
    May 2019
    April 2019
    January 2016
    November 2015
    October 2015
    September 2015
    March 2015
    February 2015
    November 2014
    October 2014
    September 2014
    August 2014
    July 2014
    June 2014
    May 2014
    April 2014
    March 2014
    February 2014
    January 2014
    December 2013
    November 2013
    October 2013
    September 2013
    August 2013
    July 2013
    June 2013
    May 2013
    April 2013
    March 2013
    February 2013
    January 2013
    December 2012
    November 2012
    October 2012
    September 2012
    August 2012
    July 2012
    June 2012
    May 2012
    April 2012
    March 2012
    February 2012
    January 2012
    December 2011
    November 2011
    October 2011
    September 2011
    August 2011
    July 2011
    June 2011
    May 2011
    April 2011
    March 2011
    February 2011
    January 2011
    December 2010
    November 2010
    October 2010
    September 2010

    Categories

    All
    Alcohol
    Alternate Cooking
    Appearances
    Apple
    Apricots
    April Fools
    Aprons
    Bananas
    Beans
    Beef
    Beets
    Bench
    Beverages
    Bonnet
    Bread
    Breakfast
    Budget
    Budgeting
    Cake
    Candy
    Canning
    Carrots
    Cheese
    Chicken
    Children
    Chocolate
    Christmas
    Cleaning
    Coconut
    Comfrey
    Common Core
    Constitution
    Cookbook
    Cookies
    Cooking Oil
    Crafts
    Dairy Substitutions
    Dehydrating
    Dessert
    Dried Fruit
    Earth Oven
    Earthquake
    Easter
    Edible Weeds
    Eggs
    Emergency Prep
    Essential Oils
    Faith
    Family Home Evening
    Fertilizing
    Food Storage
    Fourth Of July
    Freezer
    Frosting
    Fudge
    Garden
    Gardening
    Gingerbread
    Gluten
    Gluten Free
    Gold
    Government
    Grains
    Gratitude
    Hat
    Herbs
    Home Remedies
    Home Repairs
    Homeschool
    Home Storage
    Honey
    Hope
    Inflation
    Leftovers
    Legumes
    Lemon
    Main Dishes
    Mixes
    Mothers
    Noah
    Non Artificial Colors
    Non-artificial Colors
    Nuts
    Oats
    Oil
    Orange
    Paint
    Peaches
    Pear
    Pie
    Pizza
    Plums
    Poem
    Popcorn
    Pork
    Potatoes
    Powdered Milk
    Prayer
    Preparedness
    Projects
    Prophecy
    Pruning
    Pumpkin
    Quick Bread
    Rhubarb
    Rice
    Salad
    Salt
    Sauces
    Self Reliance
    Self-reliance
    Sewing
    Shelf Life
    Shelves
    Sky
    Smoothie
    Snacks
    Soup
    Spices Or Seasonings
    Squash
    Strawberries
    Substitutions
    Sugar
    Summer Fun
    Three Month Supply
    Time
    Tomatoes
    Trees
    Truffles
    T-shirts
    Tuna
    Ultra Gel
    Valentine\'s Day
    Vegetables
    Water
    Watermelon
    Wheat
    Work
    Year Supply
    Zucchini

    RSS Feed

Web Hosting by iPage