The Provident Homemaker
  • Recipes and Info
    • Making Bread
  • My Blog
  • Favorite Resources
  • Documents and Files
  • 52 Weeks of Building Storage

Caramel Apple Cupcakes

10/15/2011

1 Comment

 
Picture
Aren't these so cute?  I saw them in a magazine someplace last week; wish I could remember which one it was!    Anyway, when there was a bake sale at school a couple days ago, it was the perfect excuse to make them!

You can make any kind of cupcake; I chose an applesauce cake recipe to go along with the look.  These also got a caramel filling, topped with caramel frosting, rolled in sprinkles, and then poked with a clean craft stick.

Mix up a batch of cake batter, either from scratch, or using a yellow, white, or spice cake mix: to make it applesauce cake, replace half the oil or butter in the recipe with twice as much applesauce (you can replace all the oil, but the cupcakes will be a little bouncy- fat adds tenderness).  For a 24-cupcake batch (same size as for a 9x13 pan full), also add 1 Tbsp. cinnamon.  If you have them (or like them!), you can also add a total of 2 teaspoons of other spices: ground cloves (go easy here!), nutmeg, ginger, and/or cardamom.  Bake as usual.  When cool, fill them if you like.  I used a sweetened condensed milk caramel (see Making Tres Leches Cake, second paragraph down), mixed with an equal amount of vanilla pudding to make it go further, since I was making 5 dozen.  Use whatever you like- homemade or jarred caramel sauce, butterscotch pudding, sweetened cream cheese (2 Tbsp. sugar per 8 oz. cream cheese), cream cheese frosting, or whatever sounds good with apple or caramel.
Picture
Make a batch of caramel frosting (see second page here); leave the pan over low heat to keep it warm and soft.  If you want sprinkles on the edges, pour a layer about 1/4" deep in a wide bowl or on a plate.

Picture
Dip the top of a cupcake in the warm caramel frosting.

Picture
Let excess drip off for a couple seconds...

Picture
then twist the cupcake so the drips end up on the frosted top.

Picture
Put the cupcake on its side in the dish of sprinkles, then rotate it around to coat the edges all around.

Picture
Set it on a tray for easy transporting, and insert a craft stick.


Done!  (Wasn't that awesome?)
1 Comment

Fluffy Frostings That Are Not Too Sweet, non-artificial colors

6/23/2011

1 Comment

 
Picture
Do you have to go colorless when avoiding artificial colors?
 
The NYTimes recently ran an article called "Colorless Food?  We Blanch", claiming nobody would want to eat food anymore if manufacturers didn't use artificial colors.   It was a little ridiculous.   One response to it is found here.

Yesterday I needed to make a pink and purple unicorn cake for my daughter.  And one extra issue- use no artificial colors, or one son couldn’t have any of the cake.  At least not with any frosting.

Picture
My husband now has a new favorite frosting, as does a neighbour who stopped by:  Fluffy Blueberry Cheesecake Frosting, which was my answer to needing a purple mane, tail, and border. 

(If you just want the frosting recipe, go to the bottom of this post.  To read about making a non-artificial pink-and-purple unicorn, read on.)


To make the basic pony part, I greased a pony-shaped cake pan, mixed up 4 cups of liquid with enough gelatin, and let it set up in the fridge.  I use unflavored gelatin; Knox comes that way in packets, but I buy it in the bulk section of a local health food store.  To make the pony pink, I used fruit punch as 3 cups of the liquid, and 1 cup sour cream (or plain yogurt; I used kefir ‘cause that’s what was in the fridge!) to make it opaque pink instead of transparent red.  Use twice as much gelatin as you would normally; otherwise it will fall apart when you flip it out of the pan. (Mine did, thus the recommendation to double the gelatin!)  It might anyway, but at least you’ll be upping the chance for success.

I baked a rectangular cake big enough for the pony to fit on and frosted it with Fluffy Cheesecake Frosting.   I set the pony pan in a sink of hot water for just a couple seconds, then flipped the pan over the cake so the pony landed in the right place.  Then I decorated with the purple frosting, and carved a horn out of a stick of jicama.  (I was going to use the tip of an ice cream cone, but we were having jicama for dinner.)  Voile!  Everyone’s happy!

Fluffy Blueberry Cheesecake Frosting- makes about 2 1/2 cups
(See here for Strawberry Cheesecake Frosting)
1 cup fresh or frozen blueberries (or 6 oz. other berries)
½ c. sugar
1 Tbsp. Ultra Gel
8 oz. cream cheese, softened
4 oz butter, softened
½ tsp. vanilla 

Combine blueberries and sugar; either puree them in a blender until smooth, OR cook and stir until boiling; cool.   Beat cream cheese until smooth, add butter, sugar, blueberry mixture (cooled if you cooked it),  Ultra Gel, and vanilla.  Beat until smooth and fluffy.  Let stand 5 minutes. 

_____
Ultra Gel needs five minutes to fully absorb liquid; that’s why I’ve added the 5-minute wait time.  These frostings are easy to adjust- if too thick or pasty, add a little (1-2 tsp.) water, or as needed.  If too thin, sprinkle on another 1 tsp. Ultra Gel and beat it in. 


The cream cheese frosting recipe I tweaked to get this, above, as well as the white base layer:

No-cook “cooked”
Fluffy Cheesecake Frosting
½ c. sugar

1 Tbsp. Ultra Gel
8 oz. cream cheese
4 oz butter (1 stick), softened
¼ c. milk
½ tsp. vanilla

Stir together sugar and Ultra Gel, set aside.  Beat cream cheese until smooth, add butter, milk, vanilla, and sugar mixture.  Beat until smooth and fluffy, about 2 minutes.  Let stand 5 minutes.


Another variation I’ve come up with, in case you don't use table sugar at your house:

Fluffy Honey –Cheesecake Frosting

8 oz. cream cheese
4 oz. butter, softened
1/3 cup honey
3 T. water, milk, or cream
½ tsp. vanilla
2 Tbsp. Ultra Gel

Beat cream cheese until smooth; add butter, honey, water, and vanilla.  Sprinkle the Ultra Gel  on top, then beat all until smooth and fluffy, about 2 minutes.  Let stand 5 minutes.

1 Comment

Basic, Simple, Adaptable, FREE Cookbook

3/10/2011

0 Comments

 
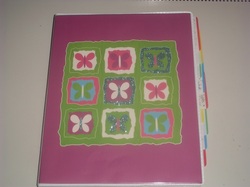
Picture
My version of the finished cookbook.   What will yours look like?

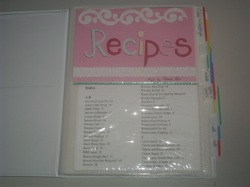
Picture
Title page: this is as close as I get to scrapbooking!  The book also has a table of contents and an index. 

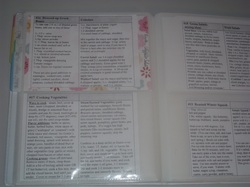
Picture
Each section has a tabbed divider stuck onto the page.  I just used the tabs you find in the office supply section of a store.

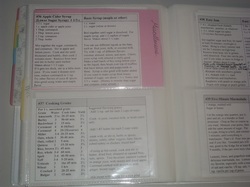
Picture
The first recipe of each new section gets a colored 'scrapbooking' paper behind it.

I’ve put together a cookbook of basic recipes and cooking concepts (like how to take a basic yellow cake recipe to make any number of variations). It was designed to be portable and highly useful.   I hope it is!   I had non-cooks, college students, and young missionaries in mind.    It’s typed in 3x5/4x6 card format, so you cut out the cards and slip them into the sleeves of a small photo album. This collection fits perfectly in a 72-sleeve album.  If you only find bigger ones, you can use the extra spaces for blank cards to write recipe notes on, or slip a photo of the food in the sleeve next to the recipe.  If you like the photo idea, I already have pictures of lots of them.  Email me if you want them, [email protected]

Rather than give a link to the whole cookbook, I’ll put an installment of it once or twice a week here on my website.  That way you have time to really look through the recipes, at a manageable pace.  The first one is below:


Cakes and Frostings page 1
Cakes and Frostings page 2

Note on printing these pages:  the links open to GoogleDocs.  To print, select GoogleDoc's print button, don't do Control-P or you'll print the browser page and only get half the recipes.
0 Comments

Making Tres Leches Cake

11/8/2010

1 Comment

 
Picture
If you've never had a Tres Leches cake, you're in for a treat!  It's very moist, with a Dulce de Leche flavor throughout.  It's soaked with a mixture of 'three milks'- whole milk, evaporated milk, and cream, normally.  I tend to use whatever's on hand, though.  If you don't have cream, replace with an equal amount of evaporated milk.  You can even whip evaporated milk, if it's very cold.  30 minutes in the freezer usually does the trick.

Picture
This is how you get the Dulce de Leche flavor- caramelize a can of sweetened condensed milk.  It takes two hours if you let the unopened can boil, ALWAYS completely covered by water (or it could explode). Or if you open up the can and pour it in a bowl,  it takes 7-15 minutes in the microwave.  It really boils up, though, so use the biggest microwave-safe bowl you own!  And cover it with plastic wrap.  The condensed milk on the left is caramelized; the condensed milk on the right is what it looks like beforehand.

Picture
The baked cake, a sturdy hot-milk sponge cake.  Let it cool for ten minutes, then poke holes all over, using a skewer or similar.  (My 'skewer' is the bottom of an instant-read thermometer.)

Picture
While the cake is still hot, but the 'milks' mixture is cool-ish, pour all over the cake.  It will start soaking in.  Refrigerate for at least 3 hours, to let the liquid totally soak in and start to set up a bit.

Picture
You know how food blogs make it look like everything is always perfect?


Well... 
 a doubled recipe + the same size bowl = scrubbing!

For an easy-to print version, click on one of these, below.
Tres Leches Cake recipe
, or Gluten-free, Dairy-free, Egg-free version here.

To get the milk mixture to soak in properly, the cake should be hot and the milks room temperature: make the milk  mixture first so it can cool during cake baking time. This was modified from the Cook’s Country recipe.  I live at 3500 ft. elevation, and their version kept falling in the center.  If you live around sea level, you might need to increase the sugar back up to 2 cups, and the baking powder to 2 tsp.  

Tres Leches cake

Milk Mixture:
1 (14 oz) can sweetened condensed milk (or use the powdered-milk version)
1 (12 oz) can evaporated milk
1 c. heavy cream (sometimes I just add 1 c. more evap. milk instead)
1 tsp. vanilla
           Caramelize the sweetened condensed milk by either boiling the can (covered at ALL TIMES by water) for two hours OR in the microwave:  pour into a large microwave-safe bowl, cover with plastic wrap, and microwave for 7-15 minutes, until slightly darkened and thickened.  Stir every couple minutes, especially at the end.  This takes 7 ½ minutes in my microwave.  If it looks a little burned, it’s still OK.  Stir in about half of  the evaporated milk, then set aside 3 Tbsp. for the top of the cake. Whisk in the remaining evaporated milk, cream, and  vanilla.  Set aside.

Cake:
½ c. unsalted butter (if using regular butter, reduce salt by ¼ tsp.)
1 c. milk
4 large eggs, room temperature
1 ¾ c. sugar
2 tsp. vanilla
2 c. flour
1 ½ tsp. baking powder
1 tsp. salt
1/2 tsp. cinnamon, optional (I prefer the cake without)
           Preheat oven to 350 degrees. Heat together the butter and milk until the butter melts; set aside.  Beat the eggs for about 30 seconds, then slowly add the sugar while beating.  Beat on med-high for 5-7 minutes, until they become very thick and glossy.  Mix in vanilla and hot milk/butter.  Add flour, baking powder, and salt  (I dump them on in that order, then mix them with my fingers a bit before beating them into the batter.)  Pour into a greased and floured 9x13 pan.  Bake for about 30 minutes, until cake tests done with a toothpick.  Let sit on a cooling rack for 10 minutes.  Poke holes every half inch all over the cake with a skewer; pour milk mixture over top.  Let sit for 15 minutes, then refrigerate for at least 3 hours and up to 24.  Frost right before serving.

Frosting:
1 c. whipping cream
3 Tbsp. reserved cooked sweetened condensed milk
1 Tbsp. sugar
1 tsp. vanilla
           Beat all together until whipped and thick enough to spread.
1 Comment
Forward>>

    Need a Search bar?
    One day I may upgrade my website-- but until then, use your web browser search bar. Type in my web address and what you're looking for, like this-- 
    www.theprovidenthomemaker.com  pumpkin --  and you should get results.


    Author

    I'm a disciple of Christ, a member of the Church of Jesus Christ of Latter-day Saints, a family-defending, homemaking, and homeschooling mom of eight children, two of whom sometimes can't have milk or wheat. Growing up on a farm in a high mountain valley, my parents taught me to 'make do', work hard, smile, and help others.  I love cooking, learning, growing food and flowers, picking tomatoes, and making gingerbread houses --which CAN be made allergy-friendly-- with my children.  I hope you find something to help you on my site!

    Archives

    April 2024
    July 2023
    April 2022
    September 2021
    March 2021
    December 2020
    April 2020
    March 2020
    February 2020
    January 2020
    December 2019
    November 2019
    October 2019
    September 2019
    August 2019
    July 2019
    June 2019
    May 2019
    April 2019
    January 2016
    November 2015
    October 2015
    September 2015
    March 2015
    February 2015
    November 2014
    October 2014
    September 2014
    August 2014
    July 2014
    June 2014
    May 2014
    April 2014
    March 2014
    February 2014
    January 2014
    December 2013
    November 2013
    October 2013
    September 2013
    August 2013
    July 2013
    June 2013
    May 2013
    April 2013
    March 2013
    February 2013
    January 2013
    December 2012
    November 2012
    October 2012
    September 2012
    August 2012
    July 2012
    June 2012
    May 2012
    April 2012
    March 2012
    February 2012
    January 2012
    December 2011
    November 2011
    October 2011
    September 2011
    August 2011
    July 2011
    June 2011
    May 2011
    April 2011
    March 2011
    February 2011
    January 2011
    December 2010
    November 2010
    October 2010
    September 2010

    Categories

    All
    Alcohol
    Alternate Cooking
    Appearances
    Apple
    Apricots
    April Fools
    Aprons
    Bananas
    Beans
    Beef
    Beets
    Bench
    Beverages
    Bonnet
    Bread
    Breakfast
    Budget
    Budgeting
    Cake
    Candy
    Canning
    Carrots
    Cheese
    Chicken
    Children
    Chocolate
    Christmas
    Cleaning
    Coconut
    Comfrey
    Common Core
    Constitution
    Cookbook
    Cookies
    Cooking Oil
    Crafts
    Dairy Substitutions
    Dehydrating
    Dessert
    Dried Fruit
    Earth Oven
    Earthquake
    Easter
    Edible Weeds
    Eggs
    Emergency Prep
    Essential Oils
    Faith
    Family Home Evening
    Fertilizing
    Food Storage
    Fourth Of July
    Freezer
    Frosting
    Fudge
    Garden
    Gardening
    Gingerbread
    Gluten
    Gluten Free
    Gold
    Government
    Grains
    Gratitude
    Hat
    Herbs
    Home Remedies
    Home Repairs
    Homeschool
    Home Storage
    Honey
    Hope
    Inflation
    Leftovers
    Legumes
    Lemon
    Main Dishes
    Mixes
    Mothers
    Noah
    Non Artificial Colors
    Non-artificial Colors
    Nuts
    Oats
    Oil
    Orange
    Paint
    Peaches
    Pear
    Pie
    Pizza
    Plums
    Poem
    Popcorn
    Pork
    Potatoes
    Powdered Milk
    Prayer
    Preparedness
    Projects
    Prophecy
    Pruning
    Pumpkin
    Quick Bread
    Rhubarb
    Rice
    Salad
    Salt
    Sauces
    Self Reliance
    Self-reliance
    Sewing
    Shelf Life
    Shelves
    Sky
    Smoothie
    Snacks
    Soup
    Spices Or Seasonings
    Squash
    Strawberries
    Substitutions
    Sugar
    Summer Fun
    Three Month Supply
    Time
    Tomatoes
    Trees
    Truffles
    T-shirts
    Tuna
    Ultra Gel
    Valentine\'s Day
    Vegetables
    Water
    Watermelon
    Wheat
    Work
    Year Supply
    Zucchini

    RSS Feed

Web Hosting by iPage