The Provident Homemaker
  • Recipes and Info
    • Making Bread
  • My Blog
  • Favorite Resources
  • Documents and Files
  • 52 Weeks of Building Storage

Building an Earth Oven

4/6/2011

4 Comments

 
Bakeries boast if they use a brick oven for their breads.  Why? 
These ovens cook using multiple forms of heat- conduction, radiant, and direct heat.  Add some steam, and you get some seriously fabulous crust on your bread.  Pizza?  You better believe it.  You cook it at an ideal 700 degrees Fahrenheit; a thin-crust pizza is done after only 3 minutes, emerging bubbling and with a lovely smoky flavor.
Cook anything in this that you would in a regular oven.  And when it's cooled down, it can remain the ideal temperature for incubating yogurt, clear through the night.

This type of oven has the fire built on the cooking floor.  Fill the oven with wood, light it, and let it burn for 2-4 hours, until the oven walls glow white-hot.  My thermometer doesn't measure high enough to know how hot this is; it only measures to about 1400 degrees!

Scrape out the fire, quickly scrub off the oven floor, and let the heat "soak"- you're letting the temperature equalize all over the interior.  When the temperature has dropped to what you want, add some steam (for bread baking) by swabbing the oven floor with a wet cloth or mop.  Load it up with your bread, or turkey, or squash, potatoes, casserole, or whatever-- and close the oven door to bake.


It's called an earth oven because it's made using packed earth; in other words, mud.  This makes it very affordable!  I highly recommend Kiko Denzer's book, Build Your Own Earth Oven.  It was invaluable to me, and has many excellent suggestions for making do with what you have locally.  He also has a great overview on Mother Earth News, right here.
You can make a fabulous oven out of nothing but dirt, sand, chopped hay or leaves, and some bricks or tiles.  There are even simpler versions around, using just rocks and dirt. 

Since I opted for several upgrades on this oven, it cost about $200 total. 

Items I got for free:
cinderblocks (a stack was in the yard when we bought the house)
sand (huge sandbox, in the photos' background)
bricks for the oven face

Items purchased included:
bags of cement for a foundation pad
rebar for reinforcing the foundation
rebar for reinforcing the cinder blocks
cement for reinforcing cinder block construction
one used steel entry door
one circular saw blade to cut the steel entry door
about 45 firebricks
1/2 cubic yard of dirt
a couple small buckets of refractory cement
portland cement and a bag of vermiculite, for the insulation layer.
12" of 1" diameter steel electrical duct tubing
one dial-gauge thermometer
mortar, used with the oven face, and some gaps in the cinderblocks

If the pictures below seem overwhelming, here are the steps in short form- prepare an insulated base for the oven; build a sand dome on it; pack moist earth all around  the dome (thermal layer); pack insulation around the thermal layer.  Finish with a breatheable plaster, for longest-lasting results.  The doorway can be molded in as you go, or carved out afterwards.
Picture
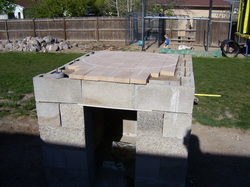
Sorry, I didn't take any photos before this point.  I poured a slightly sloped foundation pad, reinforced it with rebar, and dry-stacked cinderblocks, leaving some slots for drainage between cinderblocks at the low part (the back) of the pad.  To reinforce the cinderblock walls, I stuck rebar down every 2-3 cells, then filled those (with rebar) with cement.  (I did this because I have roughhousing boys, and live nearby a major  fault line.)  In this photo, half of it is in shadow; the oven floor is meant to be just above waist-high.  The area under the oven is to store wood.  To support the block over the opening, I found a piece of hardi-backer (cement) board.  The top course of cinderblocks were narrower than the ones below, which gave me a spot to place some kind of support for the oven floor.  I bought a used steel entry door and a special saw blade, and cut the door to fit.  On top of that went a layer of sand, for insulation, filled even with the top of the blocks (packed really well).  Firebricks were set snugly together for the oven floor, and a circle scribed in chalk.  This would be the inner diameter of the oven.

Picture
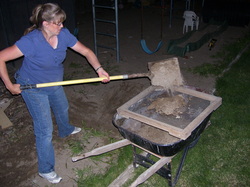
The sand was free, but it had lots of rocks- and small toys- mixed with it.  A frame with 1/2" hardware cloth stapled to it worked well for sifting.  If you notice my expanding waist in the next photos, it's because I was 8 months pregnant when I started this project, and 9 months along when it finished.

Picture
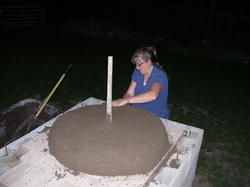
Build a dome of moist sand; this will be your oven's hollow part later.  There's a height-to-width radio that works most efficiently, but about ratio will give you an oven that cooks. 
The pipe in the middle was to show my required finished height.  Pack the sand really well, or it won't support the weight you're about to put on it.

TIP:  this takes a TON of sand, which you'll have to scoop out later.  At about this point I started added cinderblocks and other large items to the dome. That saved a lot of scooping.  And sifting.
Picture
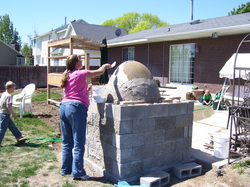
Once the dome is as big as you want, pack and smooth it as best you can. A little water helps, and a board to press and smooth. 
If you want a layer of refractory cement, to help hold heat and protect the inside walls, add it now.  A thin layer, 1/8 - 1/4 " thick, is all you need.
Picture
Once that's in place, mix your dirt- er, I mean 'earth'.  It needs to be moist enough to hold together, but not so wet it squishes when you pack it.  You can mix it on a tarp with your feet, or in a wheelbarrow with a shovel.  Starting at the bottom, tightly pack this earth in a layer about 4" high, and the width of your hand.  Use your closed fist to pack it, and a small bucket of the dirt to keep it handy. Spiral your way up the dome, always packing hard onto the layer below.  Don't apply any pressure to the sand dome.  Let this sit for a few days, then scoop out all the sand.

Picture
Once the earth layer is complete, add an insulation layer in the same way as the earth layer.  This makes a huge difference in how well your oven retains heat.  You can use more mud, mixed with any organic material- chopped leaves, straw, horse hair, you name it.  They will burn out when the oven heats up, leaving insulating air pockets behind.  This oven's insulation is a mixture of portland cement and vermiculite; I wanted it to be very durable.  Shape this layer with your oven door in place so it fits. 

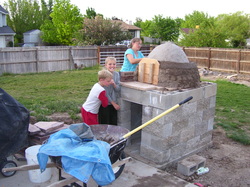
The pipe sticking out in front of my face is a piece of metal conduit with a fitting to screw on the temperature gauge.  Next time I'll put it down close to the oven floor, which is where the bread bakes.  There's actually about 100-degree (Fahrenheit) difference between the oven floor and where the oven probe sits. 
Picture
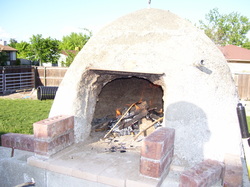
If you want the oven to dry with as few cracks as possible, build a low fire and let it burn for several hours.


Picture
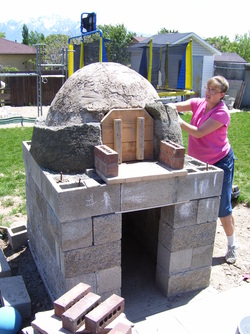
For a brick face-  a chisel and hammer yielded a really poor keystone for the arch.  Improvise to support the arch until it dries.   A bucket and cinderblock came to the rescue here.

Picture
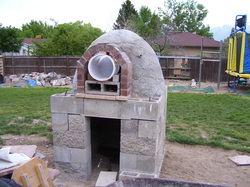
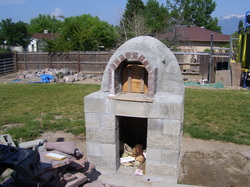
The completed oven. 

Picture
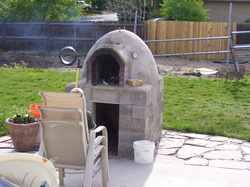
More completed, with flagstones set around it. 

When using the oven, keep a bucket of water handy. 

I still intend to make a roof for it- Utah winters are rough on it.  There are two eye bolts embedded in the top of the oven- all it will take is a piece of sheet metal, creased at the center to make a sloping roof, and two slits cut in it to slip over the eye bolts.  Twist them, and it should stay on.

4 Comments
Carma Rose de Jong Anderson link
9/14/2012 03:11:56 pm

You are wonderful to bear children & still work while pregnant , I didand I'm glad (& keep your salt down I hope) while still having self fulfilling projects that help the whole family. I fell in love with making cement when I was five & six, and learned 4 recipies for making various cement, loving to shovel it and mix it in a metal wheel-barrow all through my teens for our family home and then helping neighbors after my marriage. I was blessed with a sweet full time Mama until age 9 (sob) and then doing very exciting projects with my Papa, the founding dean of Fine Arts of BYU in Provo, UT. I am sure you also garden food & flowers, as we did in the Great Depression in the 1930s. Since I am an artist & historian I think your ancient concept of a bake oven put into modern terms is FAB!f Bon Voyage in taking care of your family & neighbors, & teaching children to work P:RODUCTIVELY.How thrilling are the building & cooking arts! I serve food on different china and placemats every meal for my 86 yr. old adored husband. He says i have never fixed the same menu twice. All arts of painting and sculpting & singing while you weed gardens and scrub is joy, and teaches the Hymns and the Gospel while they grow up in poetry!

Reply
Marc
2/23/2013 07:42:55 am

Thanks for this article,

I love this idea. its a blend of cob oven with a longer lasting cement finish which is what i'm looking for. Since its been about 2 years since this posting, how has the oven held up and is there anything you would do different. i'm starting on my first oven this month and any pointers would be awesome. thanks so much and your article is truly inspiring.

-Marc

Reply
Rhonda link
2/23/2013 10:03:33 am

Marc,

The finish is holding up pretty well except for the bottom right of the dome and the flat part to the right of the opening, where it has cracked and sloughed off That's on the south side, which surprised me; I thought the north side would fare worse. I guess it's subject to more freeze-thaw cycles through the winters, whereas the north side tends to stay frozen longer.
The finish on the dome has cracks through it, which I understand why they formed but wish they hadn't. I was hoping the finish would allow the steam from the inside to just nicely permeate and escape... but it doesn't. So I just have to deal with the oven breathing through the cracks, which spiral around the oven in the same place my cob/mud seams are.
I'm certain the finish would have at least double the life if I put a roof over top, but you'll need to expect some cracks in the dome finish anyway.

Reply
Marc
2/24/2013 07:19:07 am

thanks for the reply!!! cant wait t start

Reply

Your comment will be posted after it is approved.


Leave a Reply.

    Need a Search bar?
    One day I may upgrade my website-- but until then, use your web browser search bar. Type in my web address and what you're looking for, like this-- 
    www.theprovidenthomemaker.com  pumpkin --  and you should get results.


    Author

    I'm a disciple of Christ, a member of the Church of Jesus Christ of Latter-day Saints, a family-defending, homemaking, and homeschooling mom of eight children, two of whom sometimes can't have milk or wheat. Growing up on a farm in a high mountain valley, my parents taught me to 'make do', work hard, smile, and help others.  I love cooking, learning, growing food and flowers, picking tomatoes, and making gingerbread houses --which CAN be made allergy-friendly-- with my children.  I hope you find something to help you on my site!

    Archives

    April 2024
    July 2023
    April 2022
    September 2021
    March 2021
    December 2020
    April 2020
    March 2020
    February 2020
    January 2020
    December 2019
    November 2019
    October 2019
    September 2019
    August 2019
    July 2019
    June 2019
    May 2019
    April 2019
    January 2016
    November 2015
    October 2015
    September 2015
    March 2015
    February 2015
    November 2014
    October 2014
    September 2014
    August 2014
    July 2014
    June 2014
    May 2014
    April 2014
    March 2014
    February 2014
    January 2014
    December 2013
    November 2013
    October 2013
    September 2013
    August 2013
    July 2013
    June 2013
    May 2013
    April 2013
    March 2013
    February 2013
    January 2013
    December 2012
    November 2012
    October 2012
    September 2012
    August 2012
    July 2012
    June 2012
    May 2012
    April 2012
    March 2012
    February 2012
    January 2012
    December 2011
    November 2011
    October 2011
    September 2011
    August 2011
    July 2011
    June 2011
    May 2011
    April 2011
    March 2011
    February 2011
    January 2011
    December 2010
    November 2010
    October 2010
    September 2010

    Categories

    All
    Alcohol
    Alternate Cooking
    Appearances
    Apple
    Apricots
    April Fools
    Aprons
    Bananas
    Beans
    Beef
    Beets
    Bench
    Beverages
    Bonnet
    Bread
    Breakfast
    Budget
    Budgeting
    Cake
    Candy
    Canning
    Carrots
    Cheese
    Chicken
    Children
    Chocolate
    Christmas
    Cleaning
    Coconut
    Comfrey
    Common Core
    Constitution
    Cookbook
    Cookies
    Cooking Oil
    Crafts
    Dairy Substitutions
    Dehydrating
    Dessert
    Dried Fruit
    Earth Oven
    Earthquake
    Easter
    Edible Weeds
    Eggs
    Emergency Prep
    Essential Oils
    Faith
    Family Home Evening
    Fertilizing
    Food Storage
    Fourth Of July
    Freezer
    Frosting
    Fudge
    Garden
    Gardening
    Gingerbread
    Gluten
    Gluten Free
    Gold
    Government
    Grains
    Gratitude
    Hat
    Herbs
    Home Remedies
    Home Repairs
    Homeschool
    Home Storage
    Honey
    Hope
    Inflation
    Leftovers
    Legumes
    Lemon
    Main Dishes
    Mixes
    Mothers
    Noah
    Non Artificial Colors
    Non-artificial Colors
    Nuts
    Oats
    Oil
    Orange
    Paint
    Peaches
    Pear
    Pie
    Pizza
    Plums
    Poem
    Popcorn
    Pork
    Potatoes
    Powdered Milk
    Prayer
    Preparedness
    Projects
    Prophecy
    Pruning
    Pumpkin
    Quick Bread
    Rhubarb
    Rice
    Salad
    Salt
    Sauces
    Self Reliance
    Self-reliance
    Sewing
    Shelf Life
    Shelves
    Sky
    Smoothie
    Snacks
    Soup
    Spices Or Seasonings
    Squash
    Strawberries
    Substitutions
    Sugar
    Summer Fun
    Three Month Supply
    Time
    Tomatoes
    Trees
    Truffles
    T-shirts
    Tuna
    Ultra Gel
    Valentine\'s Day
    Vegetables
    Water
    Watermelon
    Wheat
    Work
    Year Supply
    Zucchini

    RSS Feed

Web Hosting by iPage