The Provident Homemaker
  • Recipes and Info
    • Making Bread
  • My Blog
  • Favorite Resources
  • Documents and Files
  • 52 Weeks of Building Storage

No-Knead Danish Pastries ("Danishes")

8/18/2012

1 Comment

 
Picture
This makes for a very special breakfast, one of my husband's very favorites.  It's fun to serve these when I have overnight guests, or sometimes just to surprise my family. 
I love the flavor of fresh-ground wheat, so I usually make these using 1 cup whole wheat flour and 1 cup all-purpose flour.
If you prefer a fruit filling, use 1-2 Tbsp. jam, jelly, or pie filling instead of (or in addition to!) the cream cheese.
You'll need to plan ahead- mix these up in the evening (10 minutes), stick the dough in the fridge overnight, then shape, quick-rise, and bake in the morning (45-60 minutes). 

Easy Danish Pastry
Makes 1 dozen

1 Tbsp. or 1 pkg. instant yeast
½ c. warm water (110-120 degrees F)
2 c. flour
3 Tbsp. sugar
¼ tsp. salt
½ cup (1 stick) butter, softened
½ c. milk, buttermilk, or kefir
1 egg yolk

Cream Cheese Filling
8 oz. cream cheese
2 Tbsp. sugar or 1 Tbsp. honey
½ tsp. vanilla

Glaze
1 c. powdered sugar
1-2 Tbsp. milk

Combine yeast and warm water, let sit 5 minutes.  Meanwhile, combine the flour, sugar, and salt in a large bowl.  Mix the butter in, mashing as needed!  Beat the egg yolk with the milk, then add them to the dry mixture.  Pour the yeast mixture on top.  Mix well.  Cover and refrigerate dough at least 3 hours, but not more than 24.

Combine the ingredients for the filling- stir cream cheese, sugar, and vanilla until smooth.

Divide dough into two logs about 8” long; keep one  in the fridge to stay cold.  Sprinkle counter with flour, then put one of the logs on the flour.  Sprinkle it with flour, as well.  Roll to a rectangle about 8x14”, then cut into 6 strips, each 14” long.   Roll each strip into a rope, then shape into a coil on a greased baking sheet.   Put about 1 ½ Tbsp. of the cream cheese filling on the center of each coil.  Turn the oven on to 350 F.   Cover the rolls and let rise while the oven heats and you roll out the next half.    After the rolls have risen for about 20 minutes, bake for 15-20 minutes or until set and golden brown on the bottoms.  Mix together powdered sugar and milk for glaze, then drizzle over rolls. 

Leftover pastries can be frozen on the baking sheet, then transferred to ziptop baggies for longer storage.  Best frozen within 3 months (but OK after that).

1 Comment

Extra-moist bread

8/4/2012

0 Comments

 
Picture
publicdomainpictures.net
Just about everyone seems to know about potato bread, or potato rolls, and how moist and tender they are.  There was even a while when mashed potatoes were added to raised doughnut dough (which is essentially the same as roll dough anyway); the finished product ones were called "Spudnuts".  Potatoes aren't your only option here, but here's how to use them:

Adding about 1/2 cup of mashed potatoes for every 3 cups of flour in the recipe seems to be about as high as you'd want to go.  Potatoes don't have gluten, so adding too much would result in a dense, heavy bread.  I like to reduce the water in the recipe by about 1/4 cup for each 1/2 cup of mashed potatoes, since they have a lot of water in them.  You can use the basic bread recipe for this, or any other one you like.  If you don't have mashed potatoes, add potato flakes in place of some of the flour.  Even using the water you cooked potatoes in, as the liquid in your bread, will help with moistness.

You can make a 'fully loaded' potato bread by adding some sour cream (reduce your water again!), bacon pieces, cheese, chives, or whatever else.  See TheFreshLoaf for one version of this.  Just remember- adding high-water ingredients- like the mashed potatoes, or sour cream- will require you to either reduce your water, OR add more flour.  Adding mix-ins, like the bacon, cheese, chives, etc, doesn't affect the dough.  However, it's easier to knead the bread without them, so add them last.

Now- for more options-

Use other purees!  Use up to the same ratio as above, for the same reason.  This will work best if the purees are warm, to help the dough's yeast grow.  110-120 degrees F is ideal.

-Mashed pumpkin- plain (which you won't taste), or with some cinnamon and pecans added!
-Mashed sweet potato
-Pureed fruit - good for using up overripe things, or old bottled fruit that's turning darker (as long as the jar's still sealed).  You might want to reduce the sugar in the recipe; too much actually slows down (but doesn't kill) the yeast.
-Pureed vegetables- I've used green beans (up to 1-2 cups puree in the 6-loaf batch), pureed corn, chiles, olives, carrots, etc.  Unless you want that particulat flavor, though, its best to avoid the cabbage/broccoli/cauliflower family.   Just remember to reduce salt if you're using salted veggies, reduce by 1/4 tsp. for each cup of puree.
-Mashed cooked beans or other legumes.
-Cooked hot cereal- this includes leftover breakfast oatmeal, cooked 7-grain cereal, Cream of Wheat, cooked millet or amaranth, or whatever you happen to have.  I've even added an abandoned, soggy bowl of cold cereal before.


This is a good way to use up little bits of (clean) leftovers- imagine the flavors of bread you can create!  Just keep in mind that if you add something that has meat in it, you'll need to refrigerate the finished bread.


What things have you added to bread?
0 Comments

Baking Powder and Baking Soda

6/26/2012

0 Comments

 
Picture
Do you know the difference between baking soda and baking powder?  

How long have they been around?


Baking soda, sodium bicarbonate is an alkaline powder; when it is mixed with acidic ingredients, the two react and form carbon dioxide bubbles.  The bubbles lift and lighten batter as it bakes; baking must be done right away, before the bubbles dissipate and you lose its leavening power.  Common acidic ingredients include vinegar, buttermilk, sour cream, lemon juice, cream of tartar, brown sugar, and honey.  Baking soda also helps foods brown better, since moderate alkalinity, along with heat,  is a catalyst for the Maillard Reaction (the reason, other than caramelization, that cooked foods turn brown).

Baking powder is a combination of alkaline, acid (cream of tartar), and starch.  You don't need to use acidic ingredients in recipes using just baking powder, since the balance is already there.  Most baking powders are made with two different alkaline powders- one that reacts right away (baking soda), and one that reacts only with heat.  This way you can save some of that leavening power for when the food is actually IN the oven.  The starch is there to help absorb moisture so the powders don't react in the can and to help the powder stay free-flowing.

To use baking soda instead of baking powder, use 1/3 the amount, and make sure there's something acidic in the batter.  For instance, if your recipe calls for 1 Tbsp (which is 3 tsp.) baking powder, you can use 1 tsp. baking soda, and use buttermilk- or sour milk-  instead of regular milk.  Or mix in 1 tsp. cream of tartar.  Or use brown sugar instead of white.  

This works in reverse, too: if your biscuit recipe calls for buttermilk and you only have plain milk, use it but switch that 1 tsp. baking soda for 1 Tbsp. baking powder (or whatever it calls for, keeping that 1:3 ratio).

As far as I can find, baking powder wasn't invented until the 1800's, but leavening powders have been around at least for centuries.  Some of the earlier ones include:

Baker's Ammonia (ammonium carbonate, "hartshorn"; NOT cleaning ammonia!- which is poisonous)- made from powdered reindeer horn.  (Seriously.)  This one actually has characteristics more of baking powder, substitutes 1:1 for it, and makes cookies especially crisp and light.

Potash or pearl ash (potassium carbonate, an alkaline salt)- made by adding water to  the ashes of 'vegetables' or weeds, steeping overnight, then evaporating all the water by boiling.  The fine 'ash' left is used as baking soda.  There's a fascinating article on the process in the 1802 "Domestic Encyclopedia"

Saleratus, or soda ash (sodium carbonate, an alkaline salt)- also known as washing soda... sometimes used also in the boiling water step of making bagels, as it helps them brown better (Maillard reaction!!!).  An interesting bit of chemistry with this one is that when you heat  sodium bicarbonate (baking soda) by itself above about 160 F, you end up with sodium carbonate (washing soda), with byproducts of carbon dioxide and water (which dissipate into the air).  2NaHCO3(sodium bicarbonate) → Na2CO3(sodium carbonate)+ H2O + CO2  (It works fastest at 400 F.)

Baking soda's first large-scale appearance was in 1846, when a factory was built to make this new product, created by doing the opposite of the formula above- dissolving sodium carbonate in water, then pumping in carbon dioxide.  (There's a more efficient method now.)

  Can you believe we've had this useful leavener less than 200 years, and baking powder less than 150?     Boy, are we spoiled in the kitchen nowadays...


Read more:
http://www.foodsubs.com/Leaven.html
http://en.wikipedia.org/wiki/Saleratus
http://en.wikipedia.org/wiki/Washing_soda
http://chestofbooks.com/reference/The-Domestic-Encyclopaedia-Vol3/Pearl-Ash.html
0 Comments

Baking with Whole Wheat Flour

5/26/2012

0 Comments

 
Picture
If you're new to cooking with whole wheat, I recommend you also read Wheat Basics.


If you’re using whole-wheat flour instead of all-purpose flour, there are a couple things to know for successful baking.  Whole grains contain fiber-rich bran and nutrient-rich germ, as well as the starchy endosperm.  Processed white flour contains only the starchy part, not the bran or germ.  Because of this, you'll need to adjust your ingredients a little bit, either reduce the amount of flour by 2-3 Tbsp. per cup used, OR increase liquid by 3-4 Tbsp. per cup used and increase leavening by about 1/3.   Otherwise, your baked goods will be more dense, heavy, and flat than they need to be.   See more on this below.

Bran
is the outer protective layer of the kernel, it's very high in fiber and minerals, and vitamins.  That fiber  is very absorbent.  Because of this, whole wheat flour (measured by weight) absorbs about 25% more liquid than processed white flour does.   Bran also makes it harder for gluten to form; its sharp edges tend to cut the tiny gluten strands.  Soaking the dough – mixing at least the flour and liquid, then letting it sit for a few hours or overnight - softens the bran.  That’s one reason European breads have long rise times. The technique works well for pancake batter and cake batter- leave eggs out of the batter until ready to bake, or soak covered in the refrigerator.

The germ is also high in vitamins and minerals, as well as protein, some fiber and fat (vitamin E).   Its name comes from the same Latin root as the word "germinate"; germen , which means to sprout or shoot.   The germ is the part of the grain that can grow into a plant.  It is dense and heavy, and therefore you'll need more leavening in the recipe.  The vitamin E, which is an oil, is the reason for whole wheat flour's short shelf life; this type of fat oxidizes quickly, which makes it slightly rancid.  Store fresh-ground flour in the fridge or freezer to prolong its life and vitamin content.  If you leave the flour at room temperature, it's at its best within 24 hours, but is still good (though less nutritious) for about a week.  It won't make you sick after that, just won't give you all the benefits it would have when more fresh.  Neither does it taste as good.  That's why bread made from freshly ground flour tastes so much better than bread made with whole wheat flour from a bag at the store.

To recap:  
either use about 20% less flour (2-3 Tbsp. less per cup used),
or increase water by about 3-4 Tbsp. per cup of liquid and add about 1/3 more of any leavening agent you’re using (1 tsp. more per Tbsp).  

Fresh-ground flour is fluffy and less packed in the cup, so there’s already less there.  For the most accurate measuring, go by weight, not volume.
0 Comments

Chocolate-Chocolate Buns

2/25/2012

0 Comments

 
Picture
These are chocolatey, smooth, chewy buns or rolls.   The bread itself is chocolate, and then there are bursts of flavor from little melty pockets of semisweet chocolate.  These are gooooood.

So that you can see what a difference it makes, the bun on the left was not brushed with the cornstarch wash; the bun on the right was.  It not only deepens color and intensifies shine, but also helps form a thin, tender, and chewy crust. 

Chocolate-Chocolate Buns
1 c. semisweet chocolate chips,divided   
½ tsp. oil                                          
3/4 c. semisweet chocolate chips
1 1/3 c. milk                                     
1 Tbsp. butter
3 to 3 ¼ c. flour (to start with)
1/4 c. cocoa
1 tsp. salt                                           
1 pkg. RapidRise yeast * or 2 ½ tsp. instant yeast
1 egg                                                                          
½ tsp. cornstarch                           
1/4 c. water                                      

In a small zip-top baggie, combine ¼ c. chocolate chips with ½ tsp. oil; set aside.  Put remaining ¾ c. chocolate chips in the freezer while you make the dough.

In a small pan, heat the milk and butter until very warm, about 120-130 degrees F.   Meanwhile, in  a medium bowl combine 2 c. flour, the cocoa, salt, and yeast.   Pour in the warm milk mixture.  Add the egg and beat until everything is smooth.  Add 1 cup flour and knead 5 minutes or until satiny-smooth.  Let rest 10 minutes.  Stretch dough on counter in a rectangle about 8x16".  Sprinkle on the 3/4 c. cold chocolate chips, roll up, and knead 1-2 minutes or until well dispersed.  Divide dough into 12 equal pieces (or 24 pieces for smaller buns).  Shape each into a smooth bun and place on a greased or parchment-lined cookie sheet.  Cover and let rise til double, about 1 hr. 15 min.  Meanwhile, combine cornstarch and water.  Stir until smooth, then boil it until it thickens slightly.  Cover and set aside. 

Heat oven to 375 degrees.  Just before baking, brush gently with the cornstarch wash.  Bake for 15-17 minutes, or until bottoms are very lightly browned (baking longer will decrease the chocolate flavor).  After removing from oven, brush again with cornstarch wash, remove to a cooling rack.  When cool, melt the chocolate & oil (in the baggie), knead the bag to mix well.   Snip a tiny corner off the baggie and drizzle chocolate over the buns.  These buns are best eaten the first day.

Picture
These are the newly-shaped buns just starting to rise.  Yes, I covered them right after this shot; they rise much better when the surface can stay moist.

Picture
The buns are brushed gently with the cornstarch wash right before baking, then again as they come out.  This photo is of the baked buns.  The wash, and then the chocolate drizzle on them, turn something funny-looking into something mouthwateringly attractive!

Picture
Don't you just want to make these now?

0 Comments

No bored kids

12/27/2011

0 Comments

 
Picture
Well, at least they'll be bored less....

Do you need some ideas of things to do with your kids during Christmas break?

How about:

Pipe Cleaner Animals 
Pipe Cleaner & PomPom creatures

Picture
Peel a hardboiled egg the cool way (my teenagers will love this!- but I'll do my own, thanks)   I'd blown eggs before, when they were raw, but had never heard you could use a similar technique when they're cooked!

Picture
Have you ever thought about the name "Play dough"?  I hadn't, until I bought a book called Kids' Ideas With Frozen Dough.  This book, printed by Rhodes Bread, who makes frozen bake-at-home bread dough, shows how to make butterflies, turtles, alligators, bees, dinosaurs, your name... all from regular bread dough.

As a mom, I detest play dough- it gets everywhere, and is usually abandoned someplace with its lid off, where it dries out.  But this-  Hey!  this is useful.  And edible.  I give my kids a lump of bread dough to play with, and later we bake and eat their creation.  If you want to make your own, see the Making Bread page.  You can even use biscuit dough, though it becomes tougher the more it's handled.  Yeast bread dough can take a lot  of abuse.

Now one more for anyone over about age 5: The Two-Second Shirt Fold. 
See it here,
then learn how to do it, here.  You'll be amazed.  Then you'll want to go fold all the shirts in your house!
0 Comments

Refrigerator Rolls

12/15/2011

0 Comments

 
Picture
Do you ever wish you could have cinnamon rolls in the morning without having to get up two hours early? Do you ever wish you could have dinner rolls ready to bake when you walk in the door from church or work? 

With this recipe, you can.  No pop-open refrigerated dough cans required.  You get fresh, hot, delicious bread with all normal, easy-to-pronounce ingredients.   (Do I sense a Christmas tradition in the making?)

The technique might work with other bread/roll recipes; I haven't experimented to find out yet.  (Please let me know if you do!)


The recipe is from a 1987 Fleishman Yeast bread recipe booklet and tweaked only slightly.  One chapter in the booklet was called "Rising On Ice"; hence the name, below.  The dinner roll dough is soft, tender, springy, with a tender crumb.  You can make any shape of rolls with it, including cinnamon rolls!  If you make dinner rolls, remember that you can sprinkle them with herbs, sesame seeds, poppyseed, or sea salt.  These could even be made into can't-be-beat hamburger buns!  (Roll 1/2" thick, cut 3-4" circles with a biscuit cutter or canning ring.)

This makes about 2 1/2 dozen rolls, or one 14x18" baking sheet full of cinnamon rolls.


Rising On Ice Dinner Rolls  
 
1 cup milk
2/3 c. water
1/4 c. (1/2 stick) butter
6-7 cups flour
1/2 c. sugar
1 1/2 tsp. salt
2 packages active dry yeast (or 3-4 tsp. instant yeast)
2 eggs, at room temperature
 
Combine milk, water, and butter; heat to 120-130 degrees (butter doesn't need to melt).  Meanwhile, put 2 cups of the flour, the sugar, salt, and yeast in a large bowl.  Add the warm milk mixture, then beat two minutes on high speed.  Add eggs and 3/4 c. more flour; beat two more minutes on high.  Add more flour to make a fairly stiff dough; knead 8-10 minutes, until smooth.  Cover and let rest for 20 minutes.  Punch down, shape into whatever shape rolls you want. Place them on a greased baking sheet.  Brush them with oil (this helps them not dry out in the fridge, as well as to not let the plastic stick), then cover them loosely with plastic wrap.  Refrigerate for 2-24 hours.  When ready to bake, pull them out of the fridge, carefully uncover them, and let them sit at room temperature while the oven heats.  Bake at 375 degrees for 15-20 minutes or until done. 

For instructions to make cinnamon rolls, see the Making Bread page and scroll about halfway down. 
0 Comments

Wheat Flour Basics

4/25/2011

1 Comment

 
Picture
Left- White Wheat
Right- Red Wheat

Picture
As you can see from the loaves, red and white wheat bake up nearly identically except for color.  They differ quite a bit in flavor.
"50%" means that the loaf is made of 50% whole grain, and 50% all-purpose flour.

Last time you made bread, was it coarse and crumbly once it sat for a while?

If it was, you had a gluten problem.  It could be that the dough wasn't kneaded enough to form good long gluten strands, or your flour may have not had enough gluten in it to begin with.   If so, use flour with a higher gluten content next time, or add gluten itself.  Cans of gluten are often sold with breadbaking supplies. 

Another thing that makes a big difference is how finely ground your flour is: if it's coarse, gluten can't form well.  Develop enough gluten, and you have small, even air bubbles in your bread, and a chewy texture.

Why is gluten so important?  

Gluten is the main protein in wheat.  It forms tiny elastic chains that allow the dough to stretch and hold together, and that matrix forms walls around the carbon dioxide bubbles produced by the yeast as it grows.   If there's not enough gluten, the cell walls break, leaving large, unevenly-shaped air bubbles.    Gluten is activated by liquid, warmth and kneading- which is why you use as little of those three when you're making pie crust.  That's one food that you want to avoid gluten forming.  Gluten makes great bread, but tough pastry.
 
Wheat comes in different colors and 'hardness', or protein content.  You can buy "soft white", "soft red", "hard white" and "hard red".   There are even distinctions among the hard wheats- it is often labeled as "spring wheat" or "winter wheat".  Winter wheat is planted in late fall, and grows using the moisture from winter snow and rain.   Spring wheat is planted in spring, and grows through the hot, dry summer.  The more water the wheat gets, the more grain it produces, but these higher yields result in lower protein content.  So hard spring wheat, growing when it's hot and dry, ends up with a higher protein content.  (This explanation is somewhat simplified- if you like scientific details, see here.)  If you buy a bag that just says "hard red wheat", assume it's winter wheat.  Being able to label wheat as "hard spring wheat" is a selling point, and the farmers get more money for higher-protein wheat. 

This also means that if you buy the cheapest 'hard' wheat, you'll most likely have lower protein content.  Which means it's gonna take a little more effort to make it into good bread.

Red Wheat, either hard or soft, has a deeper, heartier flavor, and a reddish-brown color.

White Wheat, hard or soft, has a more delicate flavor, and a light tan color.  If you're just starting with whole-wheat bread making, this is a good one, since the flavor is more subtle.  It tastes more like 'white bread', but better!  I love the taste and fragrance of freshly-ground wheat in bread.  Hard white wheats are relatively new to the market.

Hard Red or White Spring Wheat is usually between 12-15% protein (or gluten), the best-quality ones run between 14-15%.  This is what you want for good whole-wheat bread.

Hard Red or White Winter Wheat generally contains 11- 13% protein.

Soft Red or White Wheat only has about 6-10% protein. 

The protein content can be as low as 2%, or as high as 18%.  It depends on growing conditions, what variety the grain is, and even how moist the wheat is.  And not all the protein is gluten: only the amino acids "gliadin" and "glutenin" will become gluten.  That's why oats, though high in protein, will not make good yeast bread on its own.  They don't contain gliadin and glutenin as part of the amino acid profile.  This is also why celiacs can have oats.
(see here for more info on amino acids and celiac.)
----------------------------

Soft wheat is best in quickbreads and things where you DON'T want gluten forming: cookies, pastries, cakes, quickbreads. (This also means that non-gluten containing grains and seeds are good for this group of breads.)

Hard wheat is best for yeast bread, tortillas, and pasta. When I use 100% hard wheat flour in bread,  I still have to add something to increase the dough strength- crushed Vitamin C, lecithin, dough enhancer, gluten, extended soaking, or using part all-purpose flour; see Making Bread for suggested quantities. 

See here for info about baking with whole wheat flour.
1 Comment

Building an Earth Oven

4/6/2011

4 Comments

 
Bakeries boast if they use a brick oven for their breads.  Why? 
These ovens cook using multiple forms of heat- conduction, radiant, and direct heat.  Add some steam, and you get some seriously fabulous crust on your bread.  Pizza?  You better believe it.  You cook it at an ideal 700 degrees Fahrenheit; a thin-crust pizza is done after only 3 minutes, emerging bubbling and with a lovely smoky flavor.
Cook anything in this that you would in a regular oven.  And when it's cooled down, it can remain the ideal temperature for incubating yogurt, clear through the night.

This type of oven has the fire built on the cooking floor.  Fill the oven with wood, light it, and let it burn for 2-4 hours, until the oven walls glow white-hot.  My thermometer doesn't measure high enough to know how hot this is; it only measures to about 1400 degrees!

Scrape out the fire, quickly scrub off the oven floor, and let the heat "soak"- you're letting the temperature equalize all over the interior.  When the temperature has dropped to what you want, add some steam (for bread baking) by swabbing the oven floor with a wet cloth or mop.  Load it up with your bread, or turkey, or squash, potatoes, casserole, or whatever-- and close the oven door to bake.


It's called an earth oven because it's made using packed earth; in other words, mud.  This makes it very affordable!  I highly recommend Kiko Denzer's book, Build Your Own Earth Oven.  It was invaluable to me, and has many excellent suggestions for making do with what you have locally.  He also has a great overview on Mother Earth News, right here.
You can make a fabulous oven out of nothing but dirt, sand, chopped hay or leaves, and some bricks or tiles.  There are even simpler versions around, using just rocks and dirt. 

Since I opted for several upgrades on this oven, it cost about $200 total. 

Items I got for free:
cinderblocks (a stack was in the yard when we bought the house)
sand (huge sandbox, in the photos' background)
bricks for the oven face

Items purchased included:
bags of cement for a foundation pad
rebar for reinforcing the foundation
rebar for reinforcing the cinder blocks
cement for reinforcing cinder block construction
one used steel entry door
one circular saw blade to cut the steel entry door
about 45 firebricks
1/2 cubic yard of dirt
a couple small buckets of refractory cement
portland cement and a bag of vermiculite, for the insulation layer.
12" of 1" diameter steel electrical duct tubing
one dial-gauge thermometer
mortar, used with the oven face, and some gaps in the cinderblocks

If the pictures below seem overwhelming, here are the steps in short form- prepare an insulated base for the oven; build a sand dome on it; pack moist earth all around  the dome (thermal layer); pack insulation around the thermal layer.  Finish with a breatheable plaster, for longest-lasting results.  The doorway can be molded in as you go, or carved out afterwards.

Picture
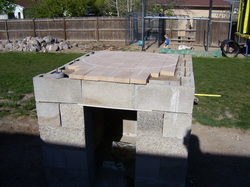
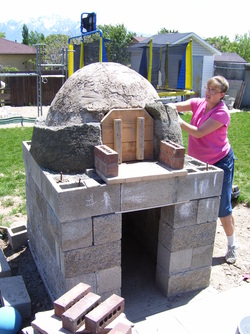
Sorry, I didn't take any photos before this point.  I poured a slightly sloped foundation pad, reinforced it with rebar, and dry-stacked cinderblocks, leaving some slots for drainage between cinderblocks at the low part (the back) of the pad.  To reinforce the cinderblock walls, I stuck rebar down every 2-3 cells, then filled those (with rebar) with cement.  (I did this because I have roughhousing boys, and live nearby a major  fault line.)  In this photo, half of it is in shadow; the oven floor is meant to be just above waist-high.  The area under the oven is to store wood.  To support the block over the opening, I found a piece of hardi-backer (cement) board.  The top course of cinderblocks were narrower than the ones below, which gave me a spot to place some kind of support for the oven floor.  I bought a used steel entry door and a special saw blade, and cut the door to fit.  On top of that went a layer of sand, for insulation, filled even with the top of the blocks (packed really well).  Firebricks were set snugly together for the oven floor, and a circle scribed in chalk.  This would be the inner diameter of the oven.

Picture
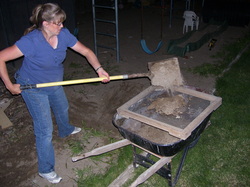
The sand was free, but it had lots of rocks- and small toys- mixed with it.  A frame with 1/2" hardware cloth stapled to it worked well for sifting.  If you notice my expanding waist in the next photos, it's because I was 8 months pregnant when I started this project, and 9 months along when it finished.

Picture
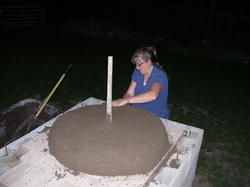
Build a dome of moist sand; this will be your oven's hollow part later.  There's a height-to-width radio that works most efficiently, but about ratio will give you an oven that cooks. 
The pipe in the middle was to show my required finished height.  Pack the sand really well, or it won't support the weight you're about to put on it.

TIP:  this takes a TON of sand, which you'll have to scoop out later.  At about this point I started added cinderblocks and other large items to the dome. That saved a lot of scooping.  And sifting.

Picture
Once the dome is as big as you want, pack and smooth it as best you can. A little water helps, and a board to press and smooth. 
If you want a layer of refractory cement, to help hold heat and protect the inside walls, add it now.  A thin layer, 1/8 - 1/4 " thick, is all you need.

Picture
Once that's in place, mix your dirt- er, I mean 'earth'.  It needs to be moist enough to hold together, but not so wet it squishes when you pack it.  You can mix it on a tarp with your feet, or in a wheelbarrow with a shovel.  Starting at the bottom, tightly pack this earth in a layer about 4" high, and the width of your hand.  Use your closed fist to pack it, and a small bucket of the dirt to keep it handy. Spiral your way up the dome, always packing hard onto the layer below.  Don't apply any pressure to the sand dome.  Let this sit for a few days, then scoop out all the sand.

Picture
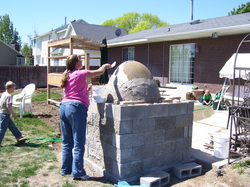
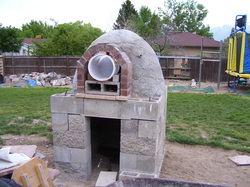
Once the earth layer is complete, add an insulation layer in the same way as the earth layer.  This makes a huge difference in how well your oven retains heat.  You can use more mud, mixed with any organic material- chopped leaves, straw, horse hair, you name it.  They will burn out when the oven heats up, leaving insulating air pockets behind.  This oven's insulation is a mixture of portland cement and vermiculite; I wanted it to be very durable.  Shape this layer with your oven door in place so it fits. 

The pipe sticking out in front of my face is a piece of metal conduit with a fitting to screw on the temperature gauge.  Next time I'll put it down close to the oven floor, which is where the bread bakes.  There's actually about 100-degree (Fahrenheit) difference between the oven floor and where the oven probe sits. 

Picture
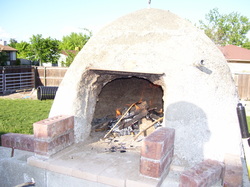
If you want the oven to dry with as few cracks as possible, build a low fire and let it burn for several hours.


Picture
For a brick face-  a chisel and hammer yielded a really poor keystone for the arch.  Improvise to support the arch until it dries.   A bucket and cinderblock came to the rescue here.

Picture
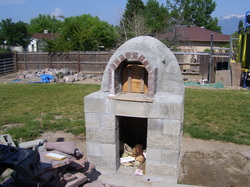
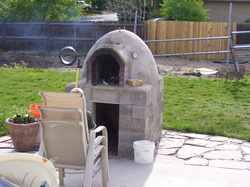
The completed oven. 

Picture
More completed, with flagstones set around it. 

When using the oven, keep a bucket of water handy. 

I still intend to make a roof for it- Utah winters are rough on it.  There are two eye bolts embedded in the top of the oven- all it will take is a piece of sheet metal, creased at the center to make a sloping roof, and two slits cut in it to slip over the eye bolts.  Twist them, and it should stay on.

4 Comments

How to eat well and still spend less; Quick & Cheap Meals

2/3/2011

0 Comments

 
Picture
photo courtesy of photos8.com

Hi everyone,

Does it always seem like too much of your budget goes to food?  Do you wonder what amount of money is 'normal'?  If so, go to the Official USDA Food Plans pdf.

This page will give you the 2010 averages, based on nutritionally balanced diets cooked at home.  Now that you see how frugal you really are, here are some tips to help even more; pick just one or two to try so it's not overwhelming. Then all that's left is deciding how that new-found money is going to better use!

Ways to eat well on less money:

*Buy on sale and get extras so you never pay full price.

*Buy the fresh fruits/veggies that are $1/lb or less.

*Find ways to throw away less- only serve up what you will eat, save wilted veggies in the freezer for soup later, re-purpose leftovers.

*Use meat mostly as a flavoring (mixed in with other ingredients), not as its own dish.

*Buy meats that you can get for $2/lb or less, or whatever is bargain-price for your area.

*When you buy meat, get a bunch on sale, then cook it all at once.  Package and freeze most of it for future, faster, meals.

*Buy flour, sugar in bulk, make more things from scratch.

*Keep your kitchen clean so you like being there!  (You don't need to do it all yourself!  Doing dishes 'all the time' causes depression for me- once I added that to my kids' job charts, I felt much better!)

*Grow a garden where you used to have some lawn- you get the same water bill, more food.  Packets of seeds can last 4-5 years if kept cool and dark.   Or split packets with a friend.  

*Make your own bread instead of buying it.

How much can you save on bread?  Cost varies by recipe, but mine comes out to less than $ .50 per loaf ($. 42), including the electricity for baking, for top-quality whole-wheat bread.  (Well, frankly, the quality varies by week....)   If you eat two loaves a week, that saves you $200/year when compared to $2.50/loaf of bread.   We go through 6 loaves a week, so we’re saving over $600 per year.  Yes, a stand mixer and grain mill  definitely pay for themselves!  For the recipe I use, see Basic Bread on my website.
 
Yesterday the Teachers' Quorum (14-15 yr. old boys) came to my house for their weekly activity.  They've been learning about nutrition and safe food handling, so they all pitched in and cooked a meal.    Their handout included budget-friendly, adaptable, and fairly fast recipes; the kind that would be especially valuable when in college or on missions.  For these recipes, click on Quick & Cheap Meals.  The boys did great with them, I think you'll like them, too.   

Happy cooking and budgeting!
0 Comments

Candy Cane Bread

12/27/2010

0 Comments

 
Picture
This one doesn't taste like a candy cane- though you could make it so that it does!

I just noticed that in my 'dinner rolls' post there were no instructions for making that candy cane bread.  So here they are.  Use the same technique to make cinnamon rolls, only those need sliced at the end of making the roll.
Picture
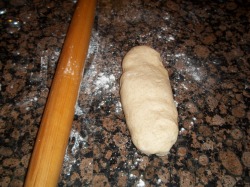
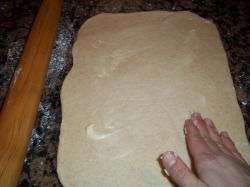
The simplest way I've found to roll a rectangle is to give the shape a head-start before rolling it out.  Pat or stretch it into an oblong shape.

Picture
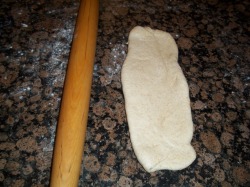
Roll it out to its full finished length.  In this case, I have a pound of dough that I want to be about 8x14, so it's now rolled to be 14" long.

Picture
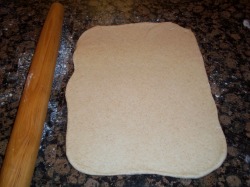
Then work on getting it the right width.  Eight inches is the width of my thumb to pinky, when I stretch my hand.  It doesn't have to be exact when you roll these things out; a hand width is a great measuring tool!

Picture
Spread soft butter on it, using a utensil or your hand.  If your butter is cold and hard, your hand warms it up in a hurry.  The butter prevents the dough from sticking to itself, which leaves your finished spiral open (great for letting frosting ooze into if you're making cinnamon rolls!).  This means you DON'T want to spread the butter clear to the edge; stay about an inch or two away from one long edge.

Picture
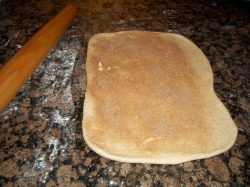
Sprinkle with cinnamon and sugar, if that's the filling you want.   I 'eyeball' this kind of thing, but this was about 1- 1 1/2 tsp. cinnamon and 2-3 Tbsp. sugar.  Again, stay an inch away from one long edge.

Picture
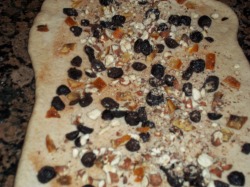
You can add whatever you want as filling- this one has the cinnamon and sugar, but then also has raisins, chopped toasted hazelnuts, and some chopped candied orange peel.

Picture
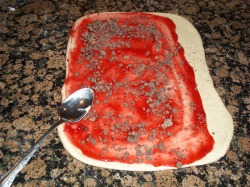
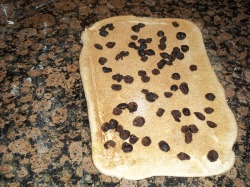
This flavor was the most popular with everyone who tried it this year- raspberry filling, sprinkled with little chocolate chunks, or chocolate chips.  I get the raspberry filling from the bakery at a local grocery store; it's cheaper than I can make it, plus it doesn't go runny when heated, like raspberry jam does.  Raspberry jam does have better flavor, however.

Picture
Start rolling the dough, starting with the long side opposite the unbuttered one.

Picture
This is when you'll be glad you remembered to keep the butter away from the edge.  Pinch the edge to seal.

Picture
Curve the roll into a candy cane shape and put it pinched-side down on a cookie sheet.  Butter it or use parchment paper.   When I have different flavors on the same cookie sheet, I sprinkle or spread some of the filling on top, too, so it's easy to tell them apart.   Let rise until nearly doubled, 45-90 minutes, depending on the temperature of your kitchen, and bake at 350- 375 degrees F  about 20-25 minutes, or until well browned on bottom, and a little browned on top.  It will continue to cook outside the oven for the next 15-20 minutes.  When they're cool.  Drizzle with icing, chocolate syrup, melted chocolate or white chocolate, or melted jam, and sprinkle with some nuts, cinnamon, or chocolate chips if you like.

0 Comments

Far Above Rubies; Dinner Rolls and sweetbreads

12/9/2010

0 Comments

 
Picture
To make 2 oz. Butterhorn rolls- start with one pound of dough and roll it into about a 12" circle.  Spread softened butter on all except the middle, leave about a 2-3" circle unbuttered so the dough can stick to itself.  With a pizza cutter or knife, cut into eight wedges.  Roll each one up, starting with the wide edge.  Pinch the point so it sticks to the rest of the roll.  Put the rolls on parchment or a greased baking sheet, point-side tucked securely underneath so it doesn't unroll during baking. Curve ends a bit, then cover and let rise.
If you're making a bunch of these, use a loaf's worth of dough (about 1 1/2 lbs), roll into a 12-15" circle, and cut into 12 wedges.

Picture
Great gift bread for Christmas- the Candy Cane loaf.  This one has a raspberry-chocolate swirl through it; see the slice at right.  I like to give these to neighbors with a little poem about the symbolism of the candy cane

This week here  is a review of the ideal we work towards as women, and then the info from the Dinner Rolls class I held this week.

---------------

Have you read Proverbs chapter 31 lately?  The Hebrew word for 'virtuous' is חַיִל, 'chayil,' and means POWERFUL, STRONG, and EFFICIENT. Virtues are strengths. Excellence in particular attributes.

Who can find a powerful woman? Her price is far above the most valuable gems. 

I think most of us remember reading verse 10, but look what else it says. 


"Who can find a  virtuous woman? for her price is far above rubies.  The heart of her husband doth safely trust in her, so that he shall have no need of spoil. She will do him good and not evil all the days of her life.

"She seeketh wool, and flax, and worketh willingly with her hands. She is like the merchants’ ships; she bringeth her food from afar. She riseth also while it is yet night, and giveth meat to her household, and a portion to her maidens. She considereth a field, and buyeth it: with the fruit of her hands she planteth  a vineyard. She girdeth her loins with strength, and strengtheneth her arms. She perceiveth that her merchandise is good: her candle goeth not out by  night. She layeth her hands to the spindle, and her hands hold the distaff. She stretcheth out her hand to the poor; yea, she reacheth forth her hands to the needy.

"She is not afraid of the snow for her household: for all her household are clothed with scarlet. She maketh herself coverings of tapestry; her clothing is silk and purple.

"Her husband is known in the gates, when he sitteth among the elders of the land.  She maketh fine linen, and selleth it; and delivereth girdles unto the merchant.

"Strength and honour are her clothing; and she shall rejoice in time to come. She openeth her mouth with wisdom; and in her tongue is the law of kindness. She looketh well to the ways of her household, and eateth not the bread of idleness. Her children arise up, and call her blessed; her husband also, and he praiseth her

"Many daughters have done virtuously, but thou excellest them all.
Favour is deceitful, and beauty is vain: but a woman that feareth the Lord, she shall be praised. Give her of the fruit of her hands; and let her own works praise her in the gates."

I know that all of us can grow by picking something in those verses on which to begin-- or continue-- our efforts.  Are you ‘afraid of the snow for [your] household’?  Or are they going to be fine through lean times because of your preparations? 
​________________


For  the basic bread recipe along with these variations, see my Google Docs version  

This makes 2 dozen 2 oz. rolls (if basic shape rolls, closely spaced, they’ll fill a 12x18 baking sheet perfectly), two dozen medium-small cinnamon rolls (a trayful),  two 8x4” loaves, OR three 1-lb. ‘candy cane’ loaves.

 
Dinner Roll/Sweetbread Dough

3 cups flour to start with (5-6 cups total)
2 tsp. salt
2 tsp. yeast
¼-1/3 c. sugar
3 Tbsp. oil or butter
1 egg
2 cups hot water or milk (no hotter than 130 degrees F or it will kill the yeast)

      Mix salt, yeast, sugar, oil, water, and first amount of flour in a bowl.  Beat about two minutes with a wooden spoon.  Stir in half of what’s left, then mix in more until too stiff to stir.  Dump out onto a floured counter and knead for 8-10 minutes, adding only enough flour to keep the dough from sticking to the counter.   The dough should be smooth and elastic after kneading.  (Yes, you could use a stand mixer for this, too….)

     Cover with a kitchen towel or plastic grocery bag and let rise 1 to 1 ½ hours, or until doubled.  Punch down and shape into rolls or loaves.  Place on greased baking sheet or in 8x4 loaf pans and let rise about 45 minutes or until nearly doubled.  Bake at 350 for about 30 minutes or until the bottoms of rolls, or sides of loaves, are brown.  (Tip a loaf out of the pan to check.)  Remove from pans and cool on a rack.

 
This is my basic bread recipe with three tweaks: egg, milk, and more sugar.

The egg helps make the bread more moist, springy, higher-rising, and tender.  The white helps add strength and leavening.  The yolk adds a tiny bit of color, plus some richness and tenderness from the natural fats in it, especially from the lecithin (worth a whole blog post just for lecithin!) it contains.

Milk helps a little bit with browning, as well as making the internal structure (“the crumb”) softer and smoother.  It’s one of those things that may be harder for an amateur to notice, but it makes enough of a difference that I always use it in sweet breads for competitions.  If you have powdered milk available, just mix the milk powder in with the other dry ingredients, and use water.  For this size batch, you’ll use 6 Tbsp powder, which is just over 1/3 c.

Sugar makes a big difference in the crust browning, or ‘caramelizing’, as well as in the flavor of the bread.  Sugar can also help the yeasts grow, but it only helps to a certain point.  No-sugar-used bread will still rise, but will take twice as long.  And you can get it to brown, too, because of the natural sugars in the flour, but you have to use a higher temperature.  When I’m making bread with no sugar, I bake it between 400 and 450 degrees F, which gives a nice brown crust.  If you cook bread with sugar in the dough, if you cook that hot it will be black on the outside before the inside is done.  When baking sweetened breads like this, then, keep the temperature between 350-400; the bigger the loaf, the lower temperature.  Smaller things, like individual rolls, can still handle up to 400 degrees because the insides can cook quickly.  The other thing about sugar, helping the yeasts grow, is kind of funny.  A moderate amount of sugar is good food for the yeast, but over a certain point actually slows down its growth.  To compensate, let it rise a little longer, or add more yeast. 


Picture
How long the rolls are in the oven will make a HUGE difference in how dry or moist and velvety they are.  Cook them just until the bottoms are brown and they sound a bit hollow.  They will continue to cook for 15-20 minutes after coming out of the oven.  The roll on the left is overbaked and is dry.  The one on the right is perfect. See how the sides are golden brown where the baking pan touched? 
​If you want more color on top, brush with oil or butter after baking; this will intensify the color that is there.  You can also brush them before baking, with milk, beaten egg, or melted butter.  Each one has a little different effect; see which you prefer.

Picture
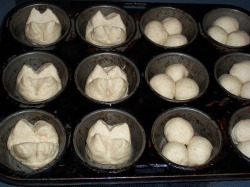
(left) Mock Cloverleaf rolls, (right) Cloverleaf rolls.  Start with 2 oz dough, a little bigger than a golf ball.  For the Mock style, shape it into a smooth ball, put in greased muffin tins, and make two snips with scissors to create four points.
For the Cloverleaf, divide each golf-ball-sized into three; shape each into a smooth ball.

Picture
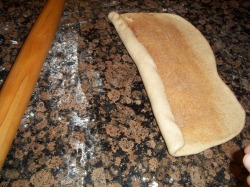
For cinnamon rolls, roll dough into a rectangle.  A two-loaf batch will make 2 dozen; roll into a 24x10 rectangle, spread with butter (so the rolls will 'peel' open and let frosting seep between the spirals!), sprinkle with cinnamon and sugar, raisins if you want.  Roll up and pinch to seal.

Picture
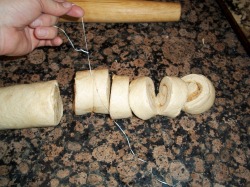
Cut into 1” sections using dental floss or thread, put on greased baking sheet, let rise, and bake.  Frost (Cream Cheese Frosting is great!!!) or glaze while warm.

Picture
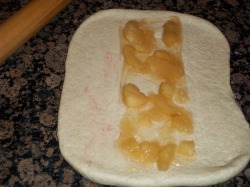
To make a filled ladder loaf, roll dough into a rectangle.  I used one pound of dough and rolled it to about 8" by 14".  Whatever amount of dough you use, roll it to about 1/4-inch thick.  Put filling down the center third.  I used apple pie filling from a can, but you can use cream cheese and jam, rehydrated dried fruit, nuts and cinnamon, or thinly sliced or chopped fruit, sweetened or not, depending on what you have.  What's in your house or yard that might taste good in this?

Picture
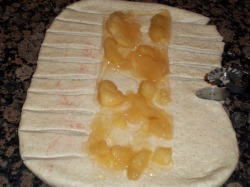
Make cuts about an inch apart.  You'll want to have the same number on each side.  A pizza cutter makes great work of slicing.

Picture
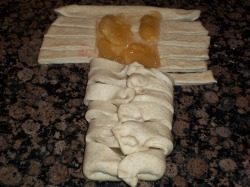
Bring opposite slices together; pinch together in the middle to seal them.  Let it rise until dough is nearly doubled, then bake.  Great with a drizzle of glaze (powdered sugar and water), maybe with a sprinkle of cinnamon or nuts on top for a nice presentation.

0 Comments

Storing Water: Benjamin Franklin quotes; Basic Bread

11/10/2010

0 Comments

 
Picture
from photos8.com

(originally from 6/03/10)
Have you stored water yet?  Benjamin Franklin wrote, “When the well is dry, they know the worth of water.”   Even a little bit helps.  Keep a few water-filled 2-liter bottles, or 2-quart juice containers, under the sink in the kitchen and bathrooms.  I screw the lids on REALLY tight because of my curious little ones….

These are great for when the city water suddenly goes out, or a pipe breaks in your house.  (Last winter we were out of water TWO times in two weeks because of broken pipes!)   Then figure a way to keep a lot more water stored someplace; President Hinckley told us to store at least a gallon per person per day, for two weeks.  The blue barrels are good for this, and can be kept in your garage. If you’re buying storage containers, figure a dollar for each gallon of storage capacity- $50 or under for 50 gallon barrel, $5 or so for a 5-gallon jug, etc. You can live a lot longer without food than you can without water.  If you want to have even MORE than the minimum, check out the super-size containers at
http://familywatertanks.com/    Our water already has chlorine in it, so it will stay clean and safe as long as the container is closed securely.   If/when we have a large-scale disaster (remember Sister Beck told us to prepare for ‘eventualities’….) the city can get to repairing much faster if they don’t have to spend all their time hauling water around to all of us.


Here are some more applicable quotes from Franklin, enjoy!


“Energy and persistence conquer all things.
                           *
“Well done is better than well said.
                           *
“God helps those who help themselves.
                           *
“It is hard for an empty sack to stand upright.”

* * * * * * * 
 Here’s the bread recipe I’ve eaten for the last 30+ years; it’s my mom’s recipe.  The beauty of bread is that is so adaptable.  Use this recipe to make anything from white sandwich loaves, to whole wheat bread, pizza, fluffy dinner rolls or mouthwatering cinnamon rolls.   See Making Bread for these variations and more.  The bread freezes well, so I always make an oven full; it’s no more work to make six than to make two.  I keep enough in the pantry for 3 days because it is fresh-tasting for only that long; I put the rest in the freezer as soon as it's cooled and sliced.  

 -Rhonda

          Basic Bread

Six loaves:                                        Two loaves:
2 Tbsp. salt                                          2 tsp. salt
2 Tbsp. yeast                                       2 tsp. yeast     
½ cup -1 cup sugar                             1/4 -1/3 cup sugar
½ cup oil                                             3 Tbsp. oil
6 cups hot water (hottest from           2 cups hot water
  faucet, not over 130 degrees)                   

8 cups flour to start- you will             3 cups flour to start, will be 5-6
  use around 16 c. total                          total


      Mix salt, yeast, sugar, oil, water, and first amount of flour in a bowl.  Beat about two minutes with a wooden spoon.  Stir in half of what’s left, then mix in more until too stiff to stir.  Dump out onto a floured counter and knead for 8-10 minutes, adding only enough flour to keep the dough from sticking to the counter.   The dough should be smooth and elastic after kneading.  (Yes, you could use a stand mixer for this, too….)

     Cover with a kitchen towel or plastic grocery bag and let rise 1 to 1 ½ hours, or until doubled.  Punch down and shape into loaves.  Place in greased 8x4 loaf pans and let rise about 45 minutes or until nearly doubled.  Bake at 350 degrees F for about 30 minutes (or at 375 for 25 minutes) or until the sides of the bread are brown.  (Tip a loaf out of the pan to check.)  Remove from pans and cool on a rack.

100% WHOLE WHEAT BREAD-
Follow above 6 loaf recipe, using all whole wheat flour, and also add one of the following:

1/4 c. lecithin, 1/4 c. gluten, 1/4 c. dough enhancer, or 1000 mg Vitamin C, crushed or dissolved in water.  These improve texture and reduce coarseness.  Any of the variations can be made with whole wheat.
0 Comments

Ezra Taft Benson garden quote; Using Wheat Without a Mill

11/9/2010

0 Comments

 
Picture
(originally from 6/17/10)
QUOTE OF THE DAY:
Ezra Taft Benson

"There are blessings in being close to the soil, in raising your own food, even if it is only a garden in your yard and a fruit tree or two.  Those families will be fortunate who, in the last days, have an adequate supply of food because of their foresight and ability to produce their own" (The Teachings of Ezra Taft Benson, p. 266).

In Google Docs there
 is a file with the recipes  I made for the basic-foods class today; Using Wheat Without A Mill.  It covers different ways to use your wheat (all without a mill- a grinder-), including sprouting it, cooking it whole or cracked, how to crack it in the first place, blender-wheat recipes (including a chart to help you convert your own recipes to use whole wheat with the blender), making malt, and soaking wheat before using it.  The last page also has links to some great recipes and resources for using your wheat.   These links are also listed below.
 
Please buy wheat!  You cannot beat it for price.  You can buy it by the bag at the Family Home Storage Center, you don’t have to get it in the cans. White wheat there is $5.80 for a 25 lb bag, which is about 23 cents per POUND, which is enough to make one whole loaf of bread.  You pay that much, or more, for each OUNCE of breakfast cereal.  If you don't have a grain mill (grinder), or don't know yet how to use wheat if it's not already flour, now is a great time to jump in and get some wheat anyway.  If you're worried that you won't be able to rotate/use it before it goes bad, don't let that stop you from following the commandment to build your food storage.  It lasts for a long, long time.  Decades or more, if stored right.  Get it, then learn how to use it.  It's healthy stuff to have on hand anyway! It’s also inexpensive insurance.  You'll be glad you have it, and I know you’ll be blessed for following the prophet's counsel.

-Rhonda

Notes from what we tasted and learned at the class- these and more are in the handout, link is above:

We sampled Blender Wheat Pancakes, Wheat Puree Bread, Wheat Salad with Chicken and Corn, Strawberry Nut Jello Salad (the 'nuts' are wheat), Gourmet Banana Nut Cookies, cooked wheat, cracked wheat, sprouted wheat, malt powder .  Also covered was the difference between COOKED and SPROUTED wheat, and how to make malt. 

Why  eat it:  it's CHEAP, stores a LONG time, high in fiber, high in some proteins, vitamins, minerals.

 (summary of the class):   How to eat it:  Grind in blender (2 cups for 1 ½ minutes) or food processor (the dry grains or soaked/cooked), crack in blender, cook whole or cracked, sprout and eat as kernels (as breakfast cereal, or ground beef extender, or rice/pasta/nut substitute), make malt, or sprout and eat as wheat grass or wheat grass juice.

Ways to cook wheat:  in a Thermos, rice cooker, crock pot, regular pan, use in breads (quick/yeast), cakes, salads, (including Jello).  You may cook them then freeze for later. 

Why soak grains before eating them- phytates (phytic acid, the form the phosphorus is in) are anti-nutrients, they bind with and so block absorption of minerals, especially zinc, that you need for proper growth and immune system strength. You inactivate phytates by making the grain think it’s sprouting- warm, moist. Also, soaking freshly ground grain in warm liquid also destroys the phytic acid by activating the enzyme phytase.  A diet rich in Vitamins D, C, A, and calcium help mitigate the effect of phytic acid on the body.  Sprouted wheat is a vegetable, does not lose gluten, but the amino acid profile and vitamins change and it becomes more easily digestible.

 Wheat Berries

2 cups hard red winter-wheat berries
7 cups cold water
1 teaspoon salt


Place wheat berries in a large heavy saucepan. Add water and salt.
 Bring to a boil over high heat, then reduce heat, cover, and simmer gently for 1 hour, stirring occasionally. Drain and rinse. To serve hot, use immediately. Otherwise, follow the make-ahead instructions. Makes about 4 1/2 cups.                    
MAKE AHEAD TIP: Cover and refrigerate  or freeze. 
For Cracked Wheat,  put ¼ to ½ cup of uncooked wheat in a blender, run for 30 seconds or til cracked. 

NUTRITION INFORMATION: Per 1/2 cup: 151 calories; 1 g fat (0 g sat, 0 g mono); 0 mg cholesterol; 29 g carbohydrate; 6 g protein; 4 g fiber; 263 mg sodium; 0 mg potassium.
2 Carbohydrate Servings
Exchanges: 2 Starch

Ready-made toppings for your cooked wheat:
Applesauce
Pure fruit spreads
Fruit butters, such as apple, apricot, prune, pear
Marmalades, jams, preserves, conserves
Frozen berries and fruits, with or without syrup
Nut butters- peanut, almond, cashew
Lemon and lime curds
Maple syrup
Pure honey, whipped, unfiltered or in unusual flavors such as sage, lavender, or chestnut
Chocolate-hazelnut and chocolate peanut butter spreads
Sundae toppings

Making malt: http://www.dryit.com/diastaticmalt.html 

Put 1 cup of wheat kernels in a quart jar, cover with water, and let soak for about 12 hours.  Drain the water (which has vitamins and minerals- save for broth, watering plants, or making bread), rinse, and drain completely.  Rinse and drain 1-3 times a day for 2 days, until the sprouted part is about the same length as the grain. Spread on cookie sheets to go in the sunshine or warm oven or in a dehydrator; dry thoroughly but don’t heat over 130 degrees, so you don’t kill the enzymes.  Grind in a mill or in your blender.  Makes about one cup.  Store tightly covered.  This will keep indefinitely in the fridge or freezer.  Use about 1-1 ½   teaspoon (1/10 of 1% flour) per loaf of bread.  More than this will give you sticky dough and is not beneficial. 

The enzyme in malt (diastase) converts starch in the dough to sugars (maltose) that the yeast can use; longer fermentation (rising) times are needed to be most effective.   Malt replaces sugar/honey and feeds the yeast, browns the crust.  It also has lots of enzymes and vitamins, and so makes your bread more digestible and more nutritious.  The enzymes also improve the flavor, make a finer texture, and increase shelf life.  If you wanted to make malt syrup, you would slowly cook the sprouted grain to get a dark syrup.

Also see:  http://makinghomemadewineandbeer.blogspot.com/2008/05/making-malt-extract.html 

Links:


http://everydayfoodstorage.net/training-cooking/grains, http://everydayfoodstorage.net/2008/10/12/pumpkin-blender-wheat-waffles-with-caramel-sauce/food-storage-recipes Pumpkin Blender Wheat Waffles with Caramel Sauce, http://everydayfoodstorage.net/category/long-term-food-storage/grains/wheat/blender-wheat  Red, White and Blue Blender Pancakes (blender pancakes with red and blue berries, whipped cream), http://everydayfoodstorage.net/2008/04/01/food-storage-gourmet-blender-wheat-cookie/food-storage-recipes Gourmet Blender Banana Wheat Cookie, http://everydayfoodstorage.net/2008/06/24/bring-one-of-these-one-of-a-kind-salads-to-your-next-gathering/food-storage-recipes Feta Wheat Berry Salad, Wheat Berry Salad with Apples and Cashews

http://selfreliantsisters.blogspot.com/search/label/Wheat%20Berries Black Bean, Edamame, and Wheat Berry Salad, Crockpot Wheat Berries, Stovetop Wheat Berries, Pressure Cooker Wheat Berries, Carroll Shelby’s Chili, Wheat Berry Pineapple Chicken Salad, Wheat Berry Salad, Wheat Nuts (like Corn Nuts); http://selfreliantsisters.blogspot.com/2010/02/4-blender-pancake-recipes.html 4 different blender pancake recipes to try

http://www.foodnetwork.com/search/delegate.do?fnSearchString=wheat+berry&fnSearchType=site  Wheat Berry Tapenade, Mushroom Wheat Berry Pilaf, Cumin-Scented Wheat Berry-Lentil Soup, Zesty Wheat Berry-Black Bean Chili, Rice, Red Lentil, and Wheat Berry Salad, Wheat Berries and Greens (Farro e Verdure)

http://www.foodnetwork.com/search/delegate.do?fnSearchString=wheat+berry&fnSearchType=site Easter Wheat Pie (Pastiera di Grano); the same type recipe baked in a springform pan to be a cake is as http://www.celtnet.org.uk/recipes/miscellaneous/fetch-recipe.php?rid=misc-la-pastiera-di-grano

http://www.ldspreparedness.com/Files/cookbook.pdf   The “New Ideas For Cooking with Food Storage” cookbook (20 pages).  Meat substitutes and extenders, Bulgur Wheat, another Blender Wheat Pancake recipe with variation for Waffles, Chinese Fried Wheat (instead of rice), Italian Fried Wheat, Spanish Fried Wheat, Cracked Wheat Casserole (includes burger too), Popped Wheat (similar to Corn Nuts), how to cook it: stovetop, Thermos, gas range’s pilot light, crockpot, as cracked wheat.

http://www.suegregg.com/  for whole foods, including lots of blender wheat recipes

0 Comments

The Celestial Nature of Self-Reliance, Lemon-Zucchini Bread

10/28/2010

0 Comments

 
Picture
(originally from 8/5/10)
Do you have garden produce yet?  Or are you seeing it at farmers' markets?  We got the first yellow summer squash of the year yesterday.  This is exciting!  Unfortunately, we don’t have zucchini at all because one of my little people stepped on the plants just as they were coming up.  I replanted, but didn’t water well enough that first week…


Fortunately, I still have frozen zucchini from last year.  I used to shred it and freeze it in quart bags, which was the proper amount for a double batch of my zucchini bread, but didn’t like how it thawed.  It separated into water and strings of fiber.  That’s kind of baffling to cook with.  There’s a much better way-  puree it! Chop the zucchini into chunks small enough to fit down your blender, and buzz until smooth.  A bonus is that the texture of your baked goods will be smoother. 

Our favorite recipe to use it is Lemon Zucchini Bread.  It has a little more flavor if you use fresh lemons, but is still good using bottled lemon juice and dried lemon zest.  Or use your lemon-zest-sugar, (find it in the archives under 'homemade orange seasoning', in the Spices or Seasonings category, right. And FYI, Zucchini bread, since it’s a ‘quick bread’, is simply a variation on the muffin recipe.   To see for yourself, go look at the 'Anything-Goes' Muffin recipe.                                          

 *  *  *  *  * 
Now, for the thought of the week- a First Presidency message from 1984, reprinted in the Ensign last year as one of the ‘classics’- “The Celestial Nature of Self-Reliance”.  Or, ‘what does self-reliance have to do with eternal life’? Think about it: Is food/money/water storage a suggestion or a commandment?  This article has something for any of us to work on- whether you haven’t started, are a little ways into it, making a lot of progress, or have built up all your reserves.  I HIGHLY recommend re-reading the whole article, below is a condensed piece of it:

 “Since the beginning of time man has been counseled to earn his own way, thereby becoming self-reliant. It is easy to understand the reason the Lord places so much emphasis on this principle when we come to understand that it is tied very closely to freedom itself.

Now, I wish to speak of a very important truth: self-reliance is not the end, but a means to an end.

Doctrine and Covenants 29:34–35 tells us there is no such thing as a temporal commandment, that all commandments are spiritual. It also tells us that man is to be “an agent unto himself.” Man cannot be an agent unto himself if he is not self-reliant. Herein we see that independence and self-reliance are critical keys to our spiritual growth.  Whenever we get into a situation which threatens our self-reliance, we will find our freedom threatened as well.  If we increase our dependence, we will find an immediate decrease in our freedom to act.

The key to making self-reliance spiritual is in using the freedom to comply with God’s commandments.”

For the whole article, which I know can bless everyone’s life,  go to The Celestial Nature of Self-Reliance at lds.org.

If using fresh lemons for this recipe, you'll need two. 

Lemon-Zucchini Bread


1 lb. zucchini or other summer squash (4 c. loosely packed, or 2 cups pureed)
¼ c. lemon juice*
2 Tbsp. fresh lemon zest, OR ½ tsp. lemon extract, OR 1/8 tsp (16 drops)    lemon essential oil
2 c. sugar
½ c. oil
3 eggs
3 c. flour
1 Tbsp. baking powder
1 c. chopped walnuts, optional

Place lemon juice, zest, sugar, and oil in a bowl and beat.  Add eggs, one at a time, beating well after each.  Stir in flour and baking powder, then add zucchini and nuts.  Pour into two greased and floured 9x5 loaf pans.   Or use three 8x4 pans.  Bake at 375 degrees about 50 minutes (40 for 8x4 pans) or until a toothpick inserted near center comes out clean.  Let cool in pans for 10 minutes, then turn out onto a cooling rack. Wrap or bag when completely cool. The flavor is even better the next day.


See the blender-mixing-method here.  

 *An acceptable substitute for lemon juice in this recipe is 1/4 cup vinegar (apple cider vinegar is better but not necessary) and a little bit extra lemon zest, extract, or essential oil.

 
0 Comments

Rescuing old, stale bread; sustaining ourselves

10/27/2010

0 Comments

 
Picture
Caramel Bread Pudding using leftover bread.  This batch was made from some loaves I accidentally left cooking while I went to my son's concert.  Good thing it was short!!!  I trimmed off the burnt outside, then cubed it.

Picture
For some recipes, the drier and staler your bread, the better! 

(original date: 9/10/10)


This week I’ve got a couple recipes to help you ‘re-purpose’ some of that bread that might otherwise end up in the garbage.  If it’s dry, great!  If it’s crumbling, great! If it’s stale, perfect!  The only time you don’t use it is if it’s moldy.  Even then it’s still good for the compost pile, if it’s in an enclosed container to keep out rodents.  Meanwhile, here’s some food for thought from Brigham Young, one of the most practical of people.

“My faith does not lead me,” President Young said, “to think the Lord will provide us with roast pigs, bread already buttered, etc.; he will give us the ability to raise the grain, to obtain the fruits of the earth, to make habitations, to procure a few boards to make a box, and when harvest comes, giving us the grain, it is for us to preserve it—to save the wheat until we have one, two, five, or seven years’ provisions on hand, until there is enough of the staff of life saved by the people to bread themselves and those who will come here seeking for safety. … [The fulfillment of that prophecy is yet in the future.]

“Ye Latter-day Saints, learn to sustain yourselves. …  

“Implied faith and confidence in God is for you and me to do everything we can to sustain and preserve ourselves. …  

“You have learned a good deal, it is true; but learn more; learn to sustain yourselves; lay up grain and flour, and save it against a day of scarcity. …  

“Instead of searching after what the Lord is going to do for us, let us inquire what we can do for ourselves.” (Discourses of Brigham Young, Deseret Book, 1966 ed., pp. 291–93.) , quoted in Marion G. Romney, “Church Welfare Services’ Basic Principles,” Ensign, May 1976


Today’s recipes give you a couple good ways to not waste that dried-out, stale, or crumbly bread.  We have a little problem at our house with the heels of the bread- somehow I always find a heel or two in a bag at the back of the cupboard, dried out by then, of course.  Those either get turned into croutons or French toast right away, or get stuck in my ‘old bread’ bag in the freezer.  When I have enough, we make stuffing or bread pudding.


Homemade Croutons

 Cut bread into cubes and turn it into croutons: either sauté in, or drizzle with, olive oil or melted butter (1 Tbsp. for each 1-4 slices),  sprinkle with garlic powder, onion powder, dill, oregano, parsley, Parmesan cheese, ranch dressing mix (1/2 pkgs per loaf of bread), or anything that sounds like a good idea. Bake at 350 degrees for 15-20 minutes, or until dry and crispy.  Spread on a paper towel to cool, store when cool in a ziptop bag.  They’ll keep for a good couple of weeks, if you don’t eat them first.

________________________________

The ideal bread pudding is custard-y and creamy inside with a little bit of crunch on the outside. 
Basic Bread Pudding

12 slices bread, cut in 1” squares, (the more stale, the better! – or bake them)
½ -1 cup raisins, soaked, optional
1 Tbsp. cinnamon
3-6 eggs (less makes it more dry, more makes more of a custard)
¾- 1 ½ cups sugar, to suit your tastes, white or brown
¼ cup butter, melted
2 tsp.vanilla
½ tsp. salt
3 c. hot milk- ideally half-and-half, or one 12-oz can evaporated milk and 1 ½ c. milk
pinch ground nutmeg

 Mix together the bread, raisins, and cinnamon.  Dump into a 9x13 pan.  Using the same bowl as before, beat the eggs, then stir in sugar, butter, vanilla, and salt.  Mix until sugar dissolves.  Slowly mix in the hot milk.  Pour all of this over the bread, sprinkle with nutmeg, and let sit for 5-20 minutes to soak.  Bake at 375 degrees for 25-30 minutes, until center is set and a knife inserted in the center comes out mostly clean.  If you bake this in a hot water bath, it will come out more custardy.  Serve warm.  Very nice with a dollop of whipped cream, scoop of ice cream, or a drizzle of some kind of sweet sauce (vanilla sauce, caramel sauce, rum sauce, maple syrup, etc.)

 Variations: Use any dried or chopped fruit in this, (this is a great way to use those two lonely, shriveled apples sitting on your countertop!), shredded coconut, cocoa or melted chocolate (2-4 squares), chocolate chips, pecans or other nuts, rum extract, orange extract or zest.

For the liquid, you can substitute eggnog, hot chocolate, coconut milk, and about anything that sounds good.  One great combination is shredded coconut with chocolate milk..... 

 Even if you think you don’t like bread pudding, you’ll probably love this one:

 Caramel Bread Pudding- fills a 9x13 pan

15 slices good-quality white bread, cut into 1” pieces (about 16 cups)- baked until crisp (about 10 minutes at 450 degrees)
1 ½ sticks butter
2 cups light brown sugar
1 cup heavy cream or evaporated milk
¼ c. corn syrup or honey
5 tsp. vanilla, divided
3 c. half-and-half, or use  the last ½ cup evaporated milk from your can (above),use whole milk for the remaining 2 ½ cups here.  
5 large eggs


Melt butter and sugar together in a saucepan on medium-high heat.  Stir about 4 minutes, or until bubbly and golden.  Remove from heat and stir in cream or evaporated milk, corn syrup, and 2 tsp. vanilla.  Pour one cup of this caramel into a greased 9x13 pan.  Set aside one more cup of caramel, to use as topping later.  To the remaining caramel, add the half-and-half (or mixture of evaporated milk and whole milk).  Beat the eggs together, then whisk in the half-and-half mixture a little at a time.  Add remaining vanilla.  Fold in the bread, and let sit until soaked through, about 20 minutes. Meanwhile, heat oven to 350 degrees. Put bread mixture into the 9x13 pan, bake about 40-45 minutes, until the top is crisp and the custard is barely set.  Serve warm, with the reserved cup of caramel drizzled on top.

 
0 Comments

Water Storage, Powdered Milk recipes & notes

10/25/2010

0 Comments

 
Picture
Powdered Milk from the Home Storage Center, $1.40/lb.  The bowl holds yogurt.  You can make plain yogurt as cheap as $ .42/quart, or $ .10/serving.

If you don’t have your water storage yet, what is a good price for water drums? Prices vary, but generally figure $1 per gallon of storage capacity.  The 55-gallon drums, then, will probably be $55 or less.  Once in a while they go on sale; I've found them at Macey's (our grocery store) for $40.  They're even cheaper if you can find them in the classifieds.  Only use food-grade drums. Empty pop bottles or juice bottles work great, but milk jugs break down fairly quickly and will leak.  If you are using  chlorinated city water,  you do NOT have to drain and refill these every year.  The First Presidency has asked us to store at least 14 gallons per person.  This is one gallon per person per day for 2 weeks. 
Attached are the recipes from yesterday's class on powdered milk.  Here's a list of what is there, and a few notes on them.  Sorry, it's a scanned-in document, so I couldn't go through and type in my notes.

Anyplace I've put cost of a recipe, it's based on the following: $1.40/lb for powdered milk, $13 for 25 lbs of sugar, $2 for a pound of butter, $8 for 25 lbs. flour.

For the recipes that give you whey (any of the cheeses, including the yogurt cream cheese), save the whey.  It has vitamins, minerals, some protein, no fat, and some milk sugar (lactose- very low on the glycemic scale).  I use it in pancakes, muffins, bread, etc.  If  your whey has vinegar in it (most of the cheeses use this), you can add 1 tsp. baking soda for every 2-3 cups of whey.  This will neutralize most of the vinegar.  Yes, it will foam up, kinda like those volcanoes you made in 3rd grade…

Go to http://everydayfoodstorage.net/training-cooking/powdered-milk  for  recipes for evaporated milk, Magic Mix, and Condensed Soups using Magic Mix. And she has a great little chart you can print out and tape to the inside of your cupboard  so you know how much milk powder to use when you're baking with it:

http://www.everydayfoodstorage.net/handouts/milk-conversion-charts.pdf

The Wooden Spoon class handout has a TON of info on powdered milk.  It is from some classes that the LDS Church's Welfare Square was teaching for a little while. The collection is not copyrighted; the two ladies who compiled it just wanted to spread the information.
   
When I get a bunch of new recipes, usually most of them get ignored unless I'm already familiar with them.  So let me familiarize you with all these possibilities....                        


 The first couple pages include:

what the difference is between regular and instant dry milk

storage times-  which are completely off!  Ignore what it says;  a BYU study shows that canned dry milk has been found to last 20+ years when kept at room temperature and below.

Mixing and drinking it- how to make it taste the best

Cooking with powdered milk

How much to store per person

How to determine if milk is past its prime shelf life

What to do with it if it's too old

Reconstituting chart

 
Now the recipes-

'whole milk' (powdered milk is powdered SKIM milk)

Buttermilk substitute

Evaporated milk- everydayfoodstorage link above gives quantities for a 12-oz can.  This costs $ .25.

Sweetened Condensed Milk – for the closest version to a 14-oz can, use

1/2 c. (non-instant) powdered milk
1/2 c. water
1 c.  sugar

0-2 Tbsp. butter

 If you like to be precise, use 1 1/2 Tbsp. less than 1/2 c. water (this also gives a slightly thicker result, like the can), but the first way is very close (yields 14 3/4 oz)    Other recipes use more -or less- of any of those ingredients.  Really, they all work. That said, the 'closest' version costs $ .39 if you use no butter, and $ .53 if you use 2 Tbsp.  What a deal! One important thing to know- these recipes call for hot or boiling water so the sugar gets completely dissolved. Otherwise you get grainy condensed milk.  I usually put my sugar with the water, then microwave and stir until the sugar dissolves.  Then blend with the milk powder and butter.


Hot Cinnamon Milk Mix- from an old 'Friend' magazine

Hot Caramel Milk Mix- like hot chocolate, only not!

Hot Chocolate Mix- one of many options out there, this one you just add water to.

Strawberry Shake- with a touch of orange to pep it up.  yummy.

Creamsicle Drink Mix- uses 3 Cannery products.  And it is really good.

Orange Julius- uses the church cannery orange drink powder.  You could use Tang if that's all you have.

Presoaked Wheat Blender Pancakes or Crepes- blender pancakes that are a little easier on your blender.  You just have to plan ahead with these.

Whole Wheat Pancake Mix

Fruit Syrup- no powdered milk here- just a really handy way to make a fruity topping for your pancakes.  The handwritten note says "Can use peaches canned in syrup and you just add cornstarch and cook"  Use 1-2 tsp. cornstarch per cup of syrup/juice.

Basic White Sauce

Cheese Sauce Mix- uses powdered cheese, pdr. milk and pdr. butter.  And onion powder.  (Remember my method of making onion powder?)

Low-Fat Cream Soup Mix -replaces 9 cans of condensed creamed soup, at $ .30 per can!

Potato Soup Mix-   very very easy.  (Well, they all are..)

Broccoli Soup- using all fresh ingredients except for the milk

Biscuit Mix- "Bisquick" where you add only water.  Use for any Bisquick recipes.  This makes as much as 2  40-oz boxes, at about $2.75/box

Honey Dinner Rolls

Whole Wheat Muffins

Weiner Schnitzel- not what you think, it's the old German dish.  Uses noodles, cheese, hotdogs.

Macaroni and Cheese- using the little 5-oz jar of cheese sauce.  This is a 'bag' recipe; everything can be put in a bag ahead of time and kept on a shelf (or given to a friend)

Microwave Caramels- mmmm

Whipped Topping- A little explanation here...  Evaporated milk will whip like cream if it is ICY-cold when you whip it.  This is glorified whipped evaporated milk, starting with the powder.  They add a few things for flavor, some oil for richness, and gelatin to keep it from going flat.  I think the gelatin gives it a strange consistency.  Next time I'll use a couple teaspoons of Instant Clear Jel.  Or cook some cornstarch with the water.  Or forget stabilizing it, and just eat it fast- maybe just whip evaporated milk and add sugar and vanilla to taste.

Fudgsicles-  don't these sound good?

Dry Milk Ice Cream- Bad name, but it uses sweetened condensed milk, which makes it really good.  The recipe claims to make a gallon, but it's really more like 2 quarts.

Peanut Butter Chews- similar to Bit-O'Honey if you use the honey instead of corn syrup.

Vanilla Pudding Mix- fat free, and has variations for chocolate and caramel pudding. When you make it, you add a tiny bit of butter and an egg, so it’s still lowfat, just not fat free.  If you cannot have wheat, substitute half as much cornstarch as the flour called for.

Plain Yogurt- really, this IS easy.  The recipe says it makes 2 quarts, but part of the water got left off the ingredients list.  Use 7 cups instead.  If you use your hottest tap water, this will be about right to start incubating.  You need the yogurt to start out between 105 and 120 degrees.  The lower end gives sweeter yogurt, the higher end makes it more tart. Wrapping the jars in a towel help keep it warm. Some warm areas to incubate it are- on top of a heating pad (cover with a  towel), an insulated cooler (I put in a jar of almost-boiling water to warm it up in there), a water-filled crockpot, a warm oven (an oven thermometer is helpful!  Hotter than 130 degrees will kill those friendly bacteria.).  Or get creative.  This costs only $ .42  per quart if you are using your own starter. 

Vanilla Yogurt- has gelatin in it, like most of the store-bought versions. This keeps it firm, even after stirring.  (Yogurt with no gelatin will become drinkable after stirring.)  If you want to use sugar instead of honey, use from 1 to 1 ½ cups.  And dissolve (boil) it in some of the water first, or it will settle to the bottom. You could use a package of flavored Jello- a 3 oz box is just under ½ c. of sugar, and  as much gelatin as one packet of unflavored.   Or use juice/syrup from canned fruit as part of your water.  Stir in fruit after the yogurt sets up.

Almond Crunch Granola- also no powdered milk, unless you count what you pour on top when eating this!

Strawberry Banana Smoothie- uses the yogurt you just made…

Yogurt-Fruit Smoothie- Banana-orange; uses yogurt as well as powdered milk

Yogurt Breakfast Waffles- yogurt makes them extra moist.  They also have a hint of orange and cinnamon in them.  I love these using the lemon yogurt.

Yogurt Dill-Veggie Dip- close to Ranch Dip

Yogurt, Berries, and Pecans on Crispbread- self-explanatory

Ranch Salad Dressing-  do you have any idea how much better fresh made is?

Fruit Yogurt Salad- uses vanilla yogurt and whatever fruit you have

Yogurt Parmesan Chicken- uses yogurt instead of mayonnaise or eggs to get the coating to stick.  Very good.

Granola, Yogurt, Berry Parfait- kinda like those little ones at McDonald’s, only you sweeten plain yogurt with honey.  You taste the fruit better this way.

Mock Mozzarella Cheese- about $1.50 per pound.  It only takes 10 minutes to make!  And it melts wonderfully.  Do use a blender to mix everything, otherwise the oil won’t mix in with the cheese curds and you’ll end up with a layer of oil on top of the whey.  (Make bread!)  NOTE- the recipe doesn’t tell you about salt.  Unsalted cheese is not very tasty.  I use 1 tsp. salt for this; I mix it in after rinsing the curds.   Even wrapping in cheesecloth, and pressing (under whatever heavy thing I can find) overnight, this hasn’t ever been cohesive enough for me to grate.  It crumbles, though. When I aged this for a couple months, it became very creamy and softer.  If you don’t have cheesecloth, you can use a piece of cotton fabric- something that will let the liquid drip out.  Cheesecloth can be found in some grocery stores in the kitchen tools section, or in fabric stores and Walmart over with the notions.

Parmesan Cheese- this is in already-crumbled form.  Best flavor after aging in fridge for 3 months, but still good used right away. 

Yogurt Cream Cheese, Yogurt Sour Cream- which one you make only depends on how long you let the yogurt drain.  16 ounces of yogurt will make just over 8 oz. of cream cheese, so it costs about $ .21  per 8 oz block.

Easy Homemade Cheese Ball- a cream cheese based cheese ball.  Use your yogurt cream cheese.

Mock Ricotta Cheese- about $ .84 for the batch, using your homemade yogurt.  ‘Real’ ricotta uses whey instead of milk, but normally you don’t have easy access to whey.  If you do (from making mozzarella?), use ¼ c. vinegar in 2 quarts whey, heat to simmering, then let sit for several hours for the curds to form.  Then strain through cheesecloth, salt,  and press.

Jalapeno Cheese- variation on the ricotta. 

Queso Blanco- this one does not melt; it holds its shape through cooking.

Homemade Cottage Cheese-  this makes the curds.  To make the creamy liquid the curds sit in, use a little yogurt, sour cream, or evaporated milk to the curds.  I like it with ¼ tsp. salt.  Add more if you like. The recipe makes about 8 oz. of curds and costs $ .36 

Cottage Cheese Scramble- a form of scrambled eggs, only mostly cottage cheese, with chives.  

Cheese-Stuffed Jumbo Shells- like Manicotti.  For those of you unfamiliar with it, this is similar in flavor to lasagna, only you use shaped pasta and stuff them, instead of doing layers.  The recipe calls for ricotta, cottage cheese, mozzarella, and Parmesan cheeses… but use what you have.  When I made it for the class, I used only cottage cheese, with mozzarella just on the top.  And only about a cup of spaghetti sauce.

Happy cooking!  

-Rhonda


0 Comments

Cooking and storing pumpkins, root cellaring

10/16/2010

0 Comments

 
Picture
You can even store summer squash alongside your pumpkins, if the summer squash is very mature, with a hard rind.

Picture
A bowl of thick, tasty Pumpkin Chili.  Don't tell your kids, and they'll never know....
Want to know what nutrients you're getting with that pumpkin?  A whole cup of it has only 49 calories, but is loaded with fiber, Vitamin C, riboflavin, potassium, and lots and lots of Vitamin A.  For the numbers, see nutrition for cooked pumpkin puree.
For the facts on its seeds, which are a great source of protein, Omega-6's, magnesium, potassium, zinc, copper, and manganese, see nutrition for pumpkin seeds.

Hi everyone,

This week we had a pumpkin class at my house.  It was fun, and I think everyone learned at least one new thing.  I have two different ‘handouts’; one is the Pumpkin class handout, two pages from the class; the other is a big collection of recipes I started in college, The Great Pumpkin Cookbook  (If it won't load, get it in two parts, here: The Great Pumpkin Cookbook part 1 and The Great Pumpkin Cookbook part 2).  I had asked a roommate if I could have her jack-o-lantern after Halloween.  When I told her I was going to make pie out of it, she incredulously responded with, “You can do that?  How?”  So I started by typing up instructions, and one thing lead to another…    

The Great Pumpkin Cookbook includes information on cooking pumpkin, canning, dehydrating, freezing, and ‘root cellar’ing it, plus things like Pumpkin Cheesecake, Pumpkin Shake, and Pumpkin Pancakes.  

If you want to learn more about storing vegetables through the winter, with or without a ‘real’ root cellar, click on Storing Vegetables At Home, which is a chart and information from the Wisconsin Extension Office.  
 

Here’s something to chew on, from the LDS Family Home Storage pamphlet; italics are mine:

Dear Brothers and Sisters:

Our Heavenly Father created this beautiful earth, with all its abundance,
for our benefit and use. His purpose is to provide for our needs
as we walk in faith and obedience. He has lovingly commanded us to
“prepare every needful thing” (see D&C 109:8) so that, should adversity
come, we may care for ourselves and our neighbors and support bishops
as they care for others.
We encourage Church members worldwide to prepare for adversity
in life by having a basic supply of food and water and some money in savings.  

 
And another, related, quote:

“Can we see how critical self-reliance becomes when looked upon as the prerequisite to service, when we also know service is what godhood is all about? Without self-reliance one cannot exercise these innate desires to serve. How can we give if there is nothing there? Food for the hungry cannot come from empty shelves. Money to assist the needy cannot come from an empty purse. Support and understanding cannot come from the emotionally starved. Teaching cannot come from the unlearned. And most important of all, spiritual guidance cannot come from the spiritually weak.  President Heber J. Grant declared, “Nothing destroys the individuality of a man, a woman, or a child as much as the failure to be self-reliant.”  -The Celestial Nature of Self-Reliance, Marion G. Romney

 
I challenge you to expand your home storage efforts, to find some part of it to learn more about, to try for the first time (or try better for the second-- or tenth-- time), to do something that will help you become a little bit more self-reliant. The Lord doesn’t ask us to do everything, all at once, but he does ask us to be diligent.  (See Mosiah 4: 27)  I know our capacity and freedom will increase as we do this.

-Rhonda

Here's some great information I found at http://www.americanpreppersnetwork.net/viewtopic.php?f=122&t=2166
"Only fresh and sound produce should be root-cellared. The food should be free from cuts, cracks, bruises, insects and mechanical damage. When I prepare produce for winter storage, I inspect it carefully. Items with any damage are either eaten quickly or canned or frozen. Apples and pears can be made into sauce, squash roasted and frozen, and beets pickled.

Quantities for a family of four:

Apples: 5 bushels
Carrots: 40 to 60 pounds
Cabbage: green, 20 heads; red, 10 heads
Beets: 20 pounds
Celeriac: (celery root, use instead of celery) 10 to 20 heads
Leeks: 40 plants
Potatoes: 100 pounds or more
Jerusalem artichoke: 10 pounds
Onions: 40 pounds
Garlic: 10 to 20 pounds
Winter radish: 10
Parsnip: 20 pounds
Squash: 40 ‘Delicata’ and 30 pounds butternut
Pumpkin: 5 to 10
Turnip and rutabaga: 10 or more"
0 Comments

Our divinely inspired Constitution, easy homemade pizza

9/17/2010

0 Comments

 
 Happy Constitution Day!   It was signed on September 17 in 1787. For a wonderful article on it, see “The Divinely Inspired Constitution”, Dallin H. Oaks, at http://lds.org/ldsorg/v/index.jsp?locale=0&sourceId=729d94bf3938b010VgnVCM1000004d82620a____&vgnextoid=2354fccf2b7db010VgnVCM1000004d82620aRCRD     It has three main sections: its amazing creation and ratification, inspiration (what parts in it are divinely inspired?), and citizen responsibilities.  You’ll finish it with a renewed sense of appreciation and wonder.

 Shifting over to food now, are you finding enough things to do with all the wonderful produce right now?  I had to laugh when I saw a big, abandoned zucchini right in the middle of the road last week.  All those urban legends came to mind about people’s desperation to get rid of the squash.  (Freeze it!  Dry it!  Slice it and pretend it’s pasta in recipes!)

 I have two main recipes I make when I need to use up odds and ends:  soup, and pizza.  You can make pizza just about as fast as running down to Little Caesar’s, and it’s much better.  I make a batch of bread every week (the six-loaf batch holds us, and fills the oven), and as often as not, bread-baking day is Pizza Day.  This way I already have the dough, so it’s a no-brainer for dinner.  If you make the dough in the morning, you can keep a chunk in the fridge until almost dinner time.  If you’re making the dough that afternoon, you can let it rise, punch it down, let it rise, punch it down,….repeat until you’re ready for it!  Or even just use it without letting it rise first.   One loaf’s worth of dough (1 to 1 ½ lbs) is a good amount to fill a 12x18 cookie sheet.  To keep it from sticking to the pan, either grease or oil it, or sprinkle it with cornmeal or Cream of Wheat (coarsely ground wheat).  If you like a crispy crust, preheat the cookie sheet with 2-3 Tbsp. olive oil on it.  Or bake it on a  pizza stone.  Roll the dough out, and bake it at 425 degrees (really, any temperature between 325 and 450) until it’s just set (no longer doughy), then add toppings and bake or broil until the cheese is melted.  You can even bake some crusts ahead of time; bake for 5-10 minutes at 425, cool, wrap, and freeze.  The Basic Bread recipe is also posted on this site.

 

My basic pizza sauce is:  

one (8 oz) can tomato sauce

garlic powder (1/2 tsp.) or minced garlic (1-2 cloves)

a couple shakes of black pepper

spices: total of around 1 tsp. of whatever sounds good- oregano, basil, thyme, fennel seeds (great but go LIGHT on this one), rosemary

 
But what it really looks like, when I cook, is: open one can of tomato sauce, and to the top of the can add a couple shakes each of garlic powder and black pepper (if I feel like it), and then a few shakes each of 2-3 kinds of my ‘green spices’ (the ones listed, above).  Stir it, kind of, then spread it on the baked crust.  Sometimes I have part of a jar of spaghetti sauce sitting in the fridge.  That makes a good pizza sauce, too. So does barbecue sauce.  Or Alfredo.  Whatever you have that needs used.

 
If you have a bunch of tomatoes, you can use a bunch of them on the pizza, sliced or diced,  and skip the sauce.  You already know the standard toppings; other topping ideas are:

-       Shredded zucchini (yes, really.  Especially if it’s hidden under the cheese)

-       Shredded carrots (hides  especially well under Cheddar)

-       Chopped up spinach or chard leaves

-       Onions or green onions,  bell peppers

-       Leftover bits of meat  (whatever lonely thing is sitting around gets added to our pizzas)- ham, deli meat, bacon, summer sausage from last Christmas (those things last forever!), crumbled hamburger patties, chicken, etc.

 
And of course you can always look at your favorite pizza chain’s menu to get more topping ideas.

                                               
You can also make breadsticks or dessert sticks/pizza out of the dough.   To make simple breadsticks, roll out the dough, cut into strips with your pizza cutter.  Bake, then brush with melted butter, sprinkle with Parmesan and garlic powder.  Dip in spaghetti sauce or pizza sauce.  For dessert sticks, roll and cut them the same, but roll in melted butter and then in a mix of cinnamon and sugar.  Then bake.  Dip in applesauce or drizzle with glaze (1 cup powdered sugar, 1 tsp. vanilla, and 1-2 Tbsp. milk or water)


m

Sep
0 Comments
Forward>>

    Need a Search bar?
    One day I may upgrade my website-- but until then, use your web browser search bar. Type in my web address and what you're looking for, like this-- 
    www.theprovidenthomemaker.com  pumpkin --  and you should get results.


    Author

    I'm a disciple of Christ, a member of the Church of Jesus Christ of Latter-day Saints, a family-defending, homemaking, and homeschooling mom of eight children, two of whom sometimes can't have milk or wheat. Growing up on a farm in a high mountain valley, my parents taught me to 'make do', work hard, smile, and help others.  I love cooking, learning, growing food and flowers, picking tomatoes, and making gingerbread houses --which CAN be made allergy-friendly-- with my children.  I hope you find something to help you on my site!

    Archives

    April 2024
    July 2023
    April 2022
    September 2021
    March 2021
    December 2020
    April 2020
    March 2020
    February 2020
    January 2020
    December 2019
    November 2019
    October 2019
    September 2019
    August 2019
    July 2019
    June 2019
    May 2019
    April 2019
    January 2016
    November 2015
    October 2015
    September 2015
    March 2015
    February 2015
    November 2014
    October 2014
    September 2014
    August 2014
    July 2014
    June 2014
    May 2014
    April 2014
    March 2014
    February 2014
    January 2014
    December 2013
    November 2013
    October 2013
    September 2013
    August 2013
    July 2013
    June 2013
    May 2013
    April 2013
    March 2013
    February 2013
    January 2013
    December 2012
    November 2012
    October 2012
    September 2012
    August 2012
    July 2012
    June 2012
    May 2012
    April 2012
    March 2012
    February 2012
    January 2012
    December 2011
    November 2011
    October 2011
    September 2011
    August 2011
    July 2011
    June 2011
    May 2011
    April 2011
    March 2011
    February 2011
    January 2011
    December 2010
    November 2010
    October 2010
    September 2010

    Categories

    All
    Alcohol
    Alternate Cooking
    Appearances
    Apple
    Apricots
    April Fools
    Aprons
    Bananas
    Beans
    Beef
    Beets
    Bench
    Beverages
    Bonnet
    Bread
    Breakfast
    Budget
    Budgeting
    Cake
    Candy
    Canning
    Carrots
    Cheese
    Chicken
    Children
    Chocolate
    Christmas
    Cleaning
    Coconut
    Comfrey
    Common Core
    Constitution
    Cookbook
    Cookies
    Cooking Oil
    Crafts
    Dairy Substitutions
    Dehydrating
    Dessert
    Dried Fruit
    Earth Oven
    Earthquake
    Easter
    Edible Weeds
    Eggs
    Emergency Prep
    Essential Oils
    Faith
    Family Home Evening
    Fertilizing
    Food Storage
    Fourth Of July
    Freezer
    Frosting
    Fudge
    Garden
    Gardening
    Gingerbread
    Gluten
    Gluten Free
    Gold
    Government
    Grains
    Gratitude
    Hat
    Herbs
    Home Remedies
    Home Repairs
    Homeschool
    Home Storage
    Honey
    Hope
    Inflation
    Leftovers
    Legumes
    Lemon
    Main Dishes
    Mixes
    Mothers
    Noah
    Non Artificial Colors
    Non-artificial Colors
    Nuts
    Oats
    Oil
    Orange
    Paint
    Peaches
    Pear
    Pie
    Pizza
    Plums
    Poem
    Popcorn
    Pork
    Potatoes
    Powdered Milk
    Prayer
    Preparedness
    Projects
    Prophecy
    Pruning
    Pumpkin
    Quick Bread
    Rhubarb
    Rice
    Salad
    Salt
    Sauces
    Self Reliance
    Self-reliance
    Sewing
    Shelf Life
    Shelves
    Sky
    Smoothie
    Snacks
    Soup
    Spices Or Seasonings
    Squash
    Strawberries
    Substitutions
    Sugar
    Summer Fun
    Three Month Supply
    Time
    Tomatoes
    Trees
    Truffles
    T-shirts
    Tuna
    Ultra Gel
    Valentine\'s Day
    Vegetables
    Water
    Watermelon
    Wheat
    Work
    Year Supply
    Zucchini

    RSS Feed

Web Hosting by iPage