The Provident Homemaker
  • Recipes and Info
    • Making Bread
  • My Blog
  • Favorite Resources
  • Documents and Files
  • 52 Weeks of Building Storage

Tropical Oatmeal for breakfast

1/18/2012

0 Comments

 
Picture
Oatmeal is a blank slate- nothing much to look at (or taste!) by itself, but it makes a great foundation!

I've been learning about coconut, and have decided it doesn't deserve the bad rap it sometimes gets.  Yes, it's high in fat, but it seems to be the kind of fat our body recognizes and can build with.  It's also very high in fiber.  If you look at coconut flour, which is defatted, ground & dried coconut, it has 6 grams of fiber in a 2 Tbsp serving (shredded coconut has 1/2 to 1/3 that amount).  Oat bran has only 2 grams of fiber in 2 Tbsp.  All that fiber helps reduce the glycemic load of whatever you're eating, in a major way.  This fiber is also a prebiotic, meaning it encourages good intestinal probiotic growth (good bacteria in your gut, necessary to break down food and assimilate vitamins and minerals).  
Some people have severe allergies with tree nuts, and coconut is now classified by the FDA as a tree nut.  So if you're allergic to almonds, does that mean you can't have coconut?  -Most likely you'll be fine.  Check with your doctor, but the few people who have been allergic to coconut are... just allergic to coconut, not other nuts.  See FoodAllergy.org for more info.

Here's a breakfast that is filling, with a fun flavor.  Adding the macadamias gives it an especially satisfying crunch.  You can double, triple, or otherwise multiply this recipe. 

Coconut-Lime Breakfast Oatmeal

1 c. coconut milk (water or milk is OK, too)
1/2 c. rolled oats
a dash of salt (1/16 tsp.)
1 tsp. lime or lemon juice, optional
2 Tbsp. shredded coconut
2 drops lime essential oil, or 1/2 tsp. lime zest
1/4 c. macadamia nuts, optional

Combine water, coconut cream concentrate, rolled oats, and the dash of salt.  Bring to a boil; simmer and stir for two minutes.  Remove from heat, then stir in juice, coconut, and essential oil or zest.  Top with macadamia nuts.  Drizzle with a little honey if you like, but I like it without.

If you use macaroon (fine flake) coconut, it will disappear into the oatmeal, leaving only flavor.  Using sweetened shredded coconut will both sweeten it and add a little texture.  My favorite is the shaved dried coconut; it adds both flavor and crunch.

Other flavor ideas:
Use pineapple, orange, or mango juice in place of part or all of the coconut milk  or water.
Or add fresh, frozen, canned, or dried pieces of pineapple, mango, or papaya
I don't know why it is, but pineapple and macadamias go together exceptionally well.  Coconut is a natural addition here.

0 Comments

Crepes and Blueberry Sauce

1/14/2012

0 Comments

 
Picture
Once you learn the whole rotating-the-pan trick, crepes are EASY.  It's actually the same batter as for German Pancakes.  How's that for a two-for-one?

I recommend making the blueberry sauce the night before, or not trying to make it until after the crepes are done.  You'll need your full attention on the crepe pans.

Crepes
3 eggs
1 c. milk
1 c. flour
butter or oil for the pan
Makes about 10-12 crepes, depending on size and thickness.

Put one or two skillets (6" or larger) on the stove; heat over high heat.  I always use two at a time for this.   Nonstick skillets are easiest to work with, since they are lightweight, and will require less-  or no-  butter.  While they're heating, make the batter:

Bowl method: Beat the eggs with half the milk, stir in all  the flour.  Beat in remaining milk, until mostly smooth. 

Blender or food processor method:  add eggs, all of the milk, and all the flour.  Process until smooth.
Cook the crepes (see below).  Leftovers may be stored in a bag or airtight container in the refrigerator for up to a week, or in the freezer for months (as long as they don't get freezerburn).

Blueberry Sauce

1 Tbsp. cornstarch OR 2 Tbsp. flour
1/2 c. sugar or honey
1/4 c. water
2 c. fresh or frozen blueberries, divided
a pinch of salt
1-2 drops lemon or orange oil OR 1/8 tsp. lemon extract, OR 1 Tbsp. lemon juice, optional

In a microwaveable bowl or a small saucepan, stir together the cornstarch/flour and sugar or honey. Stir in the water and half of the blueberries.  Bring to a boil, stirring often if you’re using the stove.  Once it boils and thickens, stir again, then mix in the remaining berries.  Makes about two cups.  Serve warm or cold.  If it's not sweet enough for you, add 1Tbsp. sugar, taste it, and repeat as needed.  If you want it thicker next time, double the cornstarch.  

Keep any leftover covered tightly in the refrigerator.  Leftovers can be thinned with water to make a pancake syrup, added to smoothies, stirred into plain yogurt to sweeten it, used as a topping for cake or cheesecake, as a filling for tarts or pies, or stirred in to muffin batter.

Picture
Add a teaspoon of oil to the pan, or a tablespoon if it's nonstick.  Pick up a skillet with one hand, tip it to one side, and pour about 2-4 tablespoons of batter into the hot pan.  Quickly rotate your wrist to make the batter spread in a thin layer completely around the pan.  Put it back on the stove (and pour batter into the second pan, if you're using it). 

Picture
When the edges curl up a little and/or turn brown, work a spatula underneath the crepe and flip it to the other side.  This first side should take 30-60 seconds to cook. 

Picture
The second side is even faster; once it's completely set, with just a few golden spots, slide or flip it out of the pan onto a waiting plate.  (see next photo)

You don't need to add butter to the pan every time, only if the crepes start sticking.


Picture
When all the batter has been cooked, cover with a clean kitchen towel to keep warm.

Picture
You can fill crepes with a thin layer of something strong (like jam, lemon curd, or cream cheese), or with about 1/4" cup of any filling. 
Some ideas:
-Bananas (sliced, whole, cooked, or raw) with a little brown sugar or caramel
-Apples, sauteed or microwaved until soft- add brown sugar and cinnamon to taste
-Pie filling- blueberry, apple, cherry, apricot, or whatever else
-Pudding
For savory crepes, use the crepes are manicotti shells, tortillas, or egg roll wrappers.  Fill with anything you'd put in those.  Or make a sandwich wrap with them.


0 Comments

Cooking with essential oils

1/6/2012

9 Comments

 
Picture
Pumpkin-Orange Muffins- made using essential oils!

Recipe is at the bottom of this page.

My friend's sister sells essential oils, and has had a lot of people ask how much to use if they want to cook with them.  She asked if I would play around with the oils if she provided them,  and come up with some guidelines and recipes.  Here's the start of that.  As I add more recipes, I'll add them to an indexed pdf so they're easy to access.   (More on that another time.)

First of all, please make sure that you're using pure oils that don't have any chemical residues or other nasty things.  In other words, use Grade A/Therapeutic Grade oils, or Grade B/Food Grade oils.    The label should tell you what grade it is.  There are four grades, see here for more on this.  Several sources say not to ever ingest essential oils, see more about why I disagree with thathere.

Second of all, realize this is not going to be an exact science.  Several things will affect how much oil to use in a recipe:
-What brand you use- some are better quality than others
-How old the oil is (they lose potency over time; these are strongest when under a year old)
-What the growing season was like that year for the plants
-How big your bottle is- see below for an explanation
-And how strong of a flavor YOU prefer!

I've discovered that your bottle size makes a huge difference on the size of the drops that come out.  The 15mL bottles I have require only 16 drops of oil to equal 1/8 teaspoon.  The dram-sized bottles (the kind with a stopper and a little hole in the middle of it) give out teeny-tiny drops- it takes about 64 of these drops to fill 1/8 teaspoon!  (Yes, I did crazy things like measure all of this....) If you're going to cook with your oils, I actually recommend putting your cooking-herb oils in this smaller size; so little is needed that the smaller drops are perfect.  Oils in this category would include oregano, thyme, coriander, rosemary, lavender, and marjoram.  To get a drop out, tip the bottle over the food you're adding it to, and gently rap the bottom of the bottle once.  Watch closely; it's hard to see when it comes out.  A little goes a LONG way!  The oils I've been using are from doTERRA. 
Below are the general guidelines I've learned.

When your recipe calls for herbs:
1/2 tsp. dried herb leaves =  1 1/2 tsp. (1/2 Tbsp.) fresh herb = 1/4 tsp. powdered herb = 1 tiny drop essential oil
1/2 tsp. powdered herb leaves = 1 tsp. dried herb leaves = 1 Tbsp. fresh herbs= 2 tiny drops essential oil
1 tsp. powdered herb = 2 tsp. dried herb leaves = 2 Tbsp. fresh herbs = 2 tiny drops, or 1 regular-sized drop

Using citrus oils:
1 tsp. lemon extract = 1/8 tsp. lemon essential oil = 16 drops
1 Tbsp. lemon zest = 1/16 tsp. lemon essential oil = 8 drops

So if your favorite spaghetti recipe calls for 2 tsp. powdered oregano, you can use one regular-sized drop of essential oil instead, or 4 tiny drops.

The herb ratios also seem to hold true for spices like cinnamon and ginger.  I especially love the flavor of cinnamon oil- it's a pure, clean flavor reminiscent of red hots.  I put two tiny drops in a half-pint of cream, along with 2 Tbsp. sugar and a bit of vanilla,  before whipping it-  Cinnamon Whipped Cream- delicious!  We had it on pumpkin pie, for breakfast.   The pumpkin pie itself also used essential oils for its spices.

Picture
Pan-Fried Fish

For 1 lb. boneless fish (I used tilapia):
Cut the fish into serving-sized chunks.  if there are any thin ends, tuck them under.  Pat dry with a paper towel, prinkle lightly with salt and pepper.

Breading: Combine on a plate:
2/3 c. flour, breadcrumbs, cornmeal, crushed potato chips, potato flakes, or whatever!  (I used 1/3 c. each flour and cornmeal)
1/2 tsp. salt
1/4 tsp. pepper

Dipping mixture: combine in a wide dish:
1 egg, beaten
2 Tbsp. buttermilk, yogurt, or mayonnaise
1 Tbsp. mustard (either Dijon or regular is great)
1/4 tsp. garlic powder, or 1 tiny drop garlic essential oil
1/8 tsp. cayenne pepper
1/2 tsp. thyme, or 2 tiny drops thyme oil- I used rosemary instead
4 regular drops any citrus oil, optional (lemon, lime, orange, or grapefruit)

Heat a 12" skillet over medium-high heat.  Add oil; at least 2 Tbsp. or up to 1/2 " deep, depending on how "fried" you want this.  While it's heating, drop a piece of fish into the dipping mixture; turn to coat.  Lift out, then put it in the breading.  Flip it over with a fork to coat it, then put it in the hot oil.  Repeat with other pieces until the pan is fairly full, but pieces are not crowded or touching.  Fry 2-4 minutes, until bottom is dark golden brown.  Flip, and cook other side until the thickest piece is opaque inside and starts to flake when poked open.  Serve hot, with tartar sauce or lemon wedges.

I always have leftover breading and dipping mixture.  Instead of throwing it out, I turn it into Hushpuppies:  To however much breading is left, add that much fresh flour (breading is very salty!) If you now have a cup of this dry mixture, add 1 1/2 tsp. baking powder.  If you have less or more flour/breading, use less or more baking powder!  Add whatever dipping mixture is left.  Add water if you need, to be able to get a soft dough that more or less holds its shape.  Drop by spoonfuls into the hot oil.  Fry until golden ( a couple minutes), turning them over once.


Pumpkin-Orange Muffins- makes 12
2 c. flour (I used whole wheat)
1/2 tsp. baking soda
1 1/2 tsp. baking powder
1/2 tsp. salt
1 tsp. cinnamon, or 1 regular-sized drop cinnamon essential oil
3/4 c. sugar (or 1/2 c. honey)
1 c. buttermilk or sour milk
8-16 drops orange essential oil (1/16 to 1/8 tsp.)- this is distinctly orange-flavored!
1 c. pumpkin puree
1 beaten egg
1/4 c. oil or melted butter
1/2 c. chopped pecans, optional

Preheat oven to 375 degrees.  Grease 12 muffin cups, or line them with cupcake papers.  Mix together the dry ingredients: flour, baking soda, baking powder, salt, cinnamon, and sugar.  Add the wet ingredients all at once: buttermilk, orange oil, pumpkin, egg, and oil.  Stir just until combined.  Spoon into muffin tins, then sprinkle with the nuts.  Bake about 16-18 minutes, or until lightly golden and the top of a muffin springs back when touched. 

9 Comments

Refrigerator Rolls

12/15/2011

0 Comments

 
Picture
Do you ever wish you could have cinnamon rolls in the morning without having to get up two hours early? Do you ever wish you could have dinner rolls ready to bake when you walk in the door from church or work? 

With this recipe, you can.  No pop-open refrigerated dough cans required.  You get fresh, hot, delicious bread with all normal, easy-to-pronounce ingredients.   (Do I sense a Christmas tradition in the making?)

The technique might work with other bread/roll recipes; I haven't experimented to find out yet.  (Please let me know if you do!)


The recipe is from a 1987 Fleishman Yeast bread recipe booklet and tweaked only slightly.  One chapter in the booklet was called "Rising On Ice"; hence the name, below.  The dinner roll dough is soft, tender, springy, with a tender crumb.  You can make any shape of rolls with it, including cinnamon rolls!  If you make dinner rolls, remember that you can sprinkle them with herbs, sesame seeds, poppyseed, or sea salt.  These could even be made into can't-be-beat hamburger buns!  (Roll 1/2" thick, cut 3-4" circles with a biscuit cutter or canning ring.)

This makes about 2 1/2 dozen rolls, or one 14x18" baking sheet full of cinnamon rolls.


Rising On Ice Dinner Rolls  
 
1 cup milk
2/3 c. water
1/4 c. (1/2 stick) butter
6-7 cups flour
1/2 c. sugar
1 1/2 tsp. salt
2 packages active dry yeast (or 3-4 tsp. instant yeast)
2 eggs, at room temperature
 
Combine milk, water, and butter; heat to 120-130 degrees (butter doesn't need to melt).  Meanwhile, put 2 cups of the flour, the sugar, salt, and yeast in a large bowl.  Add the warm milk mixture, then beat two minutes on high speed.  Add eggs and 3/4 c. more flour; beat two more minutes on high.  Add more flour to make a fairly stiff dough; knead 8-10 minutes, until smooth.  Cover and let rest for 20 minutes.  Punch down, shape into whatever shape rolls you want. Place them on a greased baking sheet.  Brush them with oil (this helps them not dry out in the fridge, as well as to not let the plastic stick), then cover them loosely with plastic wrap.  Refrigerate for 2-24 hours.  When ready to bake, pull them out of the fridge, carefully uncover them, and let them sit at room temperature while the oven heats.  Bake at 375 degrees for 15-20 minutes or until done. 

For instructions to make cinnamon rolls, see the Making Bread page and scroll about halfway down. 
0 Comments

Pumpkin Pancake Mix, making pumpkin powder

1/14/2011

11 Comments

 
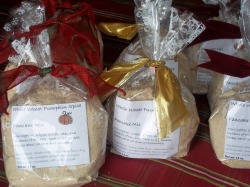
Picture
These make great little gifts.  I gave these out during the holidays, when most people are short on time and have had enough 'goodie plates'.  If you want to give them something extra, also include a bottle of syrup (homemade or storebought) or a couple different mixes in a basket.

 Back on 10/27/2010  I wrote a post on making vegetable powders.  Here's one kind you can make- pumpkin powder! The recipe below uses it to make some fragrant, fresh pancakes.   You can also adapt any recipe that calls for pumpkin puree.  I've made pumpkin pie with the powder, and it turns out great.  3 tablespoons pumpkin powder plus just shy of one cup of water is all it takes to make a cup of pumpkin puree.  Most recipes won't require rehydrating the pumpkin first, either.  Just mix everything together, and the powder will rehydrate while it cooks. 

This mix is just a really large batch of "Foolproof Pancakes," made so you only need to add eggs and water.

Pumpkin Pancake Mix

½ cup coconut oil (shortening works too, but I don't use it)
1 ¼ c. brown sugar or raw cane sugar
¼ c. cinnamon
1 ¼ c. pumpkin powder
3 c. powdered milk
1/4 c. baking soda
¼ c. salt
13 c. flour ( ½  wheat, ½ white)

Mix together the coconut oil, brown sugar, and cinnamon.  Stir in everything else.  Store in a container with a tight-fitting lid.  Makes about 20 cups.

To use it,  combine  1 1/3 c. mix, 1 egg, 1 cup water.  You'll get about 15 batches this size from the whole mix.

I made up a smaller bag with 2 2/3 c. mix, which is 12 ounces if you like to weigh things.  The instructions to use the whole bag is to add 2 eggs and 2 cups of water.

My bigger bag has 4 cups mix, about 17 ounces, and mixes with 3 eggs and 3 cups water.  For a ready-made label, click here.


* * * * *
The amount of pumpkin is based on using roughly 1/2 cup of pumpkin puree for a 1-cup-of-flour batch of pancakes.  If you don't have pumpkin powder, omit that ingredient, use just under 1 1/4 cups of mix, 1 egg, 1/2 cup fresh or canned pumpkin puree, and reduce the water to 3/4 cup. 
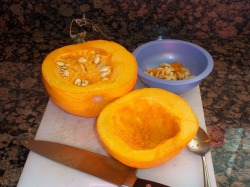
Picture
To make pumpkin powder, first wash (but don't peel) the outside of a pumpkin.  Scoop out the seeds.

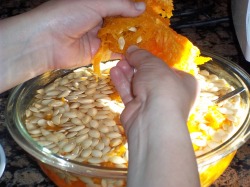
Picture
The seeds are great themselves.  I find them easiest to separate from the stringy fibers by putting them in a bowl of water.  Pinch the seeds off into the water.  Dry them for a couple weeks and save them for planting in next year's garden, or roast them with a little oil and salt.

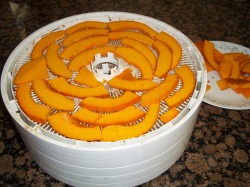
Picture
Trim off the stem and the blossom end.  Slice the pumpkin lengthwise into pieces about 2" wide.  If you steam them now, the pumpkin will dehydrate in about half the time, and have a mellower, sweeter flavor.  Let cool enough to handle, then cut them about 1/4- 3/8" thick crosswise. 

Picture
Lay the thin pieces in a single layer on a dehydrator try, or on a windowscreen laid down in a hot car, or on a cookie sheet with the oven on lowest setting... whatever you have.  When crispy-dry, put the pieces in a blender and puree until powdered.

This 5-lb pumpkin dehydrated down to just under 7 ounces, which measured 1 1/2 cups of powder.  That's a great space saver!  It takes just 3 Tbsp of this powder to equal 1 cup of puree, after adding water.

Use it in anything that calls for pumpkin; you don't even need to rehydrate it first: just add the right amount of water and powder.  Try Pumpkin Shake!  Or how about a gluten-free, dairy-free Pumpkin Cheesecake? Pumpkin Pie?

Picture
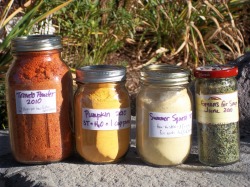
A rainbow of dehydrated vegetables: from left to right:  tomato powder, pumpkin powder, yellow squash powder, and dried & crumbled greens.

11 Comments

Ezra Taft Benson garden quote; Using Wheat Without a Mill

11/9/2010

0 Comments

 
Picture
(originally from 6/17/10)
QUOTE OF THE DAY:
Ezra Taft Benson

"There are blessings in being close to the soil, in raising your own food, even if it is only a garden in your yard and a fruit tree or two.  Those families will be fortunate who, in the last days, have an adequate supply of food because of their foresight and ability to produce their own" (The Teachings of Ezra Taft Benson, p. 266).

In Google Docs there
 is a file with the recipes  I made for the basic-foods class today; Using Wheat Without A Mill.  It covers different ways to use your wheat (all without a mill- a grinder-), including sprouting it, cooking it whole or cracked, how to crack it in the first place, blender-wheat recipes (including a chart to help you convert your own recipes to use whole wheat with the blender), making malt, and soaking wheat before using it.  The last page also has links to some great recipes and resources for using your wheat.   These links are also listed below.
 
Please buy wheat!  You cannot beat it for price.  You can buy it by the bag at the Family Home Storage Center, you don’t have to get it in the cans. White wheat there is $5.80 for a 25 lb bag, which is about 23 cents per POUND, which is enough to make one whole loaf of bread.  You pay that much, or more, for each OUNCE of breakfast cereal.  If you don't have a grain mill (grinder), or don't know yet how to use wheat if it's not already flour, now is a great time to jump in and get some wheat anyway.  If you're worried that you won't be able to rotate/use it before it goes bad, don't let that stop you from following the commandment to build your food storage.  It lasts for a long, long time.  Decades or more, if stored right.  Get it, then learn how to use it.  It's healthy stuff to have on hand anyway! It’s also inexpensive insurance.  You'll be glad you have it, and I know you’ll be blessed for following the prophet's counsel.

-Rhonda

Notes from what we tasted and learned at the class- these and more are in the handout, link is above:

We sampled Blender Wheat Pancakes, Wheat Puree Bread, Wheat Salad with Chicken and Corn, Strawberry Nut Jello Salad (the 'nuts' are wheat), Gourmet Banana Nut Cookies, cooked wheat, cracked wheat, sprouted wheat, malt powder .  Also covered was the difference between COOKED and SPROUTED wheat, and how to make malt. 

Why  eat it:  it's CHEAP, stores a LONG time, high in fiber, high in some proteins, vitamins, minerals.

 (summary of the class):   How to eat it:  Grind in blender (2 cups for 1 ½ minutes) or food processor (the dry grains or soaked/cooked), crack in blender, cook whole or cracked, sprout and eat as kernels (as breakfast cereal, or ground beef extender, or rice/pasta/nut substitute), make malt, or sprout and eat as wheat grass or wheat grass juice.

Ways to cook wheat:  in a Thermos, rice cooker, crock pot, regular pan, use in breads (quick/yeast), cakes, salads, (including Jello).  You may cook them then freeze for later. 

Why soak grains before eating them- phytates (phytic acid, the form the phosphorus is in) are anti-nutrients, they bind with and so block absorption of minerals, especially zinc, that you need for proper growth and immune system strength. You inactivate phytates by making the grain think it’s sprouting- warm, moist. Also, soaking freshly ground grain in warm liquid also destroys the phytic acid by activating the enzyme phytase.  A diet rich in Vitamins D, C, A, and calcium help mitigate the effect of phytic acid on the body.  Sprouted wheat is a vegetable, does not lose gluten, but the amino acid profile and vitamins change and it becomes more easily digestible.

 Wheat Berries

2 cups hard red winter-wheat berries
7 cups cold water
1 teaspoon salt


Place wheat berries in a large heavy saucepan. Add water and salt.
 Bring to a boil over high heat, then reduce heat, cover, and simmer gently for 1 hour, stirring occasionally. Drain and rinse. To serve hot, use immediately. Otherwise, follow the make-ahead instructions. Makes about 4 1/2 cups.                    
MAKE AHEAD TIP: Cover and refrigerate  or freeze. 
For Cracked Wheat,  put ¼ to ½ cup of uncooked wheat in a blender, run for 30 seconds or til cracked. 

NUTRITION INFORMATION: Per 1/2 cup: 151 calories; 1 g fat (0 g sat, 0 g mono); 0 mg cholesterol; 29 g carbohydrate; 6 g protein; 4 g fiber; 263 mg sodium; 0 mg potassium.
2 Carbohydrate Servings
Exchanges: 2 Starch

Ready-made toppings for your cooked wheat:
Applesauce
Pure fruit spreads
Fruit butters, such as apple, apricot, prune, pear
Marmalades, jams, preserves, conserves
Frozen berries and fruits, with or without syrup
Nut butters- peanut, almond, cashew
Lemon and lime curds
Maple syrup
Pure honey, whipped, unfiltered or in unusual flavors such as sage, lavender, or chestnut
Chocolate-hazelnut and chocolate peanut butter spreads
Sundae toppings

Making malt: http://www.dryit.com/diastaticmalt.html 

Put 1 cup of wheat kernels in a quart jar, cover with water, and let soak for about 12 hours.  Drain the water (which has vitamins and minerals- save for broth, watering plants, or making bread), rinse, and drain completely.  Rinse and drain 1-3 times a day for 2 days, until the sprouted part is about the same length as the grain. Spread on cookie sheets to go in the sunshine or warm oven or in a dehydrator; dry thoroughly but don’t heat over 130 degrees, so you don’t kill the enzymes.  Grind in a mill or in your blender.  Makes about one cup.  Store tightly covered.  This will keep indefinitely in the fridge or freezer.  Use about 1-1 ½   teaspoon (1/10 of 1% flour) per loaf of bread.  More than this will give you sticky dough and is not beneficial. 

The enzyme in malt (diastase) converts starch in the dough to sugars (maltose) that the yeast can use; longer fermentation (rising) times are needed to be most effective.   Malt replaces sugar/honey and feeds the yeast, browns the crust.  It also has lots of enzymes and vitamins, and so makes your bread more digestible and more nutritious.  The enzymes also improve the flavor, make a finer texture, and increase shelf life.  If you wanted to make malt syrup, you would slowly cook the sprouted grain to get a dark syrup.

Also see:  http://makinghomemadewineandbeer.blogspot.com/2008/05/making-malt-extract.html 

Links:


http://everydayfoodstorage.net/training-cooking/grains, http://everydayfoodstorage.net/2008/10/12/pumpkin-blender-wheat-waffles-with-caramel-sauce/food-storage-recipes Pumpkin Blender Wheat Waffles with Caramel Sauce, http://everydayfoodstorage.net/category/long-term-food-storage/grains/wheat/blender-wheat  Red, White and Blue Blender Pancakes (blender pancakes with red and blue berries, whipped cream), http://everydayfoodstorage.net/2008/04/01/food-storage-gourmet-blender-wheat-cookie/food-storage-recipes Gourmet Blender Banana Wheat Cookie, http://everydayfoodstorage.net/2008/06/24/bring-one-of-these-one-of-a-kind-salads-to-your-next-gathering/food-storage-recipes Feta Wheat Berry Salad, Wheat Berry Salad with Apples and Cashews

http://selfreliantsisters.blogspot.com/search/label/Wheat%20Berries Black Bean, Edamame, and Wheat Berry Salad, Crockpot Wheat Berries, Stovetop Wheat Berries, Pressure Cooker Wheat Berries, Carroll Shelby’s Chili, Wheat Berry Pineapple Chicken Salad, Wheat Berry Salad, Wheat Nuts (like Corn Nuts); http://selfreliantsisters.blogspot.com/2010/02/4-blender-pancake-recipes.html 4 different blender pancake recipes to try

http://www.foodnetwork.com/search/delegate.do?fnSearchString=wheat+berry&fnSearchType=site  Wheat Berry Tapenade, Mushroom Wheat Berry Pilaf, Cumin-Scented Wheat Berry-Lentil Soup, Zesty Wheat Berry-Black Bean Chili, Rice, Red Lentil, and Wheat Berry Salad, Wheat Berries and Greens (Farro e Verdure)

http://www.foodnetwork.com/search/delegate.do?fnSearchString=wheat+berry&fnSearchType=site Easter Wheat Pie (Pastiera di Grano); the same type recipe baked in a springform pan to be a cake is as http://www.celtnet.org.uk/recipes/miscellaneous/fetch-recipe.php?rid=misc-la-pastiera-di-grano

http://www.ldspreparedness.com/Files/cookbook.pdf   The “New Ideas For Cooking with Food Storage” cookbook (20 pages).  Meat substitutes and extenders, Bulgur Wheat, another Blender Wheat Pancake recipe with variation for Waffles, Chinese Fried Wheat (instead of rice), Italian Fried Wheat, Spanish Fried Wheat, Cracked Wheat Casserole (includes burger too), Popped Wheat (similar to Corn Nuts), how to cook it: stovetop, Thermos, gas range’s pilot light, crockpot, as cracked wheat.

http://www.suegregg.com/  for whole foods, including lots of blender wheat recipes

0 Comments

The Celestial Nature of Self-Reliance, Lemon-Zucchini Bread

10/28/2010

0 Comments

 
Picture
(originally from 8/5/10)
Do you have garden produce yet?  Or are you seeing it at farmers' markets?  We got the first yellow summer squash of the year yesterday.  This is exciting!  Unfortunately, we don’t have zucchini at all because one of my little people stepped on the plants just as they were coming up.  I replanted, but didn’t water well enough that first week…


Fortunately, I still have frozen zucchini from last year.  I used to shred it and freeze it in quart bags, which was the proper amount for a double batch of my zucchini bread, but didn’t like how it thawed.  It separated into water and strings of fiber.  That’s kind of baffling to cook with.  There’s a much better way-  puree it! Chop the zucchini into chunks small enough to fit down your blender, and buzz until smooth.  A bonus is that the texture of your baked goods will be smoother. 

Our favorite recipe to use it is Lemon Zucchini Bread.  It has a little more flavor if you use fresh lemons, but is still good using bottled lemon juice and dried lemon zest.  Or use your lemon-zest-sugar, (find it in the archives under 'homemade orange seasoning', in the Spices or Seasonings category, right. And FYI, Zucchini bread, since it’s a ‘quick bread’, is simply a variation on the muffin recipe.   To see for yourself, go look at the 'Anything-Goes' Muffin recipe.                                          

 *  *  *  *  * 
Now, for the thought of the week- a First Presidency message from 1984, reprinted in the Ensign last year as one of the ‘classics’- “The Celestial Nature of Self-Reliance”.  Or, ‘what does self-reliance have to do with eternal life’? Think about it: Is food/money/water storage a suggestion or a commandment?  This article has something for any of us to work on- whether you haven’t started, are a little ways into it, making a lot of progress, or have built up all your reserves.  I HIGHLY recommend re-reading the whole article, below is a condensed piece of it:

 “Since the beginning of time man has been counseled to earn his own way, thereby becoming self-reliant. It is easy to understand the reason the Lord places so much emphasis on this principle when we come to understand that it is tied very closely to freedom itself.

Now, I wish to speak of a very important truth: self-reliance is not the end, but a means to an end.

Doctrine and Covenants 29:34–35 tells us there is no such thing as a temporal commandment, that all commandments are spiritual. It also tells us that man is to be “an agent unto himself.” Man cannot be an agent unto himself if he is not self-reliant. Herein we see that independence and self-reliance are critical keys to our spiritual growth.  Whenever we get into a situation which threatens our self-reliance, we will find our freedom threatened as well.  If we increase our dependence, we will find an immediate decrease in our freedom to act.

The key to making self-reliance spiritual is in using the freedom to comply with God’s commandments.”

For the whole article, which I know can bless everyone’s life,  go to The Celestial Nature of Self-Reliance at lds.org.

If using fresh lemons for this recipe, you'll need two. 

Lemon-Zucchini Bread


1 lb. zucchini or other summer squash (4 c. loosely packed, or 2 cups pureed)
¼ c. lemon juice*
2 Tbsp. fresh lemon zest, OR ½ tsp. lemon extract, OR 1/8 tsp (16 drops)    lemon essential oil
2 c. sugar
½ c. oil
3 eggs
3 c. flour
1 Tbsp. baking powder
1 c. chopped walnuts, optional

Place lemon juice, zest, sugar, and oil in a bowl and beat.  Add eggs, one at a time, beating well after each.  Stir in flour and baking powder, then add zucchini and nuts.  Pour into two greased and floured 9x5 loaf pans.   Or use three 8x4 pans.  Bake at 375 degrees about 50 minutes (40 for 8x4 pans) or until a toothpick inserted near center comes out clean.  Let cool in pans for 10 minutes, then turn out onto a cooling rack. Wrap or bag when completely cool. The flavor is even better the next day.


See the blender-mixing-method here.  

 *An acceptable substitute for lemon juice in this recipe is 1/4 cup vinegar (apple cider vinegar is better but not necessary) and a little bit extra lemon zest, extract, or essential oil.

 
0 Comments

Summer squash and pumpkin powder, Foolproof Pancakes

10/27/2010

4 Comments

 
Picture
I love these powders!  Left to right: tomato powder, pumpkin powder, yellow summer squash powder, dried crumbled greens to put in soups in the winter.  (These greens are pigweed leaves- one of the wild edible weeds in my yard.)

Picture
Hot, fresh pancakes are simple to make. 

What else can you do with all that summer squash you have?  Make it into leather!  Yes, I know your children won’t think that’s the best snack around, but it’s not for them.  At least not by itself.  Better yet, turn it into powder.

The idea behind this is that pureed squash can be added to soups and breads (as in Zucchini Bread), and it takes a LOT less storage space when it’s dried.  There are at least two ways to get dried pureed squash:

(1)  Puree it, pour it on food dehydrator sheets, dry, and roll up, and

(2)  Slice the squash (1/4” wide is good), dry it like that, then run it through your blender when it’s crispy-dry.   This vegetable powder takes up even less storage space than the leather, plus it reconstitutes faster. If you're doing this with pumpkin, steam it before slicing; it will dry quite a bit faster and not have that raw taste.

(3)  Store it in something fairly airtight, in a dark area.  Canning jars are great, especially if you seal them by using a new lid, the ring, and an oxygen packet. (see Dry Canning.)

Now, how do you use it in recipes?  And how much do you use?  Remember thinking in school that you’d NEVER use  math in ‘real life’?  Ha!  It’s incredibly useful in the kitchen, especially when you start doing your own thing.

Measure and write down the quantity you start with, then measure and write down what you end up with.  Write it on your storage container, trust me, you’ll forget otherwise.   For instance, I started with 2 ½ lbs of yellow squash, which is 5 cups of puree.  I ran it through the blender, poured it on my (SPRAYED) dehydrating sheets, and turned on the dehydrator until it was dry and curling up on the edges and thin spots.  My sheets can fit two cups of puree each, which is one pound, so each roll of ‘leather’ is worth that much in a recipe.  To use it in a recipe, tear it up in pieces and soak it in just under 2 cups of hot water, for probably 30 minutes or so.   Then use it just like fresh puree, in whatever recipe you have.  There are photos and more detailed information on the Zucchini Powder post.

For making the powdered squash: the latest batch, 5 cups of puree, became just 10 tablespoons after drying and powdering.  That means to make one cup of puree, use 2 Tbsp. powder along with just under 1 cup hot water.   Isn’t that amazing? Think of the space that saves!  Five cups, which would have taken up freezer space, now stores in the space of about 2/3 of a cup.  The pumpkin I dried requires 3 Tbsp. plus water to make a cup.  This pumpkin powder bakes up beautifully in pies and breads.

 
When I make vegetable powder, it usually sticks to itself in a big lump after storing a little while.  Normally I just whack it a couple times to break off what I need, or chop around in the jar with a butter knife.  This time something new occurred to me- sometimes a little cornstarch is added to powdered sugar to keep it from lumping.  It’s a good moisture absorber, so my most recent batch has a little cornstarch added to it.  So far, so good.  We’ll see in six months how it really works.  Just in case that quantity messes with my recipes, I wrote how much cornstarch is there, on the jar of powder.  In this case, it’s 1 Tbsp. cornstarch per 2 cups reconstituted puree.  It looks like maybe more than necessary, but so far nothing is sticking!


You can powder about anything- think what you ever use in a pureed form, and make that into vegetable powder.  Tomato powder is great, it can be used to replace tomato paste, tomato sauce,  or tomato juice, depending on how much powder you use with how much water.  Mushroom powder is nice for cream-of-mushroom soup, or for extra flavor in soups and stews, onion powder goes almost without saying, carrot powder is good, too, and beet powder is sneaky but awesome. Throw it in almost anything.  I mostly use it to color frosting, though, since one of my boys can’t have artificial colors without his eczema flaring. It’s also great way to use beets that stayed in the garden a little too long and became a bit woody.  Try this out, and see what you think!


           Foolproof Pancakes -for my size family, we triple this
Makes 10 3" pancakes        (You can also turn this recipe into Pumpkin Pancake mix.)

1   cup   flour   (white or whole wheat)
1   cup   buttermilk or sour milk   
1   tsp.   sugar   
1/2  tsp.   baking soda   
1/2  tsp.   salt   
1   egg   
2   Tbsp.   butter, melted, optional

Combine all and whisk lightly.  Cook on a greased or non-stick skillet,  on medium-high, using 1/4 cup batter per pancake.  Cook until bubbles form around outside edges, then flip and cook until other side is browned.

The original recipe called for 3/4 cup buttermilk and 1/4 cup whole milk, but what I've got above works great.
For blueberry pancakes, stir 3/4 cup of blueberries into batter. 
For banana pancakes, slice one banana into batter. 
Picture
Cook pancakes on high heat, either on a greased or nonstick surface.  When the bubbles around the edges stay 'popped' and the edges are not runny, flip the pancake.

Picture
Cook until the other side is golden as well.  The pancake will puff up when you first flip it, and then it will stop rising.  If you're not sure if it's done, poke one in the center.  It shouldn't be runny.  If you flip the pancakes a second time, they will deflate and be more dense and flat.

4 Comments

Rescuing old, stale bread; sustaining ourselves

10/27/2010

0 Comments

 
Picture
Caramel Bread Pudding using leftover bread.  This batch was made from some loaves I accidentally left cooking while I went to my son's concert.  Good thing it was short!!!  I trimmed off the burnt outside, then cubed it.

Picture
For some recipes, the drier and staler your bread, the better! 

(original date: 9/10/10)


This week I’ve got a couple recipes to help you ‘re-purpose’ some of that bread that might otherwise end up in the garbage.  If it’s dry, great!  If it’s crumbling, great! If it’s stale, perfect!  The only time you don’t use it is if it’s moldy.  Even then it’s still good for the compost pile, if it’s in an enclosed container to keep out rodents.  Meanwhile, here’s some food for thought from Brigham Young, one of the most practical of people.

“My faith does not lead me,” President Young said, “to think the Lord will provide us with roast pigs, bread already buttered, etc.; he will give us the ability to raise the grain, to obtain the fruits of the earth, to make habitations, to procure a few boards to make a box, and when harvest comes, giving us the grain, it is for us to preserve it—to save the wheat until we have one, two, five, or seven years’ provisions on hand, until there is enough of the staff of life saved by the people to bread themselves and those who will come here seeking for safety. … [The fulfillment of that prophecy is yet in the future.]

“Ye Latter-day Saints, learn to sustain yourselves. …  

“Implied faith and confidence in God is for you and me to do everything we can to sustain and preserve ourselves. …  

“You have learned a good deal, it is true; but learn more; learn to sustain yourselves; lay up grain and flour, and save it against a day of scarcity. …  

“Instead of searching after what the Lord is going to do for us, let us inquire what we can do for ourselves.” (Discourses of Brigham Young, Deseret Book, 1966 ed., pp. 291–93.) , quoted in Marion G. Romney, “Church Welfare Services’ Basic Principles,” Ensign, May 1976


Today’s recipes give you a couple good ways to not waste that dried-out, stale, or crumbly bread.  We have a little problem at our house with the heels of the bread- somehow I always find a heel or two in a bag at the back of the cupboard, dried out by then, of course.  Those either get turned into croutons or French toast right away, or get stuck in my ‘old bread’ bag in the freezer.  When I have enough, we make stuffing or bread pudding.


Homemade Croutons

 Cut bread into cubes and turn it into croutons: either sauté in, or drizzle with, olive oil or melted butter (1 Tbsp. for each 1-4 slices),  sprinkle with garlic powder, onion powder, dill, oregano, parsley, Parmesan cheese, ranch dressing mix (1/2 pkgs per loaf of bread), or anything that sounds like a good idea. Bake at 350 degrees for 15-20 minutes, or until dry and crispy.  Spread on a paper towel to cool, store when cool in a ziptop bag.  They’ll keep for a good couple of weeks, if you don’t eat them first.

________________________________

The ideal bread pudding is custard-y and creamy inside with a little bit of crunch on the outside. 
Basic Bread Pudding

12 slices bread, cut in 1” squares, (the more stale, the better! – or bake them)
½ -1 cup raisins, soaked, optional
1 Tbsp. cinnamon
3-6 eggs (less makes it more dry, more makes more of a custard)
¾- 1 ½ cups sugar, to suit your tastes, white or brown
¼ cup butter, melted
2 tsp.vanilla
½ tsp. salt
3 c. hot milk- ideally half-and-half, or one 12-oz can evaporated milk and 1 ½ c. milk
pinch ground nutmeg

 Mix together the bread, raisins, and cinnamon.  Dump into a 9x13 pan.  Using the same bowl as before, beat the eggs, then stir in sugar, butter, vanilla, and salt.  Mix until sugar dissolves.  Slowly mix in the hot milk.  Pour all of this over the bread, sprinkle with nutmeg, and let sit for 5-20 minutes to soak.  Bake at 375 degrees for 25-30 minutes, until center is set and a knife inserted in the center comes out mostly clean.  If you bake this in a hot water bath, it will come out more custardy.  Serve warm.  Very nice with a dollop of whipped cream, scoop of ice cream, or a drizzle of some kind of sweet sauce (vanilla sauce, caramel sauce, rum sauce, maple syrup, etc.)

 Variations: Use any dried or chopped fruit in this, (this is a great way to use those two lonely, shriveled apples sitting on your countertop!), shredded coconut, cocoa or melted chocolate (2-4 squares), chocolate chips, pecans or other nuts, rum extract, orange extract or zest.

For the liquid, you can substitute eggnog, hot chocolate, coconut milk, and about anything that sounds good.  One great combination is shredded coconut with chocolate milk..... 

 Even if you think you don’t like bread pudding, you’ll probably love this one:

 Caramel Bread Pudding- fills a 9x13 pan

15 slices good-quality white bread, cut into 1” pieces (about 16 cups)- baked until crisp (about 10 minutes at 450 degrees)
1 ½ sticks butter
2 cups light brown sugar
1 cup heavy cream or evaporated milk
¼ c. corn syrup or honey
5 tsp. vanilla, divided
3 c. half-and-half, or use  the last ½ cup evaporated milk from your can (above),use whole milk for the remaining 2 ½ cups here.  
5 large eggs


Melt butter and sugar together in a saucepan on medium-high heat.  Stir about 4 minutes, or until bubbly and golden.  Remove from heat and stir in cream or evaporated milk, corn syrup, and 2 tsp. vanilla.  Pour one cup of this caramel into a greased 9x13 pan.  Set aside one more cup of caramel, to use as topping later.  To the remaining caramel, add the half-and-half (or mixture of evaporated milk and whole milk).  Beat the eggs together, then whisk in the half-and-half mixture a little at a time.  Add remaining vanilla.  Fold in the bread, and let sit until soaked through, about 20 minutes. Meanwhile, heat oven to 350 degrees. Put bread mixture into the 9x13 pan, bake about 40-45 minutes, until the top is crisp and the custard is barely set.  Serve warm, with the reserved cup of caramel drizzled on top.

 
0 Comments

Invest in food and clothes; homemade granola and "Honey Clusters of Oats"

10/4/2010

0 Comments


Picture
The recipe below is one of the main reasons I buy cornflakes anymore.  It’s my mom’s homemade granola.  Very easy, but very dense food.  So I added the box of cornflakes to it, and voila! Now it’s homemade “honey clusters of oats”!  It makes for a lighter-weight breakfast.  

 Here’s my thought on food storage this week:  There may be huge disasters where we need food storage, but we all have reasons for food storage that don’t involve major disasters- all it takes is the breadwinner getting hurt, losing a job, having a major hospital bill, all kinds of things.  Something happens to everyone, sometime. Here’s a question to ask yourself.  Is your food storage a higher priority than owning a TV or a second car?  “Wait,” you say, “WHAT?”  Read on:

A really excellent talk is “Prepare for the Days of Tribulation”  by President Ezra Taft Benson. Here’s a little piece from it: “Let every head of every household see to it that he has on hand enough food and clothing, and, where possible, fuel also, for at least a year ahead. You of small means put your money in foodstuffs and wearing apparel, not in stocks and bonds; you of large means will think you know how to care for yourselves, but I may venture to suggest that you do not speculate. Let every head of every household aim to own his own home, free from mortgage. Let every man who has a garden spot, garden it; every man who owns a farm, farm it.” (President J. Reuben Clark, Jr., in Conference Report, Apr. 1937, p. 26.)

You do not need to go into debt, may I add, to obtain a year’s supply. Plan to build up your food supply just as you would a savings account. Save a little for storage each pay-check. Make your storage a part of your budget. Store seeds and have sufficient tools on hand to do the job. If you are saving and planning for a second car or a TV set or some item which merely adds to your comfort or pleasure, you may need to change your priorities. We urge you to do this prayerfully and do it now.”  (I highly recommend spending the 5-10 minutes to read the whole talk.  This is also the time where we find his famous quote about food storage being maybe like Noah’s ark for us.)

Is your food storage a higher priority than owning a TV or a second car?!

 
And now the recipe:

Homemade Granola and “Honey Clusters of Oats”

10 cups quick oats (rolled oats are OK too, just crunchier when baked)      P.S.- a full #10 can  is about 13 cups- take out 3 cups and the rest is the right amount.
1 (7 oz.) bag of coconut (leave out if you don’t like coconut)
1 (18 oz) box  of cornflakes
1-2 c. chopped nuts, optional
1 cup honey, corn syrup, or maple syrup (pancake syrup)
1 cup brown sugar
¼ c. water
1-2 cups raisins, dates, or other dried fruit


In a really big bowl, stir together oats, coconut, cornflakes, and nuts. Combine honey, brown sugar, and water in a small saucepan.  Bring to a boil, stirring just until the sugar is all dissolved. Pour over the stuff in the big bowl, stirring well to coat.  Spread about ½” deep onto ungreased cookie sheets, then bake at 300 degrees until lightly browned (I think about 30 minutes) You can put 2 trays in at once, on different racks.   When cool, stir in 1-2 cups dried fruit bits if you want to.   Store in an airtight container (like your now-empty #10 can, or an ice cream bucket).  It will keep for several months, especially if in a cool and dark area.  It won’t ever “spoil” unless it gets wet.  The only problem I’ve had is for it to get stale after a long time. It’s still nutritious, though.  The nuts could go rancid too, but I’ve never kept it long enough for that.

-Rhonda
0 Comments
Forward>>

    Need a Search bar?
    One day I may upgrade my website-- but until then, use your web browser search bar. Type in my web address and what you're looking for, like this-- 
    www.theprovidenthomemaker.com  pumpkin --  and you should get results.


    Author

    I'm a disciple of Christ, a member of the Church of Jesus Christ of Latter-day Saints, a family-defending, homemaking, and homeschooling mom of eight children, two of whom sometimes can't have milk or wheat. Growing up on a farm in a high mountain valley, my parents taught me to 'make do', work hard, smile, and help others.  I love cooking, learning, growing food and flowers, picking tomatoes, and making gingerbread houses --which CAN be made allergy-friendly-- with my children.  I hope you find something to help you on my site!

    Archives

    April 2024
    July 2023
    April 2022
    September 2021
    March 2021
    December 2020
    April 2020
    March 2020
    February 2020
    January 2020
    December 2019
    November 2019
    October 2019
    September 2019
    August 2019
    July 2019
    June 2019
    May 2019
    April 2019
    January 2016
    November 2015
    October 2015
    September 2015
    March 2015
    February 2015
    November 2014
    October 2014
    September 2014
    August 2014
    July 2014
    June 2014
    May 2014
    April 2014
    March 2014
    February 2014
    January 2014
    December 2013
    November 2013
    October 2013
    September 2013
    August 2013
    July 2013
    June 2013
    May 2013
    April 2013
    March 2013
    February 2013
    January 2013
    December 2012
    November 2012
    October 2012
    September 2012
    August 2012
    July 2012
    June 2012
    May 2012
    April 2012
    March 2012
    February 2012
    January 2012
    December 2011
    November 2011
    October 2011
    September 2011
    August 2011
    July 2011
    June 2011
    May 2011
    April 2011
    March 2011
    February 2011
    January 2011
    December 2010
    November 2010
    October 2010
    September 2010

    Categories

    All
    Alcohol
    Alternate Cooking
    Appearances
    Apple
    Apricots
    April Fools
    Aprons
    Bananas
    Beans
    Beef
    Beets
    Bench
    Beverages
    Bonnet
    Bread
    Breakfast
    Budget
    Budgeting
    Cake
    Candy
    Canning
    Carrots
    Cheese
    Chicken
    Children
    Chocolate
    Christmas
    Cleaning
    Coconut
    Comfrey
    Common Core
    Constitution
    Cookbook
    Cookies
    Cooking Oil
    Crafts
    Dairy Substitutions
    Dehydrating
    Dessert
    Dried Fruit
    Earth Oven
    Earthquake
    Easter
    Edible Weeds
    Eggs
    Emergency Prep
    Essential Oils
    Faith
    Family Home Evening
    Fertilizing
    Food Storage
    Fourth Of July
    Freezer
    Frosting
    Fudge
    Garden
    Gardening
    Gingerbread
    Gluten
    Gluten Free
    Gold
    Government
    Grains
    Gratitude
    Hat
    Herbs
    Home Remedies
    Home Repairs
    Homeschool
    Home Storage
    Honey
    Hope
    Inflation
    Leftovers
    Legumes
    Lemon
    Main Dishes
    Mixes
    Mothers
    Noah
    Non Artificial Colors
    Non-artificial Colors
    Nuts
    Oats
    Oil
    Orange
    Paint
    Peaches
    Pear
    Pie
    Pizza
    Plums
    Poem
    Popcorn
    Pork
    Potatoes
    Powdered Milk
    Prayer
    Preparedness
    Projects
    Prophecy
    Pruning
    Pumpkin
    Quick Bread
    Rhubarb
    Rice
    Salad
    Salt
    Sauces
    Self Reliance
    Self-reliance
    Sewing
    Shelf Life
    Shelves
    Sky
    Smoothie
    Snacks
    Soup
    Spices Or Seasonings
    Squash
    Strawberries
    Substitutions
    Sugar
    Summer Fun
    Three Month Supply
    Time
    Tomatoes
    Trees
    Truffles
    T-shirts
    Tuna
    Ultra Gel
    Valentine\'s Day
    Vegetables
    Water
    Watermelon
    Wheat
    Work
    Year Supply
    Zucchini

    RSS Feed

Web Hosting by iPage